Displaying Customized Graphics on OLED display using Arduino
- Nick Koumaris
- http://educ8s.tv/
- info@educ8s.tv
- 30.135 Views
- Tested
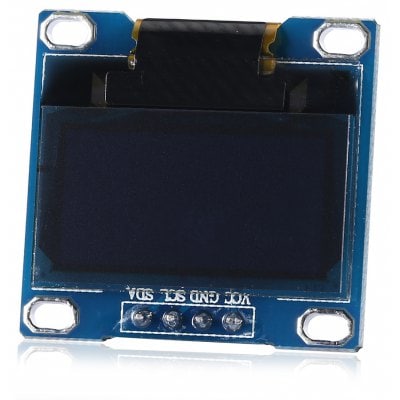
One thing we all always wish we could do when using any display is to load our own custom graphics, be it a logo, gif etc. In today’s tutorial we will show how to do just that on an OLED display using an Arduino.
OLED (organic light-emitting diode) display is a display based on light-emitting diode (LED) in which the emissive electroluminescent layer is a film of organic compound that emits light in response to an electric current. This layer of organic semiconductor is situated between two electrodes; typically, at least one of these electrodes is transparent. OLEDs are used to create digital displays in devices such as television screens, computer monitors, portable systems such as mobile phones, handheld game consoles, and PDAs. OLED displays do not require a backlight because they emit visible light and can thus, display deep black levels and be thinner and lighter than a liquid crystal display (LCD).

We covered how to display text on the OLED display in one of our previous tutorials which can be found here.
Required Component
The following components are required to build this project;
As usual, the exact components used for this tutorial can be bought by following the link attached to each of them.
Schematics
The schematics for this project is a simple one as it involves just the connection between the OLED display and the Arduino. Connect them as shown in the Schematics below.
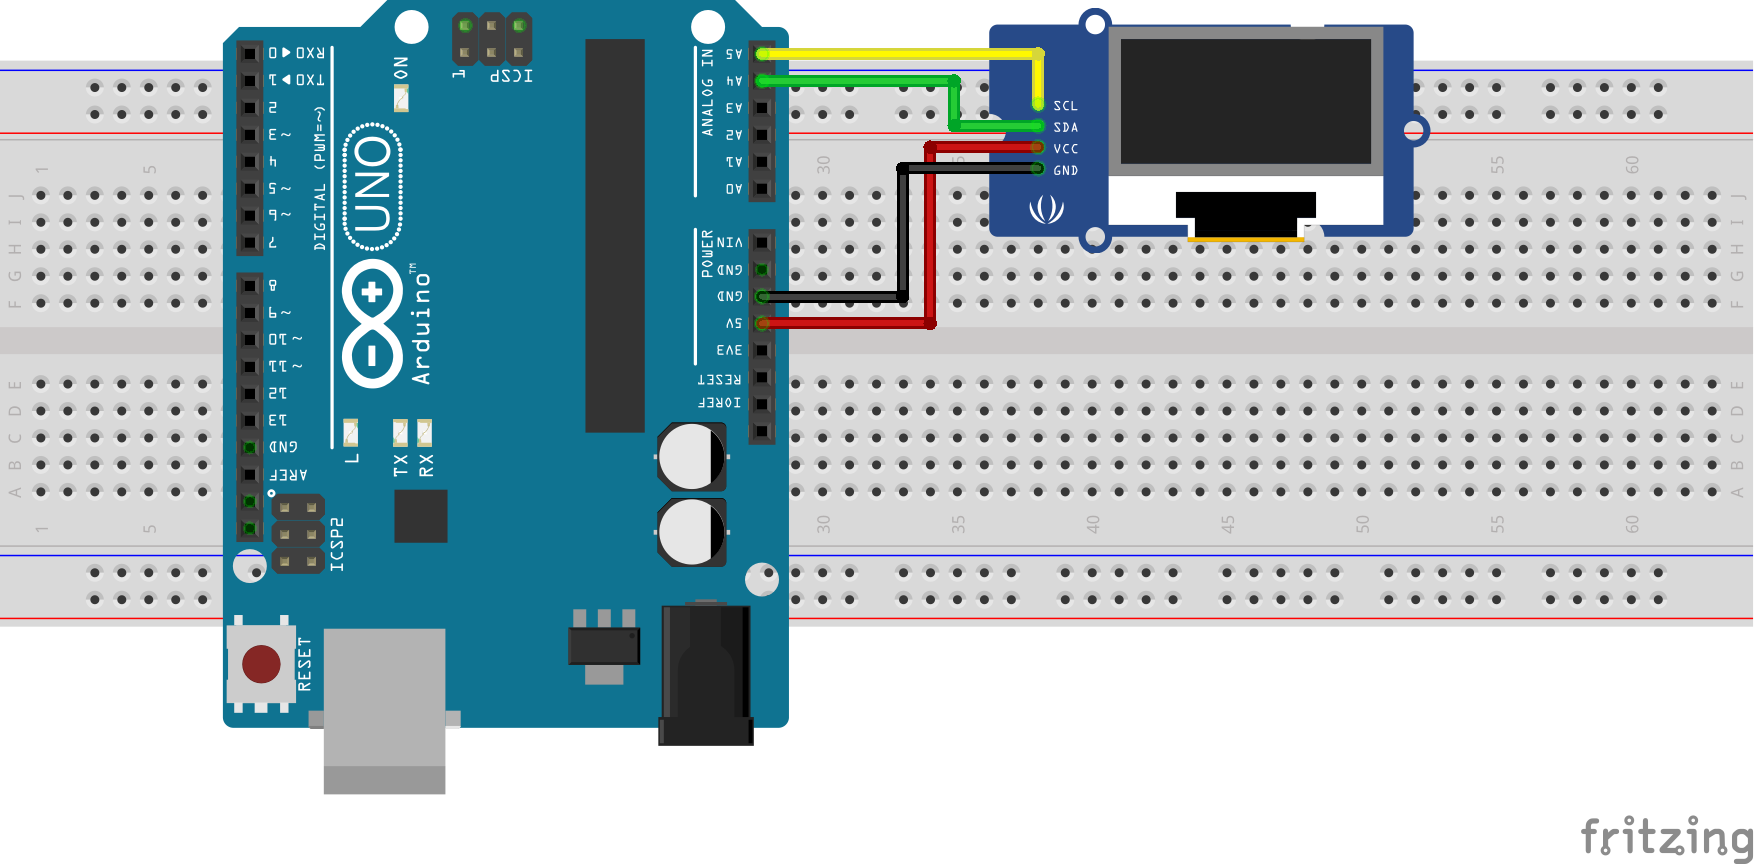
For clarity, the pin connection between the Arduino and the OLED display is also described below.
OLED – ARDUINO
VCC - 5v
GND - GND
SCL - SCL
SDA - SDA
Creating the Graphics
After connecting the LCD to our Arduino, the next line of action is to prepare the graphics to be displayed.
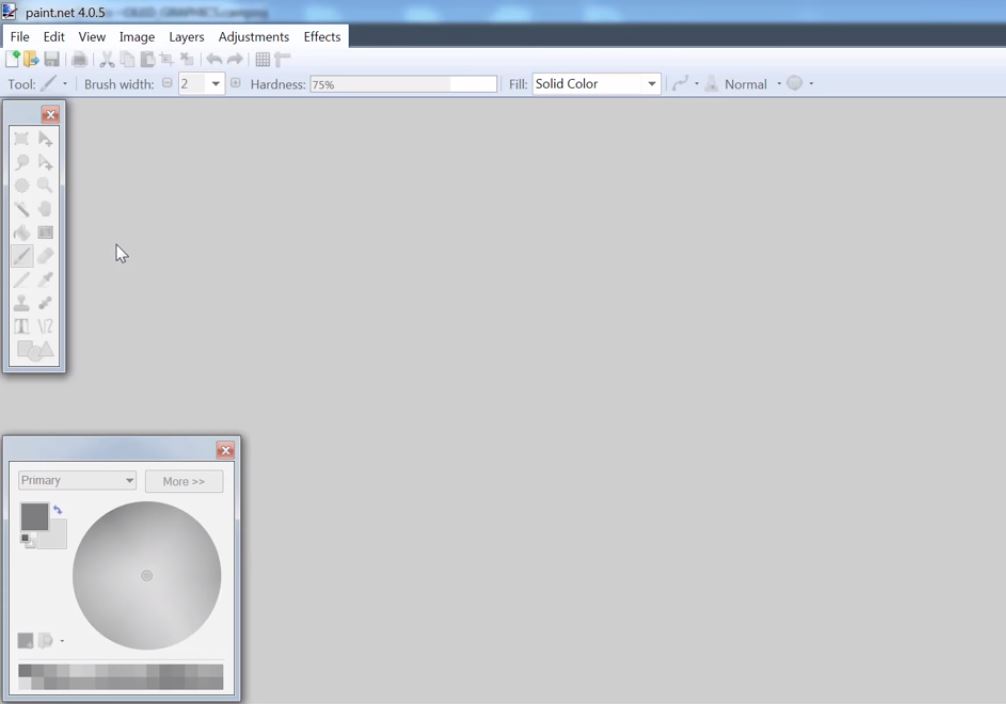
The graphics can be created/designed using tools like Microsoft paint, Corel draw, Paint.net or Adobe Photoshop. The important thing is to ensure the image is saved as a bitmap.
For the purpose of this tutorial, we will be using the paint.net tool. It is easy to use and can be downloaded from here.
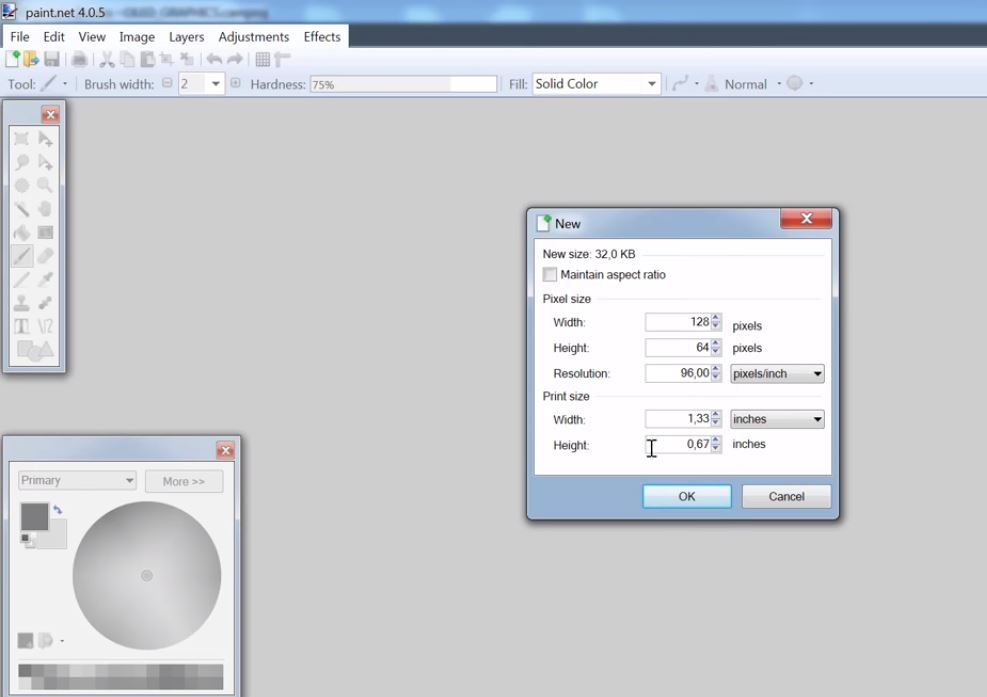
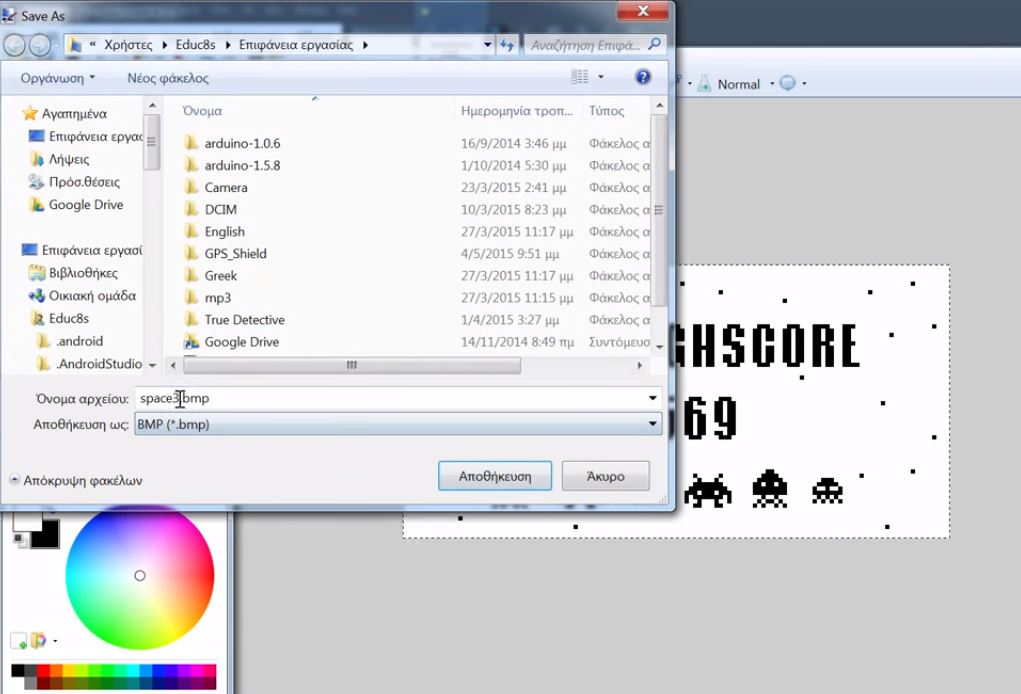
One thing that should be kept in mind while creating the graphics or logo is the canvass size. It’s important the canvass size is same as the screen, to ensure the designed graphics shows perfectly on the display. For our case, the canvass size is 128 x 64 as this is the resolution of our LCD.
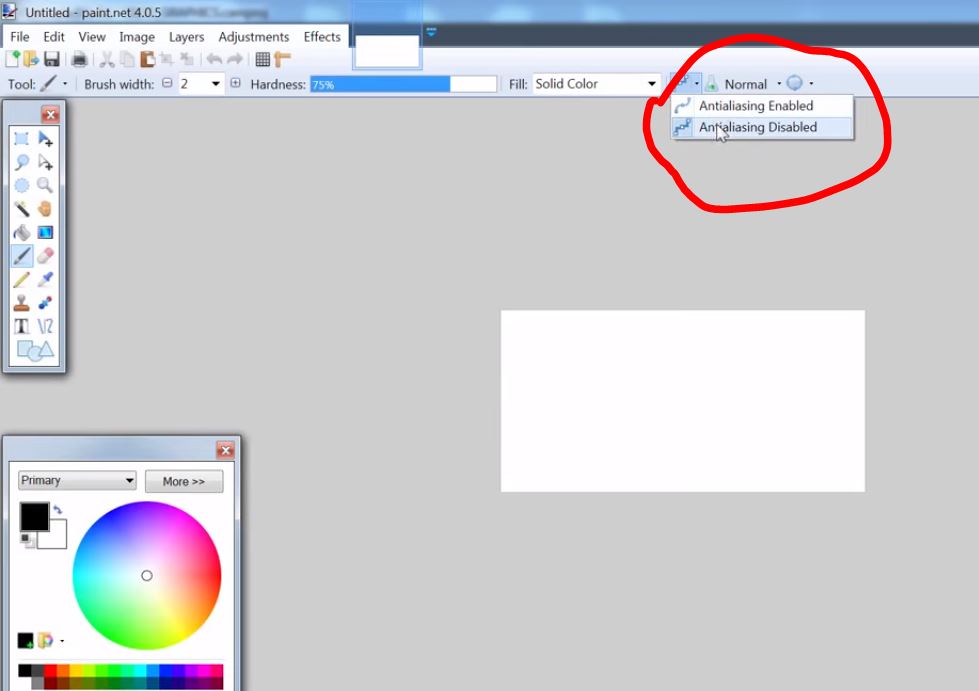
It is also important to disable antialiasing when using the paint.net software and the graphics should be designed only in black and white as these are the only color schemes that work on the OLED display. Any other color used will not be visible on the display.
After creating the graphics save it as a bitmap image.
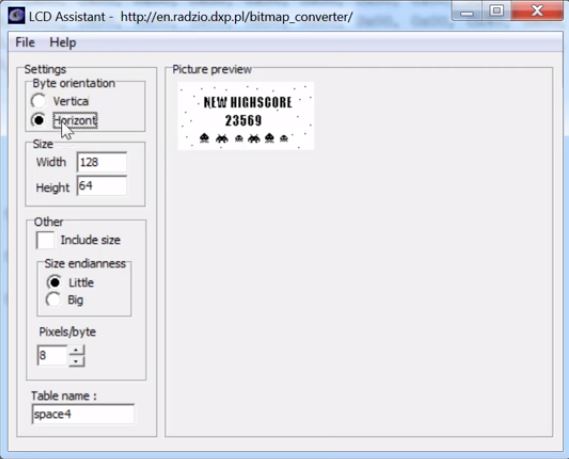
To load the graphics into our Arduino code, we will need to convert the bitmap image into byte arrays. To do this, we will use the LCD assistant software. LCD Assistant is a free and easy to use software that converts bitmap images into a data array which can then be used in C programming language based firmware for any micro-controller. The software can be downloaded here.
Load the bitmap image into the software as shown in the image below and save the output. It will return a data array which we will use later when writing the code, so ensure it is saved.
With our graphics converted to a byte array, we have all we need to proceed with the code.
Code
The code for this tutorial is fairly simple, to facilitate the communication with the OLED display, we will be using U8 graphics library for Arduino which can be downloaded from this website here. Unzip the code into your Arduino libraries folder and launch an instance of the Arduino IDE. The code, using the void draw function will basically be displaying the graphics represented by each of the byte arrays we specify, one after the other, with a delay in between to ensure the graphics stay long enough on the screen to be seen.
To implement this procedure, the first thing we do, as usual, is to include the libraries we will be using.
    /////////////////////////////////////////////////////////////////
   //      Arduino OLED Display Graphics Tutorial v1.00           //
  //       Get the latest version of the code here:              //
 //   http://educ8s.tv/arduino-oled-display-graphics-tutorial   //
/////////////////////////////////////////////////////////////////

#include "U8glib.h"

U8GLIB_SH1106_128X64 u8g(U8G_I2C_OPT_NO_ACK);	// Display which does not send ACK
In this code, we have three different byte arrays each of which represents different graphics. You can add your own byte array by copying the output of the LCD assistant software and pasting it into the code with a proper variable name following the format of the samples in the code.
const unsigned char PROGMEM space4 [] = {
0x00, 0x00, 0x00, 0x00, 0x00, 0x00, 0x00, 0x00, 0x00, 0x00, 0x00, 0x00, 0x00, 0x00, 0x00, 0x00,
0x00, 0x00, 0x00, 0x00, 0x00, 0x00, 0x00, 0x00, 0x00, 0x00, 0x00, 0x00, 0x00, 0x00, 0x00, 0x00,
0x00, 0x00, 0x00, 0x00, 0x00, 0x00, 0x00, 0x00, 0x00, 0x00, 0x00, 0x00, 0x00, 0x00, 0x00, 0x00,
0x00, 0x00, 0x00, 0x00, 0x00, 0x00, 0x00, 0x00, 0x00, 0x00, 0x00, 0x00, 0x00, 0x00, 0x00, 0x00,
0x00, 0x00, 0x00, 0x00, 0x00, 0x00, 0x00, 0x00, 0x40, 0x00, 0x00, 0x00, 0x00, 0x00, 0x01, 0x00,
0x00, 0x00, 0x00, 0x00, 0x20, 0x00, 0x00, 0x00, 0x00, 0x00, 0x00, 0x00, 0x00, 0x00, 0x00, 0x00,
0x00, 0x00, 0x02, 0x00, 0x00, 0x00, 0x00, 0x00, 0x00, 0x20, 0x00, 0x00, 0x00, 0x04, 0x00, 0x00,
0x10, 0x00, 0x00, 0x00, 0x00, 0x04, 0x00, 0x00, 0x00, 0x00, 0x00, 0x00, 0x00, 0x00, 0x00, 0x00,
0x00, 0x00, 0x00, 0x00, 0x00, 0x00, 0x00, 0x00, 0x00, 0x00, 0x00, 0x40, 0x00, 0x00, 0x00, 0x00,
0x00, 0x00, 0x00, 0x00, 0x00, 0x00, 0x00, 0x00, 0x00, 0x00, 0x00, 0x00, 0x00, 0x00, 0x00, 0x00,
0x00, 0x00, 0x00, 0x00, 0x00, 0x00, 0x00, 0x00, 0x00, 0x00, 0x00, 0x00, 0x00, 0x00, 0x00, 0x00,
0x00, 0x00, 0x00, 0x00, 0x00, 0x00, 0x00, 0x00, 0x00, 0x00, 0x00, 0x00, 0x00, 0x00, 0x00, 0x00,
0x00, 0x00, 0x00, 0x00, 0x00, 0x00, 0x00, 0x00, 0x00, 0x00, 0x00, 0x00, 0x00, 0x00, 0x00, 0x00,
0x00, 0x01, 0x00, 0x00, 0x00, 0x00, 0x00, 0x00, 0x00, 0x00, 0x00, 0x00, 0x00, 0x00, 0x00, 0x00,
0x00, 0x00, 0x00, 0x64, 0xE6, 0x4C, 0x36, 0x63, 0x8D, 0x8E, 0x1C, 0x38, 0xF1, 0xC0, 0x00, 0x08,
0x00, 0x00, 0x00, 0x74, 0xC6, 0x4C, 0x36, 0x66, 0xCD, 0x9B, 0x36, 0x6C, 0xD9, 0x80, 0x00, 0x00,
0x00, 0x00, 0x00, 0x74, 0xC6, 0xEC, 0x36, 0x66, 0xCD, 0x9B, 0x36, 0x6C, 0xD9, 0x80, 0x20, 0x00,
0x00, 0x00, 0x00, 0x74, 0xC6, 0xEC, 0x36, 0x66, 0xCD, 0x98, 0x36, 0x6C, 0xD9, 0x80, 0x00, 0x00,
0x00, 0x00, 0x00, 0x7C, 0xE2, 0xA8, 0x36, 0x66, 0x0D, 0x9E, 0x30, 0x6C, 0xF1, 0xC0, 0x00, 0x00,
0x00, 0x00, 0x00, 0x6C, 0xC2, 0xA8, 0x3E, 0x66, 0xCF, 0x87, 0x36, 0x6C, 0xD9, 0x80, 0x00, 0x00,
0x00, 0x00, 0x10, 0x6C, 0xC2, 0xA8, 0x36, 0x66, 0xCD, 0x83, 0x36, 0x6C, 0xD9, 0x80, 0x00, 0x00,
0x00, 0x00, 0x00, 0x6C, 0xC2, 0xA8, 0x36, 0x66, 0xCD, 0x9B, 0x36, 0x6C, 0xD9, 0x80, 0x00, 0x00,
0x00, 0x00, 0x00, 0x64, 0xC3, 0xB8, 0x36, 0x66, 0xCD, 0x9B, 0x36, 0x6C, 0xD9, 0x80, 0x00, 0x00,
0x00, 0x00, 0x00, 0x64, 0xF3, 0xB8, 0x36, 0x63, 0x4D, 0x8E, 0x1C, 0x38, 0xD9, 0xE0, 0x00, 0x00,
0x00, 0x00, 0x00, 0x02, 0x00, 0x00, 0x00, 0x00, 0x00, 0x00, 0x00, 0x00, 0x00, 0x00, 0x00, 0x00,
0x00, 0x00, 0x00, 0x00, 0x00, 0x00, 0x00, 0x00, 0x00, 0x00, 0x00, 0x00, 0x00, 0x00, 0x00, 0x00,
0x00, 0x00, 0x00, 0x00, 0x00, 0x00, 0x00, 0x00, 0x00, 0x00, 0x00, 0x04, 0x00, 0x00, 0x00, 0x00,
0x00, 0x00, 0x00, 0x00, 0x00, 0x00, 0x00, 0x00, 0x00, 0x00, 0x00, 0x00, 0x00, 0x00, 0x00, 0x00,
0x01, 0x00, 0x00, 0x00, 0x00, 0x00, 0x00, 0x00, 0x00, 0x00, 0x00, 0x00, 0x00, 0x00, 0x00, 0x00,
0x00, 0x00, 0x00, 0x00, 0x00, 0x00, 0x00, 0x00, 0x00, 0x00, 0x00, 0x00, 0x00, 0x00, 0x00, 0x00,
0x00, 0x00, 0x00, 0x00, 0x00, 0x00, 0x00, 0x00, 0x00, 0x00, 0x00, 0x00, 0x00, 0x00, 0x00, 0x00,
0x00, 0x00, 0x00, 0x00, 0x00, 0x03, 0x87, 0x1F, 0x1C, 0x38, 0x00, 0x00, 0x00, 0x00, 0x00, 0x00,
0x00, 0x00, 0x00, 0x00, 0x00, 0x06, 0xCD, 0x98, 0x36, 0x6C, 0x00, 0x00, 0x00, 0x00, 0x80, 0x00,
0x00, 0x00, 0x00, 0x00, 0x00, 0x06, 0xCD, 0x98, 0x30, 0x6C, 0x00, 0x00, 0x00, 0x00, 0x00, 0x00,
0x00, 0x00, 0x00, 0x00, 0x00, 0x00, 0xC1, 0x9F, 0x3C, 0x6C, 0x00, 0x00, 0x00, 0x00, 0x00, 0x00,
0x00, 0x00, 0x00, 0x00, 0x00, 0x01, 0xC3, 0x1B, 0x36, 0x6C, 0x00, 0x00, 0x00, 0x00, 0x00, 0x00,
0x00, 0x08, 0x00, 0x00, 0x00, 0x01, 0x81, 0x83, 0x36, 0x6C, 0x00, 0x00, 0x00, 0x00, 0x00, 0x00,
0x00, 0x00, 0x00, 0x00, 0x00, 0x03, 0x8D, 0x9B, 0x36, 0x3C, 0x00, 0x00, 0x00, 0x00, 0x00, 0x00,
0x00, 0x00, 0x00, 0x00, 0x00, 0x03, 0x0D, 0x9B, 0x36, 0x0C, 0x00, 0x00, 0x00, 0x00, 0x00, 0x00,
0x00, 0x00, 0x00, 0x00, 0x00, 0x07, 0x0D, 0x9B, 0x36, 0x6C, 0x00, 0x00, 0x00, 0x00, 0x00, 0x00,
0x00, 0x00, 0x00, 0x00, 0x00, 0x07, 0xC7, 0x0E, 0x1C, 0x38, 0x00, 0x00, 0x00, 0x00, 0x00, 0x08,
0x08, 0x00, 0x00, 0x00, 0x00, 0x00, 0x00, 0x00, 0x00, 0x00, 0x00, 0x00, 0x00, 0x00, 0x00, 0x00,
0x00, 0x00, 0x00, 0x00, 0x00, 0x00, 0x00, 0x00, 0x00, 0x00, 0x00, 0x00, 0x00, 0x00, 0x00, 0x00,
0x00, 0x00, 0x00, 0x00, 0x00, 0x00, 0x00, 0x00, 0x00, 0x00, 0x00, 0x00, 0x00, 0x00, 0x00, 0x00,
0x00, 0x00, 0x00, 0x00, 0x00, 0x00, 0x00, 0x00, 0x00, 0x00, 0x00, 0x00, 0x00, 0x00, 0x00, 0x00,
0x00, 0x00, 0x00, 0x00, 0x00, 0x00, 0x00, 0x00, 0x00, 0x00, 0x00, 0x00, 0x00, 0x00, 0x00, 0x00,
0x00, 0x00, 0x00, 0x00, 0x00, 0x00, 0x00, 0x00, 0x00, 0x00, 0x00, 0x00, 0x00, 0x00, 0x00, 0x00,
0x00, 0x00, 0x00, 0x00, 0x00, 0x00, 0x00, 0x00, 0x00, 0x00, 0x00, 0x00, 0x00, 0x00, 0x00, 0x00,
0x00, 0x00, 0x00, 0xC0, 0x00, 0x00, 0x00, 0x00, 0x00, 0x00, 0x06, 0x00, 0x00, 0x00, 0x01, 0x00,
0x00, 0x00, 0x01, 0xE0, 0x02, 0x08, 0x00, 0x00, 0x08, 0x20, 0x0F, 0x00, 0x00, 0x10, 0x00, 0x00,
0x00, 0x00, 0x03, 0xF0, 0x01, 0x10, 0x00, 0xE0, 0x04, 0x40, 0x1F, 0x80, 0x38, 0x00, 0x00, 0x00,
0x00, 0x80, 0x06, 0xD8, 0x03, 0xF8, 0x01, 0xF0, 0x0F, 0xE0, 0x36, 0xC0, 0x7C, 0x00, 0x00, 0x00,
0x00, 0x00, 0x07, 0xF8, 0x07, 0xFC, 0x02, 0x48, 0x1F, 0xF0, 0x3F, 0xC0, 0x92, 0x00, 0x00, 0x00,
0x00, 0x00, 0x07, 0xF8, 0x0E, 0xEE, 0x03, 0xF8, 0x3B, 0xB8, 0x3F, 0xC0, 0xFE, 0x00, 0x00, 0x00,
0x00, 0x00, 0x01, 0x20, 0x0B, 0xFA, 0x01, 0x50, 0x2F, 0xE8, 0x09, 0x00, 0x54, 0x00, 0x00, 0x00,
0x00, 0x00, 0x02, 0xD0, 0x09, 0x12, 0x02, 0xA8, 0x24, 0x48, 0x16, 0x80, 0xAA, 0x00, 0x00, 0x00,
0x00, 0x00, 0x05, 0x28, 0x03, 0x18, 0x00, 0x00, 0x0C, 0x60, 0x29, 0x40, 0x00, 0x00, 0x00, 0x00,
0x00, 0x00, 0x00, 0x00, 0x00, 0x00, 0x00, 0x00, 0x00, 0x00, 0x00, 0x00, 0x00, 0x00, 0x00, 0x00,
0x00, 0x00, 0x00, 0x00, 0x00, 0x00, 0x00, 0x00, 0x00, 0x00, 0x00, 0x00, 0x00, 0x00, 0x00, 0x00,
0x00, 0x04, 0x00, 0x00, 0x00, 0x00, 0x00, 0x00, 0x00, 0x00, 0x00, 0x00, 0x00, 0x00, 0x00, 0x00,
0x00, 0x00, 0x00, 0x00, 0x00, 0x00, 0x00, 0x00, 0x00, 0x00, 0x00, 0x00, 0x00, 0x00, 0x00, 0x00,
0x00, 0x00, 0x00, 0x00, 0x00, 0x80, 0x00, 0x00, 0x00, 0x00, 0x00, 0x00, 0x00, 0x00, 0x40, 0x00,
0x00, 0x00, 0x00, 0x00, 0x00, 0x00, 0x00, 0x00, 0x00, 0x00, 0x00, 0x00, 0x00, 0x00, 0x00, 0x00,
0x00, 0x00, 0x00, 0x00, 0x00, 0x00, 0x00, 0x00, 0x00, 0x00, 0x00, 0x00, 0x00, 0x00, 0x00, 0x00
};
Next, we create the Void draw() function.
The void draw function is the most important part of this project as it is in charge of drawing the graphics on the display. The function uses the u8g.drawBitmapP function from the U8 graphics library to draw the specified bitmap. The u8g.drawBitmapP function has five arguments; the first two are the x and y coordinates of the top left position on the screen where we want the graphics display to start from. The 3rd argument is the width of the bitmap image (128 in this case) divided by 8 while the 4th argument is the height of the bitmap image (64 in this case). The last argument is the variable name given to the byte array which represents the image to be displayed.
void draw()
{
  if(frame==0)
   u8g.drawBitmapP( 0, 0, 16, 64, frame1);
  else if (frame == 1)
   u8g.drawBitmapP( 0, 0, 16, 64, frame2);
  else if(frame == 2)
   u8g.drawBitmapP( 0, 0, 16, 64, frame3);
   else if(frame == 3)
   u8g.drawBitmapP( 0, 0, 16, 64, space4);
}
we leave the void setup function blank since it’s not necessary for this tutorial, but it must be included as its needed for the Arduino code to compile.
void setup(void) {
}
Next, we write the void loop() function. The void loop function for this project is fairly simple, all we need to do is call the void draw function to display a graphics and wait for few seconds before calling the function to display the next graphics.
void loop(void) {

 u8g.firstPage();
  do{
   draw();
 } while(u8g.nextPage());

 frame ++;
 if(frame>3)
 frame = 0;
delay(3000);
}
The complete code for this tutorial is attached under the download section at the end of this post.
Demo
Upload the code to your Arduino board, you should see the display come alive and the graphics come up as shown in the image below.
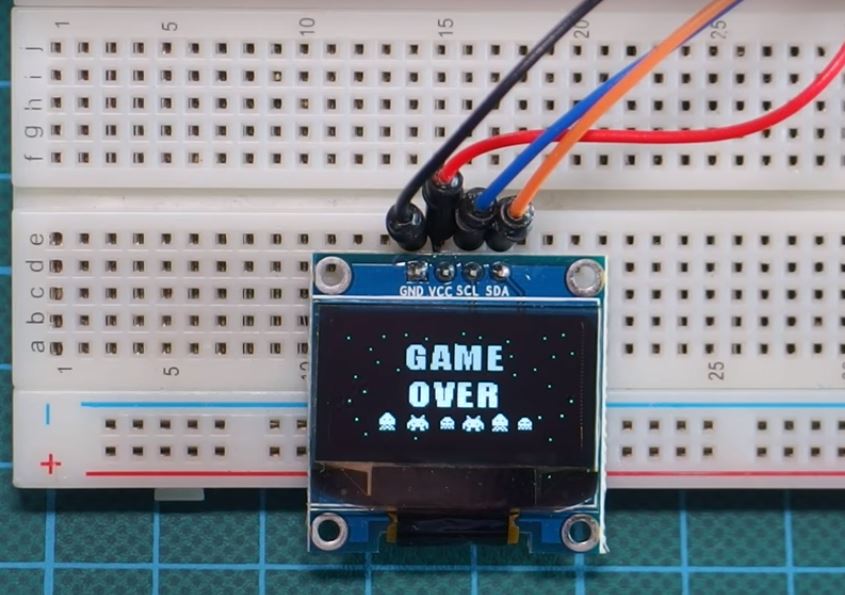
Worked right? Yea!
That’s it for this tutorial guys. As usual, let me know via the comment section if you have any questions.
The youtube video for this tutorial is available here.

