

1.2v LED Flasher – Joule thief
- Quantsuff
- QS@QuantSuff.com
- 24.857 Views
- easy
- Non tested
- 0 Likes

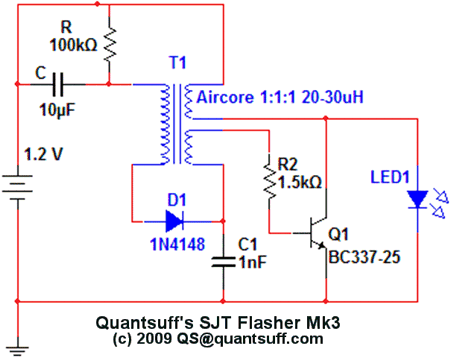
This is a 1.2-volt single transistor flyback (Joule Thief) circuit that features a third coil. With it, flash duration and brightness is much enhanced, even with just a 10uF capacitor, as can be seen in the schematic.
Description
The parts to the right of T1 form a simple Joule-thief (‘Blocking’ oscillator) circuit which boosts the 1.2v supply to 3.5v to operate the LED. C1 is used to extend the charge and discharge cycles to increase brightness and efficiency. Components R, C and D1 form a simple timing circuit which, with the values shown, is about 1 sec per flash. Capacitor C charges up through resistor R until its voltage is enough to bias D1 and turn Q1 on to light up the LED. The charge on C is slowly drained, until it is no longer able to keep Q1 on, at which point the LED turns off until C can be recharged by R again. More information on this circuit and others can be found at http://quantsuff.com.
Videos
Please follow and like us:


 – Variable Reluctance Magnetic Pickup to Voltage Converter")

I built this circuit,Good stuff ,specially no current consumption between led flashing & sufficient LED brightness.
This is the best LED Flasher circuit I’ve seen so far. Built it, Love it! It’s currently running on an AAA battery, let’s see how long it will last…
To build the coil, I’ve used toroid ferrite and about 2×1 foot of 24AWG magnet wire that I’ve twisted together. Ran about 15 loops in the toroid. That gives you 4 wires. Then cut open one of the wire on the 8th loop and you got your 3 coils: 1 full and 2 halves.
How many turns do I have to do minimum, and what difference will the amount of turns make? What can be changed to change flashing rate, and can two led’s be used instead of one (in series). Where can I find more detailed instructions?
thanks