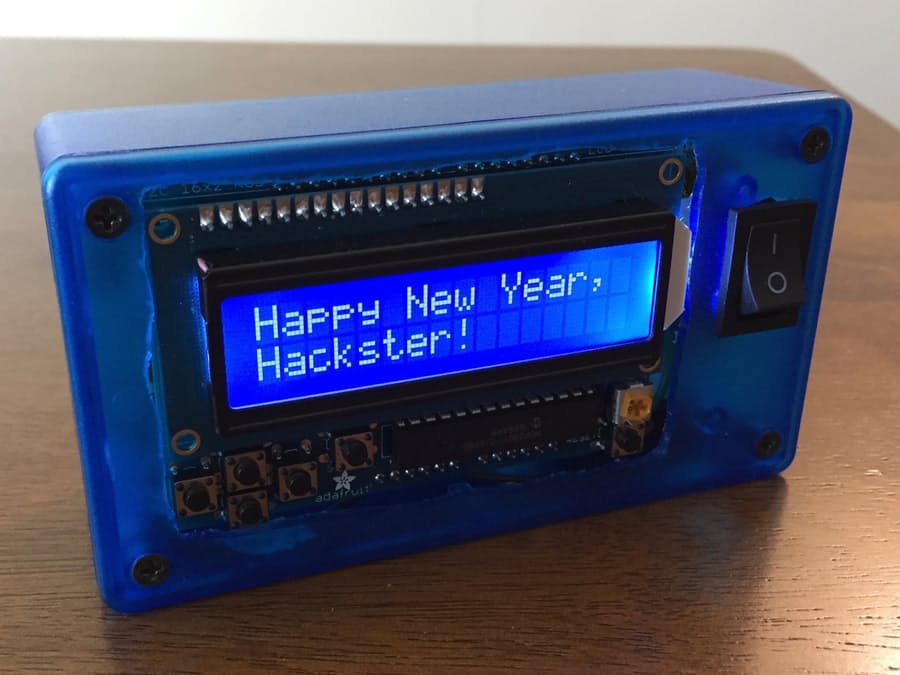
This Arduino-based pager by Mike Schaus will allow you to send and receive real SMS text messages. This messaging device has its own SIM card and phone number.
In order to build this project you need the following parts:
- 1* Arduino UNO
- 1*Hologram SIM Card w/Device Management
- 1*Arduino GSM shield V2
- 1*Adafruit LCD Shield Kit w/ 16×2 Character Display
- 1*Hammond Project Box 4.7 x 2.6 x 1.4 Translucent Blue
And you will need to use this software to run the project: Hologram Data Router.
This project was made possible as part of Hologram’s Hacker-In-Residence program, The Hologram Global SIM Card allows you to connect you IoT device everywhere. Paired with a powerful device management platform and API. It provides a cellular data service that works with any device that accepts a SIM card. In addition it is totally inexpensive.
GSM shield, the Hologram things, and Arduino stacked on top of each other made a good combination to build such a project. For powering the project, Mike had used a 9V battery as an option, and still, powering from USB is possible.
Mike had designed this project so it could be used by children instead of a real cell phone, or it could be used as an “SOS” button for someone working alone outdoors or even exercising.
Check this video to know how this project works:
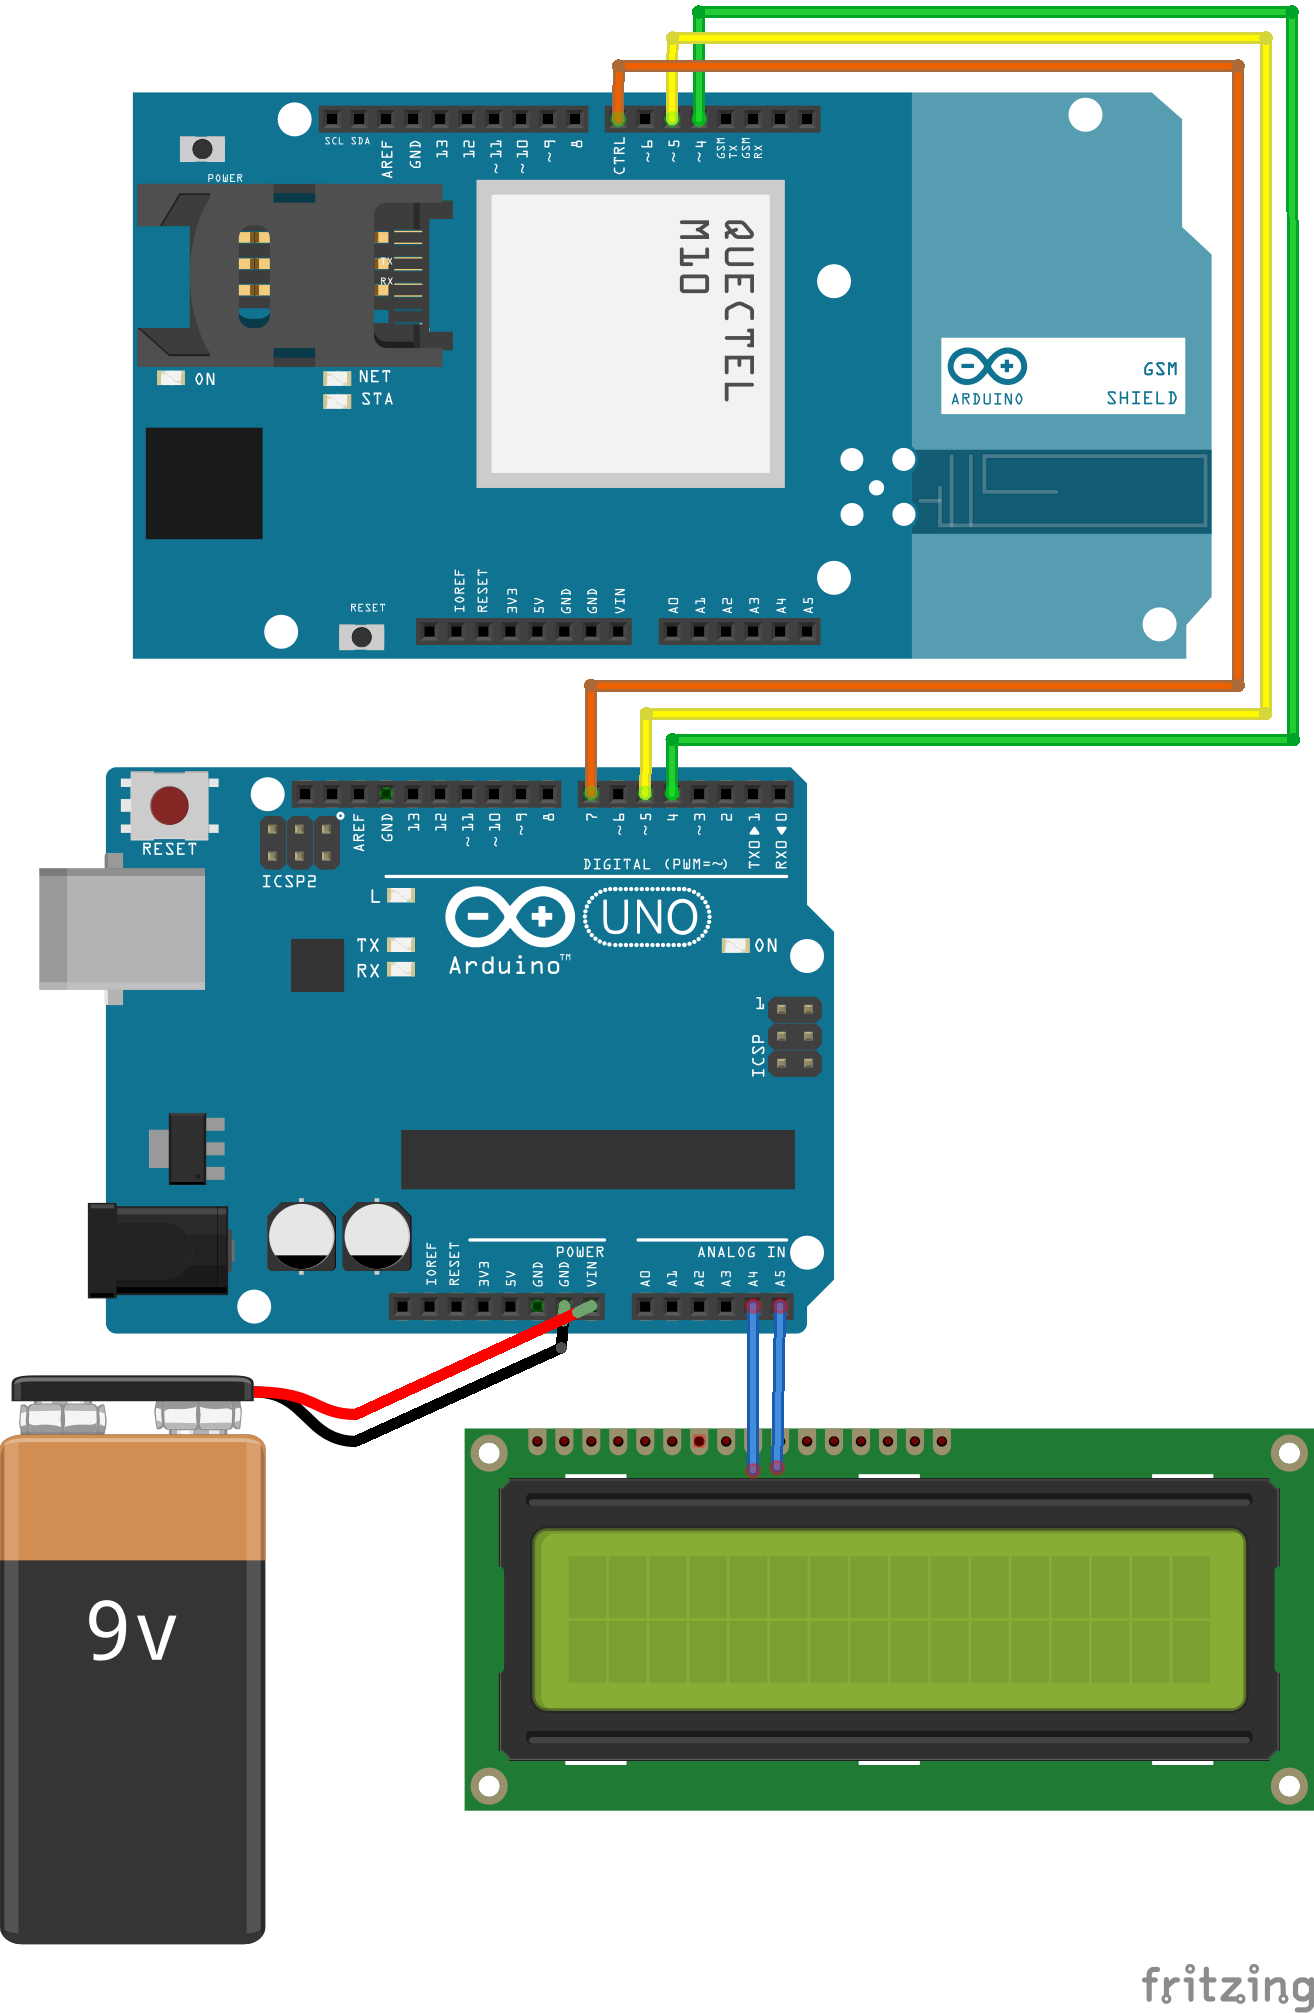
The amazing thing about Adafruit LCD shield that it only uses 2 pins of Arduino since it works over the I2C bus, which results with many places left for future features.
This is the schematics of the project: It is super easy, the wires mean putting the pieces on top of each other.
And here is the Arduino code used:
#include <GSM.h>

#define PINNUMBER ""

// include the LCD library code:
#include <Wire.h>
#include <Adafruit_RGBLCDShield.h>
#include <utility/Adafruit_MCP23017.h>

// The shield uses the I2C SCL and SDA pins. On classic Arduinos
// this is Analog 4 and 5 so you can't use those for analogRead() anymore
// However, you can connect other I2C sensors to the I2C bus and share
// the I2C bus.
Adafruit_RGBLCDShield lcd = Adafruit_RGBLCDShield();

// These #defines make it easy to set the backlight color
#define OFF 0x0
#define ON 0x1

// make the arrow special character on the LCD
const byte arrow[8] =
{
 B00000, B00000, B01000, B01100, B01110, B01100, B01000, B00000
};

// initialize the GSM library instance
GSM gsmAccess(false); // include a 'true' parameter for debug enabled
GSM_SMS sms;

// char array of the telephone number to send SMS
// change the number 12125551212 to a number
// you have access to
char remoteNumber[20]= "12125551212";

// Array to hold the number a SMS is retreived from
char senderNumber[20];

// char array of the possible outgoing messages to choose from the menu
char* responses[]={"Mike=Awesome!", "Yes", "No", "Howdy!"};
//#define NUMRESPONSES 4 // if someone knows how to calculate this instead, I'm all ears
#define NUMRESPONSES (sizeof(responses)/sizeof(char *)) // thanks to Steve Kemp's comment!

int position=-1; // this way the first button press will always show first option of the menu

int inByte = 0; // incoming serial byte for keyboard interface

boolean backlight = true; // track backlight status for toggling

unsigned long previousMillis = 0; // will store last time messages were checked
#define CHECKINTERVAL 1500 // how often to check for text messages

void setup() {
  // put your setup code here, to run once:

  // initialize serial communications
  Serial.begin(9600);
  Serial.println(F("SMS Message Sender -- starting up..."));

  // set up the LCD's number of columns and rows:
  lcd.begin(16, 2);

  // Print a message to the LCD
  lcd.print(F("Hello, Hologram!"));
  lcd.setCursor(0, 1);
  lcd.print(F("Starting up..."));
  lcd.setBacklight(ON);

  // set up the arrow character for display
  lcd.createChar(0, arrow);

  // connection state
  boolean notConnected = true;

  // Start GSM shield
  // If your SIM has PIN, pass it as a parameter of begin() in quotes
  while(notConnected)
  {
    if(gsmAccess.begin(PINNUMBER)==GSM_READY) {
      notConnected = false;
      Serial.println(F("GSM is connected because you are so awesome"));
      Serial.println(F("Waiting for messages, or send with \"s\""));
      Serial.println();

      lcd.clear();
      lcd.setCursor(0,0);
      homeScreen();

    }
    else
    {
      Serial.println(F("Not connected"));
      lcd.clear();
      lcd.setCursor(0,0);
      lcd.print(F("Not connected"));
      delay(1000);
    }
  }
}

// this is the menu system function
void showResponses() {
//  Serial.println(position); // only for debugging menu system

  lcd.clear();
  lcd.setCursor(0,0);

  // make sure cursor position is legal
  if (position<0) position=0;
  if (position>NUMRESPONSES-1) position = NUMRESPONSES-1;

  // write current selection and next option if there is another option
  lcd.write(0); //arrow character
  lcd.print(position+1);
  lcd.print("-");
  lcd.print(responses[position]);
  if (position < NUMRESPONSES-1) {
    lcd.setCursor(0,1);
    lcd.print(" ");
    lcd.print(position+2);
    lcd.print("-");
    lcd.print(responses[position+1]);
  }
}


void homeScreen() {
  lcd.clear();
  lcd.setCursor(0,0);
  lcd.print("SMS Messenger!");
  lcd.setCursor(0,1);
  lcd.print("Ready; up/dn snd");

  position=-1; //reset response selection
}


void receiveSMS(){

  char c;

  // If there are any SMSs available()
  if (sms.available()) {
    Serial.println("Message received from:");

    // Get remote number
    sms.remoteNumber(senderNumber, 20);
    Serial.println(senderNumber);

    lcd.clear();
    lcd.setCursor(0,0);
    backlight = true;
    lcd.setBacklight(ON);

    // An example of message disposal
    // Any messages starting with # should be discarded
    if (sms.peek() == '#') {
      Serial.println("Discarded SMS");
      sms.flush();
    }

    // Read message bytes and print them
    // because sms.read only returns one character at a time
    int i=0;
    while (c = sms.read()) {
      i++;
      Serial.print(c);
      if (i==17) lcd.setCursor(0, 1); // move to next line if needed
      if (i<33) lcd.print(c); // don't try to print more than 32 chars just in case
    }

    Serial.println("\nEND OF MESSAGE");

    // Delete message from modem memory
    sms.flush();
    Serial.println("MESSAGE DELETED");
    Serial.println();

    // wait for right button to acknowlege before letting program continue
    boolean acknowledged = false;
    while(!acknowledged) {
      uint8_t buttons = lcd.readButtons();
      if (buttons & BUTTON_RIGHT) acknowledged = true;
      delay(50); //short delay for troubleshooting -- without this it behaves strangely
    }
    homeScreen();
    delay(400); // prevent multiple presses in a row
  }
}

// function to show message options in the serial monitor
void printResponseOptions(){
  for(int i=0; i<NUMRESPONSES; i++){
    Serial.print(i);
    Serial.print("-");
    Serial.println(responses[i]);
  }
  Serial.println();
}


void sendSMS(const char* txtMsg){

  Serial.print("Message to mobile number: ");
  Serial.println(remoteNumber);

  // print sms text info
  Serial.println("SENDING");
  Serial.println("Message:");
  Serial.println(txtMsg);

  // send the message
  sms.beginSMS(remoteNumber);
  sms.print(txtMsg);
  // next, add a signature to the chosen message
  sms.print(" --Be sure to connect with me on my blog http://mschausprojects.blogspot.com");
  // call endSMS function to finish sending; it will return 1 if successful
  if (sms.endSMS()==1) {
    Serial.println("\nCOMPLETE!\n");
    homeScreen();
  }
  else {
    Serial.println("\nERROR\n");
    lcd.clear();
    lcd.setCursor(0,0);
    lcd.print("error");
  }
  Serial.println();
}


void loop() {
  // put your main code here, to run repeatedly:

  uint8_t buttons = lcd.readButtons();

  if (buttons) {
    if (buttons & BUTTON_UP) {
      position--;
      showResponses();
      backlight = true;
      lcd.setBacklight(ON);
    }
    if (buttons & BUTTON_DOWN) {
      position++;
      showResponses();
      backlight = true;
      lcd.setBacklight(ON);
    }
    if (buttons & BUTTON_LEFT) {
      homeScreen();
      backlight = true;
      lcd.setBacklight(ON);
    }
    if (buttons & BUTTON_RIGHT) {
      backlight = !backlight; // toggle the backlight state
      if (backlight) lcd.setBacklight(ON);
      else lcd.setBacklight(OFF);
      homeScreen(); // have to write to screen after turning light off, otherwise it goes blank
    }
    if (buttons & BUTTON_SELECT) {
      // make sure cursor selected position is legal
      if (position<0) position=0;

      lcd.clear();
      lcd.setCursor(0,0);
      lcd.print("Sending...");
      lcd.setCursor(0,1);
      lcd.print(responses[position]);
      backlight = true;
      lcd.setBacklight(ON);
      sendSMS(responses[position]);
    }
    delay(200); // prevent multiple presses in a row
  }


  // this is for serial interface only, not related to LCD and buttons
  // send a message when I type "s" in serial monitor
  // then wait for my selection of the response number
  if (Serial.available() > 0) {
    inByte = Serial.read(); // get incoming byte
    if (inByte == 's') {
      printResponseOptions();

      while (Serial.available() > 0) {  // clear the keyboard buffer just in case
        char junk = Serial.read();
      }

      while (Serial.available() == 0) ;  // Wait here until input buffer has a character
      inByte = Serial.parseInt();
      // would want to check for valid choice here to be more robust
      sendSMS(responses[inByte]);
    }
  }

  // check for new messages only once every few seconds to keep interface more responsive
  unsigned long currentMillis = millis();
  if (currentMillis - previousMillis >= CHECKINTERVAL) {
    previousMillis = currentMillis;
    receiveSMS(); // takes about 26ms when there are no messages
  }
}
CREDITS

R3tkcxkom1pu38aqb0bh
More details about this project are available on hackster.io and Mike’s own blog post. You can learn more about his projects on the same blog.







I’m actually flattered someone would take the effort to rewrite the original post in this way! Keep on hustlin’!