Picking which of the many digital signage players to use is going to depend on your priorities. It may also depend on how many digital signs you wish to use, along with where they are located. For example, if you want to set up digital signs in numerous locations across the country, then it will require different software than if you wanted to set up tens of signs in a single place. Also, some companies want different things playing on different signs, some want the same things playing on signs dotted around a single location. Then there are those who wish to turn their tens of signs into a large cinema screen where all the signs work together to create a single image. All of these options require different types of digital signage software.
What Are The Costs Relating To The Software?
You have to ask yourself if there is a subscription fee or a one-off fee. Is it free, does it come with bloatware, does it add security holes in your systems? The cost of the program alone may not be the only cost, what about deployment costs, does it need a network, does it need a constant Internet connection?
Some are going to tell you that you shouldn’t make your decision based on the cost, but there is no point in wasting money on subscriptions you don’t need or functions you will never use. In addition, how the software is paid for may lend some degree of credibility to it. If the software keeps trying to sneak in additional charges, like service fees, update fees, etc., then it is probably not a very good or reliable piece of software.
Does it Have Workflow Management and Content Scheduling Tools?
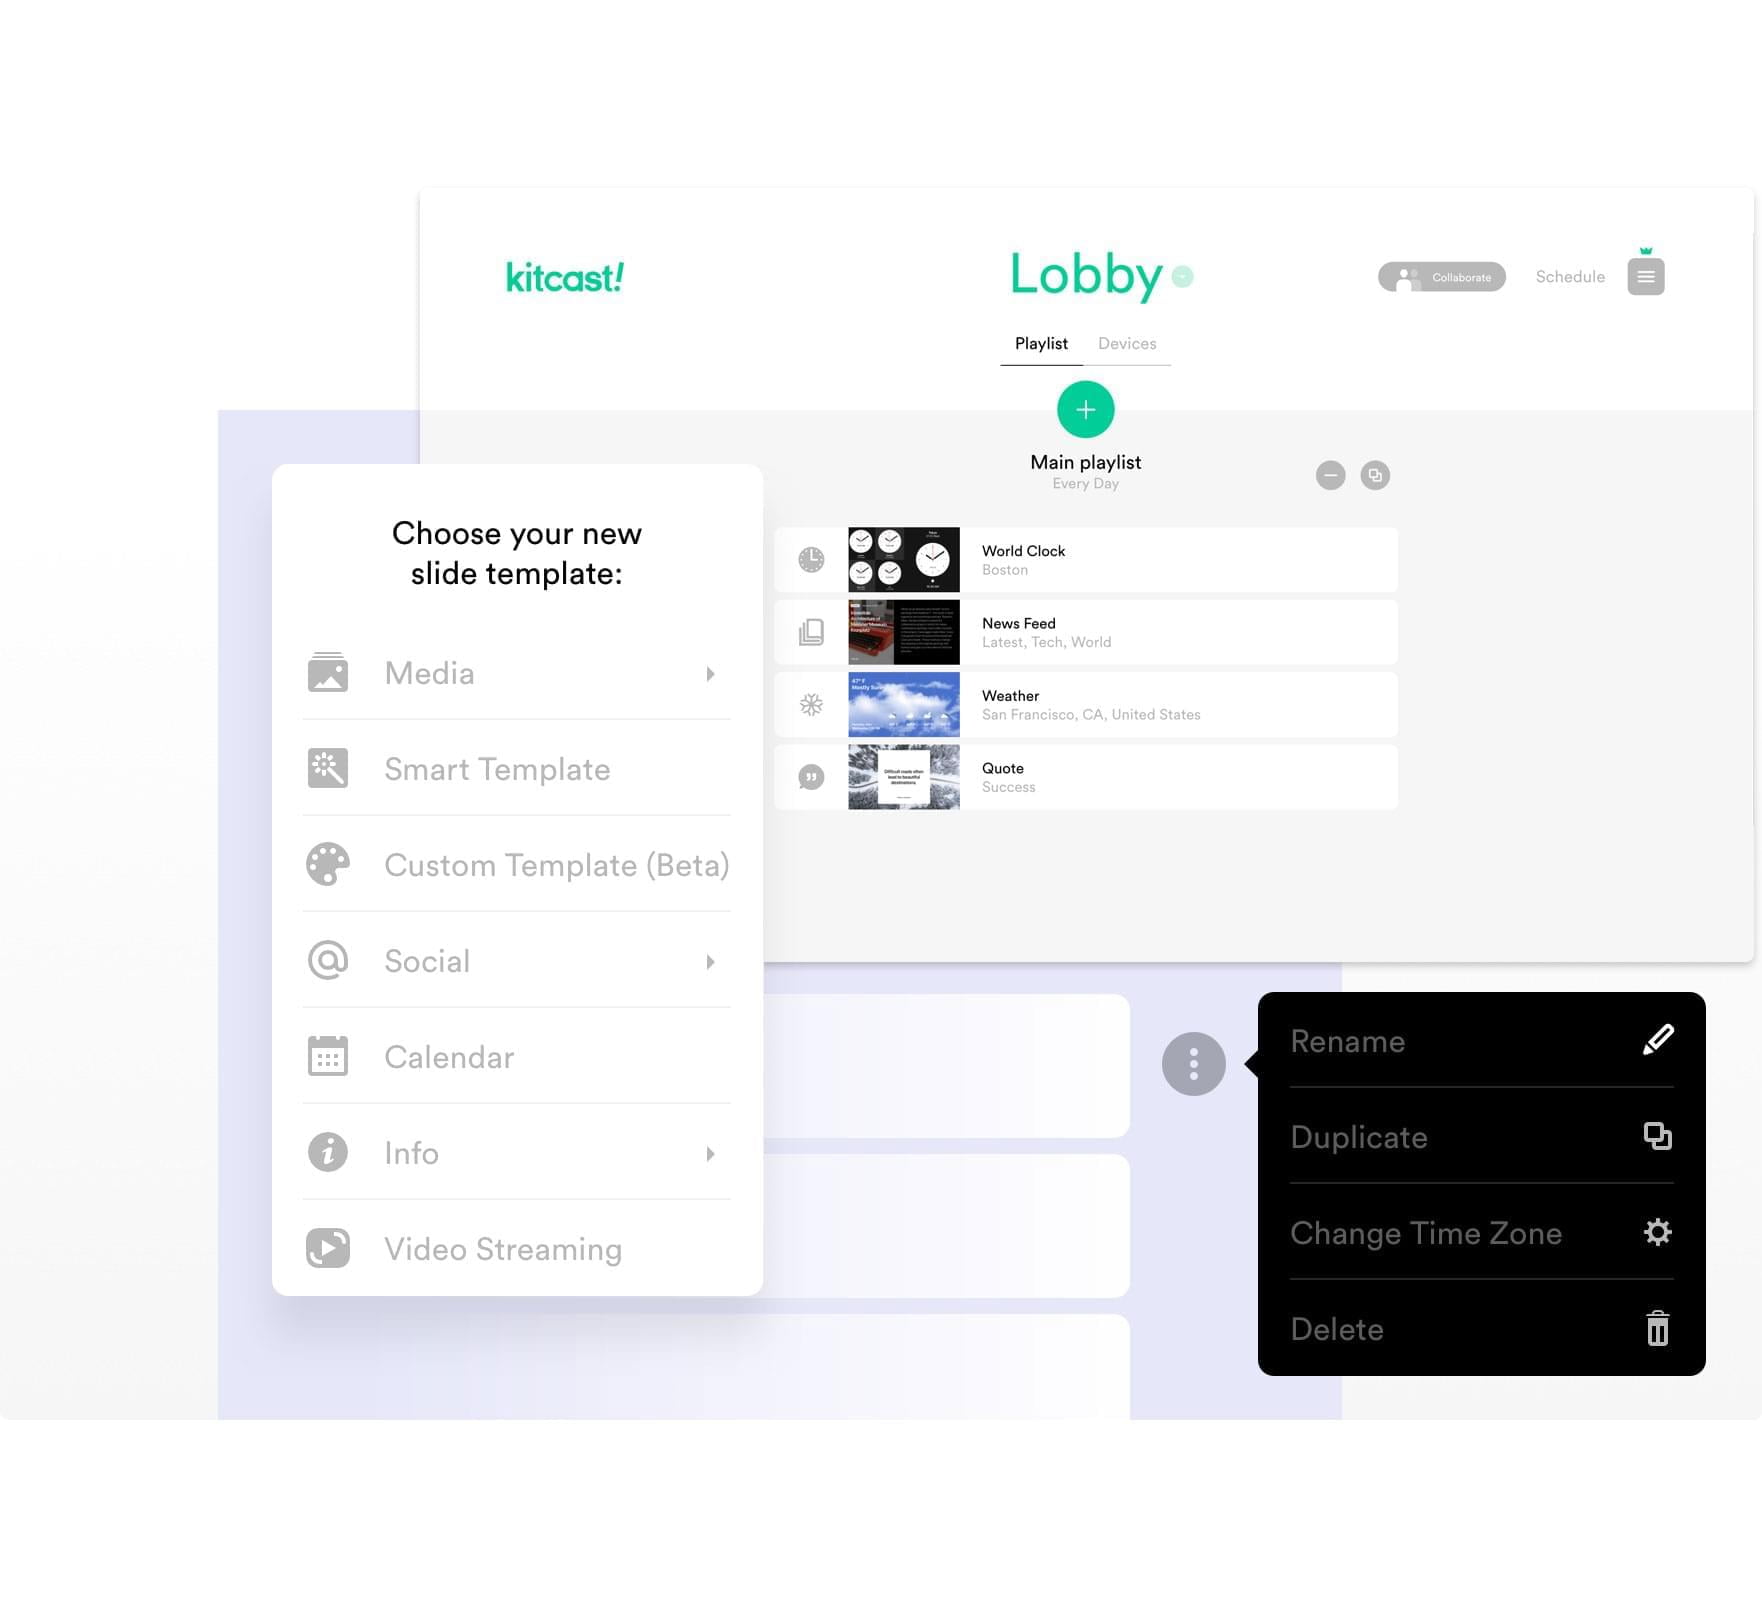
Let’s lump these two into the same consideration since one is not as robust without the other. If you have a piece of software that allows for intuitive and useful workflow management, then it makes the whole process of content creation and scheduling a lot easier. On the other hand, if your software doesn’t have content scheduling features and tools, then it is probably not worth getting the software at all. Content scheduling may work well with workflow management tools if you have projects where you have to create brand new content over a series of weeks and months.
Are There Network Monitoring and Reporting Tools?
If you set up a number of digital signs and you put them on a network, then some sort of monitoring and reporting tools are required. You need a central hub where you can monitor which digital signs are active, which are receiving new information, which is rerunning old information.
Knowing which are down, which are active, and which are displaying your most current content is important. This is especially true if you have time-sensitive information and/or if you don’t like the idea of some of your digital signs being down.
How Compatible is the Software?
In essence, you want your software to work with everything. You want it to work with every type of PC and server operating system, and every type of mobile device operating system, along with TV stick devices from companies like Amazon and Apple. Software like kitcast.tv is able to run on any system and is able to run via remote services too, such as if it were mounted on a cloud platform. Having a highly adaptable piece of software that works on everything is very important unless you are certain you will only ever use one type of device and operating system. If not, having something that is flexible is a big help.
What About Multi-Screen Support?
How you use your digital signs will determine how important things like multi-screen support are. If you want to play the same thing on all your signs, then basic multi-screen tools are all that is needed. Then, if you need things to jump from one screen to another, then a good scheduling program can help you achieve that. However, if you want things like having multiple signs pushed together to create a single screen, then that is going to take some fancy multi-screen support.
The image needs to be broken up into pieces and then distributed among your digital signs. Having the easy-to-use tools is also helpful here because the process of spreading a single stream over multiple signs is tough enough without the software’s GUI tools making it more difficult.
Does it Have Content Creation Tools?
As mentioned in the introduction, this is the sort of thing that matters depending upon your priorities. For example, if you are already creating amazing content with free tools like Blender and Audacity, then you won’t need or want software with content creation tools. On a similar note, keep this in mind when you are paying for subscription packages. If there is the option for content-creation tools and they want you to pay extra for them, then consider creating your content outside of the software and then uploading it.
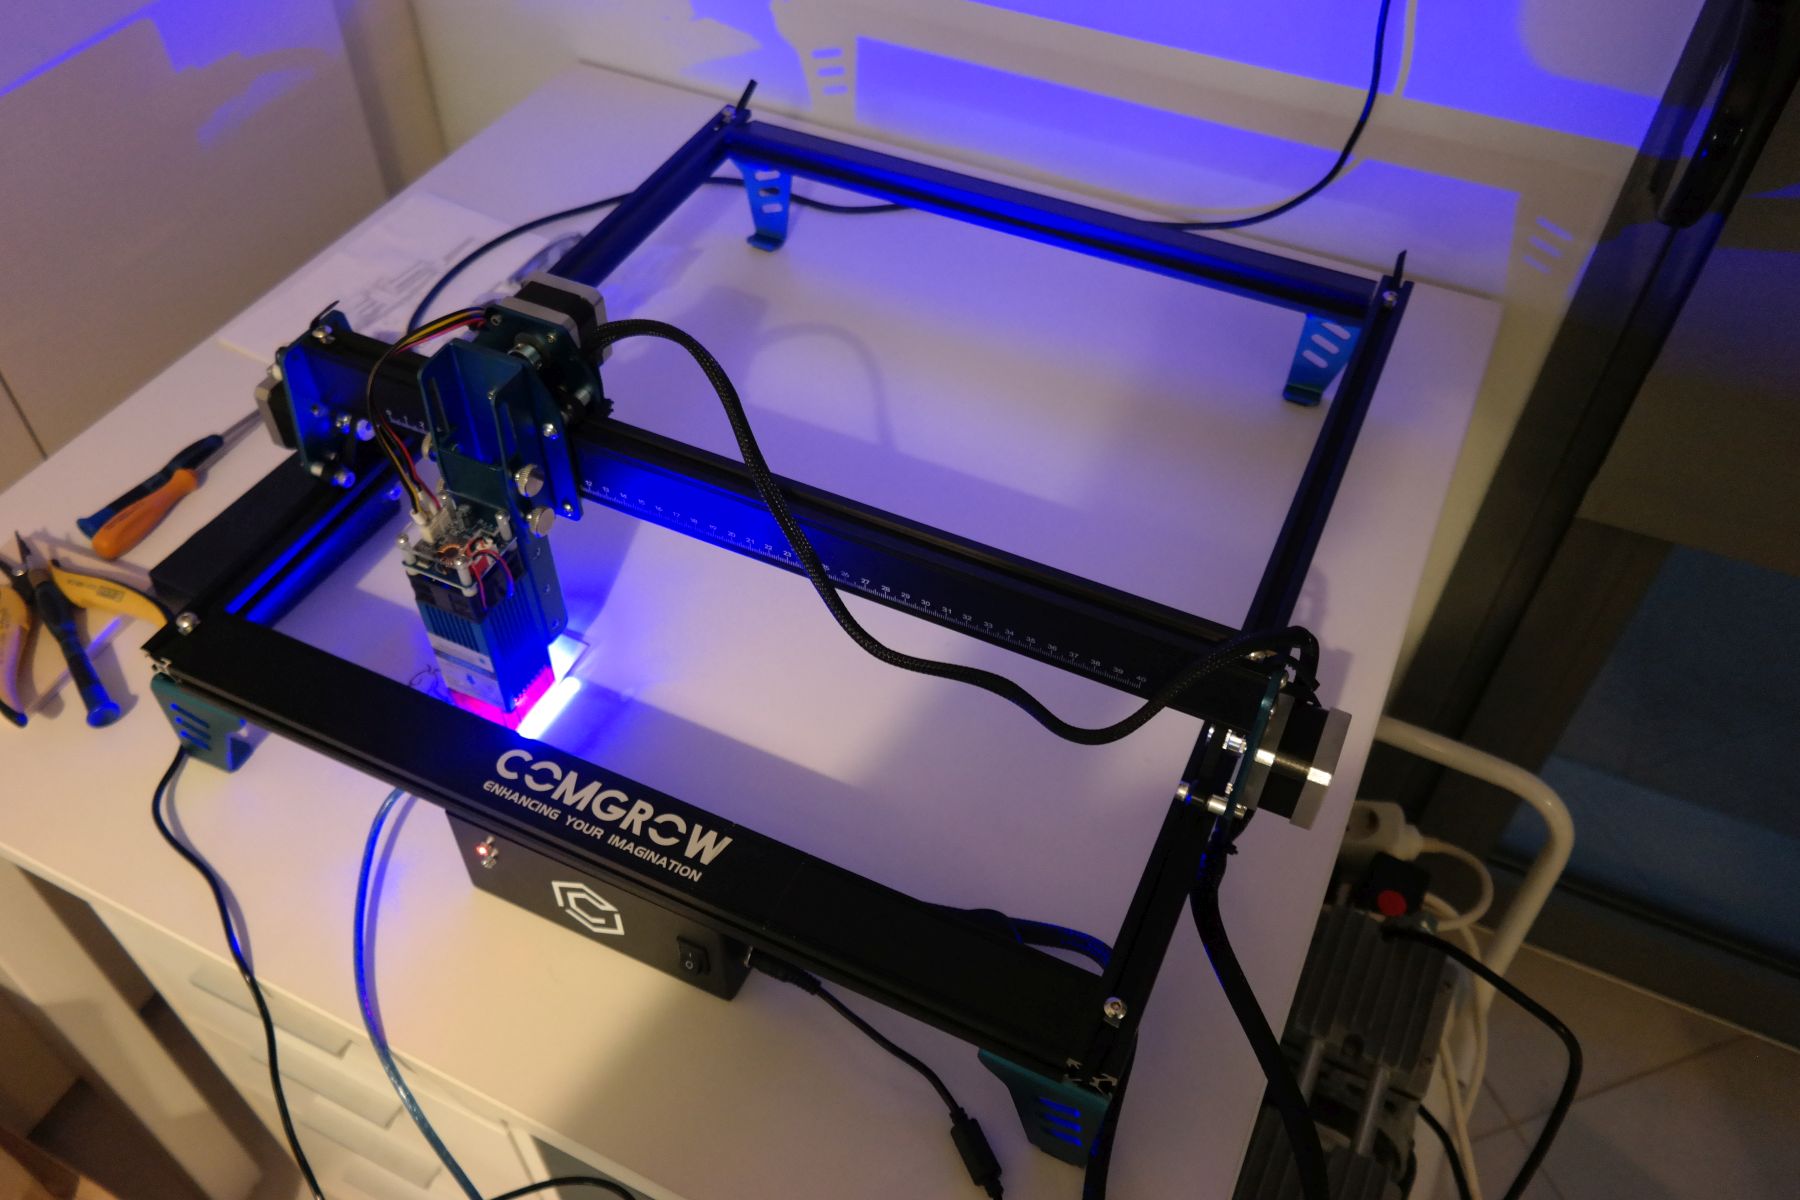
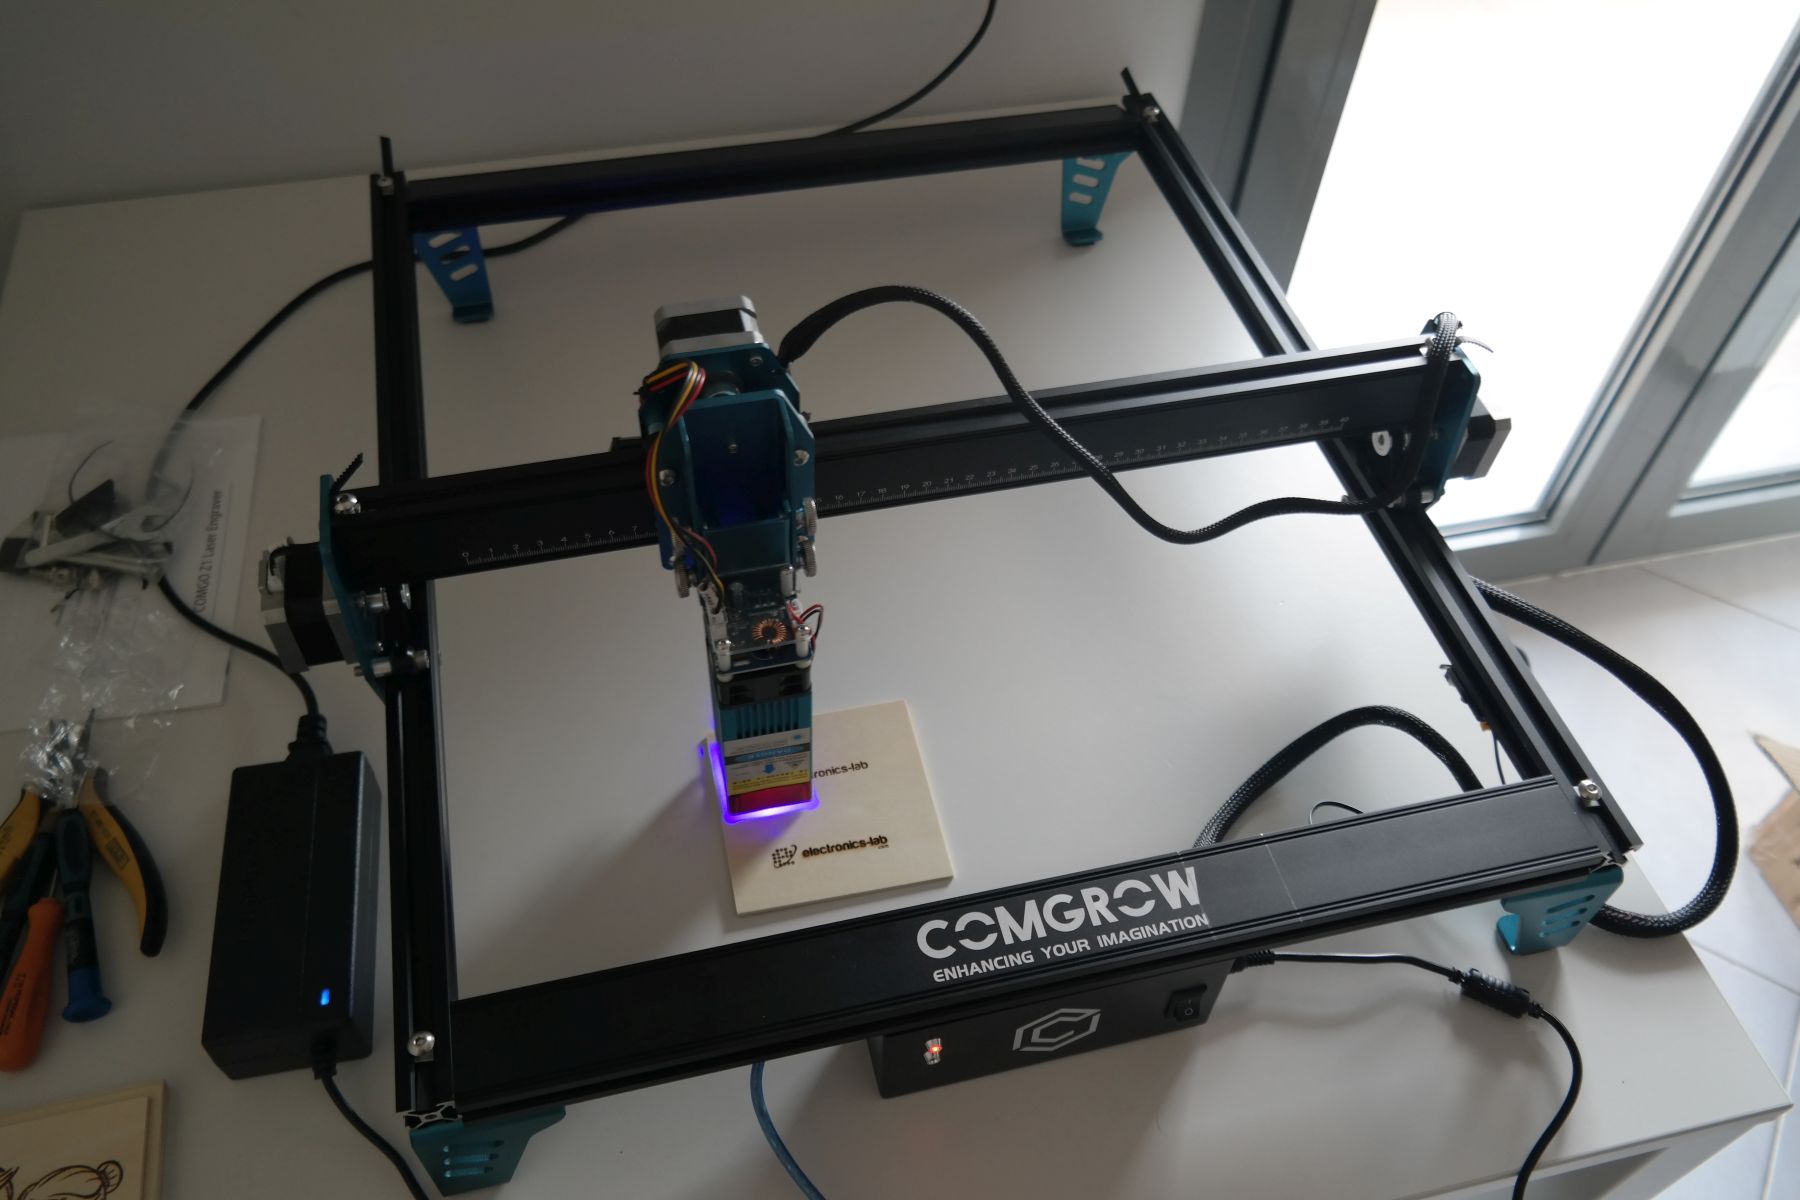
Laser engravers/cutters like 3D printers are bringing small-scale manufacturing closer to makers and hobbyists. As the technology advances, the competition between companies making them is getting stiffer, leading to the market being flooded with different types and makes, making it difficult for the average maker/hobbyist to select one. To simplify decision-making for readers, our review articles help spotlight top-of-the-line products/tools that we have enjoyed using, and for this article, in the spirit of laser engravers, we will be reviewing the COMGO Z1 desktop diode laser engraving machine from additive manufacturing solutions expert COMGROW. This is a China-made laser engraver with a simple design approach, consisting of 4 x aluminum bars and 4 x legs, a pre-assembled Y-axis with the two motors, a 5W laser module, and the USB control unit.
Intro Video
Unboxing
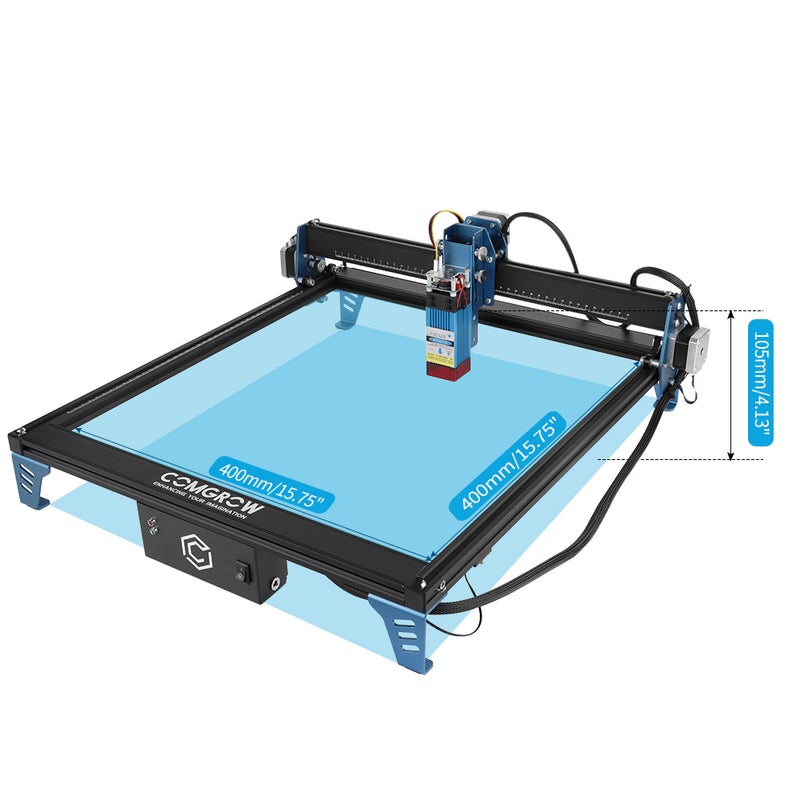
Packaged as a pre-assembled kit comprising of four profiles which when put together gives a 400 x 400mm working area, the COMGO Z1 is a quick setup laser engraver designed to provide hobbyists, makers, and DIY enthusiasts with a pocket-friendly Laser engraver with top of the line performance and features.
Package Contents:
4 x aluminum frame bars with screws
Y-axis pre-assembled
5W laser module with FAN and control PCB
4 x aluminum stands/legs
USB Control Unit supporting LaserGRBL Software
USB cable
Power Supply with power cord
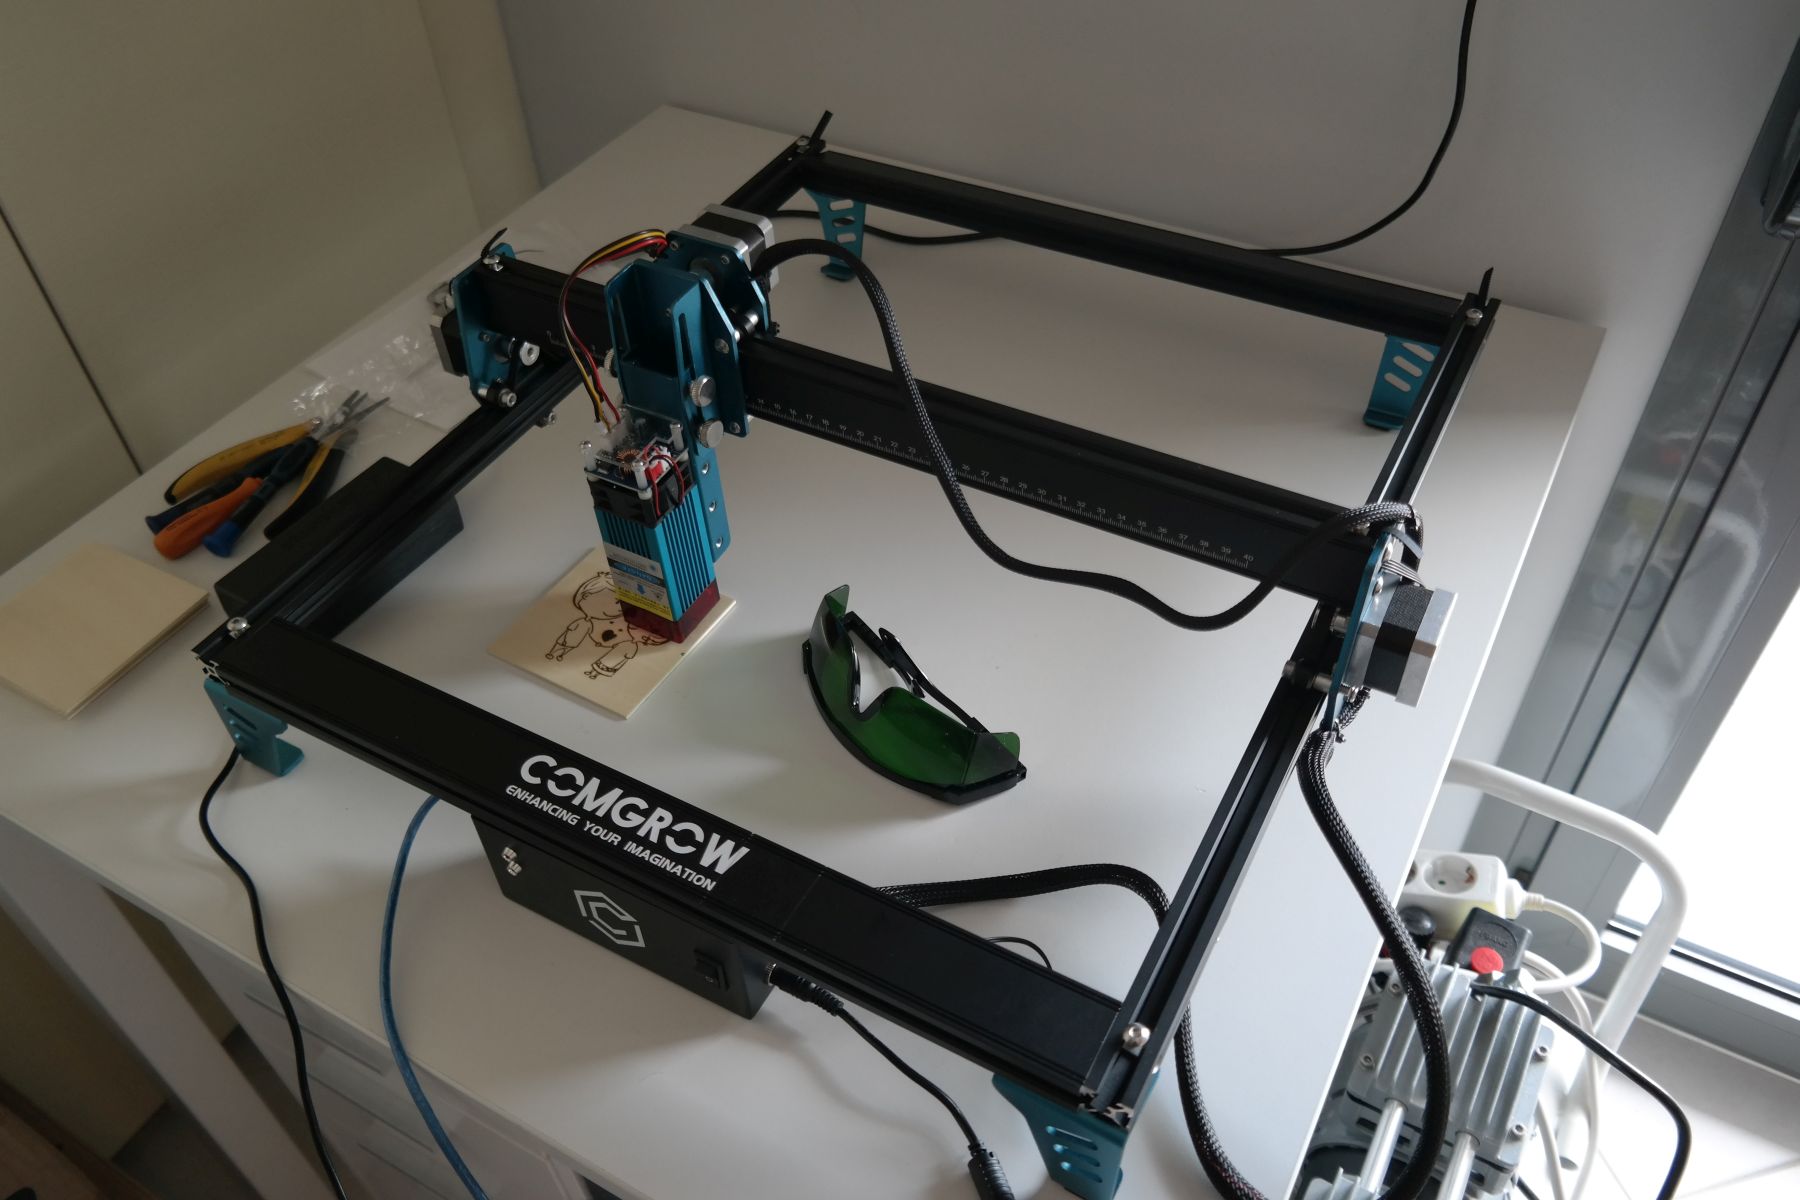
Safety Glasses
SD Card – preloaded with reading material and software
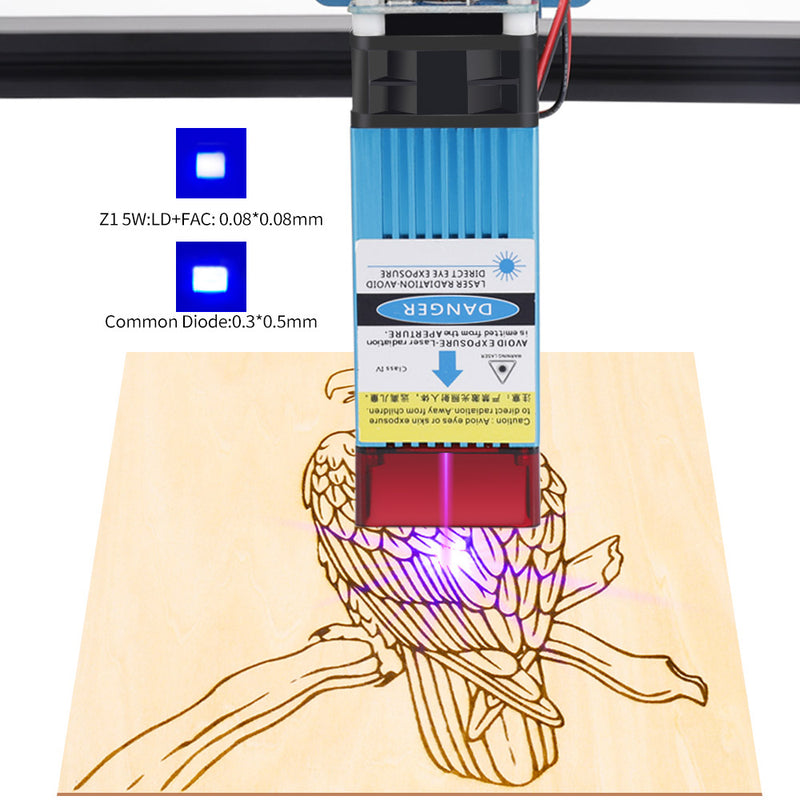
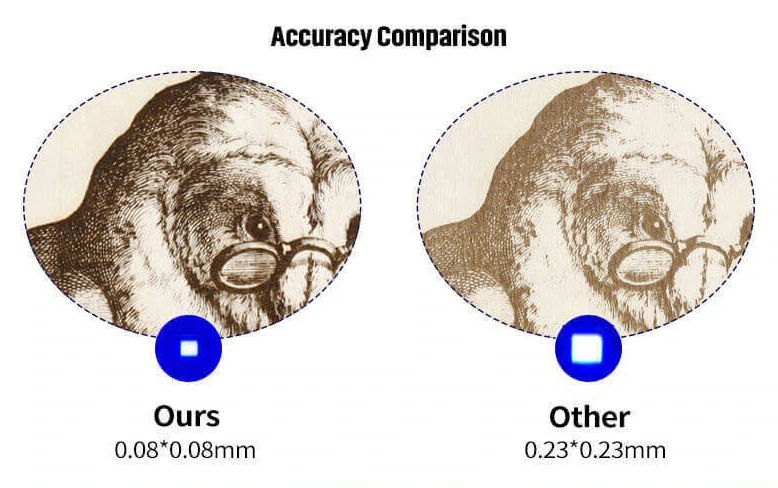
Featuring an LD+FAC-based diode laser, it’s a big contributor to the standout features and performance of the COMGO Z1 is its laser head. The Z1 uses a 5W (upgradeable to 10W) high-power compression laser head, with an incredibly accurate, 80 um (0.08 x 0.08mm) laser spot diameter which creates room for a wide range of tint and burns, altogether making it possible to accurately cut and engrave a wide range of materials such as aluminum (like 7075-T6), plywood, kraft paper, leather, plastic, cardboard, wood, non-woven fabric, bamboo, acrylic, film-coated glass, and many more, at a great speed and accuracy.
Assembly
The assembly process took us about 30-45 minutes to complete following the draft instructions on the small manual that came in the box. First, you need to attach the 4x aluminum bars together forming a large rectangle, and secure them with the available screws. At first, you will find yourself questioning which side goes up and which is back or forth as these details are not clear on the manual photos. This is important to note the company’s logo should face up and be to the front, the scale should be face to top and be on the left side and the limit switch should be placed on the right side and close to the front section (the one with the logo). After some trials and errors, we managed to assemble the frame successfully. Then we took out the pre-assembled Y-axis and rolled it from back to front so that it locks between the bars and be able to freely move. The next step was to place the 2 x silicon belts in the cavity of the left/right bars and secure them with some screws. Then we passed the belts on the stepper motors and tested the movement of the Y-axis to be smooth. Be careful to connect the stepper motor cables to each of the motors as these come disconnected. Next, was time to attach the laser module. This was easy enough using 2 x screws and securing on the Z-axis. Some attention must be taken to attach the cables on the laser module and this is not clearly indicated on the manual and these connectors are polarized. Check the photo below to see how these have to be connected.
UPDATE: A more detailed manual is available as a PDF download.
Features
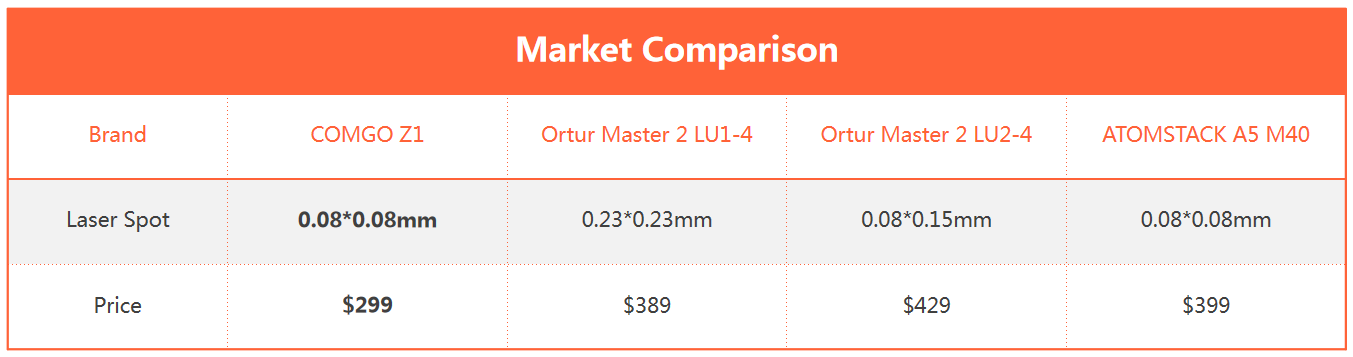
With up to 5000mm/min speed and accuracy of the COMGO Z1 is further enhanced by the use of high-performing dual Y-axis motors which ensure the Y-axis is extremely smooth and mobile, translating to high-speed engraving and increased project stability and accuracy. This great cutting power, accuracy, and support for a broad range of materials place the COMGO Z1 significantly above and beyond other “cheap”, hobbyist engravers (like the Laster Master 2 and AtomStack A5) in its class/price bracket.
The table shows how the COMGO Z1 compares to similar popular laser engravers in terms of speed and price:
Seemingly engineered with the desire to address regular hassles that are experienced when using laser engravers, there are many good things to say about the COMGO Z1. For starters, it features an innovative 20/45mm fixed focus design for setting with an adjustable laser height. The typical unhealthy practice of putting your fingers on the laser to adjust the focus is no longer necessary, as all you need to do is loosen the adjusting screw on the side and place the height block on top of the surface that is going to be engraved. Lower the laser, tighten the screw, and you should be all set. The COMGO Z1 also features a safety anti-tilt system that generates an alarm and interrupts carving/cutting when the bed is not balanced. This helps ensure safety and reduce distortion in cutting or engraving, leading to high-quality outputs. The sensitivity of the sensor can be adjusted to match the requirements/nature of the surface on which the platform is based.
Highlights
Strong Diode Laser: The COMGO Z1 diode laser uses LD+FAC technology that leads to an 80 um laser spot that gives a wide range of possibilities. More powerful laser units are available as an upgrade
Upgrade Unit: While the 5W laser may suit the most daily engraving, the optional 10W high-power laser module, provides engraving to more difficult materials like anodized aluminum alloy, mirrored stainless steel, carbon steel, curved moving pictures, glass, and so much more.
Dual Y-axis Motor: The Y-axis is extremely smooth and accurate thanks to the dual-stepper motor design on both sides.
Fixed Focus: Focus is 20mm for the 5W module and 46mm for the 10W one. To adjust focus you just have to un-tight the laser module screws and place the module close (20mm) from your material (5W version)
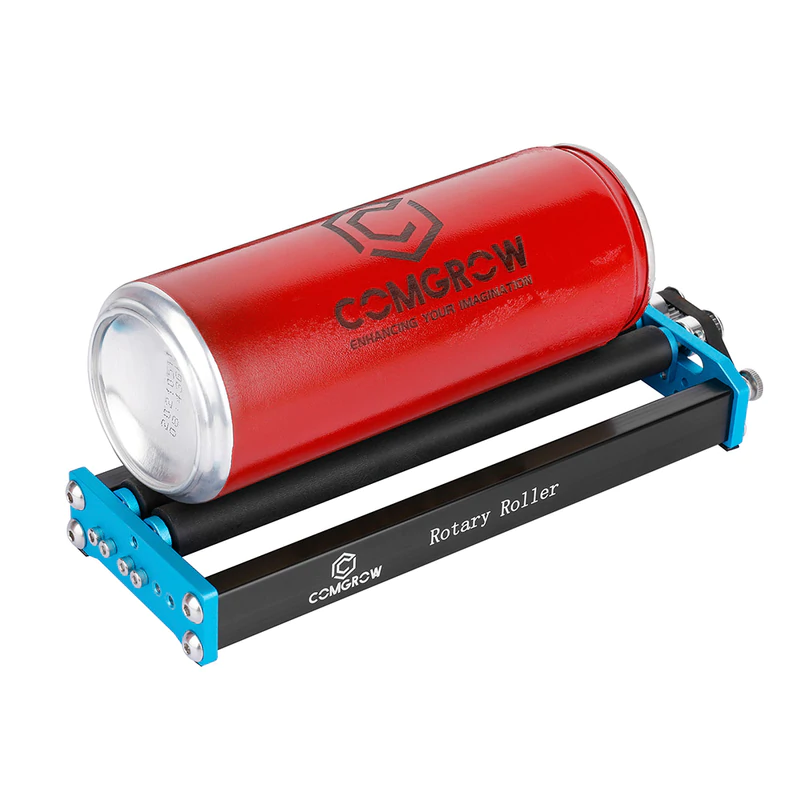
Support Expansion: The device also allows you to upgrade to a rotary roller which is perfect for engraving tumblers and cylindrical objects! It has a stable design for multiple diameters of objects. Spacing between the two rotary axes ranges from 17mm/6.6″ to 33mm 1.2″.
Software
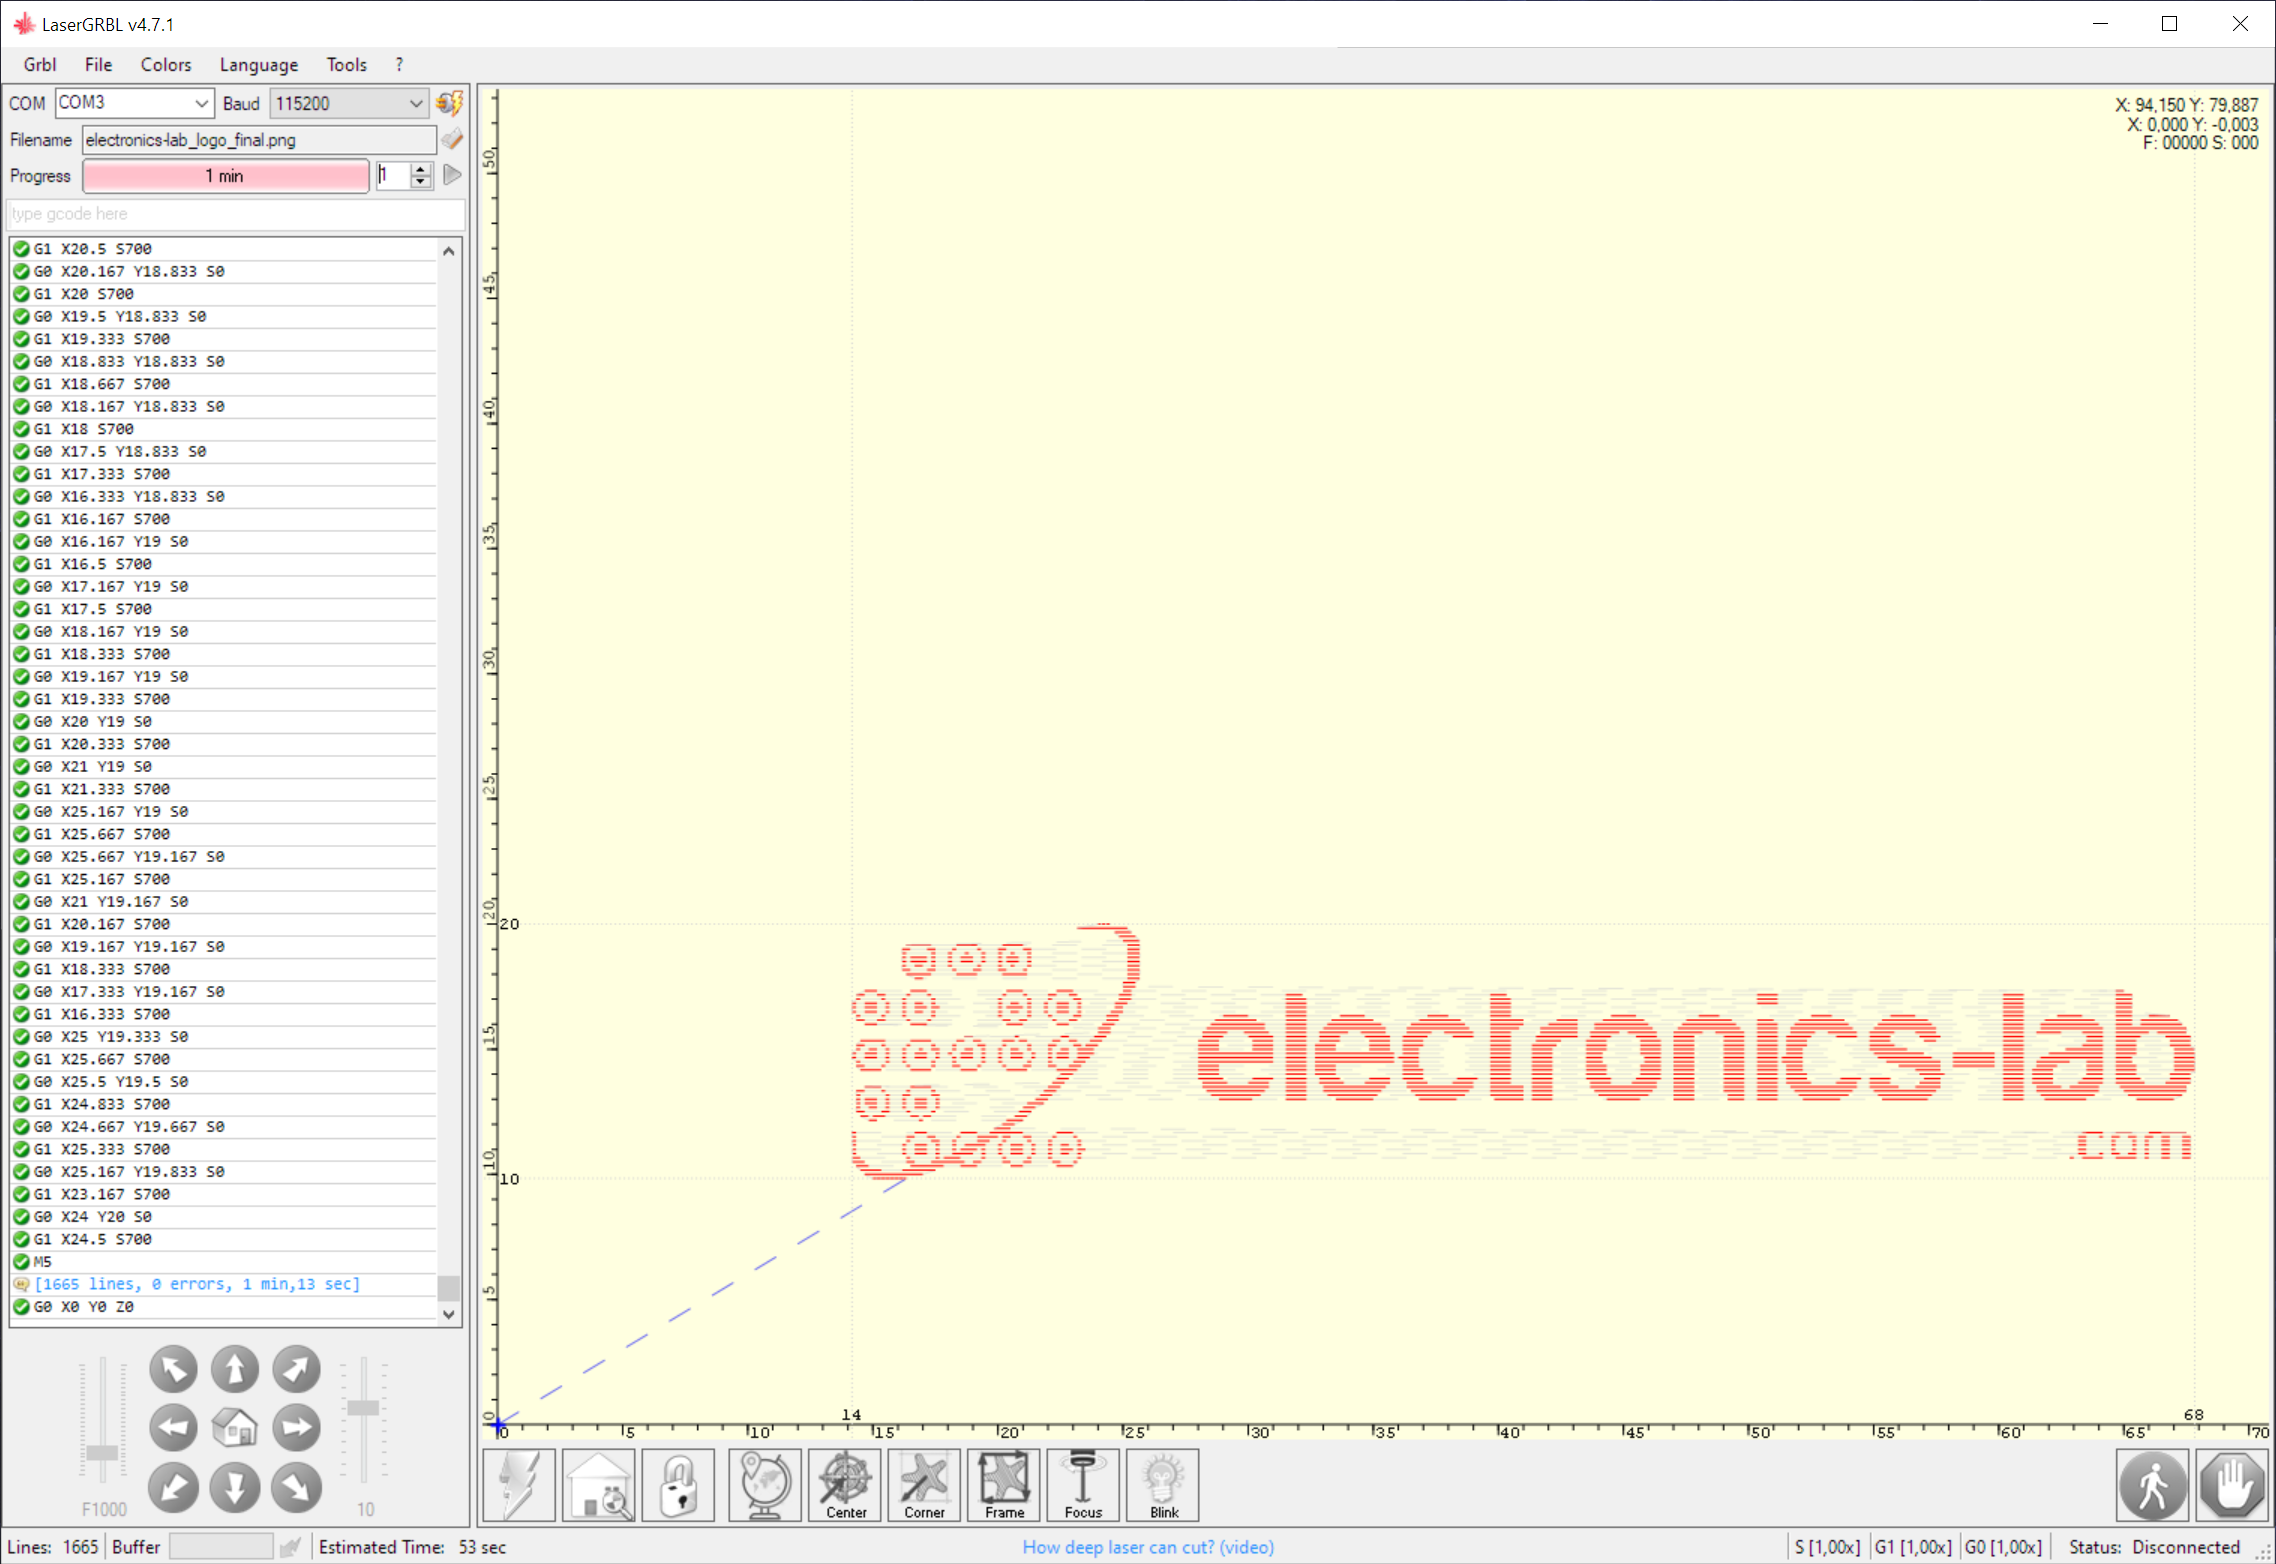
The COMGO Z1 supports both Windows and Mac systems. We will focus on the Windows software proposed in the manual which is the open-source and popular LaserGRBL. This is the basic software that seems to do the job. There are no fancy icons or user interfaces, as you can see on the screenshot above. At the first launch, you will have to go to Tools -> Install CH340 Driver so that the software will be able to communicate with your laser engraver over a USB connection. Then connect the USB cable and power on the device. Please note that in case you have connection issues, it’s advisable to do a firmware update based on the instructions on the attached link. Then click on the connect icon which is located next to the preset Baud Rate of the serial to USB bridge. Baud should be 115200bps.
If everything is fine your engraver should connect to the software and you are ready for your first print. Click the icon below the connect icon and load one of the provided graphics. A popup window will show up with some parameters to set up, then click next and be sure to define the size of the image based on your material to be burned.
You will need to move the laser module to the edge of your material, align the material and click on Define the zero point. Then you are ready to click the Play icon and start the engraving process. You may find yourself that you need to do some tests and trials and errors before you manage to print your first image. It needs some experience to make this work on the first try. Take your time to learn how the software works and be sure you will successfully make your first burn.
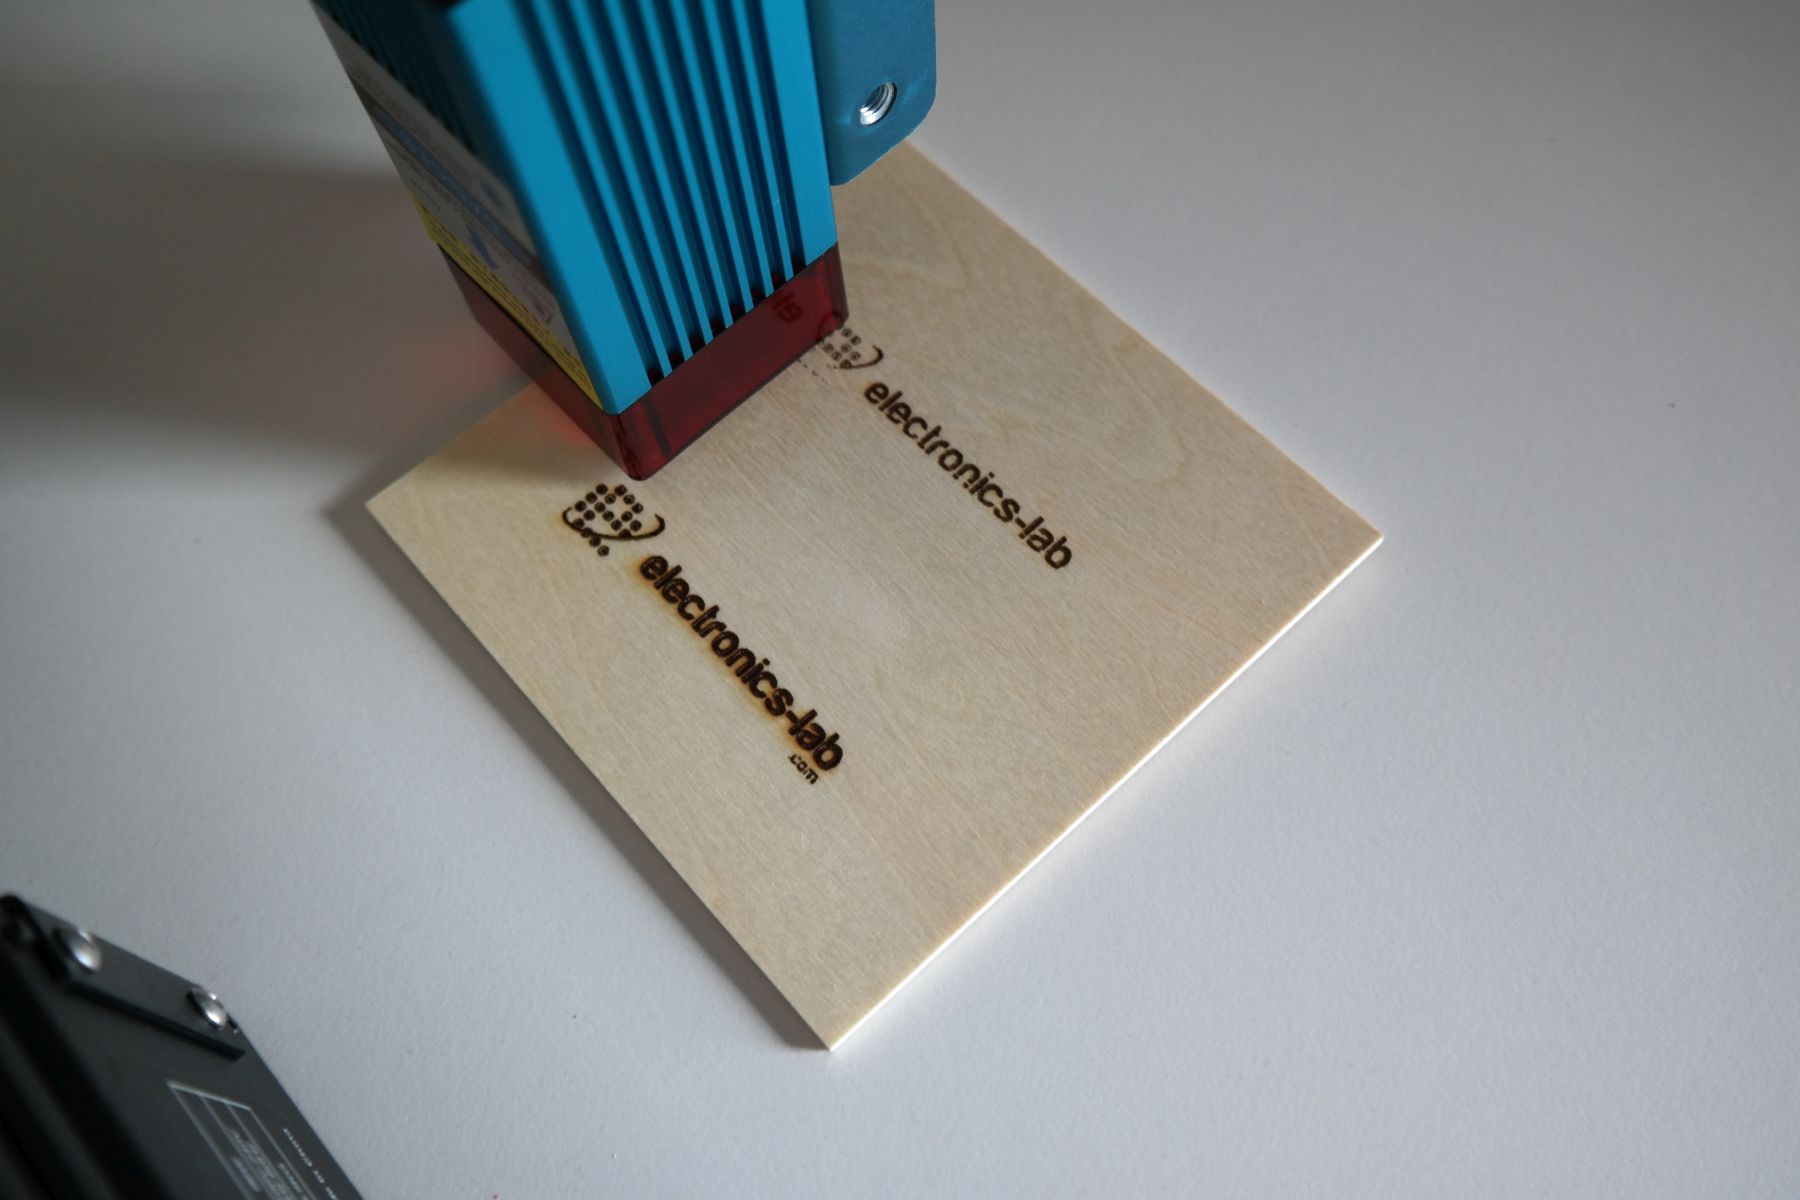
Sample Engraving
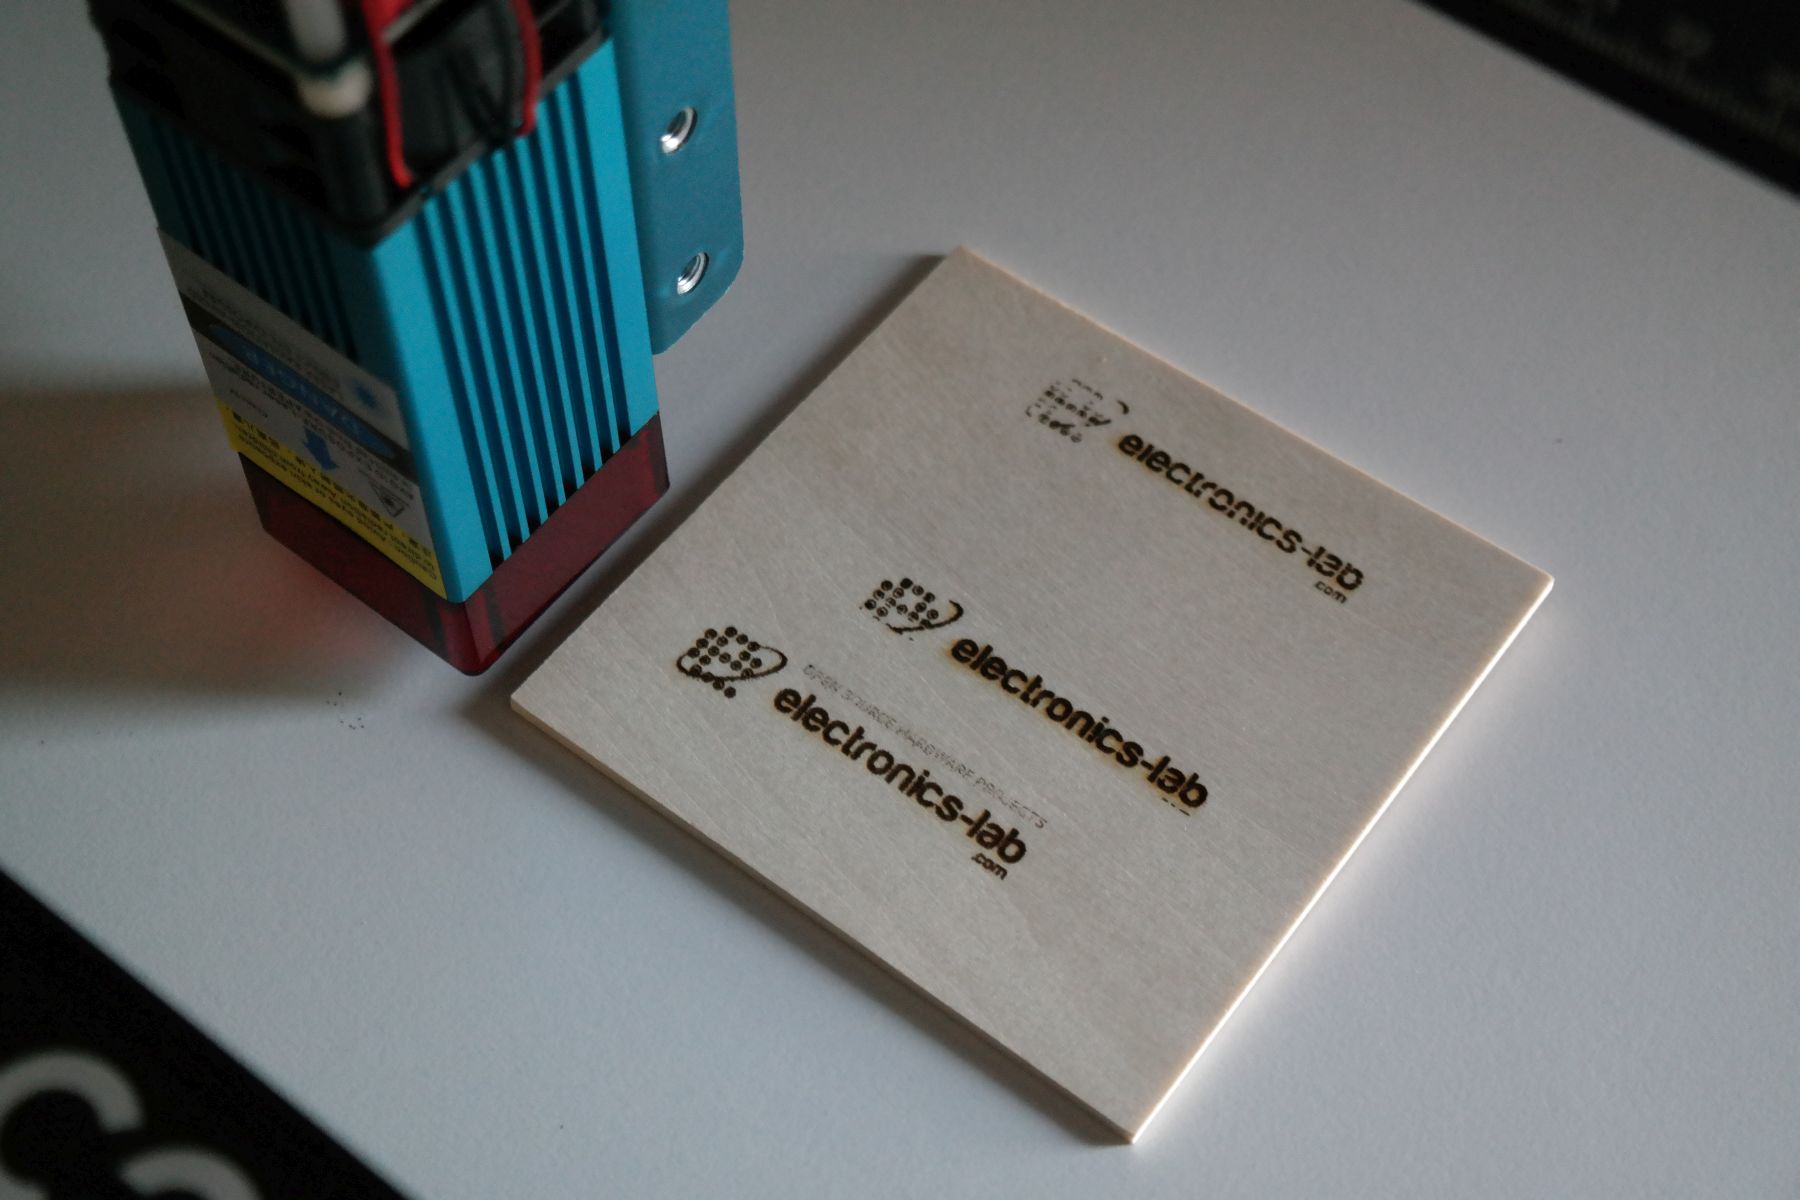
To test the COMGO Z1 Wood Laser Cutter Engraver, we loaded our logo on the LaserGRBL software, set up some parameters on the window opened and then it’s was time to align the material with the zero point. After that, we push the GO button and the engraving started right away. To etch our logo on the small wood piece a few minutes was all that it needed. You will notice that you may need to experiment with the software parameters in order to achieve the best result. One important parameter is laser power. As you can see in the photo below the laser power was to the max and that resulted in an overburn engraving. On the second engraving above we set the laser power to 50% and the letters were etched better but not the logo itself. This means that we need to experiment more with the LaserGRBL software to find the ideal settings.
Video
Upgrades
Another notable thing about the COMGO Z1 is the available upgrades. Thanks to COMGROW’s large ecosystem devices, the capabilities of the Z1 can be further enhanced with a variety of superb upgrades. For example, the 5W laser head can easily be replaced by a 10W version which brings in more cutting and engraving power. Feature upgrades can also be achieved by using add-ons like the COMGROW Laser Rotary Roller Engraving Module which allows users to engrave on/around round and cylindrical objects. as big as the travel size as the Z1.
Conclusion
The COMGO Z1 is a solid machine built from aluminum material and the overall construction is good. The travel speed of the axes is fast enough so you don’t have to wait too much for a task to be accomplished and engraving speed is quite satisfactory considering the overall size of the machine. Regarding the engraving quality, this is strongly dependent on the software parameters your choose. Trial and error are necessary to achieve good results. So take your time to experiment.
Buy
While the standard price is 299USD, the COMGO Z1 is currently available for sale on COMGROW’s website for USD259, at a 13% discount. Shipping is offered from the USA, Europe, and China, so you can select your preferred location.
More
More information on the COMGO Z1 alongside video reviews from other users can be found on the product’s page on COMGROW’s website
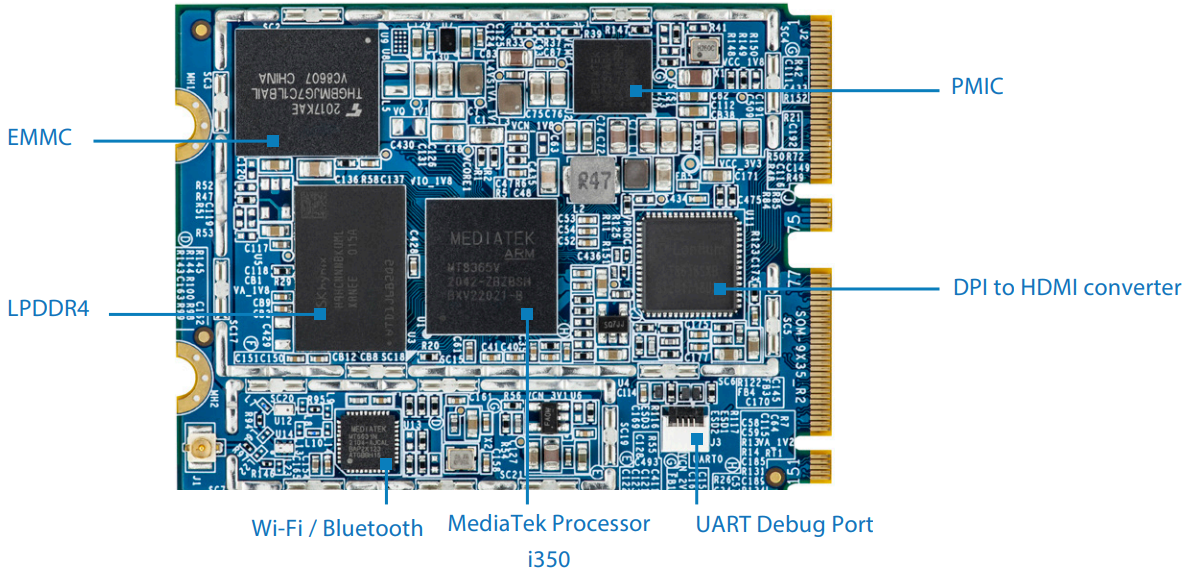
The VIA SOM-9X35 is a low-power quad-core MediaTek i350 based processor board, ideal for IoT solutions and edge AI use cases, like facial recognition, object identification, motion tracking, OCR, and bio-metric measurement. To further accelerate product development time, a VIA SOM-9X35 starter kit has been assembled by the manufacturers themselves.
The kit constitutes of the SOM-9X35 module with max 4GB RAM MediaTek i350 SoC, 16GB eMMC flash, and WiFI 5 + Bluetooth 5.0 wireless module, with VIA VAB-935 3.5-inch carrier board, a 7-inch 1024×600 touch panel display, a 13MP camera module, two speakers and microphone, and accompanying accessories.
Hardware Specifications for VIA SOM09X35 Starter Kit
VIA SOM-9X35 module has a 2.0GHz MediaTek i350 Cortex-A53 quad-core SOC that features an integrated AI processor for deep learning, neural network acceleration, and computer vision applications. Other hardware specifications include system memory 2GB LPDDR4 SDRAM (1GB/4GB optional), 16GB eMMC flash storage, dual-band (2.4GHz & 5GHz ) single-stream Wi-Fi 5 802.11 and Bluetooth 5.0 connectivity, on-module USB to UART connector for debugging, 3.4 to 4.2V DC-in supply voltage and temperature range of –40°C ~ 85°C.
The dimensions of the VIA SOM-9X35 module are 60 x 45 x 6.8mm with a two-side heat spreader.
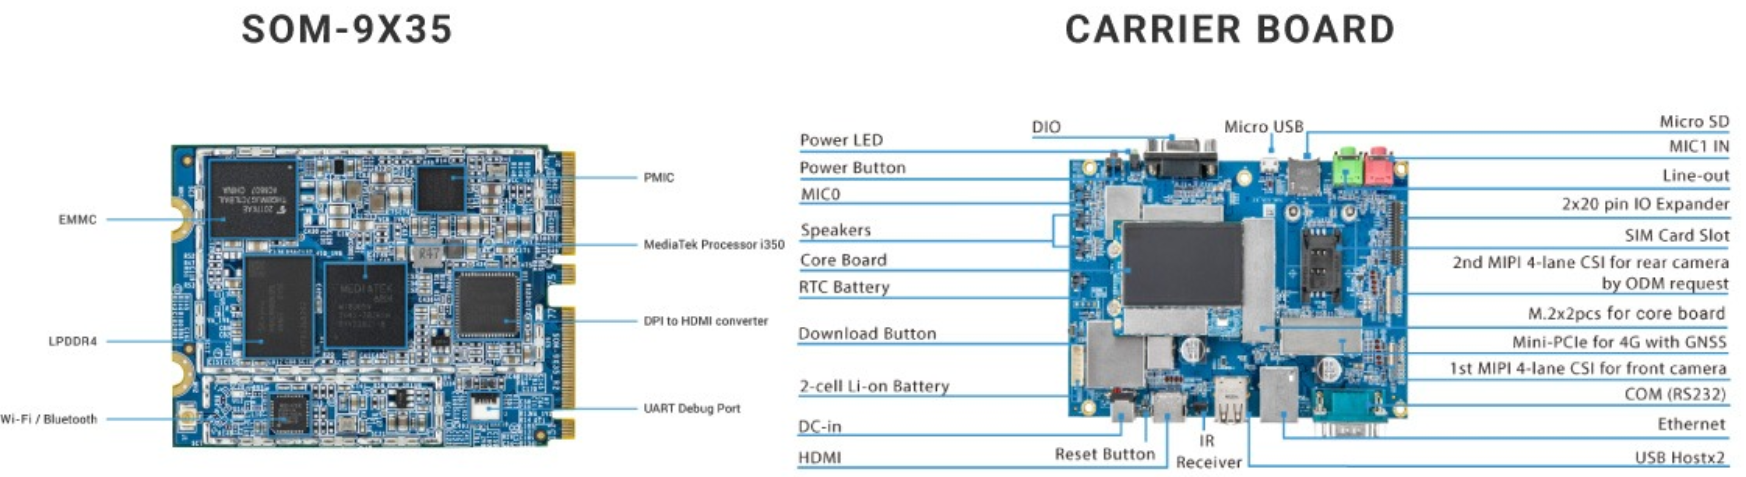
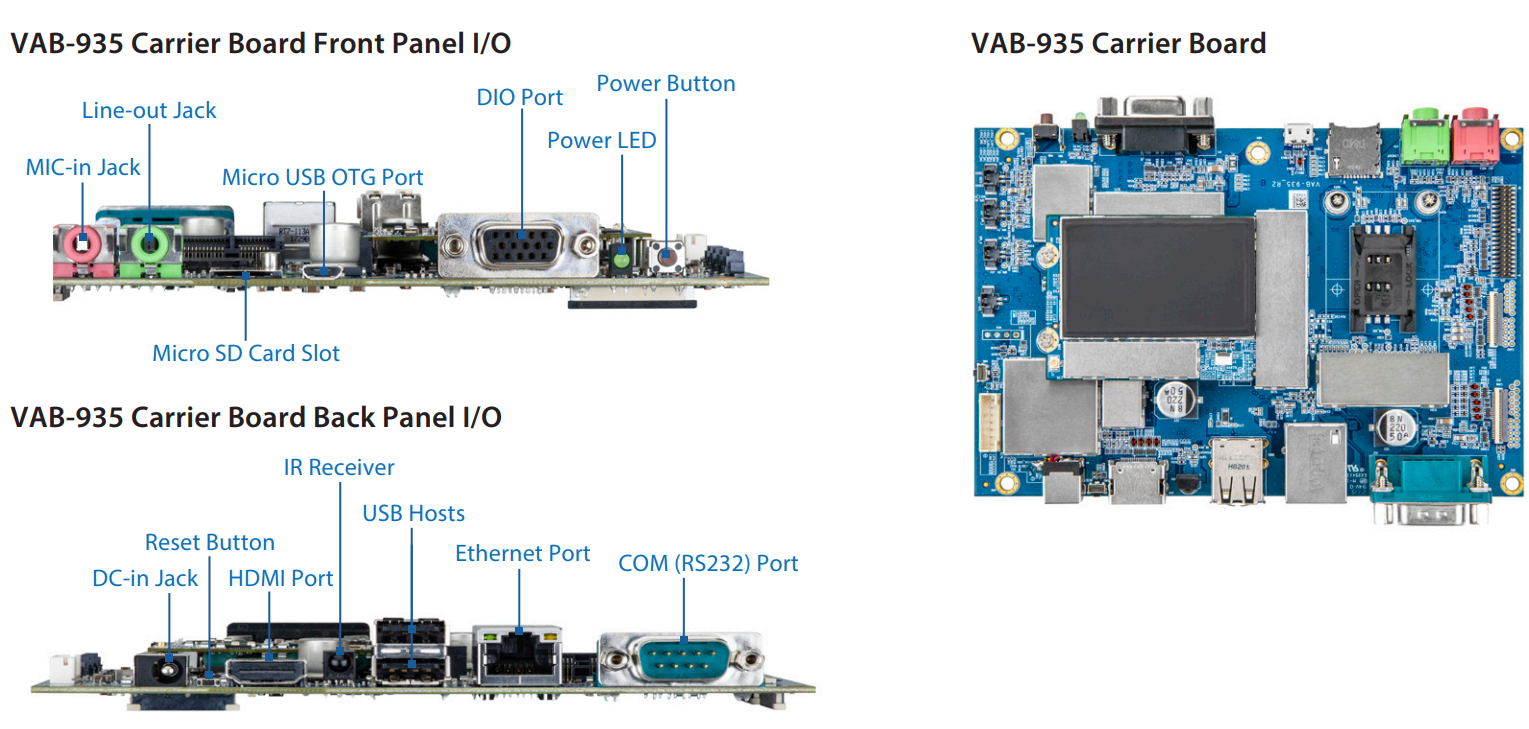
VAB-935 Carrier Board
Apart from the SoC, the starter kit also has a VAB-935 carrier board, which houses application-specific interfaces such as USB, Ethernet, UART, HDMI, etc. The carrier board connects with the SoM via standard connectors.
VAB-935 board has MicroSD card socket storage, front HDMI 1.4 port and back 4-lane MIPI DSI interface video output, built-in microphone audio, 3.5mm microphone jack, 3.5mm Line Out jack and speaker headers, MIPI CSI connector as a camera interface, 10/100M Ethernet RJ45 port and Mini PCIe socket + SIM card socket for 4G with GNSS for networking, 2x USB host ports, 1x Micro USB 2.0 OTG port and RS-232 DB9 connector. For connection to the SOM, the VAB-935 carrier board has 40-pin GPIO header with 16x GPIO, I2C, SPI, 2x PWN, ADC and DIO port. It also provides basic utility and board status features like power LED, power, reset and download button, RTC battery and IR receiver.
The benefit of the starter kit is that when VIA SOM-9X35 is combined with the VAB-935 carrier board, it provides a wealth of display and camera integration options, including HDMI, MIPI DSI, and MIPI CSI support and flexible network connectivity.
Other Tools in Starter Kit
Some additional tools provided with the VIA SOM-9X35 Starter Kit are a 7-inch1024×600 MIPI LCD touch panel display, a 13MP camera module and two speakers and one microphone for audio enhancement. As far as programming is concerned, the starter kit supports Android 10 or Linux via a Yocto Project 3.1-based SDK.
To know more about the VIA SOM-9X35 starter kit, please visit product page.
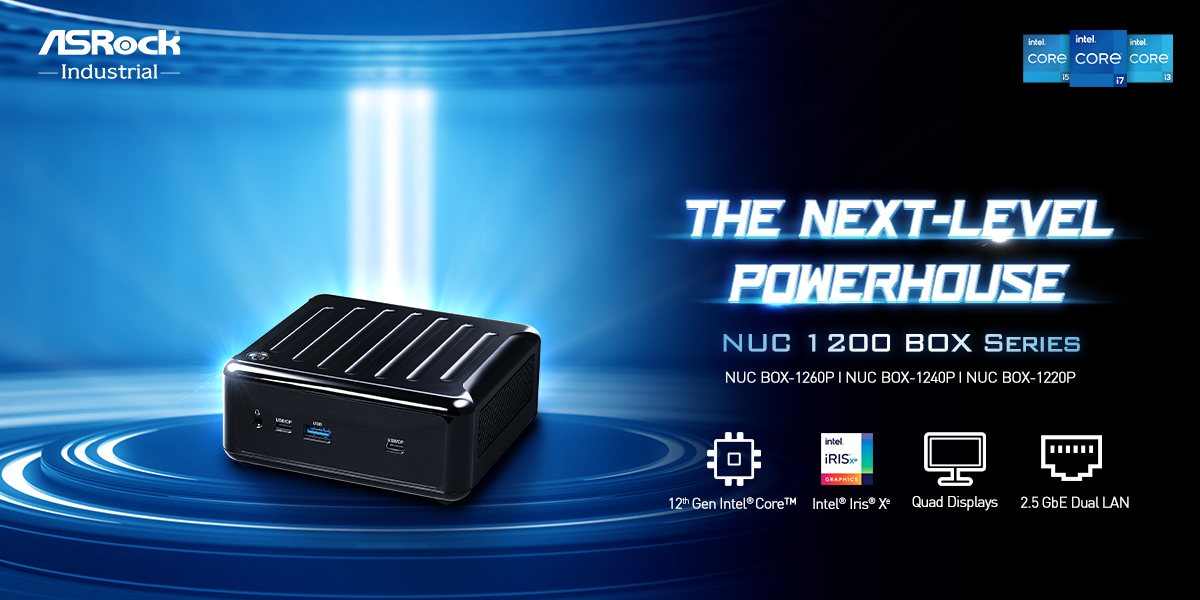
ASRock Industrial launched NUC 1200 BOX Series Mini PCs and NUC 1200 Motherboard Series, the next-level Powerhouse taking evolutionary leaps with 12th Gen Intel® Core™ Processors (Alder Lake-P). The new performance hybrid architecture offers fantastic performance and responsiveness with Intel® Iris® Xe’s enhanced graphics/media/display, 4K quad displays, 2.5GbE dual LAN, Wi-Fi 6E, and rich IOs connectivity for gaming, multi-tasking, home-office productivity boost, content creator demand, business, and AI BOX applications.
The Powerhouse with 12th Gen Intel® CoreforEvolutionary Performance
NUC 1200 BOX Series Mini PCs- NUC BOX-1260P/ NUC BOX-1240P/ NUC BOX-1220P powered by the latest 12th Gen Intel® Core™ i7/i5/i3 Processors (Alder Lake-P) pushes for evolutionary leaps in a compact casing- 110.0 x 117.5 x 47.85mm(WxDxH). The performance hybrid architecture is a novel combination of Performance-cores (P-cores) maximizing single-thread performance and Efficient–cores (E-cores) built for multitasking to deliver upgraded performance and responsiveness with intelligent Intel® Thread Director. Featuring Intel® Iris® Xe Graphics, up to 96 EUs combined with AI enablement and dual DDR4 3200 MHz memory up to 64GB, the NUC 1200 BOX Series also provides accelerated AI inference and highly scalable graphics/ media/ display engine all in one go.
Rich I/Os and Phenomenal Connectivity
The NUC 1200 BOX Series provides two Intel® 2.5 GbE LANs and one M.2 (Key E) for Intel® Wi-Fi 6E and BT 5.2 to accelerate data transmission with minimal latency, ensuring unencumbered speed in the new 6GHz spectrum. Outstanding graphics and videos are supported by quad displays in 4K resolution through one HDMI 2.0b and three DP 1.4a over two Type C. The Series also supports stunning 8K UHD through DP 1.4a for immersive visuals experience along with five USB 3.2 Gen2 ports and one audio jack for phenomenal connectivity. There is dual storage capacity with one M.2 Key M, 2242/2260/2280, and 2.5-inch SATA3 HDD/SSD tray support. Additional design of 12~19V DC-in allows for flexibility of inconsistent power input, with small fan curve lowering acoustic and TPM 2.0 for enhanced data protection through hardware-based security in support of Windows 11 upgrade. The NUC 1200 BOX Series is perfect for applications in gaming, home theater, intense office work demand, business, and retail solutions.
There’s More! NUC 1200 Motherboard Series
Supported by 12th Gen Intel® Core™ i7/i5/i3/Celeron Processors (Alder Lake-P), ASRock Industrial also introduces NUC 1200 Motherboard selections- NUC-1265UE/ NUC-1245UE/ NUC-1215UE/ NUC-1255U/ NUC-1235U/ NUC-1215U/ NUC-7305. Exciting key features include two Intel® 2.5 Gigabit LANs, WiFi-6E for faster file transfer, lower latency, and effortless high-quality video streaming under 4K quad displays through one HDMI 2.0b and three DP 1.4a with two from Type C. The Series also supports stunning 8K UHD via DP 1.4a for an outstanding visual experience. Excellent connectivity and expansions are provided through support for six USB 3.2 Gen2, two USB 2.0, one COM (RS-232/ RS-422/ RS-485), one M.2 Key E, and dual storage support with M.2 Key M and SATA 3 to optimize overall capacity. Moreover, there is a 12~19V DC-in design for flexibility under inconsistent power input, with TPM 2.0 onboard for hardware-based security. The Series can bring next-level retail solutions such as digital signage, kiosk, and POS, plus enhanced gaming experience and office boost on PCs.
The NUC 1200 BOX Series and NUC 1200 Motherboard Series powered by the latest 12th Gen Intel® Core™ are the exciting new Next-level Powerhouse, bringing you upgraded key features for a wide array of application capabilities. For a generational leap in performance and multitasking, let us aim for limitless realms!
For more product information please visit our website:
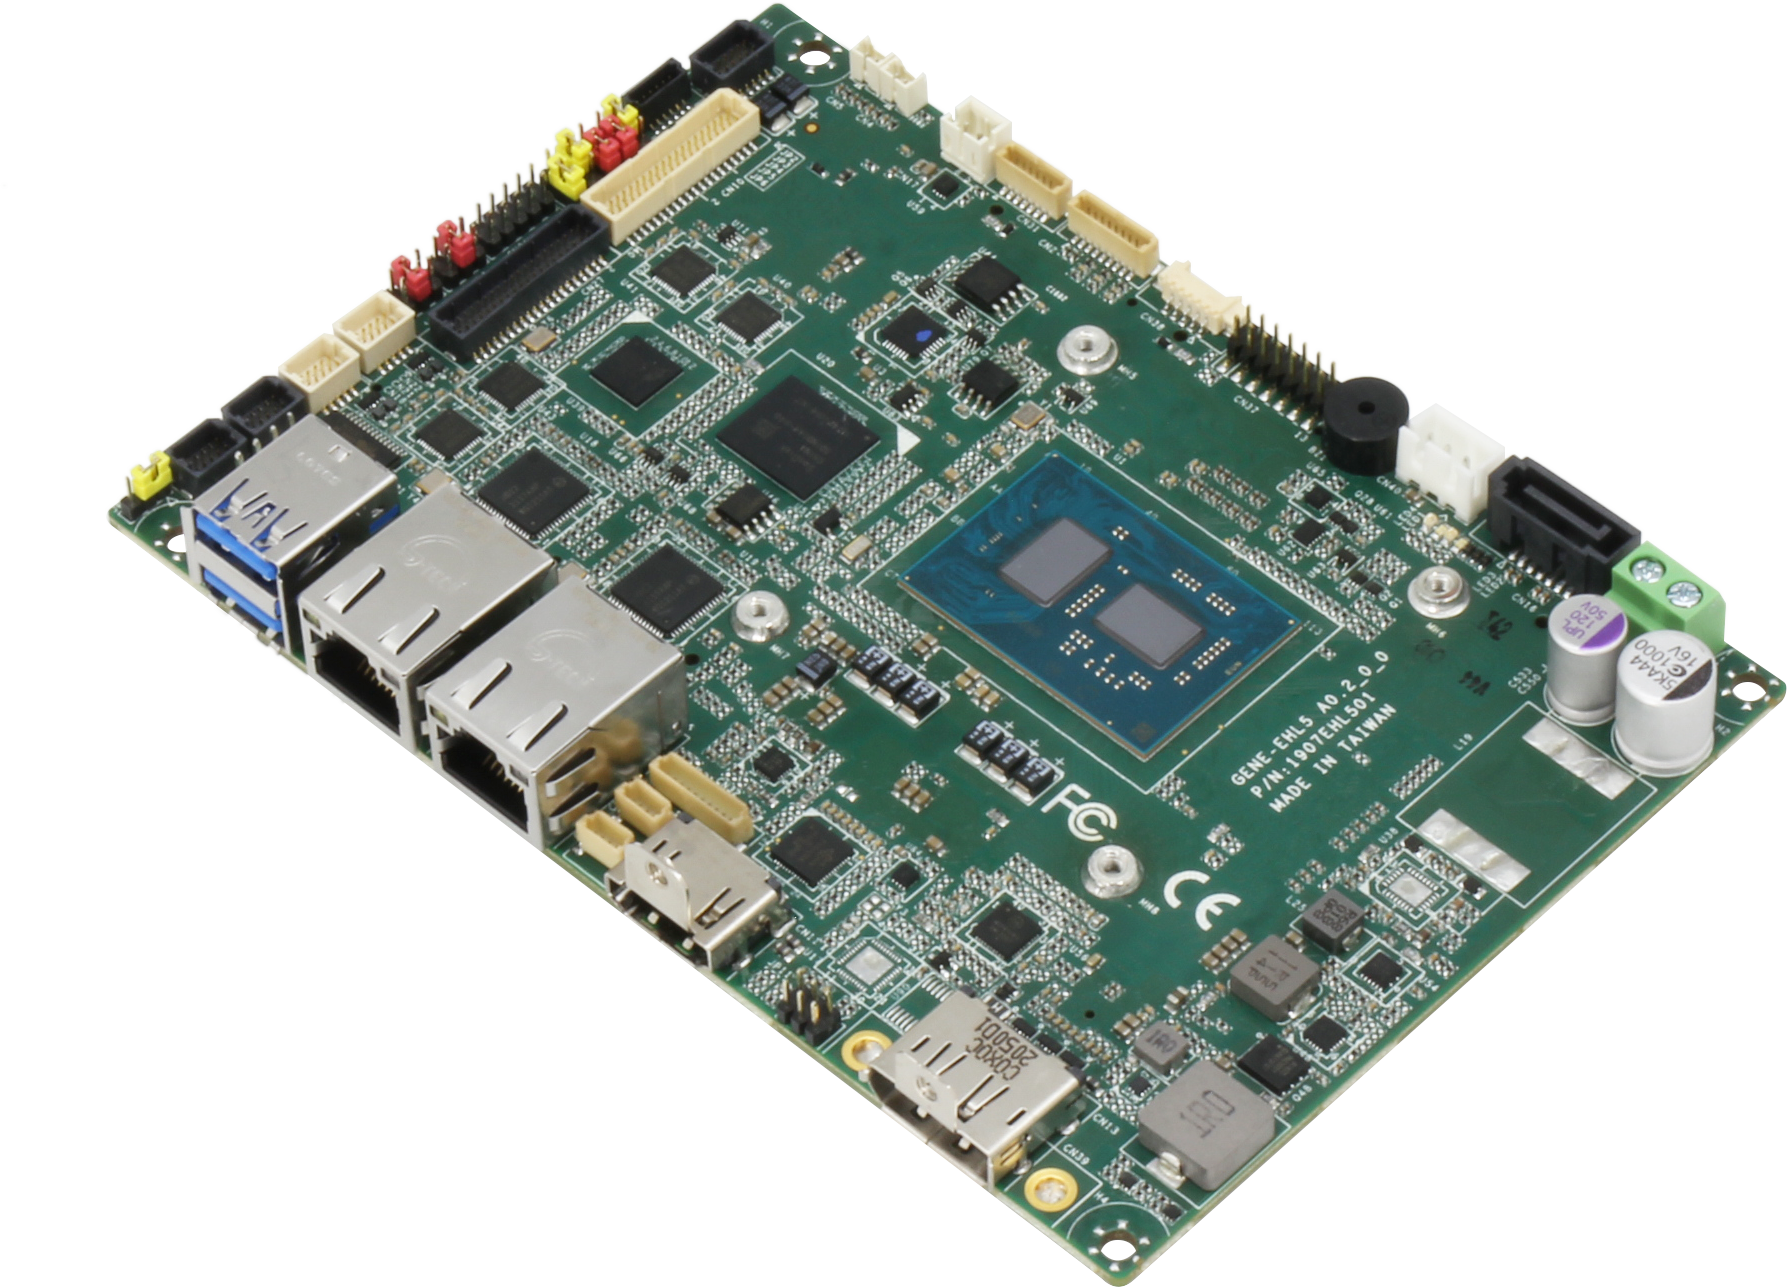
AAEON Introduces GENE-EHL5, a newly added 3.5” Subcompact Board Powered by Intel® Atom™ x6000E Series, Pentium® and Celeron® N and J series Processors to Empower Your Edge IoT
To accelerate edge IoT deployments for clients, AAEON has announced its introduction of GENE-EHL5, a newly added 3.5” Subcompact Board Powered by Intel® Atom™ x6000E Series, Pentium® and Celeron® N and J series Processors (formerly Elkhart Lake) for performance optimizations and enhanced system integration. GENE-EHL5 delivers up to 40% greater performance than previous generation platforms and comes with revolutionary board design which provides four M.2 expansion slots, doubling the previous generations. The revolutionary expansion design further strengthens scalability in time-to-market deployments
With Intel® Atom™ x6000E Series, Pentium® and Celeron® N and J series processors (formerly Elkhart Lake) on board, GENE-EHL5 delivers up to 40% greater performance than previous generation platforms upgrades than previous generation platforms, particularly in single-thread performances, multi-thread performances and graphical capabilities to meet the next-generation edge IoT requirements.
For optimal scalability in edge AIoT applications, the revolutionary board design of GENE-EHL5 offers four M.2 slots for wireless connectivity and NVMe modules, doubling our previous generations and most competing subcompact boards in the market, and one of the four M.2 sockets of GENE-EHL5 supports 5G network module for 5G MEC applications. In addition, GENE-EHL5 also comes with a nano SIM card slot that can support 5G SIM card, to further 5G connectivity in real-world deployments. Regarding wired connectivity, GENE-EHL5 is designed with dual Intel® i210 GbE Ethernet controllers to offer industrial-grade LAN connectivity for embedded applications.
To shorten the time-to-market deployment, GENE-EHL5 offers customizable display configurations with one HDMI 2.0 port plus one VGA or DP 1.4 port and one eDP or LVDS port by options. In addition, GENE-EHL5 supports up to 3 simultaneous displays for vision-intensive applications. The internal eMMC, touch controller and TPM offer an integrated solution to shorten the design-in process.
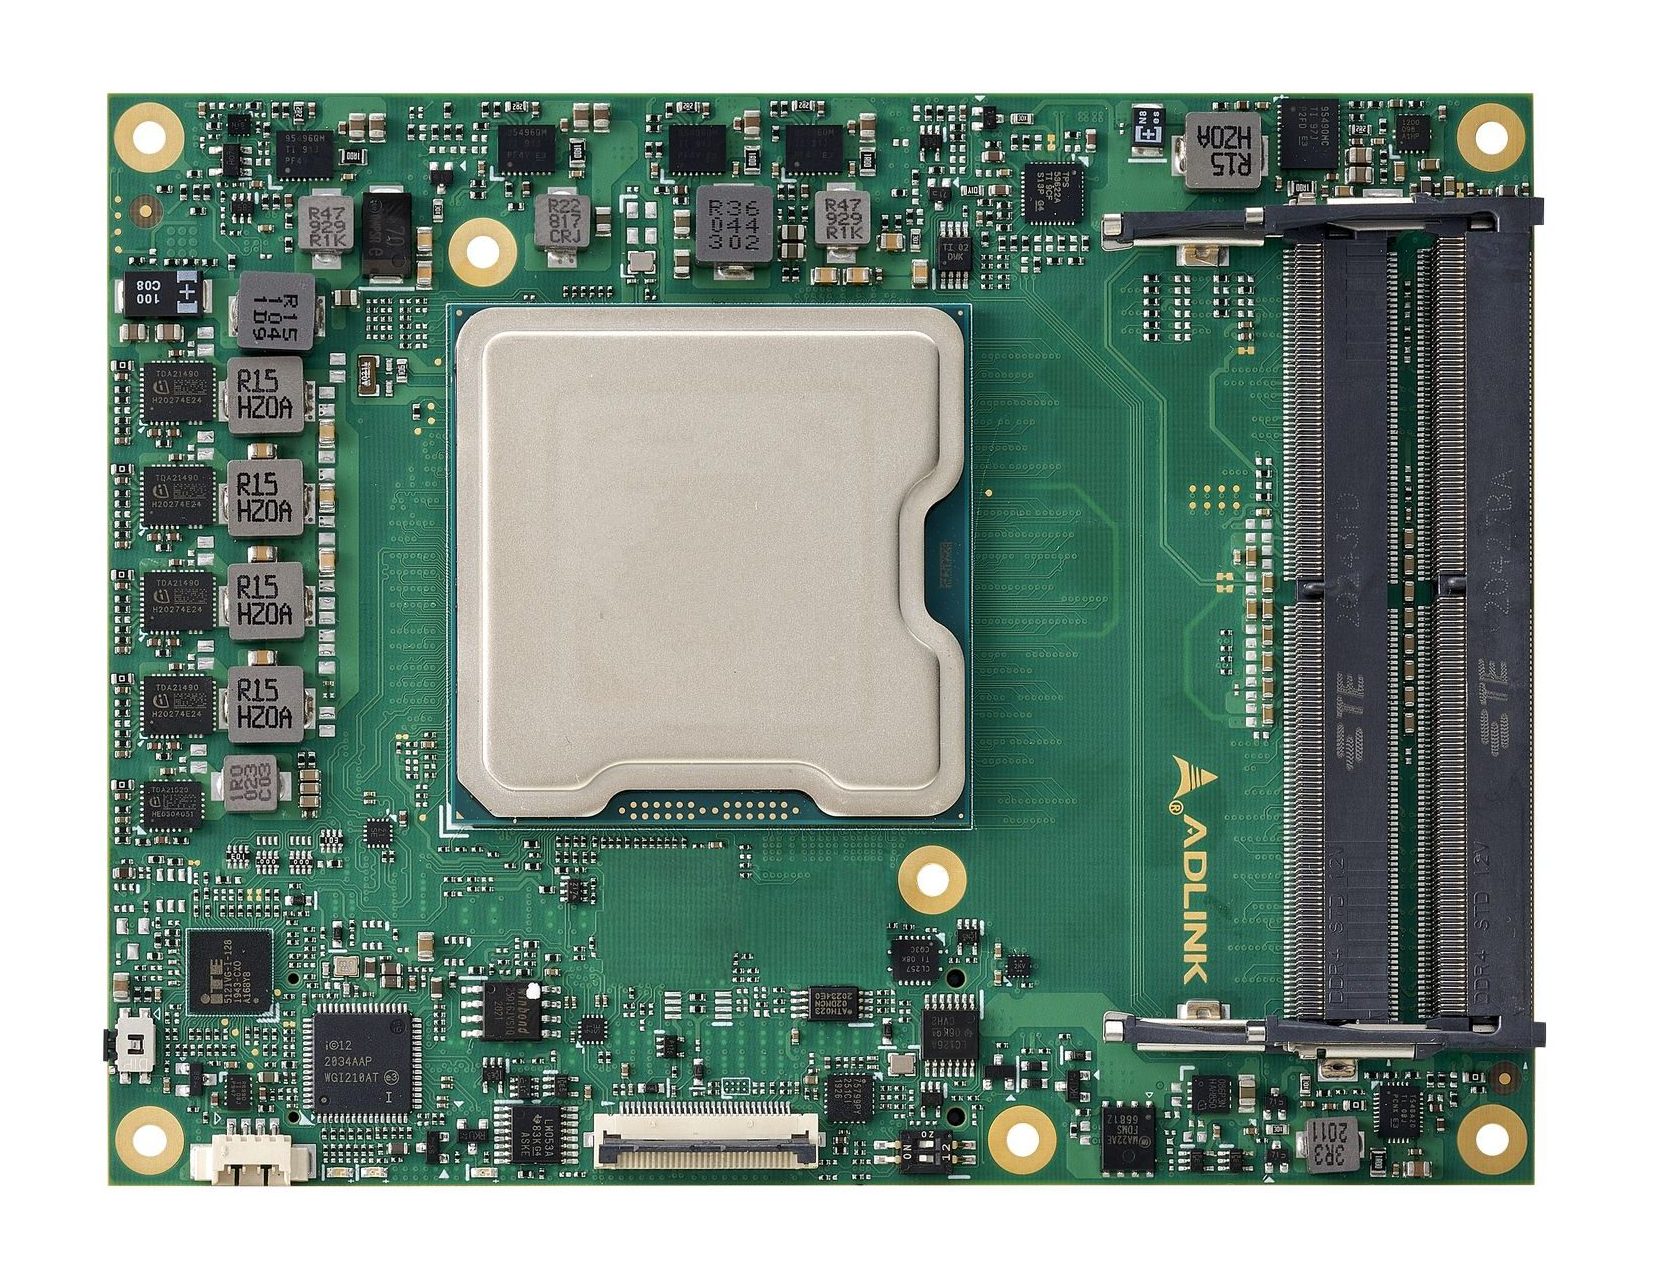
ADLINK’s new COM-HPC Server Type and COM Express Type 7 Modules boost real-time computing with integrated high-speed Ethernet and industrial-grade reliability & longevity
ADLINK Technology Inc., a global leader in edge computing, introduces its latest Intel® Xeon® D-based Computer-on-Modules (COMs), available in two form factors – COM-HPC Server Type and COM Express Type 7. Powered by Intel® Xeon® D-2700 and D-1700 series processors (Codename: Ice Lake-D), these ADLINK COMs feature integrated high speed Ethernet, up to 8x 10G or above with up to 32 PCIe Gen4 lanes, and cutting-edge AI acceleration, while exhibiting extended temperature ratings for embedded and rugged applications.
“Their integrated high-speed Ethernet significantly reduces the complexity and time required in design and development processes,” says Alex Wang, Senior Product Manager – Module Product Center, ADLINK. “With industrial-grade reliability and extended temperature range make these modules especially suitable for mission-critical edge applications,” he adds.
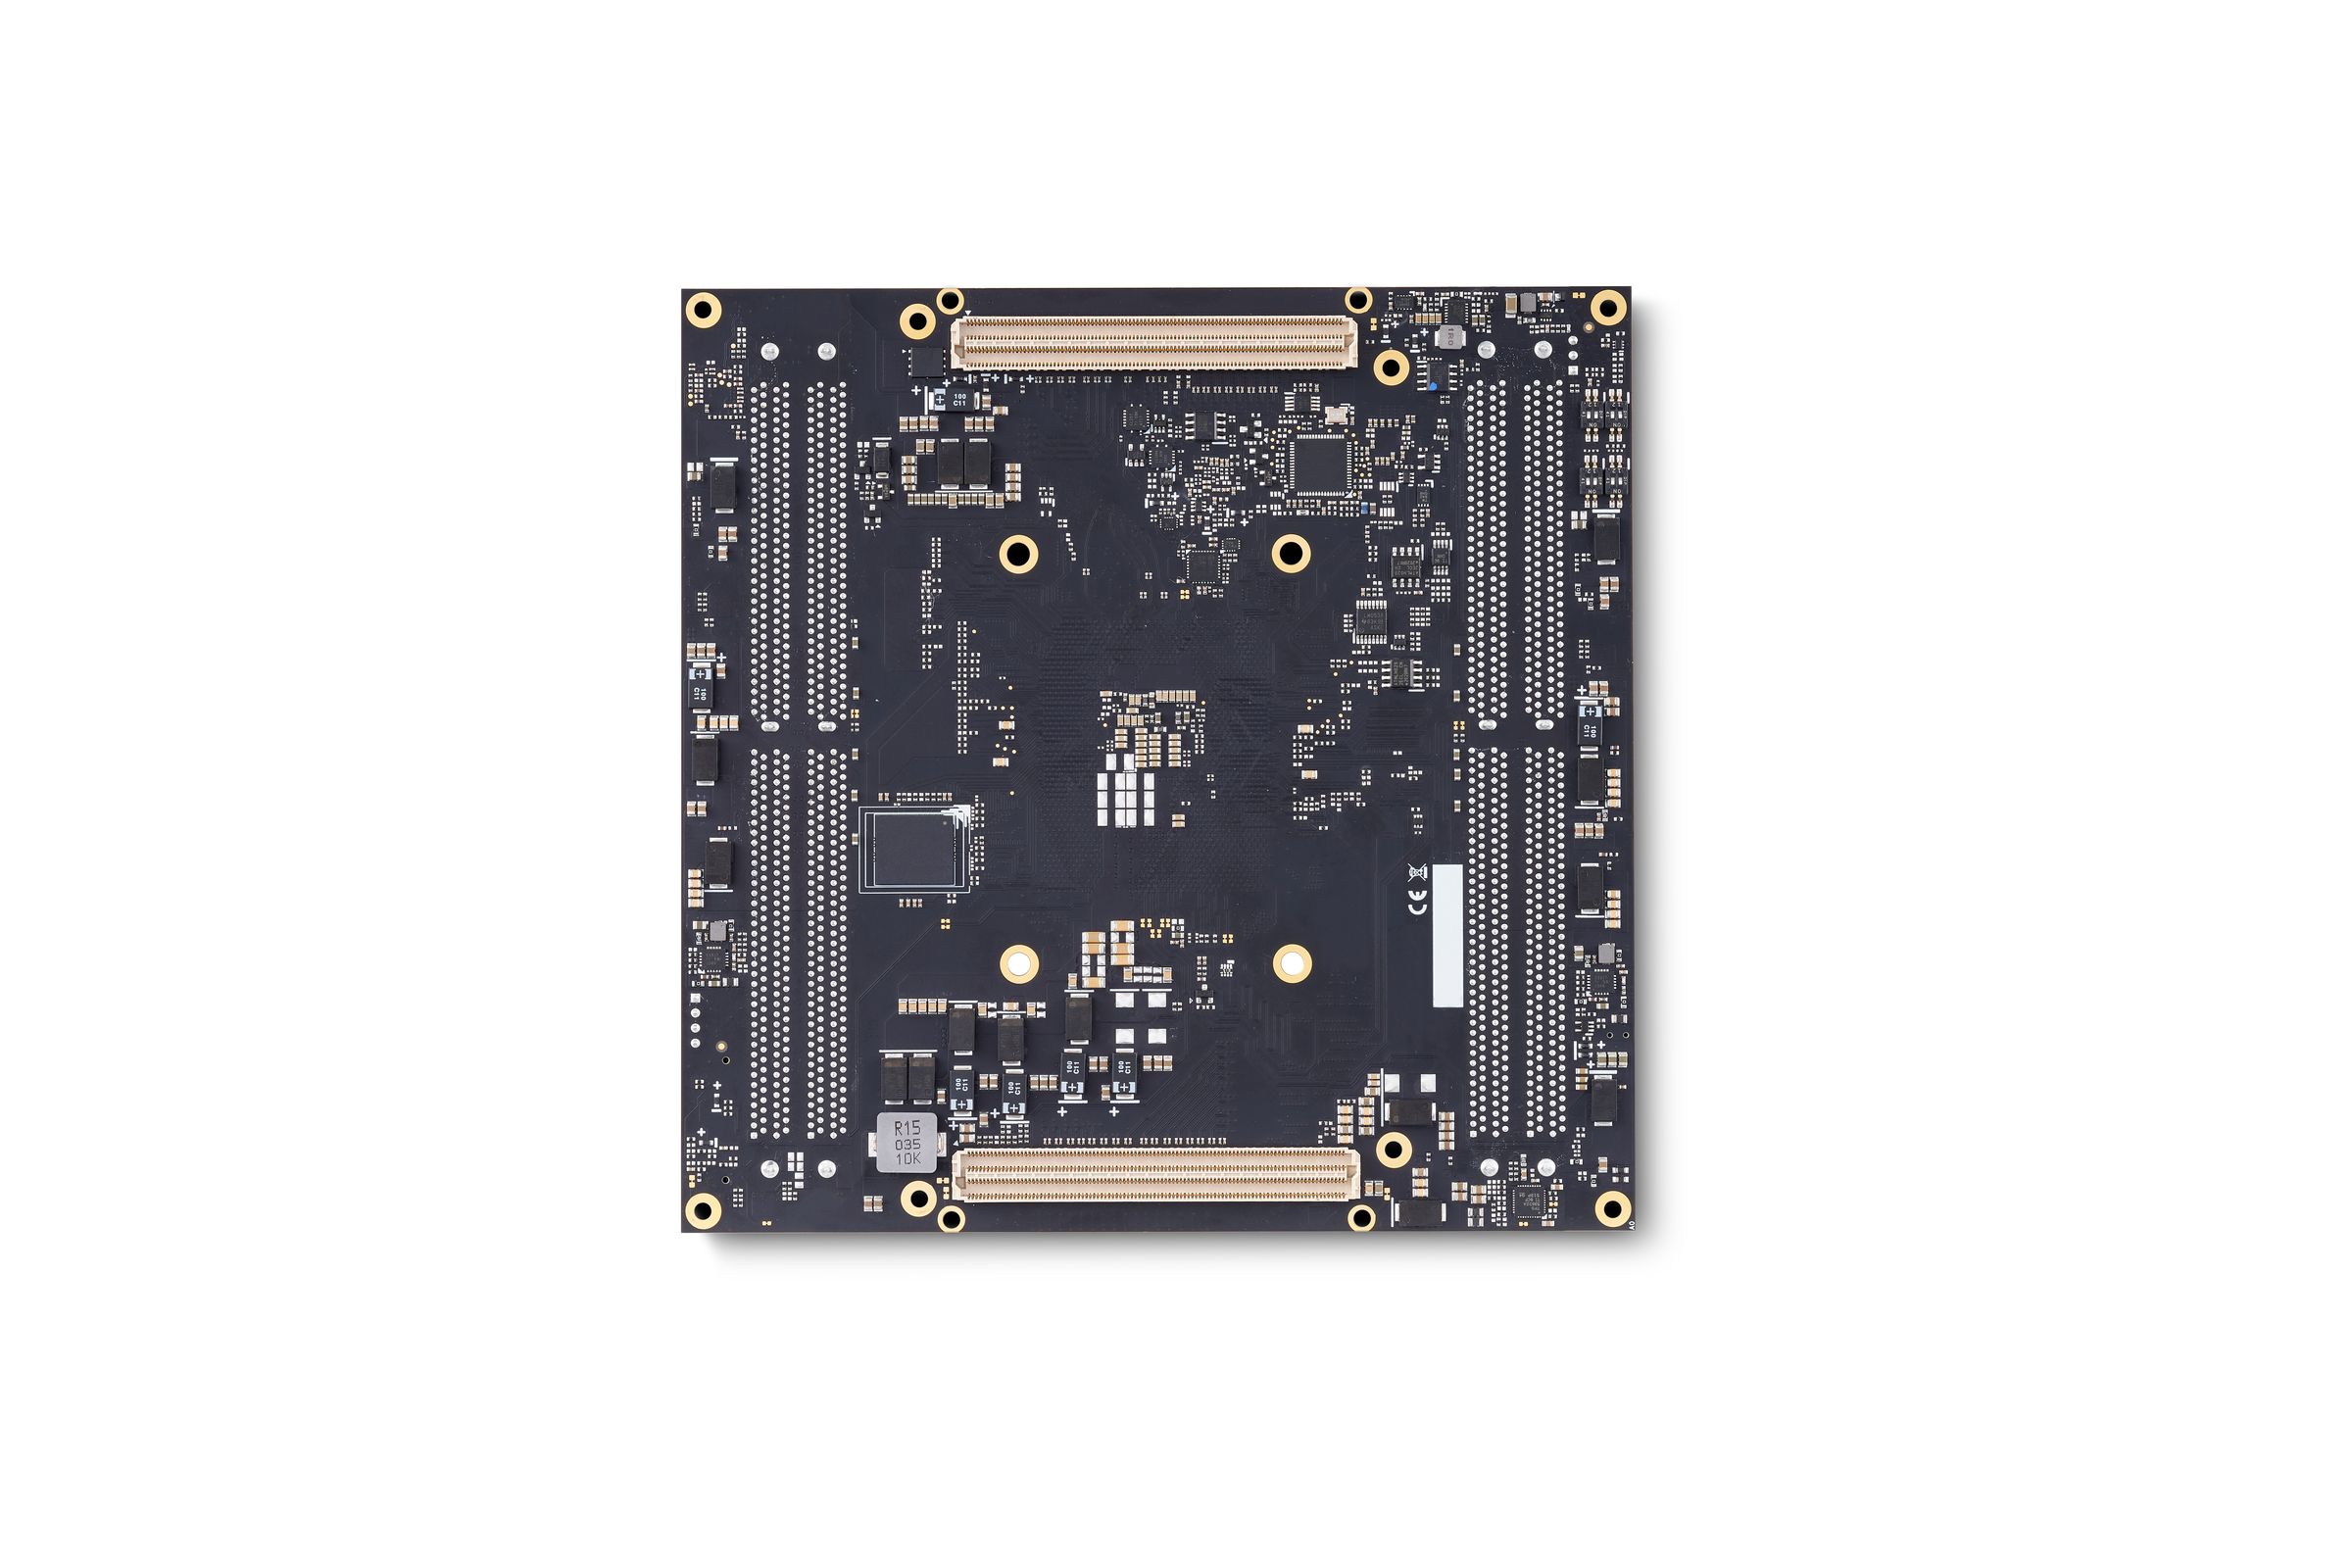
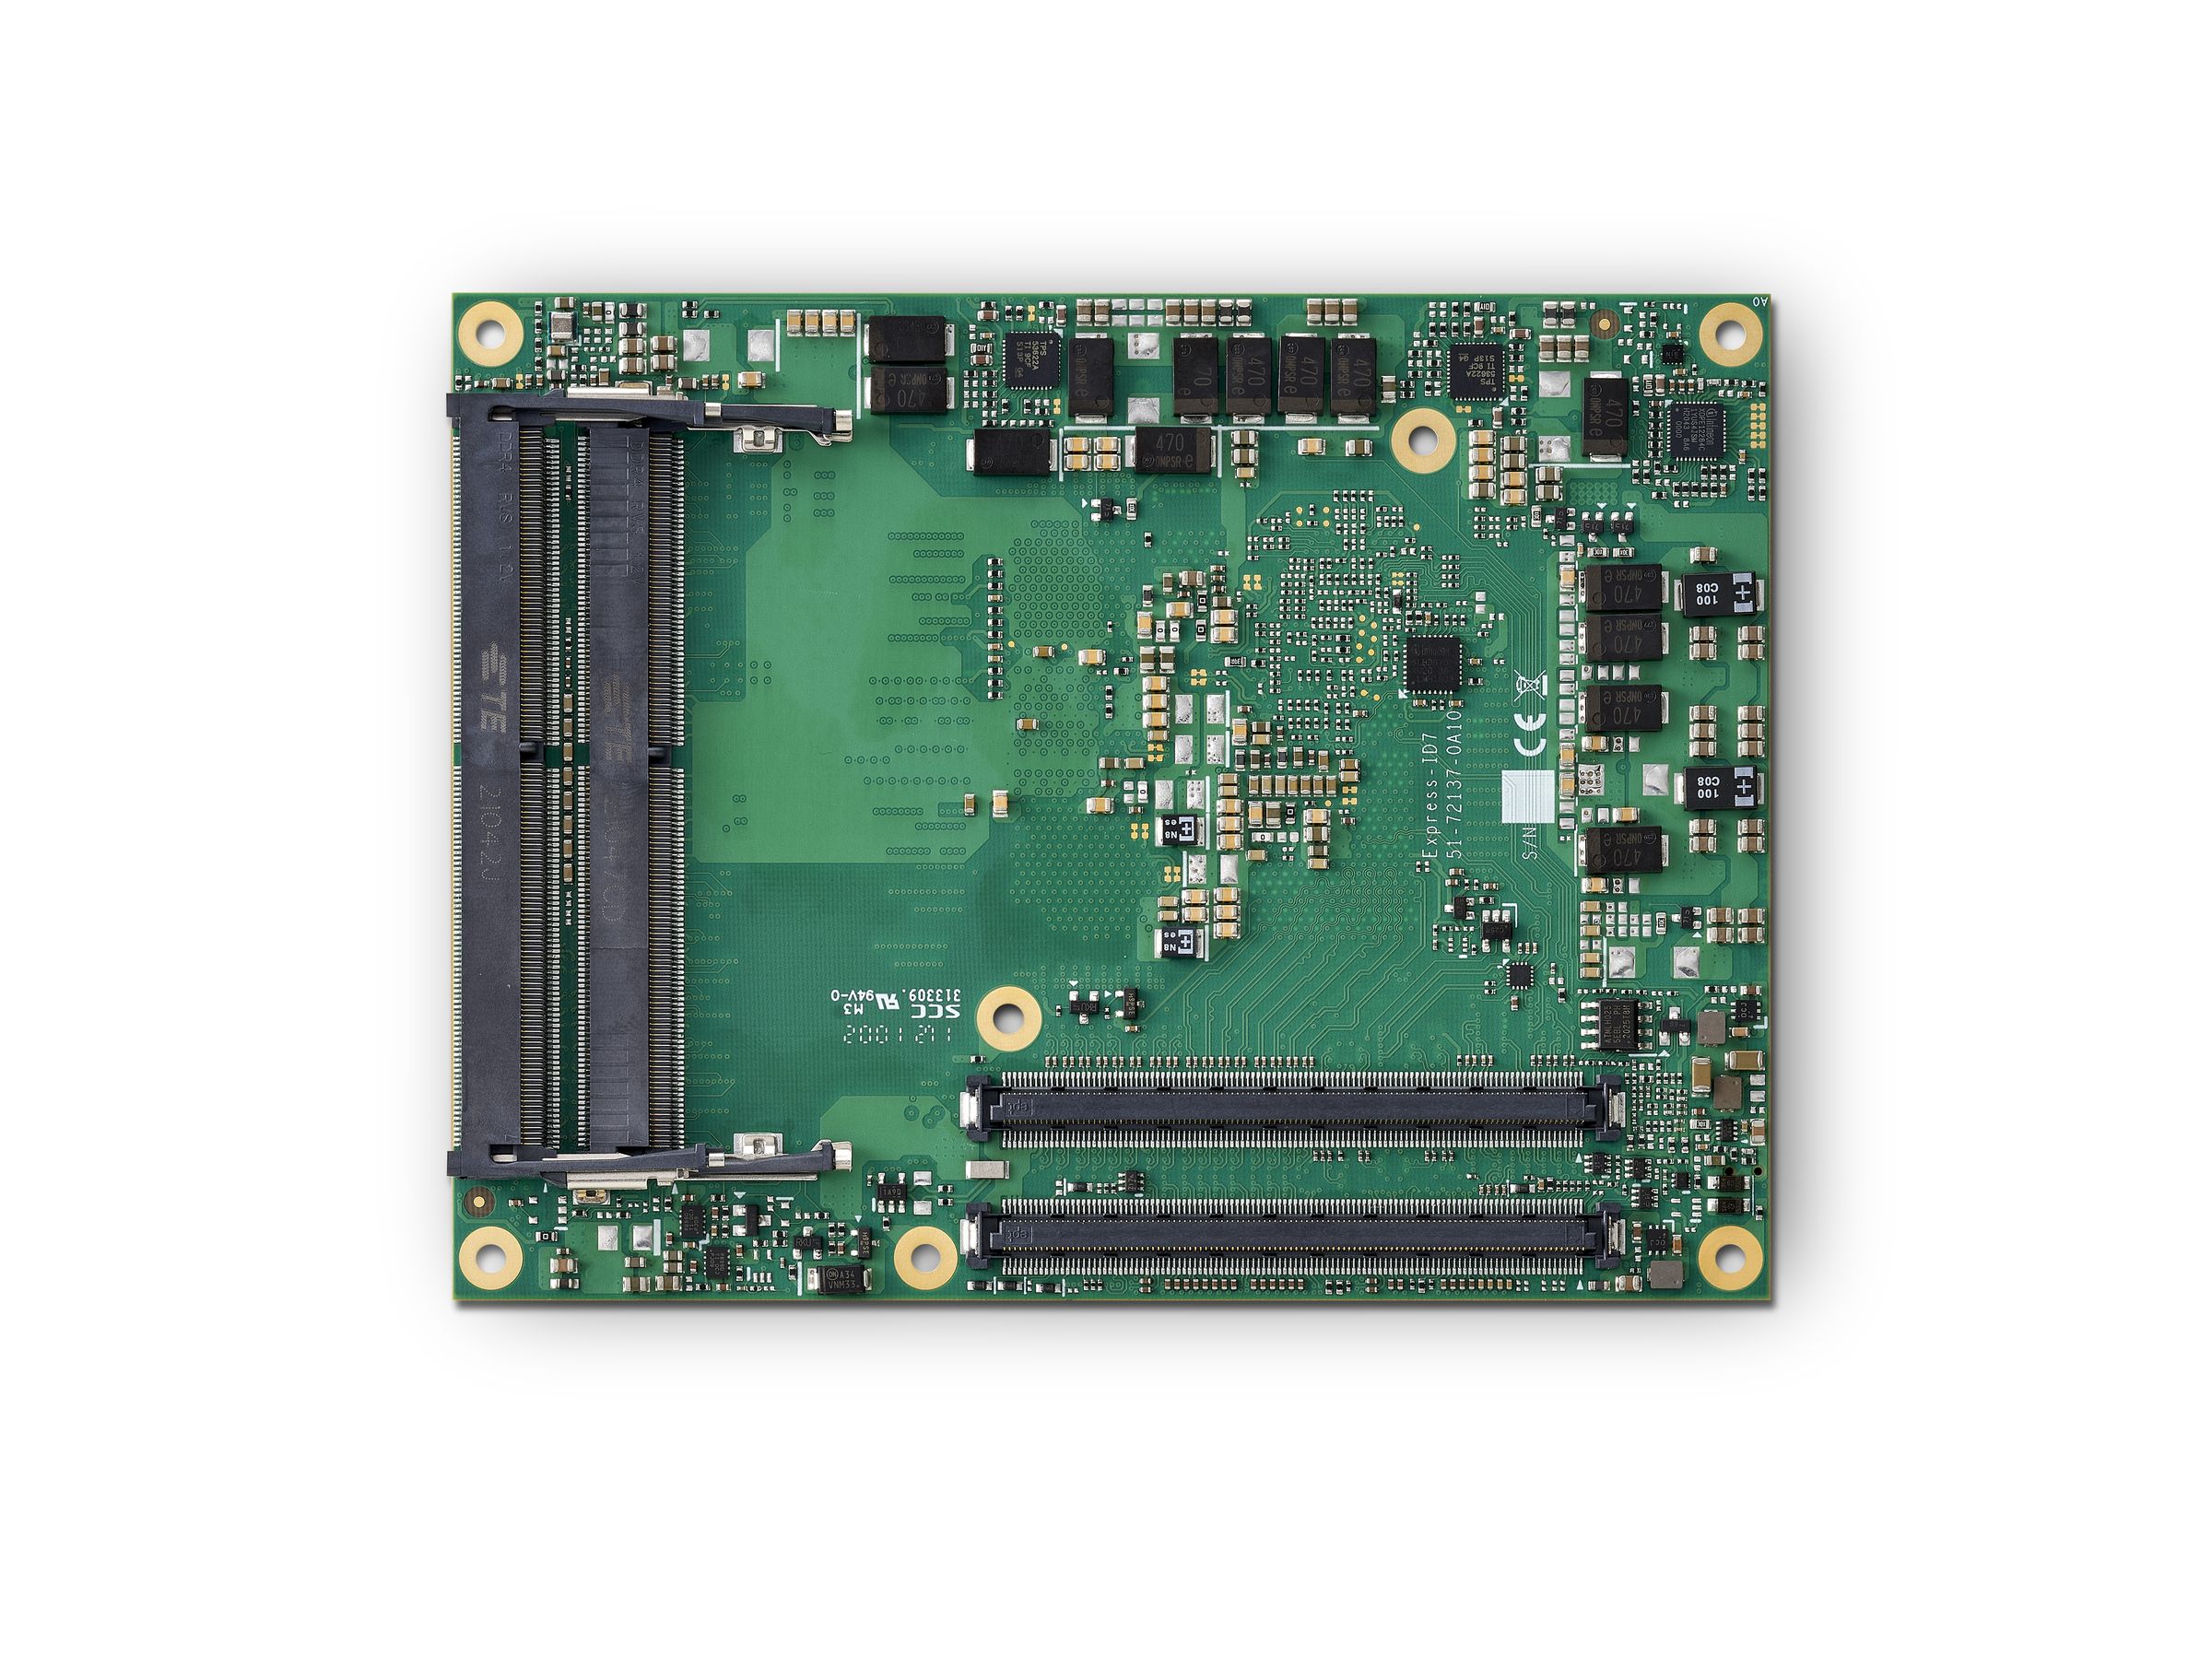
ADLINK COM-HPC-sIDH is a COM-HPC server type D size module powered by Intel® Xeon® D-2700 HCC processor with up to 20 CPU cores, 30MB cache, 512GB DDR4 memory capacity, 8x 10G or 4x 25G Ethernet, and power consumption of 65 to 118 watts. On the other hand, ADLINK Express-ID7 is a COM Express Type 7 module based on Intel® Xeon® D-1700 LCC processor and delivers a power envelope of up to 67W TDP, offering up to 10 CPU cores, 128GB DDR4 memory capacity, and 4x 10G Ethernet.
COM-HPC-sIDH – Front Side
Boasting Intel® Deep Learning Boost (VNNI) and Intel® AVX-512 for AI inference processing, ADLINK COMs with Intel® Ice Lake-D finely fulfill on-device machine learning and deep learning processes, transforming machine vision, natural language processing, and smart video analytics besting previous generations. In addition, these new COMs feature Intel® Time Coordinated Computing® (Intel® TCC), and provide Time Sensitive Networking (TSN) support –bringing precise CPU core control and timely synchronization over networked devices while ensuring low-latency, deterministic performance for driving hard-real-time workloads. COM-HPC-sIDH additionally offers Module Management Controller (MMC) featuring an IPMB interface and a dedicated PCIe-BMC lane. In conjunction with carrier BMC, it provides users with convenient remote management functions such as Serial over LAN (SOL) and iKVM.
Built for edge and rugged AI applications, these new ADLINK COMs empower system integrators to realize all of their IoT innovations, from edge networking, unmanned aerial vehicles, autonomous driving, robotic surgery, to rugged HPC servers, 5G base stations, automatic drilling, ship management, and more.
COM-HPC-sIDH Back Side
ADLINK is also providing COM-HPC and COM Express server starter kits based on the COM-HPC-sIDH and COM-ID7 modules, with COM-HPC Server Base offering AI accelerator support via Gen4 PCIe (2 x16), 10GbE optical/copper Ethernet expansion, and local and remote IPMI/BMC management via VGA, COM, and dedicated Ethernet.
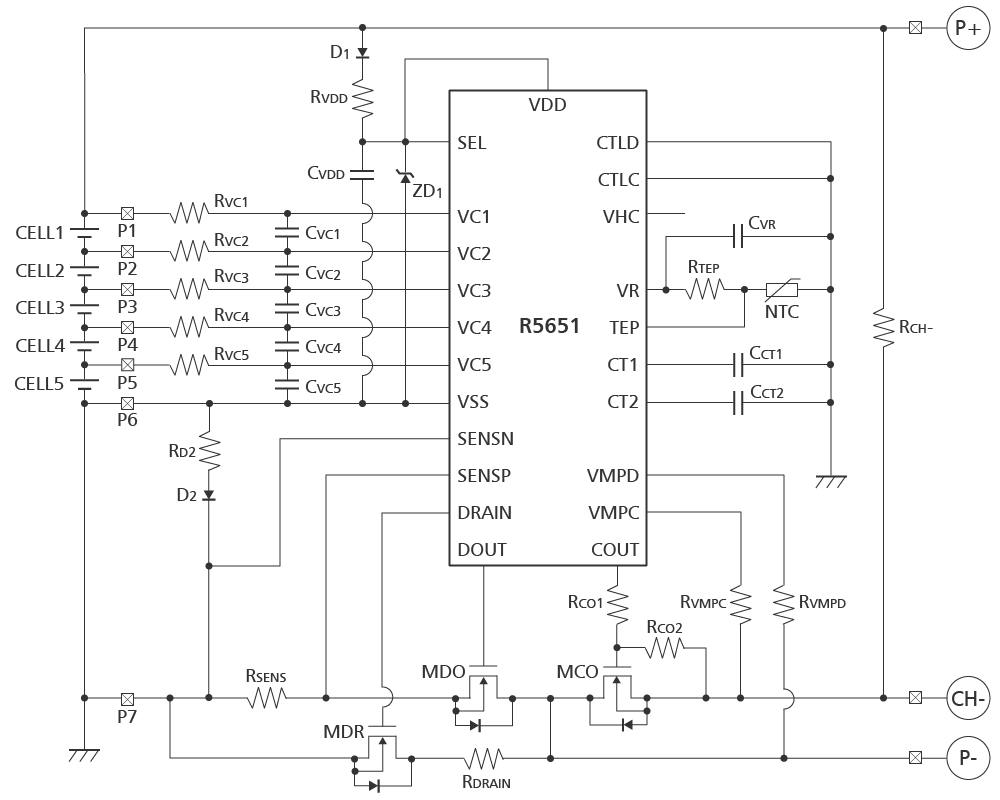
Battery protective functions are getting more important to ensure the safety of applications using Li-ion batteries such as power tools, cleaners, electrically assisted bikes, e-bikes, drones, storage batteries, etc.
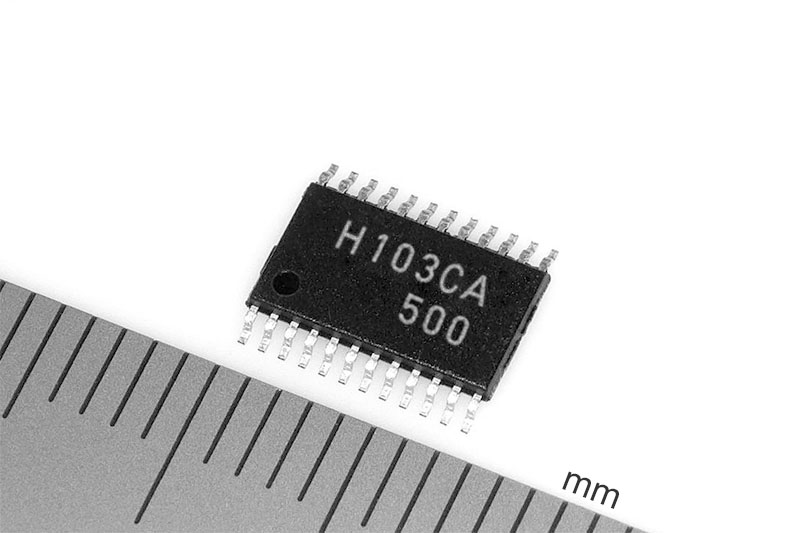
The new multi-cell battery protection IC has many features helping users simplify their manufacturing process. First, it reduces heat generation at large current by using a low-resistance SENSE resistor, making thermal design of a board easy. Second, separating the charge and discharge paths enables using a battery pack with low impedance. Third, thanks to the high-voltage cell monitor pins, there are no constraints on connection orders. Fourth, although the IC is designed for three-to-five-cell battery packs, it can also correspond to battery packs including six or more cells by connecting two or more ICs in cascade. The simple cascading structure contributes to reducing external components.
Additionally, the IC adopts the small TSSOP-24 package.
The R5651 series will strengthen your products’ competitive edge by achieving high accuracy and low power consumption.
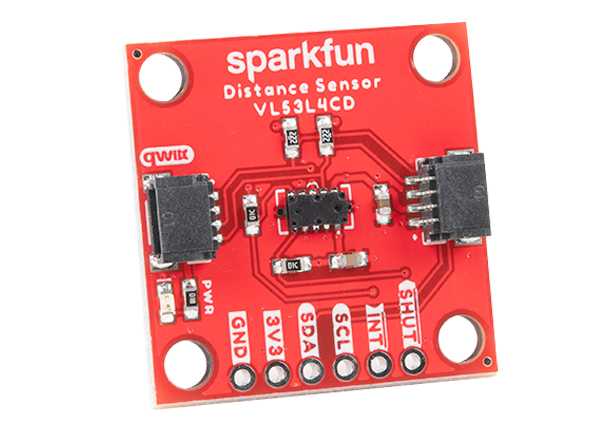
SparkFun Qwiic VL53L4CD Distance Sensor (SEN-18993) is a compact breakout board based on the STMicroelectronics VL53L4CD ToF (Time of Flight) Sensor Module. The VL53L4CD uses a VCSEL (Vertical Cavity Surface Emitting Laser) to emit an infrared laser to time the reflection to the target, measuring a 1mm to 1300mm range with millimeter resolution. The laser emitter features an 18° FoV (Field of View) for improved performance under ambient light, with a ranging speed up to 100Hz.
SparkFun Qwiic VL53L4CD Distance Sensor Qwiic Connect System can easily be connected, without soldering, to any Qwiic-based project. The signals of the VL53L4CD are also broken out on 0.1″ spaced pins for connection to a breadboard.
The SparkFun Qwiic Connect System is an ecosystem of I2C sensors, actuators, shields, and cables that make prototyping faster and less prone to error. All Qwiic-enabled boards use a common 1mm pitch, 4-pin JST connector. This feature reduces the required PCB space, and the connectors are polarized to ensure a correct hookup.
Note: This is a CLASS 1 LASER PRODUCT CLASSIFIED IEC 60825-1 2014.
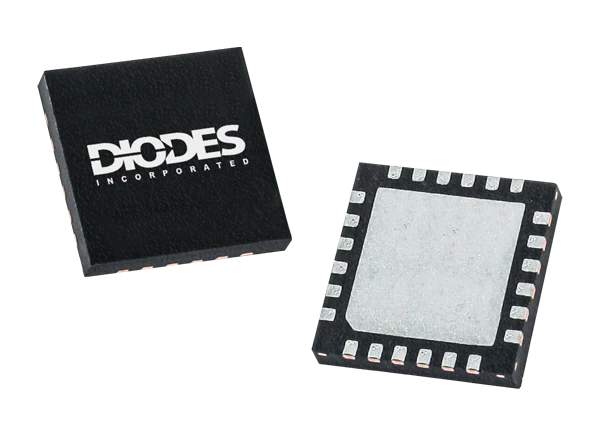
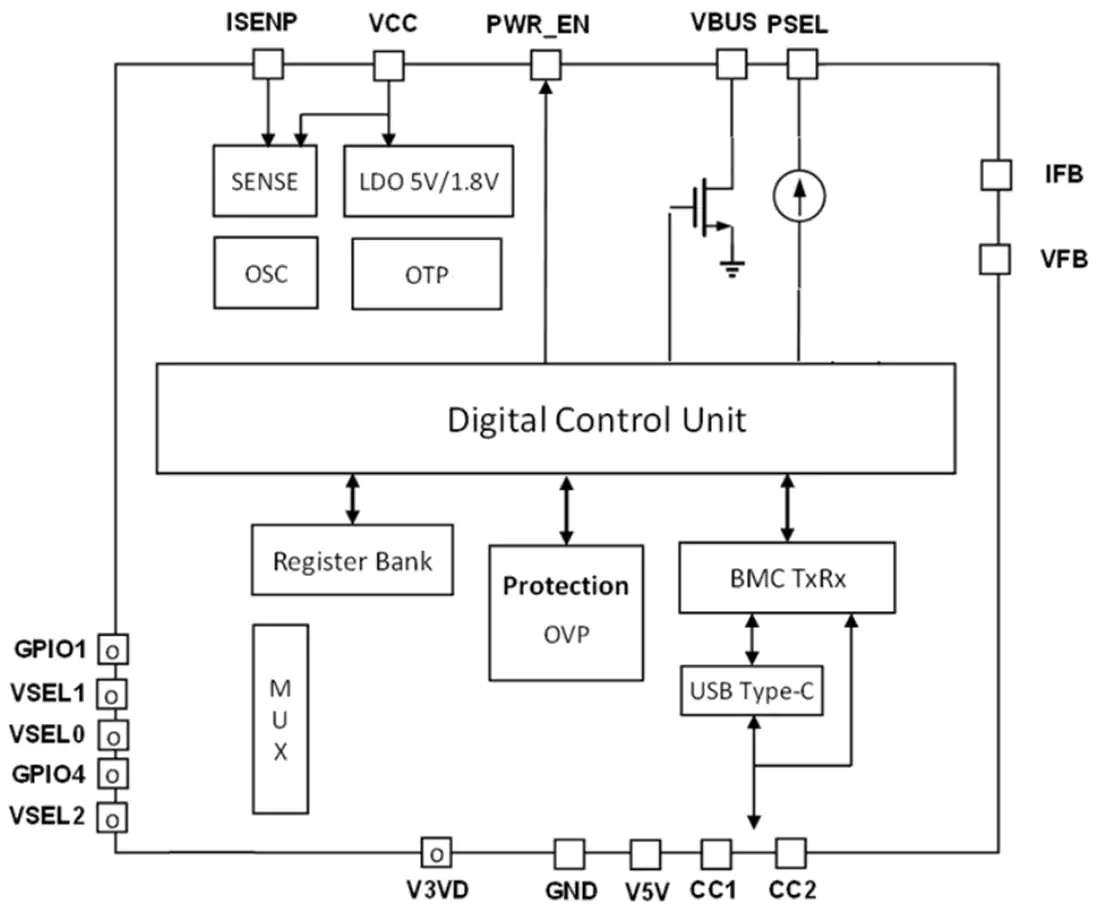
Diodes Inc. AP33771 USB PD Sink Controller is a highly integrated USB Type-C™ PD3.0/PPS sink controller. The device is targeted for DC power requests and control for Type-C connector-equipped devices (TCD). To leverage the increasing popularity of standard Type-C PD3.0 power adaptors, the AP33771 negotiates with an existing PD3.0 adaptor to acquire the required power profile to supply the TCD.
Working its role as DC-power requests from USB PD sources, the Diodes Inc. AP33771 interprets power input requirements (voltage/current and maximum power) from the TCD. It then establishes a power link with an external USB PD3.0 adaptor to output a suitable DC power. The voltage requests are specified by three pins (VSEL2, VSEL1, VSEL0). Up to eight voltages can be selected, and both fixed PDO and PPS APDO in the PD source adapter is supported in the AP33771 search algorithm. Up to ten maximum power levels can also be selected through different resistance values of the resistor connected to the PSEL pin.
Rich power functions are embedded on the chip to reduce total BOM while maintaining maximum flexibility. A one-time-programmable (OTP) ROM is provided to store the PD/sink controller firmware.
Features
Compliant with USB PD Rev. 3.0 v1.2
USB-IF certificated TID: 5000
Supports up to eight voltage selections by pin setting
Supports voltage selection with a dynamic pin setting
Supports power capability selection
Supports flash FAULT LED indication for negotiation mismatch
Supports OTP (One-Time-Programmable) for main firmware
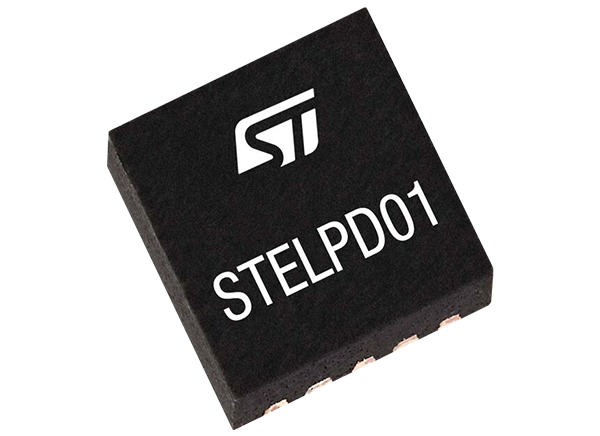
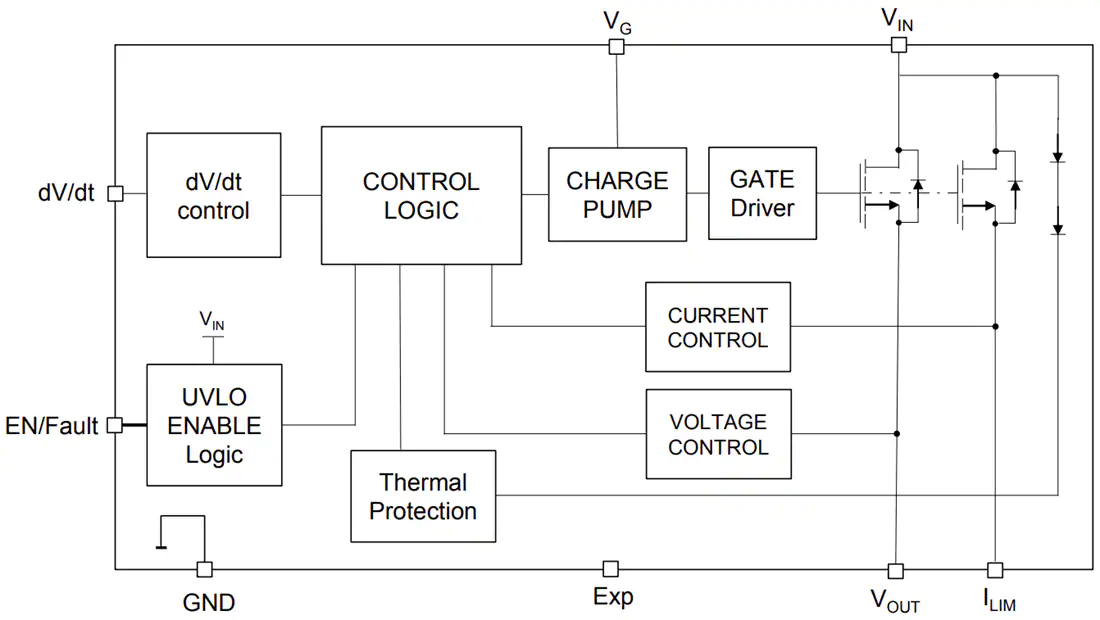
STMicroelectronics STELPD01 Electronic Load Switch is an integrated electronic power switch for power rail protection applications. It can precisely detect and react to overcurrent and overvoltage conditions. When an overload condition occurs, the device goes into an open state, disconnecting the load from the power supply. An external power MOSFET can be driven to manage the power loss protection in a fault condition. In case of overvoltage on the input, the device regulates the output to a preset 17.5V value.
Undervoltage lockout prevents the load from malfunction, keeping the device off if the rail voltage is too low. The STMicroelectronics STELPD01 features an adjustable turn-on slew rate, which is useful to keep the in-rush current under control during startup and hot-swap operations.
Features
4V to 18V wide input voltage range
17.5V typical output overvoltage clamp
Absolute maximum voltage of 23.5V
5A maximum continuous current
Adjustable current limit with circuit breaker functionality