Daniel Eichhorn @ blog.squix.org, shares his experience with some popular PCBA services and documents his finding on his blog. He writes:
Until recently I believed that having PCBs assembled by a professional service is either too costly for small batches or not possible at all. That was until I realized that some PCB manufacturers offer an additional assembly service (PCBA) and that their minimum order quantity (MOQ) is often very low. But which service should you use for future prototypes and market tests?
So I decided to pick a handful of PCBA services and order the same small board from them. Placing the same order with different services should allow me to compare quality, speed and costs between the different services.
In this post, I’m going to compare four assembly services for printed circuit boards. I got quotes from four services but placed orders with only three of them. One service (Seeedstudio) was simply too expensive for my little experiment.
All four services have a combined PCB/PCBA service. The services first manufacture the printed circuit boards and then they use the boards in a second stage to solder the components. Before you place the order you have to define the job with a couple of form fields. The required documents vary slightly from service to service but basically, you have to deliver Gerber files for the PCB stage and a detailed bill of material (BOM) in CSV or Excel format.
Two services also required a file which describes how to position the components with a pick-and-place machine, sometimes referred to as centroid files. CAD tools often can export this information. Eagle CAD, for instance, can do this with a few simple steps.
In the following paragraphs, I will describe the four services. At the end of this post, I will compare them side by side.
PCBA Service Review – Comparing PCBWay vs LocoPCB vs PCBGogo vs Seeedstudio – [Link]
BeagleBoard.org® Launches BeagleBone® AI, Offering a Fast Track to Getting Started with Artificial Intelligence at the Edge.
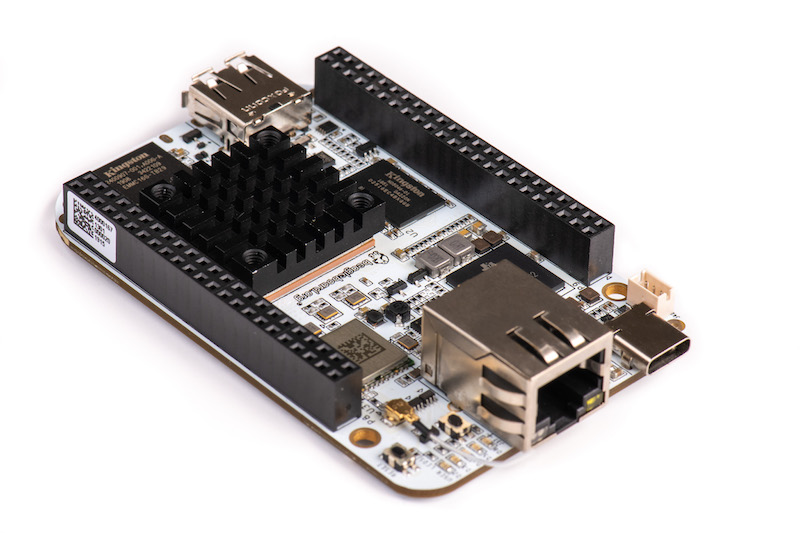
The BeagleBoard.org® Foundation today announces general availability of the newest, fastest, most powerful BeagleBoard.org® BeagleBone® low cost development board yet, and it’s driving a whole new AI revolution. Built on our proven open source Linux approach, BeagleBone® AI fills the gap between small single board computers (SBCs) and more powerful industrial computers. Leveraging the Texas Instruments Sitara™ AM5729 processor, developers have access to powerful machine learning capabilities with the ease of the BeagleBone® Black header and mechanical compatibility.
BeagleBone® AI makes it easy to explore how artificial intelligence (AI) and machine learning can be used in everyday life. Through BeagleBone® AI, developers can take advantage of the TI C66x digital-signal-processor (DSP) cores and embedded-vision-engine (EVE) cores on the Sitara AM5729 processor. Machine learning is supported by an optimized TI Deep Learning (TIDL) software framework and pre-installed software tools. Downloading and running the latest examples of edge inference algorithms and applications is only a few clicks away.
“This board is the answer to our community’s request to see the next major advancement in the BeagleBone® family” says Jason Kridner, co-founder of the BeagleBoard.org® Foundation. “Its feature set is jam packed and offers capabilities unparalleled by any other single board computer, open hardware or not.”
BeagleBone® AI has a feature set that includes:
BeagleBone® Black mechanical and header compatibility
Works with existing BeagleBoard.org® BeagleBone® cape add-on boards and many available third-party cape add-on boards and enclosures
1GB RAM and 16GB on-board eMMC flash with a high-speed interface
USB Type-C for power and superspeed dual-role controller; and USB Type-A host
Gigabit Ethernet, 2.4/5GHz WiFi, and Bluetooth 4.2/BLE
4 Embedded Vision Engines (EVEs) supported by the TIDL software framework library for machine learning
2x Dual-Core Programmable Real-Time Unit (PRU) subsystems (4 PRUs total) for ultra-low latency control and software generated peripherals
2x Dual Arm® Cortex®-M4 co-processors for real-time control and subsystem management
IVA-HD subsystem with support for 4K at 15fps H.264 encode/decode and other codecs at 1080p60
Vivante® GC320 2D graphics accelerator
Dual-Core PowerVR® SGX544™ 3D GPU
“We believe this board will excel in everyday automation in industrial, commercial and home applications” stated Christine Long, Executive Director of the BeagleBoard.org® Foundation. “And at an extremely competitive price point we’ve made this board available to everyone. It’s an industry game changer.”
BeagleBone® AI is available to buy as a standalone board, heat sink and antenna included, from BeagleBoard.org’s® key distribution partners. Visit http://beaglebone.ai.
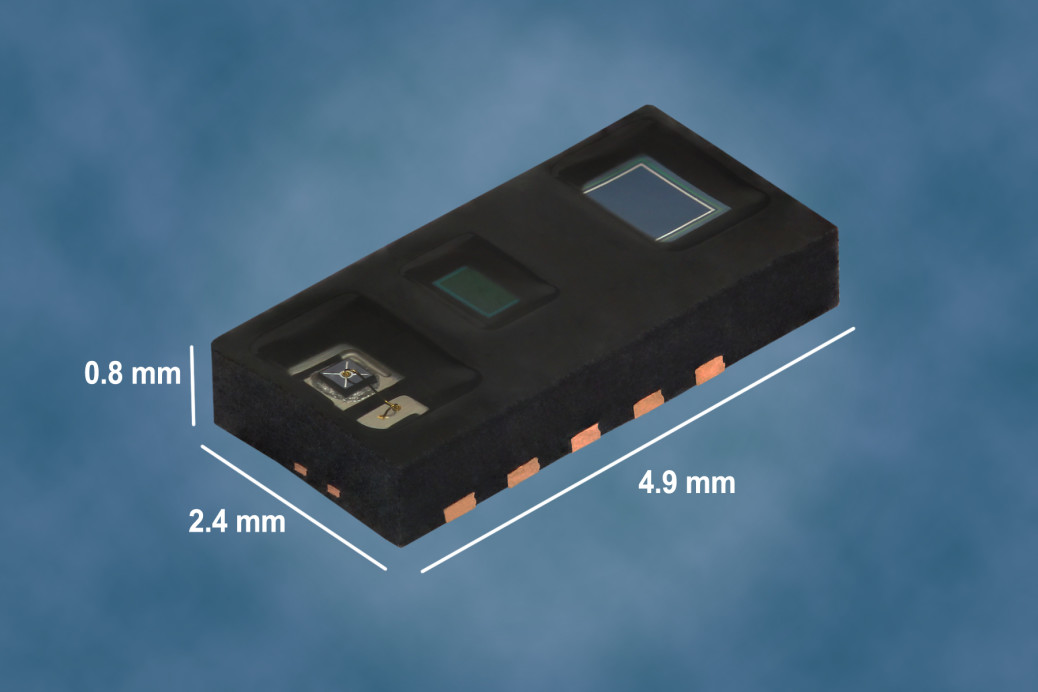
The VCNL4020C is a fully integrated biosensor and ambient light sensor. Fully integrated means that the infrared emitter is included in the package. It has 16 bit resolution. It includes a signal processing IC and features standard I2C communication interface. It features an interrupt function.
Features
Package type: surface-mount
Package form: SMD
Dimensions (L x W x H in mm): 4.90 x 2.40 x 0.83
Integrated modules: infrared emitter (IRED), ambient light sensor (ALS), photo diode (PD), and signal conditioning IC
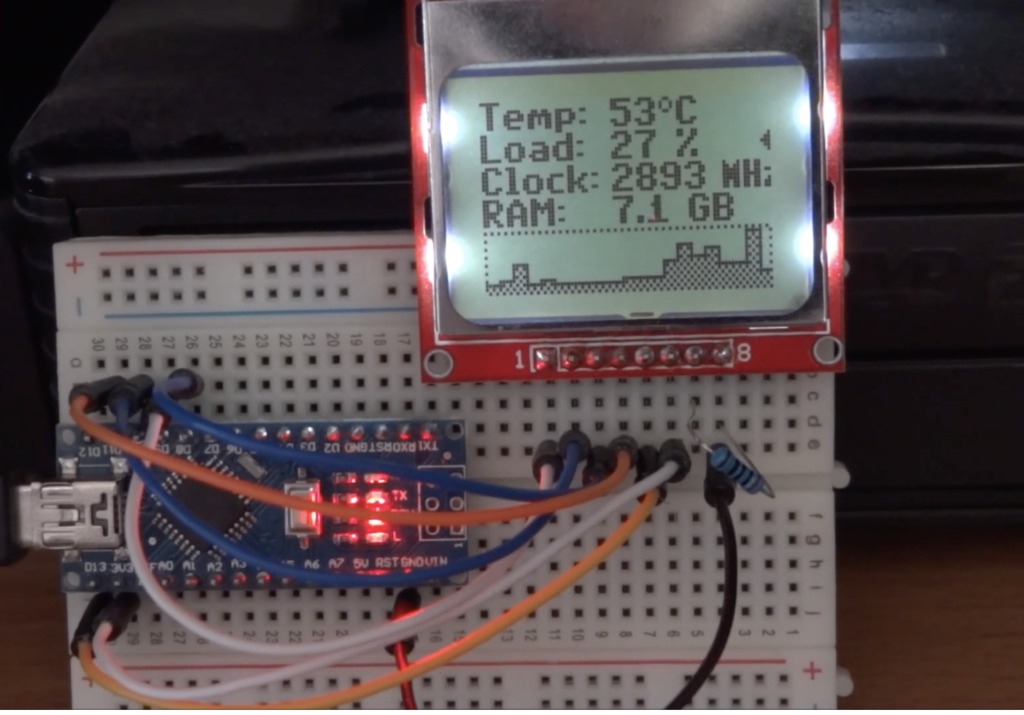
Either for benchmarking purposes or as external telemetry to help you stay within the acceptable range for your computer power, super users usually have the desire to have a way of knowing what the performance numbers of your PC are. For today’s tutorial, we will build a PC Hardware monitor which is capable of obtaining several performance-related parameters from your computer and displaying them on a Nokia 5110 LCD display.
Our PC Hardware monitor tutorial is based on the Arduino Nano microcontroller and a Nokia 5110 LCD Display. We have extensively used both of the components in past tutorials, especially the Nokia 5110 LCD Display for which we have done tutorials on displaying custom graphics, and several more tutorials on creating a custom menu on the display etc.
PC Hardware Monitor with Nokia 5110 Display and Arduino – [Link]
The project shown here is a microphone preamplifier that provides high quality amplification, optimized for use in computers, media and mobile applications. The pre-amplifier provides a differential input stage, making the device particularly effective when layout constraints force the microphone amplifier to be physically remote from the ECM microphone. This project features adjustable gain using PR1 trimmer potentiometer, very high power-supply rejection (95dB), and common-mode rejection (79dB), making it ideal for low-noise applications. Board is provided with condenser microphone as well as connector to connect external microphone, selection of external or internal microphone is possible with the help of on board Jumper. Circuit requires 5V DC input. The circuit provides differential output, use +OP/GND for single ended output. External microphone gain can be changed using R5.
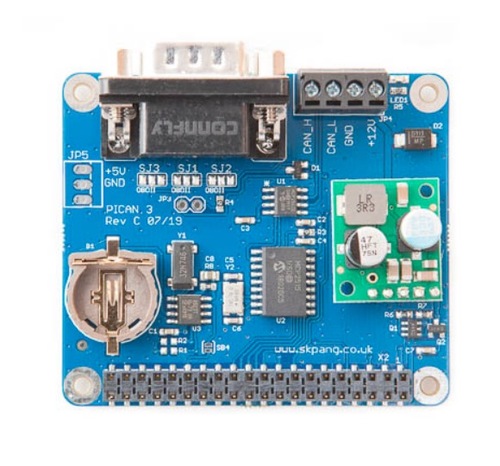
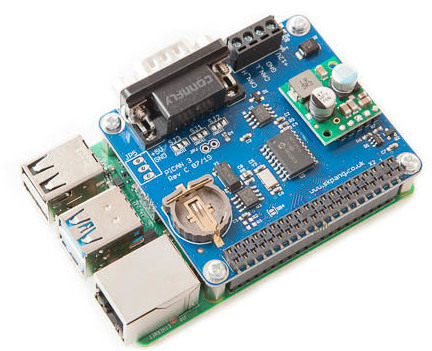
Copperhill Technologies announced the release of its PiCAN3 CAN-Bus Board for the Raspberry Pi 4, adding Controller Area Network capabilities plus a real-time clock to the new Raspberry CPU.
The PiCAN3 board with SMPS (Switch Mode Power Supply) provides CAN-Bus capabilities for the Raspberry Pi 4. It uses the Microchip MCP2515 CAN controller with MCP2551 CAN transceiver. The CAN Bus and power supply connections are made via the onboard DB9 or screw terminal.
There is an easy-to-install SocketCAN driver, and programming can be accomplished in C or Python.
The onboard PCF8523 is a CMOS Real-Time Clock (RTC) and calendar chip optimized for low power consumption. Data is transferred serially via the I²C-bus with a maximum data rate of 1000 kbit/s. Alarm and timer functions are accessible with the opportunity to produce a wake-up signal on an interrupt pin. An offset register allows fine-tuning of the clock. The PCF8523 has a backup battery switch-over circuit, which detects power failures and automatically switches to the battery supply when a power failure occurs.
Features
CAN 2.0B at 1 Mb/s
High speed SPI Interface (10 MHz)
Standard and extended data and remote frames
CAN Bus connection via standard 9-way sub-D connector or screw terminal
Compatible with OBDII cable
Solder bridge to set different configuration for DB9 connector
Onboard 120 Ohm termination resistor
Serial LCD ready
LED indicator
Footprint for two mini push buttons
Four fixing holes, comply with Pi Hat standard
SocketCAN driver, appears as can0 to application
Interrupt RX on GPIO25
5VDC@3A SMPS to power Raspberry Pi and accessories from DB9 or screw terminal
Reverse polarity protection
High efficiency switch mode design
6 VDC to 20 VDC input range
RTC with battery backup (battery not included, requires CR1225 cell)
The Switch Mode Power Supply (SMPS) allows connecting an input voltage range of 6 VDC to 20 VDC, making the board suitable for industrial and automotive applications and environments. The SMPS powers the Raspberry Pi plus PICAN3 and eliminates the need for a Micro-USB power supply.
The PiCAN3 is available for $64.95 with free shipping in the U.S. at Copperhill Technologies. More information may be found in the remarkably hype-free announcement and the PiCAN3 product and shopping page.
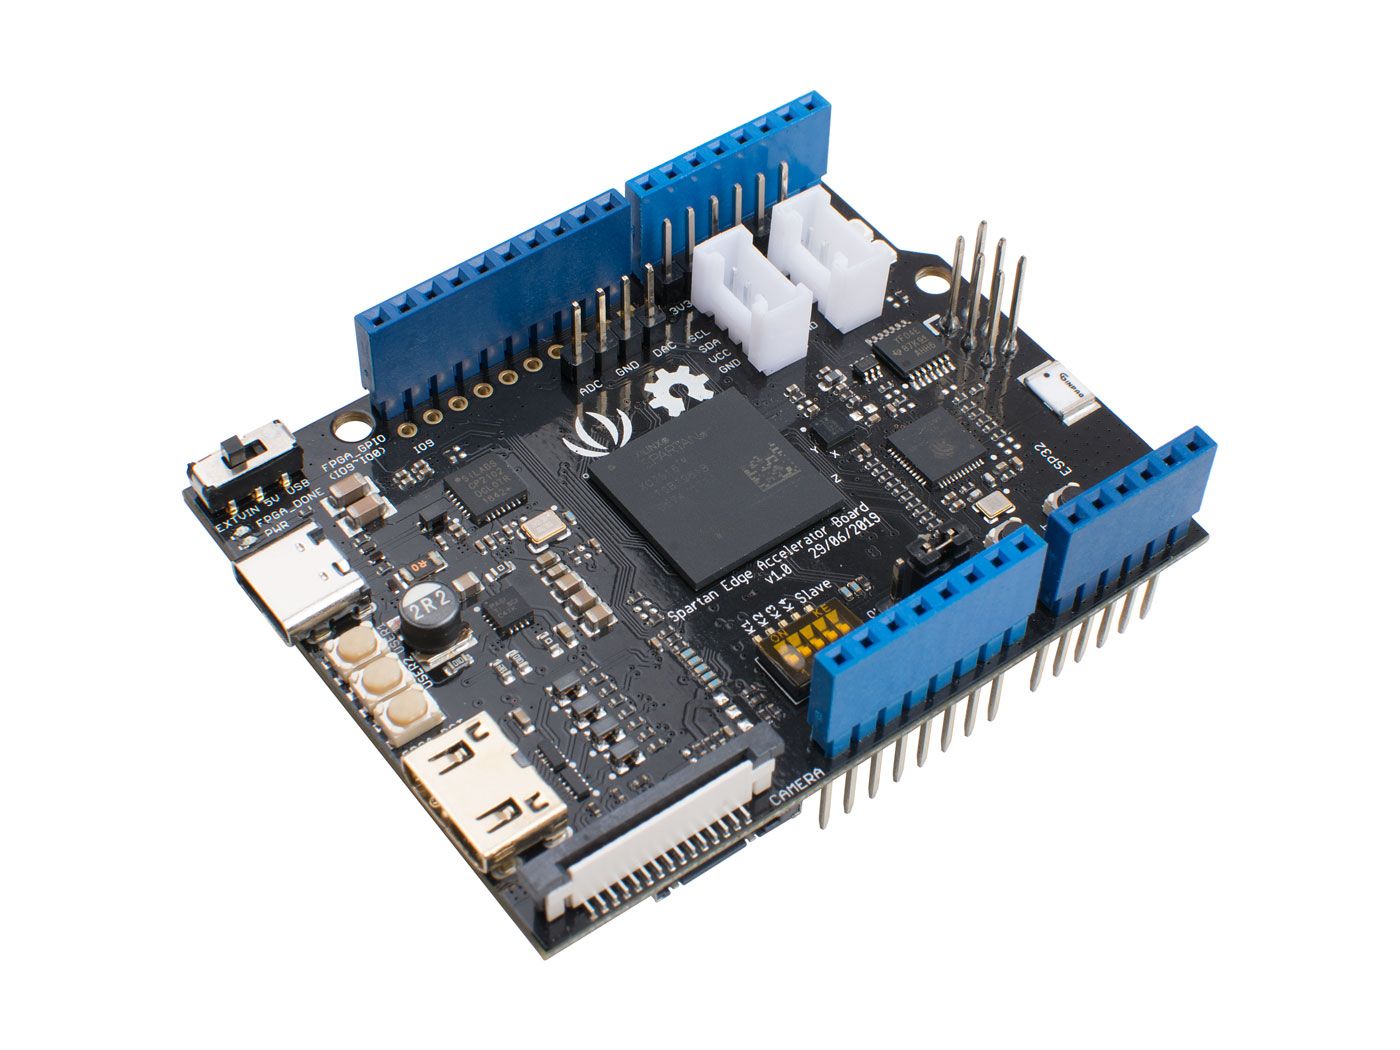
Spartan Edge Accelerator Board is a Xilinx Spartan FPGA development board in the Arduino UNO shield form factor. With the onboard ESP32 chip, it can also provide WiFi and Bluetooth functions.
Arduino – cheap to buy, easy to learn, simple to use, but can’t deal with complex calculations and large projects.
FPGA – flexible and powerful, easily handle complex calculations like audio and video processing, but hard to learn and very expensive.
What if combine the two? Will there be a monster that is expensive, cumbersome and difficult to understand? Of cause not, it will be magic! It will be a game-changer that combines the advantages of Arduino and FPGA and eliminates the shortcomings of both. We present to you the Spartan Edge Accelerator Board!
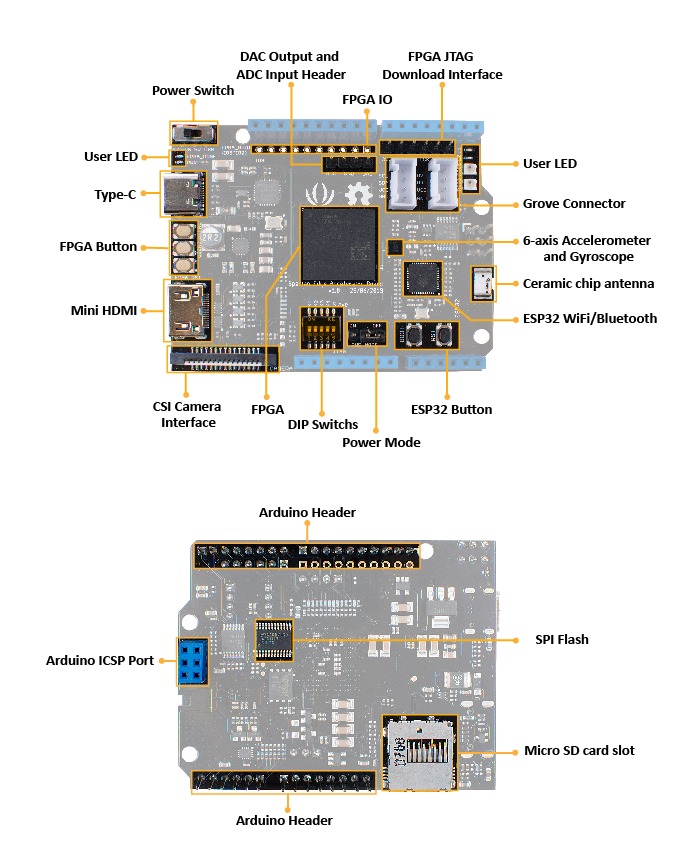
Spartan Edge Accelerator Board is a Xilinx Spartan FPGA development board in the Arduino UNO shield form factor. It can work with Arduino as an FPGA shield and as a stand-alone FPGA development board. With the onboard ESP32 chip, the Spartan Edge Accelerator Board also features 2.4GHz WiFi and Bluetooth 4.1. Moreover, this development board has a wealth of peripherals and interfaces which are extremely playable. Such as an 8-bit ADC, a 6-axis accelerometer, two RGB LEDs, a MINI HDMI interface, a CSI camera interface, two Grove interfaces, etc. All in all, it will be a perfect FPGA board for Makers and Hobbyists.
FPGA
The Spartan Edge Accelerator Board is built around Xilinx Spartan-7 XC7S15 FPGA, which is a cost-effect but powerful FPGA chip. When it comes to Ardunio FPGA, the first mover Arduino MKR Vidor 4000 was always mentioned. Compared with the official Arduino MKR Vidor 4000, the Spartan Edge Accelerator Board has a similar performance, but the price is less than half! Spartan Edge Accelerator Board can run at up to 100Mhz clock speed and offers 12.8K logic cells, 360Kb block RAM. Well, to drive a camera or HDMI display is just a piece of cake. Besides we breakout 10 user-programmable I/O pins of XC7S15, you can configure them as PWM, I2C, I2S, UART, SPI, etc.
ESP32
We know you love ESP32, so we used it as the wireless core. It supports 802.11 b/g/n 2.4GHz WiFi as well as Bluetooth 4.1 with BLE. Just a single board to enable your Arduino with FPGA and Wireless function, isn’t it amazing?
Arduino FPGA API
On top of that, we provide a full Arduino FPGA API to help you use FPGA resources to control FPGA I/Os with Arduino IDE even if you know nothing about the FPGA theory. Spartan Edge Accelerator Board will equip Arduino with the ability that was once unimaginable, such as edge technology, image recognition, signal sampling and processing, and so on.
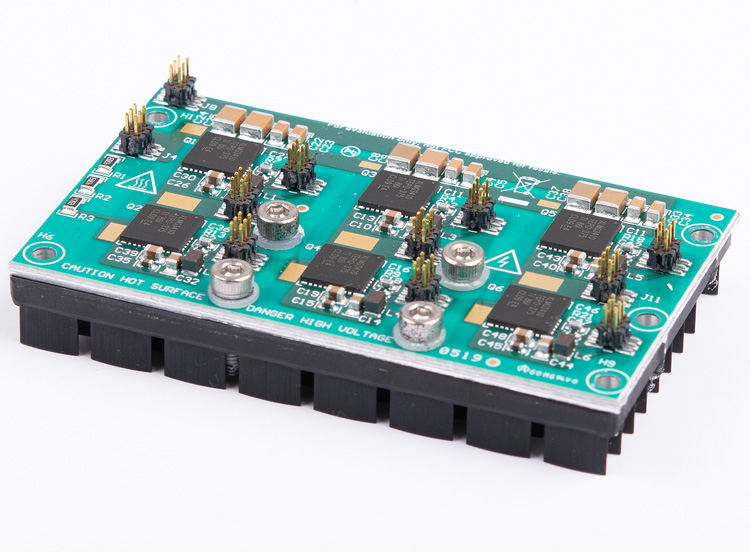
This reference design is a three-phase inverter with a continuous power rating of 1.25 kW at 50°C ambient and 550 W at 85°C ambient for driving 200-V AC servo motors. It features 600-V LMG3411R150 Gallium Nitride (GaN) power modules with an integrated FET and gate driver mounted on an 1.95-mm Insulated Metal Substrate (IMS) board for efficient heat dissipation. Isolation and control circuits are mounted on separate FR-4 boards – the dimensions of the design are 80 mm × 46 mm × 37 mm, including heatsink, control, isolation, and power stage. This ultra-small form factor, coupled with the ability to be natural convection fanless cooled, allows for easy integration of the drive with the motor, reducing the required cabinet space by up to 50% and cable lengths by up to 90 m in 6-axis motor applications including robotics, CNC machines, and so forth.
Features
600 V, 6-A LMG3411R150 GaN enables a power density of 150 W/in3 in 50°C ambient conditions up to 1.25 kW and in 85°C ambient conditions up to 550 W
Ultra-small form factor and natural convection fanless cooling allows easy integration of the drive with the motor-saving floor space and cabling costs
Very fast switching transition (<5 ns) with minimal switch node voltage ringing reduces EMI
High-efficiency power stage (peak efficiency >99% at 32-kHz PWM) reduces heat-sink size
Protection against gate undervoltage, device overcurrent, and overtemperature
Definitely, Arduino has made it easy for anyone to learn electronics and programming of modern microcontrollers. Not only that, it had brought out a new era of creative makers, just by the single thought, Arduino makes it possible to bring your ideas to life within a fraction of time without costing you a lot.
The Arduino ecosystem has grown large with many tools, kits, resources available everywhere on the internet. For the total newbie, it is easy to get overwhelmed on where to start. Maybe starting reading through Instructables, Hackaday, or even through the Arduino Playground and our own Arduino Projects, you might still get overwhelming without proper guidance.
When starting to learn electronics, Arduino is usually the most suggested route to go. People will tend to advise newbies to go buy an Arduino kit to get started, I do recommend this as well, but the problem is what kit you should go for? There are hundreds of Arduino kits roaming around the internet covering different skillets from Beginners to Advanced users, but which one should you go for?
dr.Duino board attached to Arduino
If you are in this dilemma, you probably don’t have to worry anymore with the discovery of Dr.Duino Arduino Uno Starter Kit. The Arduino Uno Starter Kit is an Arduino kit tailored for both pure beginners and advanced users.
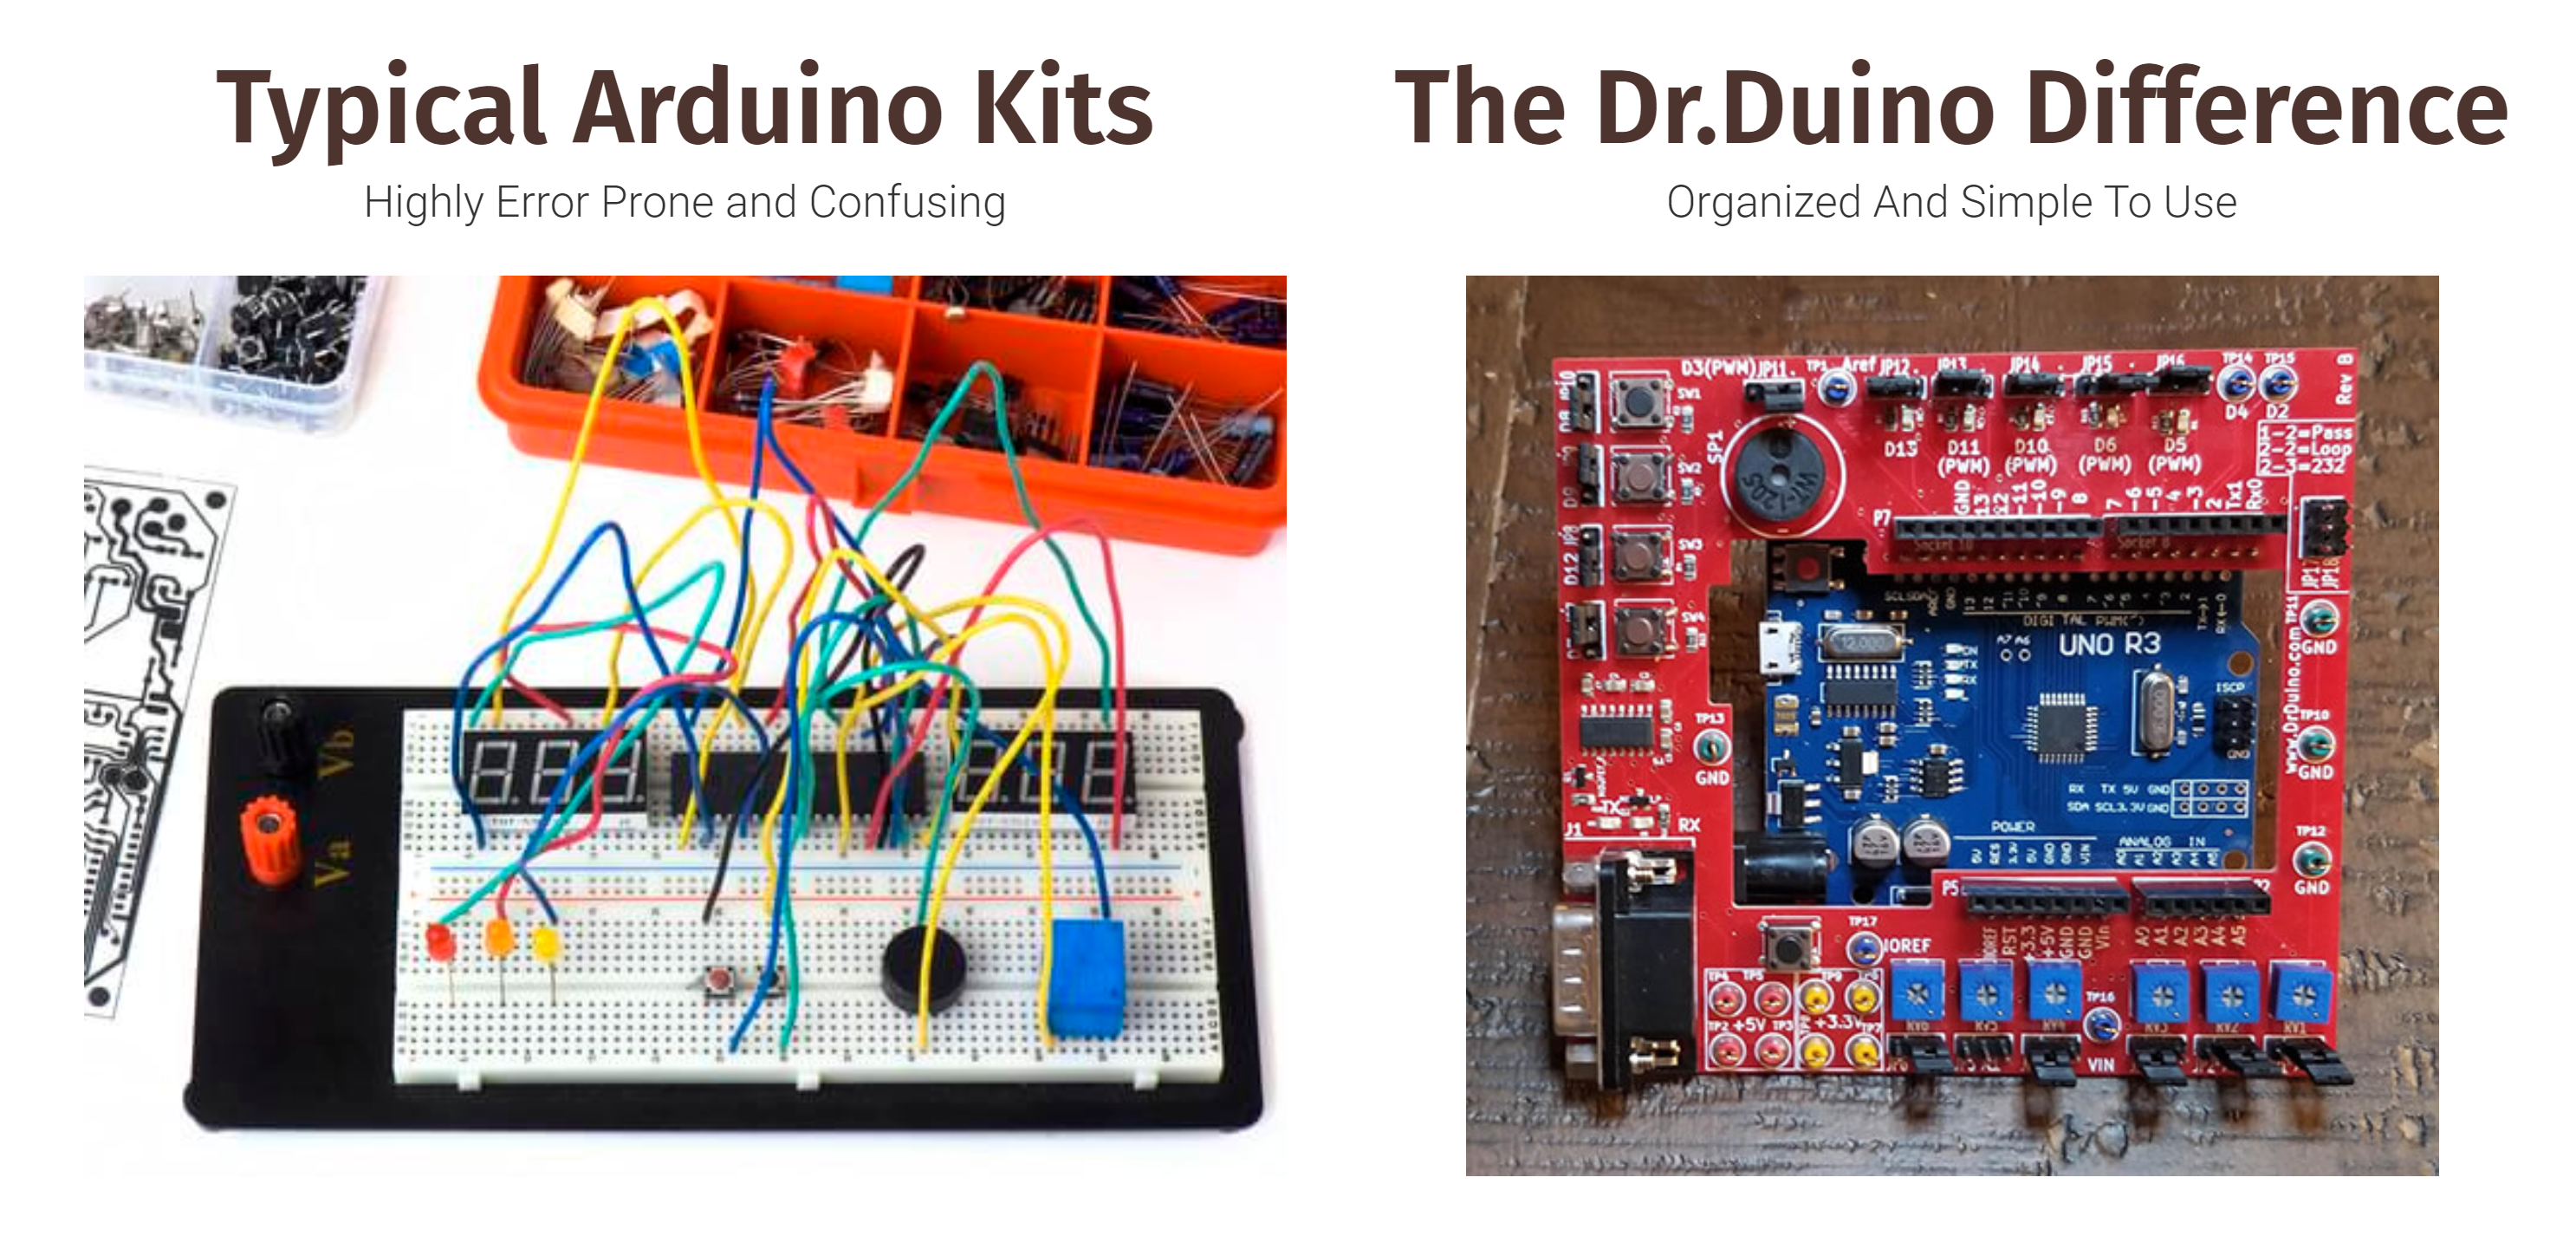
Dr.Duino Arduino Starter kit attempts to address one major concern of beginners – Frustration on building your Arduino circuits. When working on an electronics project, you will tend to make all your connections on a breadboard, using jumpers or wires to connect things. Depending on the level of connections needed, it is easy to run into a messy breadboard connection which in most cases don’t usually work after the first attempt, and then you will have to spend hours trying to fix the issue, only to realize it’s connected to wrong spot in the breadboard.
The Dr.Duino Difference
Dr.Duino kit solves this as it has all of the same components other kits have but one major difference! It’s pre-wired so you can focus on learning to code.
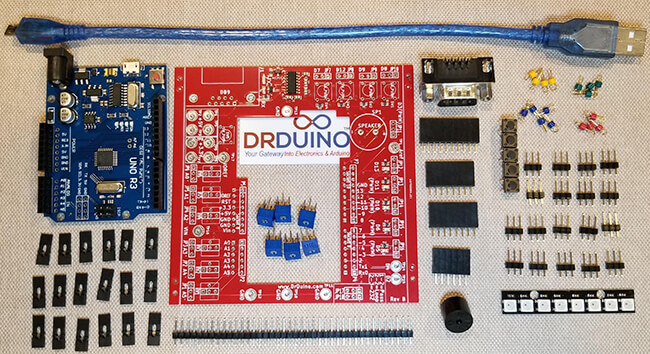
The kit comes with the following:
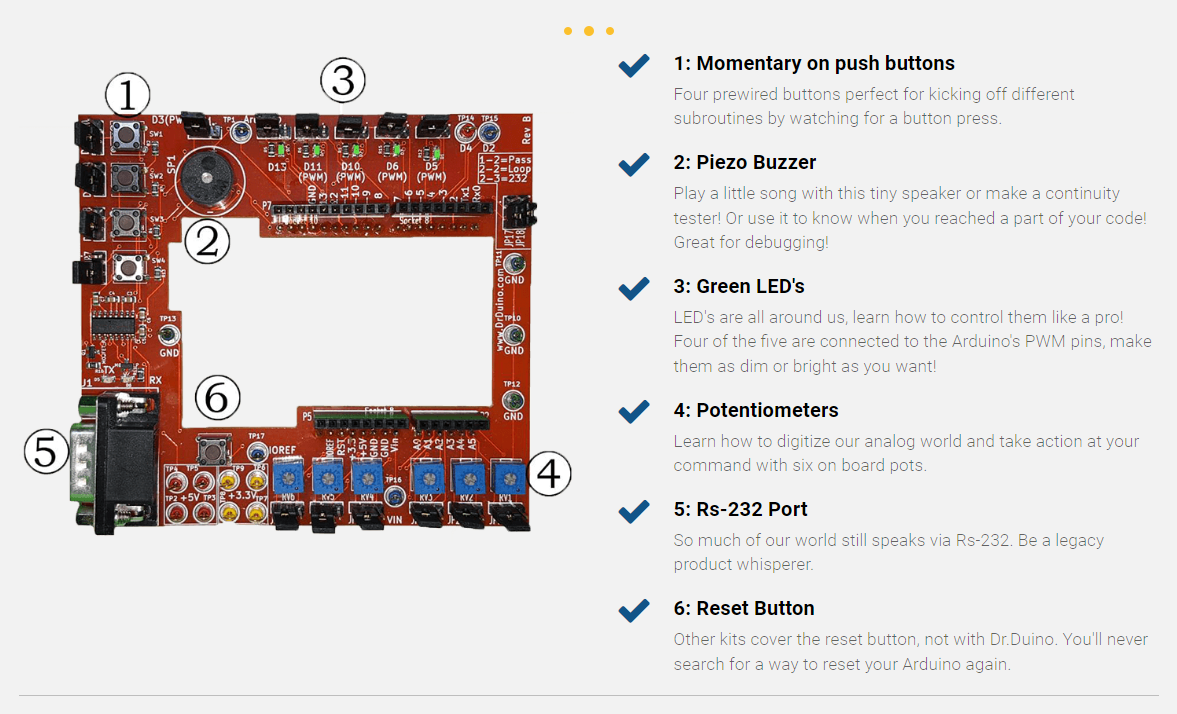
An Arduino Uno Compatible Board
Switches x 4
Piezo Buzzer
LED’s x 5
Potentiometers x 6
RS-232 Port
Arduino Reset Button
A bare board.
For advanced users – it comes with a special “re-route it technology”. Dr.Duino uses a unique but simple jumper structure to re-route the signal from the board above, out to the Dr.Duino itself. This feature allows you to isolate firmware from hardware bugs. Also, the Dr. Duino shield can work with other Arduino shields and boards.
Some other benefits include:
Exclusive Access To the Dr.Duino VIP Facebook Group
An exclusive offer for a FREE Arduino programming course
Dr. Duino Arduino Uno Starter Kit
The Dr.Duino kit does require some simple soldering (through hole components only) which typically takes about 6-90 minutes. With its highly detailed instructions, this is one fun kit to build!
Where the Dr.Duino really shines is in its ability to help you isolate hardware from coding issues and also but acting as a simulator.
The Dr.Duino kit allows the user to to attach scope probes and other test equipment without resorting to shoving wires into the female sockets and/or attaching alligator clips which often times fall off.
As a simulator, since it has all of the most common circuits prebuilt into the shield itself, you can also use it to simulate sensors which you may not have on hand.
For example, maybe you need to write a piece of code which turns on a LED when someone gets too close to an object. But if you don’t have an ultra sonic sensor on hand what do you do?
Well just use the potentiomenter to feed in various voltage levels to simulate someone moving close or far away from the sensor. Once you have the correct value selected, just pop on your sensor and your off and running!
In conclusion, the Dr.Duino Starter kit for the Arduino Uno is jam packed with features you won’t find on any other Arduino kit out on the market today.
For a limited time you can purchase one for $49.00 as compared to the original $118 price. You can purchase the kit from the product page. More information is available on the sales page.
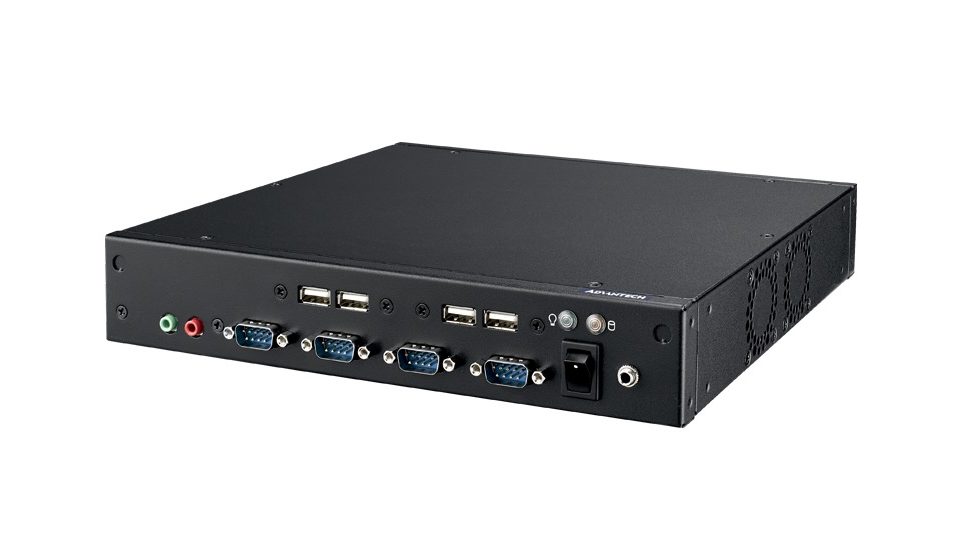
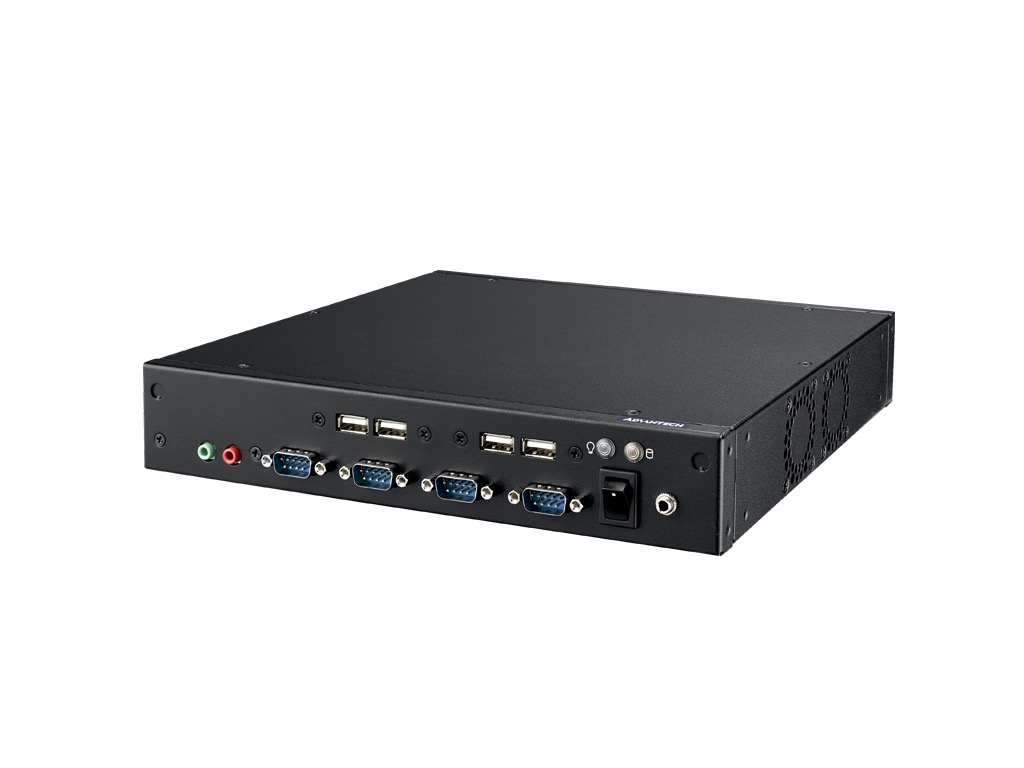
Advantech, a leading embedded computing solution provider, announced the release of its latest new 1U THIN barebone system with 8th Gen. Intel® Core™ processors up to 65W TDP – EPC-T2286
This system supports Intel® 8th generation Core™ i7/i5/i3 processors which bring enhanced performance over previous generations with up to six CPU cores and Intel’s 9th generation graphics engine. EPC-T2286 powers up to two independently operated 60 Hz 4K displays via DisplayPort or HDMI and supports Wall/ VESA/ rack mounting for flexible easy installation.
THIN Design w/Desktop CPU for Space-limited Applications
The compact 1U height EPC-T2286 is just 250 x 44.2 x 225 mm. It offers the high processing capability of a desktop CPU with up to six CPU cores and Intel® 8th Core™ i7/i5/i3 and Pentium/Celeron® processors to deliver high computing power and graphic performance. The Intel® H310 Express chipset supports Dual Channel DDR4 2666MHz memory (up to 32GB) in two SODIMM slots. Features include integrated Intel® Gen 9 graphics (Display Port, HDMI), triple gigabit Ethernet w/ EtherCAT capability, 6 x serial ports (2x RS-232/422/485 by BOM option), and ESD level 4 protection compliance. All these features make EPC-T2286 well suited to kiosk or automation applications needing a compact 1U height chassis.
Easy to Install, Connect, and Maintain
To fulfill space limited kiosk or automation application requirements, the 1U THIN EPC-T2286 offers different mounting kits for installation into various cabinets and spaces. EPC-T2286 has 6 x COM ports, 8 x USB ports, DP, and HDMI which allows it to easily connect to RFID readers, thermal printers, Key PAD, touch screens, 4k displays and so on. SI or tool machine builders can easily integrate the whole system and shorten their time to market. Furthermore, the ESD level 4 (contact 8kv and air 15kv) design offers better ESD protection for automation applications operating in harsh environments. EPC-T2286 is a modular system and provides ease of maintenance in the field.
Remote management & monitoring for IoT Applications
A core advantage of EPC-T2286 is that it comes equipped with Advantech’s WISE-PaaS/DeviceOn software solution designed to simplify IoT application integration. WISE-PaaS/DeviceOn is an IoT device management software platform which includes remote device, monitor, control, event management, system management, and software over-the-air update. WISE-PaaS/DeviceOn not only helps create new web services but also helps to integrate functions and data with its powerful management tools. WISE-PaaS highly enhances connectivity for hardware, software, devices and sensors, and helps customers to transform their business to include IoT cloud services.
EPC-T2286 Desktop System Features:
THIN design only 1U in height
The latest 8th generation Intel® Core™ i / Pentium/ Celeron processors up to 65W TDP