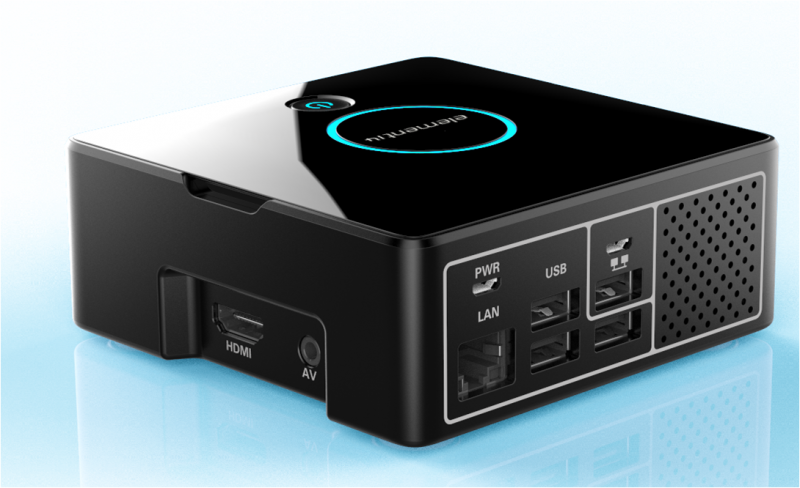
The ‘Pi Desktop’ kit from element14 offers some great features like Wi-Fi, Bluetooth, a real-time clock, an interface for an mSATA-SSD hard drive, an optional camera, heat sink, a neat power switch and of course the sleek black case. [via]
The Raspberry Pi is a well designed, powerful and inexpensive board, but not a complete computer. Some distributors know you need more than just a plastic case and a mains-adapter power supply (or USB cable). The ‘Pi Desktop’ kit from element14 contains everything you need and more, turning your RPi into a fully fledged computer.
Pi Desktop Case – include peripherals too – [Link]
by Eric Bogers @ elektormagazine.com discuss about a new project that aims to create the first image of a black hole. He writes:
A powerful network of radio telescopes, spread around our planet, attempts for the first time to create an image of a black hole. Black holes are intangible gravitational ‘vanishing holes’, the existence if which was already predicted in 1915 by Albert Einstein. The South Pole Telescope of the University of Chicago is part of this Event Horizon Telescope, in which eight observatories, spread across six widely dispersed locations, together form a single virtual telescope, which is so powerful (has sufficiently great resolving power) that it could detect a penny on the surface of the moon.
Virtual telescope makes first image of a black hole – [Link]
Today’s market requirements change faster than the typical development time for a new device or the ability of designers of SoCs to know. To solve this problem, FPGAs/MCUs are used so developers can change the configuration/firmware later.
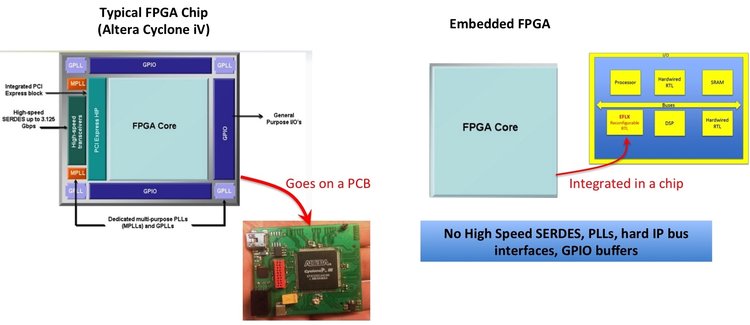
As known, MCU IP is static and you can’t change the silicon design (RTL design) after fabrication. FPGA chips are used to overcome this limitation but the FPGA high cost is a concern compared to the price of the MCUs. From this point a new technology called Embedded FPGA (eFPGA) was invented. This technology can give the flexibility of allowing SoCs to be customized post-production with no high expenses.
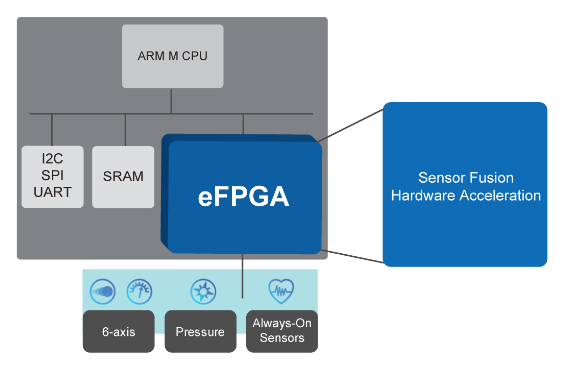
The idea behind eFPGA is to embed the FPGA core to SoCs without the other components of typical FPGA chips such as: surrounding ring of GPIO,SERDES, and PHYs. This core can be customized in a post-production stage with no need to change the RTL design and manufacturing the chips again.
Moreover, eFPGA is expected to have a brilliant future and to be adapted widely according to the CEO of Flex Logix Technologies in an article published on Circuit Cellar magazine. That’s because of increasing mask cost: approximately $1 million for 40 nm, $2 million for 28 nm, and $4 million for 16 nm, and the need for constantly changing in standards and protocols besides application of AI and machine learning algorithms.
Open source has finally arrived to microcontrollers. Based on RISC-V instruction set, a group of doctoral students at the Universidad Industrial de Santander in Colombia have been working on an open source 32-bit chip called “Open-V“.
Onchip, the startup of the research team, is focusing on integrated systems and is aiming to build the first system-on-chip designed in Colombia. The team aims to contribute to the growth of the open source community by developing an equivalent of commercial microcontrollers implemented with an ARM M0 core.
The Open-V is a 2x2mm chip that hosts built-in peripherals which any modern microcontroller could have. Currently, it has ADC, DAC, SPI, I2C, UART, GPIO, PWM, and timer peripherals designed and tested in real silicon. Other peripherals, such as USB 2, USB3, internal NVRAM and/or EEPROM, and a convolutional neural network (CNN) are under development.
RISC-V is a new open instruction set architecture (ISA) designed to support architecture research and education. RISC-V is fully available to public and has advantages such as a smaller footprint size, support for highly-parallel multi-core implementations, variable-length instructions to support an optional dense instruction, ease of implementation in hardware, and energy efficiency.
Open-V core provides compatibility with Arduino, so it is possible to benefit from its rich resources. Also when finish preparing the first patch, demos and tutorials will be released showing how Open-V can be used with the Arduino and other resources.
The Open-V microcontroller uses several portions of the Advanced Microcontroller Bus Architecture (AMBA) open standard for on-chip interconnection. This makes any Open-V functional block, such as the core or any of the peripherals, easy to incorporate into existing chip designs that also use AMBA. We hope this will motivate other silicon companies to release RISC-V-based microcontrollers using the peripherals they’ve already developed and tested with ARM-based cores.
We think buses are so important, we even wrote a paper about them for IEEE LASCAS 2016.
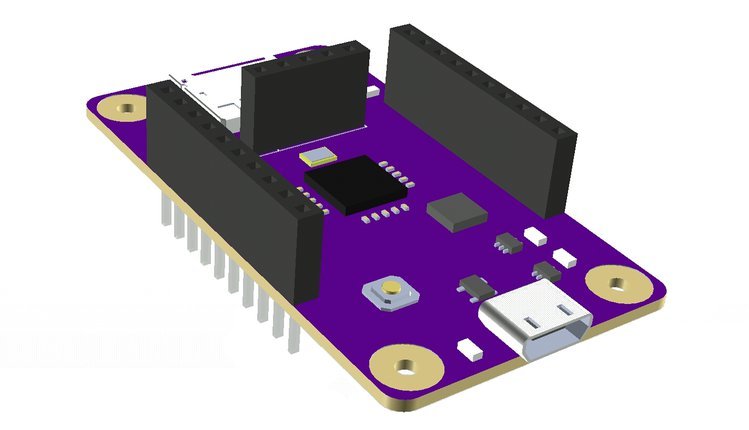
Open-V Development Board Specifications
Onchip team are also developing a fully assembled development board for their Open-V. It is a 55 mm x 30 mm board that features everything you need to get start developing with the Open-V microcontroller, include:
USB 2.0 controller
1.2 V and 3.3 V voltage regulators
Clock reference
Breadboard-compatible breakout header pins
microSD receptacle
Micro USB connector (power and data)
JTAG connector
32 KB EEPROM
32-pin QFN Open-V microcontroller
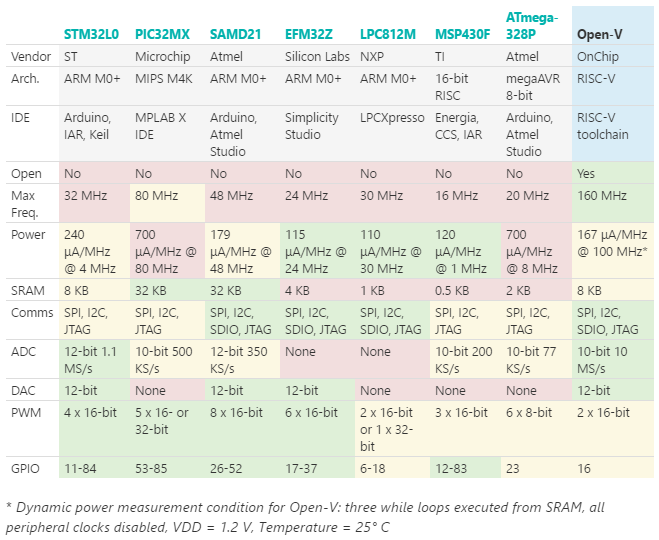
Compared with ARM M0+ microcontrollers, power and area simulations show that a RISC-V architecture can provide similar performance. This table demonstrates a comparison between Open-V and some other chipsets.
OnChip Open-V microcontroller designs are fully open sourced, including the register-transfer level (RTL) files for the CPU and all peripherals and the development and testing tools they use. All resources are available at their GitHub account under the MIT license.
We think open source integrated circuit (IC) design will give the semiconductor industry the reboot it needs to get out of the deep innovation rut dug by the entrenched players. Just like open source software ushered in the last two decades of software innovation, open source silicon will unleash a flood of hardware innovation. The Open-V microcontroller is one concrete step in that direction.
A crowdfunding campaign with $400k goal has been launched to support manufacturing of Open-V. The chip is available for $49 and the development board for $99. There are also many options and offers.
Raspberry Pi is famous for its great computing strength and ability to run the Linux operating system. In today’s tutorial, you’ll learn how to make your Raspberry Pi tweet. You can add extra features to this project to post tweets autonomously if any specific event occurs. Let’s get started.
Required Parts
You’ll need following parts to make this project.
Raspberry Pi running Raspbian OS (Any model)
USB Mouse
USB Keyboard
HDMI Compatible Monitor
HDMI Cable
USB power supply for Raspberry (5V 2A)
Working Internet Connection
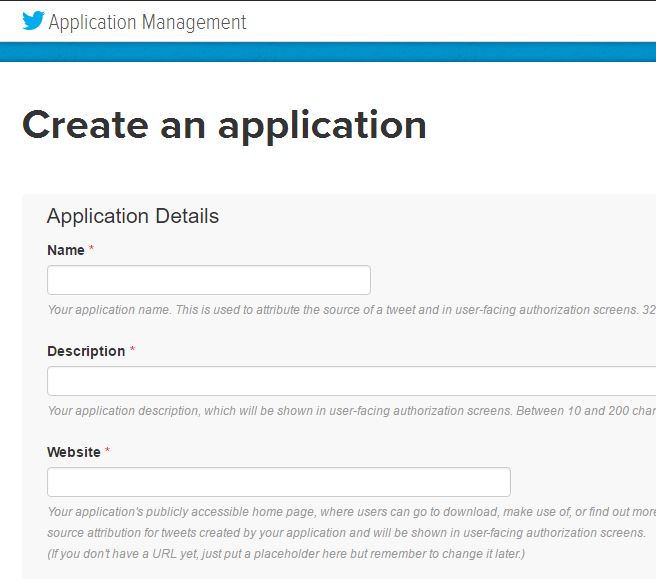
Create App In Twitter
You need to create an app in Twitter so that Raspberry Pi can use to make tweets on your behalf. Go here to make a twitter app. The Raspberry Pi will require following parameters to make tweets:
Consumer Key (API Key)
Consumer Secret (API Secret)
Access Token
Access Token Secret
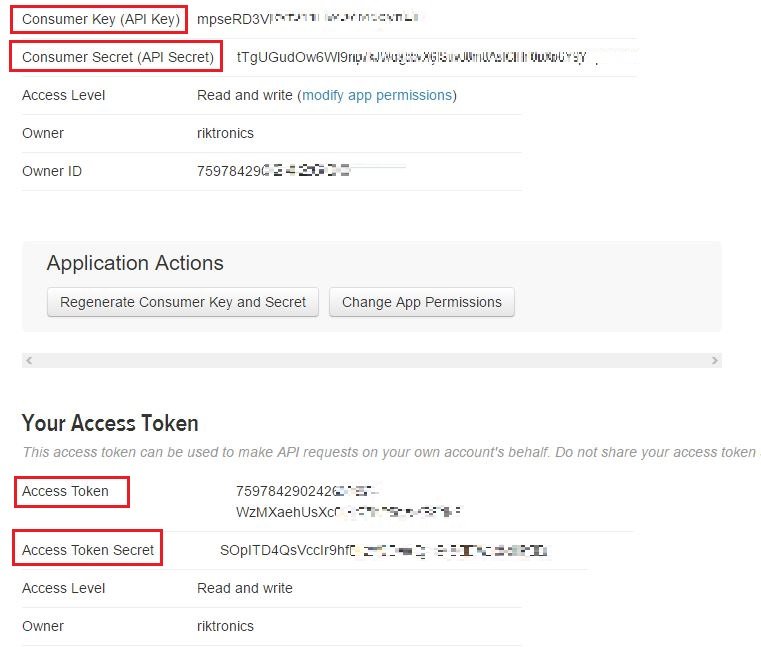
You can find all these details from your app.
Creating An App In Twitter
Store Keys In Raspberry Pi
In this step, you need to create a python file in your Raspberry Pi and store all the Keys and Tokens there. Create a file named keys.py in your working folder with all information in it.
consumer_key = "Place your consumer key here"
consumer_secret = "Place your consumer secret key here"
access_token = "Place the access token here"
access_token_secret = "place the access token secret here"
Get Access Keys And Access Tokens From App
Now, save the file and go the nex step of this tutorial.
Install Twython
Well, what is Twython actually? Twython is the premier Python library providing an easy way to access the Twitter data. It’s been tested by companies, educational institutions and individuals alike. This amazing library will make our job a lot easier and the code much shorter. To install the Twython library, follow the given steps:
pip is required to install Twython, so it’s installed in 3rd step. But if you already have pip installed, just ignore that step.
Write The Python Script & Run It
Open a file in your working directory in your Raspberry Pi and rename it to twitter.py. Make sure that it is in the same directory wit previously created keys.py file. Now, copy-paste the following code using any editor or IDE:
import sys

from twython import Twython
from keys import (
 consumer_key,
 consumer_secret,
 access_token,
 access_token_secret
)
twitter = Twython(
 consumer_key,
 consumer_secret,
 access_token,
 access_token_secret
)
message = "My first tweet using Rapberry Pi! Yeh!"
twitter.update_status(status=message)
print("Raspberry Pi successfully tweeted: %s " % message)
Pretty simple, isn’t it? Actually, the Twython library performs lots of tasks behind the screen keeping the code surprisingly small.
Now, save the file and open terminal in your raspberry pi. Write the following command and hit the Enter key to run this Python script:
python twitter.py
That’s all. Now you can see that is your Raspberry Pi is tweeting successfully.
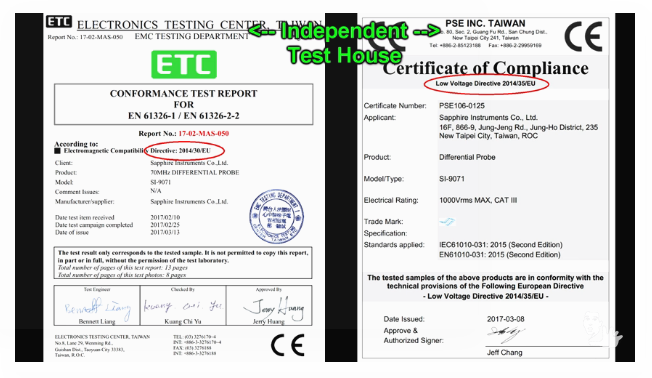
When you flip any electronic device (your TV screen, laptop, power supply, computer mouse, …etc) you will see lots of marks. These marks are conformity marking for certain quality and technical standards such as: CE, FCC and UL. Today we are going to investigate more about the CE mark.
CE is a mandatory conformity marking for certain products sold within the EU and Turkish market. The mark means that the manufacturer declares that the product meets the requirements of EU products rules. As the formal documents say, this mark is a key indicator but not a proof of a product’s compliance with EU legislation and it enables the free movement of products within the EEA and Turkish market.
How to get CE certificate?
It can be self-certified by a manufacturer by following some directives according to the type of your product. For example, if your product is designed to be used with a voltage rating of between 50 and 1000 V for alternating current (A.C.) and between 75 and 1500 V for direct current (D.C.), then you must meet the Low Voltage Directive.
Every Directive has a number of requirements that the product needs to meet. However, The manufacture should prepare the Declaration of Conformity which is a document states that the product meets the requirements of the directive(s) which apply to it. More steps are required to self-certificate your product. To know more about the full procedure refer to this Wikipedia article. Another option is to pay for a third party certification body to do all the process for you.
Test Report(on the left)-Certificate of Compliance (on the right). Image Courtesy of EEVBlog
Dаvid Jones, EEVBlog, did a short video with lots of important notes about the CE mark that worth watching. He also mentioned how some manufactures use Chinese Export mark instead of original CE mark to deceive consumers.
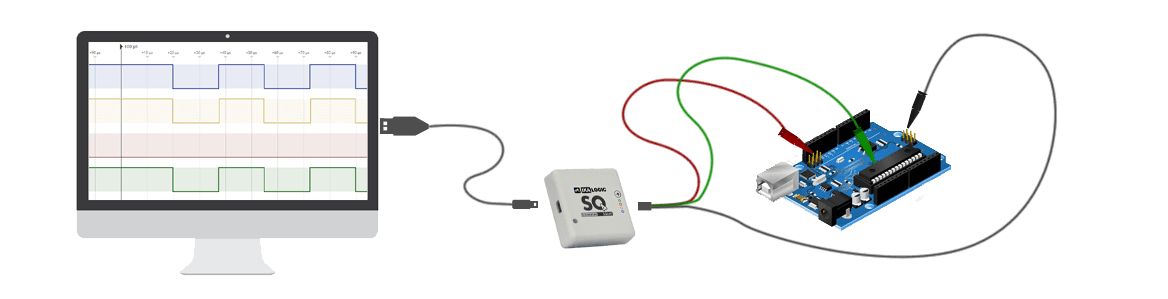
The ScanaQuad 200 by Ikalogic is a high-performance 4-channel logic analyzer and digital pattern generator. It is designed to be the best companion of a hobbyist when working on serial protocols like UART, SPI, I2C, 1-Wire, USB, I2S, CAN, LIN, RS232, RS485, and more. With the ScanaQuad 200 Logic Analyzer, you can capture signals, you can play them back, and you can even program genuine test signals using ScanaStudio software and generate them.
Connecting ScanaQuad with PC to analyze signal
Being able to capture and generate logic patterns simultaneously with a single tool, it is quite useful while testing and debugging logic signals. Now, you can achieve these same features with modern function generators and oscilloscopes. But unfortunately, these devices usually carries a price that puts them out of reach of those who only need them occasionally. So, the ScanaQuad is the best and the cheapest solution for hobbyists.
The sampling frequency of the ScanaQuad SQ200 is minimum 10KHz and maximum 200MHz, with 50MHz of input bandwidth. It has a stunning sampling resolution of ±5ns only. SQ200 is capable of handling ±15V input signal in continuous signal mode and the ±50V input signal in 10ms pulse mode. The function of the four ports of this logic analyzer can be defined by the user with the help of the ScanaStudio software. The user can also control pulse width and duty cycle of the output signal. Complex data sequences may be programmed to simulate several communication protocols using JavaScript. ScanaQuad SQ200 comes with predefined sets of various protocol decoders. This logic analyzer even allows users to create their own protocol decoders.
The following table shows the input characteristics of SQ200:
Input resistance (Fixed)
1MΩ
Input resistance (optional)
10KΩ
Input Capacitance (Max.)
4pF
Input voltage range (continuous)
±15V
Input voltage range (10ms pulse)
±50V
Pull-Up resistance (optional)
10KΩ
Low-Level input voltage (VIL MAX)
Adjustable
High-Level input voltage (VIL MIN)
Adjustable
Adjustable threshold range
0V to 4.5V
Threshold hysteresis
350mV
The following table represents output characteristics:
Output resistance
270Ω
Output current (Max.)
20mA
Output High-Level voltage (VOH)
Adjustable
Adjustable output voltage range (VOH)
1.65V to 5.5V
Finally, the below table shows all the timing characteristics:
Sampling Frequency (Max.)
200MHz
Sampling Resolution (Max.)
±5ns
Input bandwidth (Max.)
50MHz
Output frequency (Max.)
50MHz
Sampling Frequency (Min.)
10KHz
Embedded memory
16MB
Sampling Depth (Points/channel)
4M
Sampling Period (Max. at FS = 1MHz)
4s
Sampling Period (Max. at FS = 25MHz
160ms
Sampling Period Example (Max. no. of 115200 BAUD UART words at FS = 1MHz)
40K Words
SqannaStudio software shows analyzed signal
ScanaQuad SQ200 supports lots of protocols by default and user can add his/her own protocol as mentioned earlier. Supported protocols (default) are:
1-Wire
CAN
DHT11/22
DMX-512
HC-SR04
I²C
I²S
JTAG
LCD at 4 bits
LIN
Manchester
Maple
MIDI
NMEA 0183
nRF24L01
Oregon Scientific
Parallel Bus
PWM
SENT
SPI
SPI WIZnet W5100
UART
USB 1.1
The SQ200 has a really tiny form factor of 50mm × 50mm with a 7.5mm of thickness. As it weighs only 80g, you can carry it easily in your pocket without any problem. You can purchase this amazing product from the official site of IkaLogicat 149€ and change the way you debug and analyze signals.
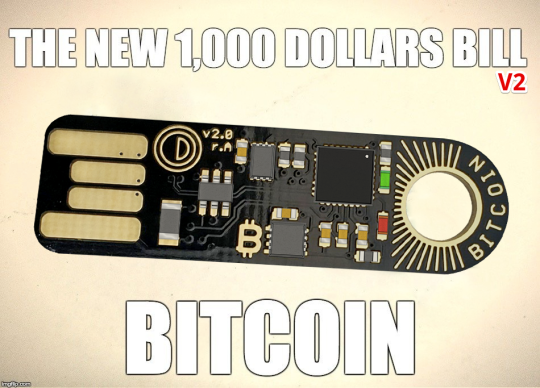
Opendime announced their USB stick that allows you to spend Bitcoin like a dollar bill:
Opendime is a small USB stick that allows you to spend Bitcoin like a dollar bill. Pass it along multiple times. Connect to any USB to check balance. Unseal anytime to spend online.
Hopefully everyone who needed an Opendime for Christmas has got it under the tree already, because we are now out of stock! But the big news is we’ve redesigned the hardware and improved it. Same price, same concept, but some useful improvements.
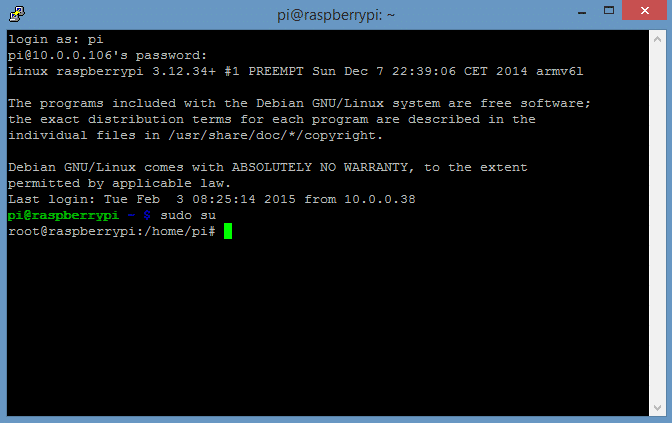
circuitbasics.com has posted an article about the most usefull Raspberry Pi commands:
Sometimes it’s hard to keep track of all the Raspberry Pi commands you use, so I created a list of some of the most useful and important ones that will make using Linux on the Raspberry Pi a lot easier. But first a quick note about user privileges…
42 of the Most Useful Raspberry Pi Commands – [Link]


 The Open-V is a 2x2mm chip that hosts built-in peripherals which any modern microcontroller could have. Currently, it has