Cheap ARM Cortex-m0 MCU Printed on Plastic Costs as low as 0.01$

Flexible electronics is one of the emerging technologies with the rise of connected things in IoT age. This increases the need of low cost electronics to use.

Photo Courtesy of PragmatiIC

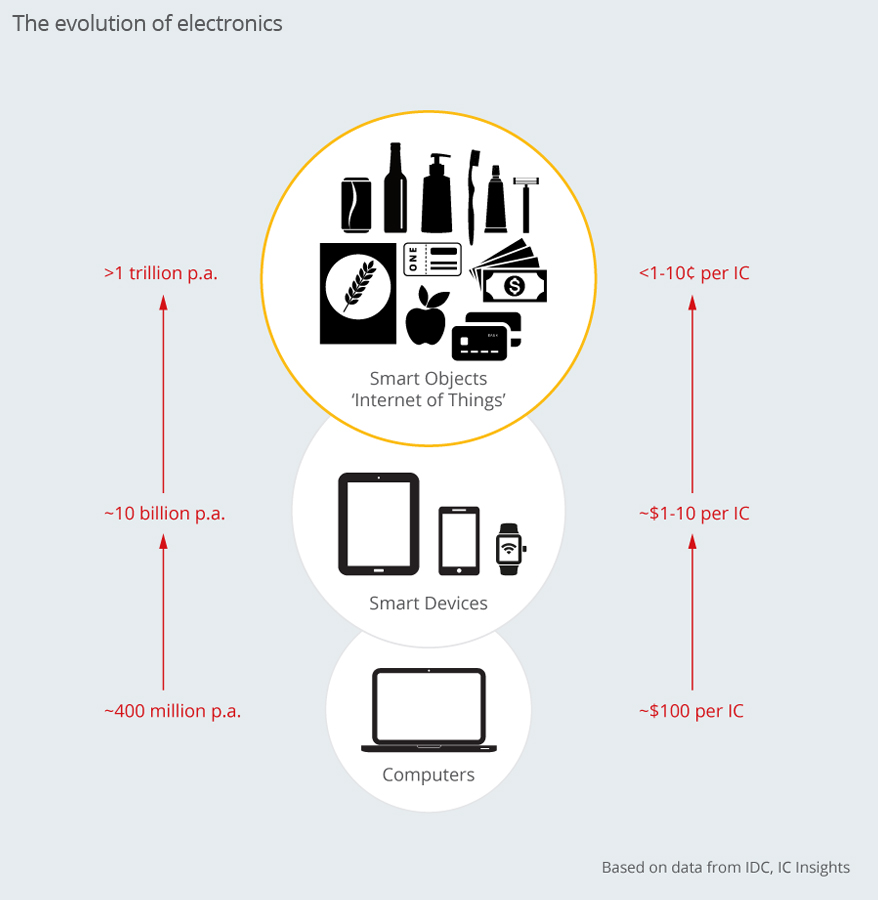
PragmatIC the specialized company in low cost flexible electronics wants to enable trillions of “smart objects” to sense and communicate with their environment, but the problem is: to turn ordinary objects —like clothing, documents, or packaging of consumer goods— into smart objects, the price needed for this is far below the cheapest silicon chip. Moreover, the thickness of silicon represents another obstacle to integrate electronics seamlessly into products. The PragmatIC’s approach tries to solve these problems.

Photo Courtesy of PragmatiIC

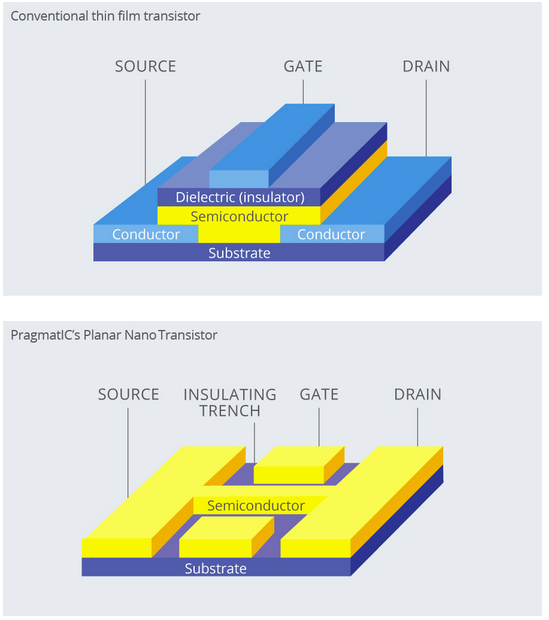
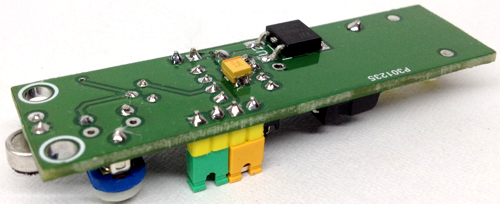
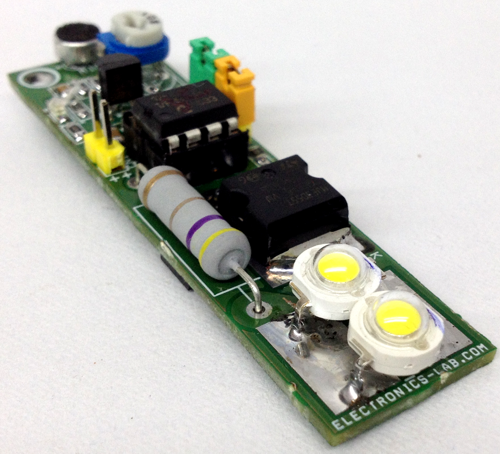
Pragmatic print electronics on a piece of 10-µm-thick plastic which is thinner than a human hair.

PING (Printed Intelligent NFC Game cards and packaging) and a bottle with illuminating brand are examples of use cases of Pragmatic solution.

Back to the title of this news, PlasticARM is the new project started 2 years earlier in collaboration with ARM to implement a fully functional 32-bit ARM Cortex-M0 MCU on 10-µm-thick flexible plastic.

Image Source: Charbax

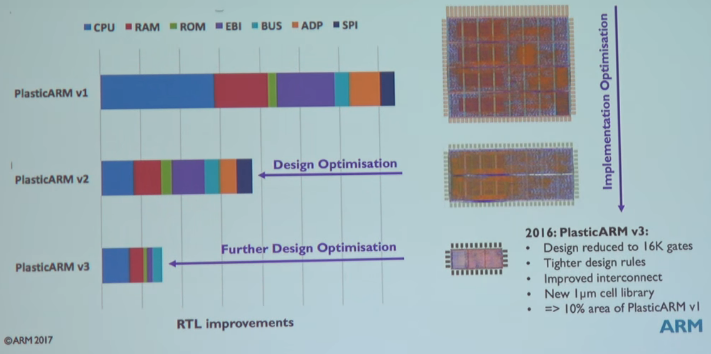
Charbax from ARMDevices.net made an interview with the CEO, Scott, during IDTechEx Show. Scott said that the last version of PlasticARM is printed on 1 square CM area and the next version will have the half size.
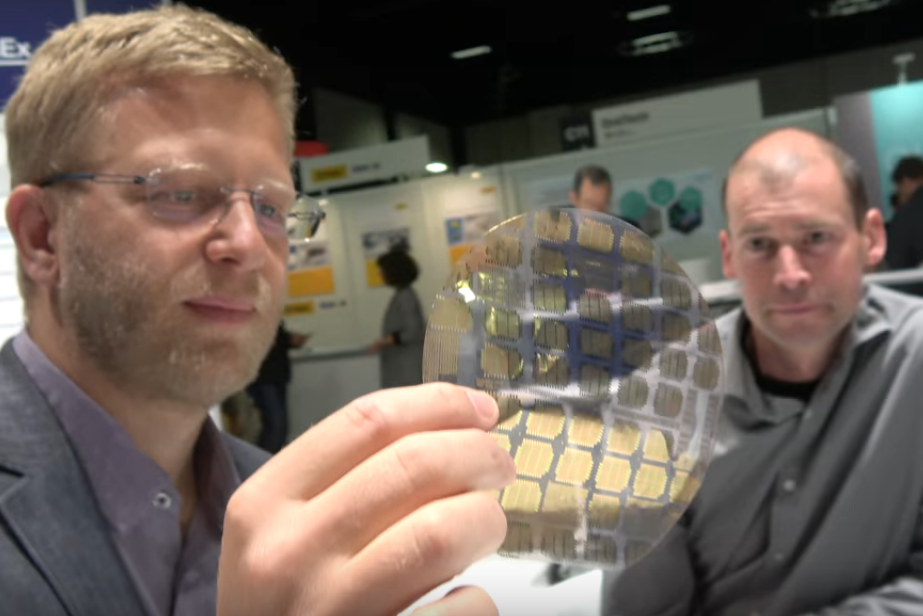
Cris —a VP Technology in ARM— holding Plastic ARM. Image Source: Charbax’s interview

Source: ARMdevices

Pulsar™ – a 4G cellular board

openh.io released their 4G Cat M1 cellular board bringing connectivity and remote management to low-bandwidth projects. The board is compatible with Arduino Zero and includes SAMD21 CPU for user code.

Your project can now evolve, even after release, with groundbreaking remote device management and debugging. Pulsar contains a Remote Cortex M0 to help maintain a connection with every device and updating over time.

Features:

  • 4G LTE  Cat M1 modem with GPS
  • No external antennas required
  • Dedicated management CPU with crypto engine
  • 10W digital power supply and battery charger with direct solar input
  • Able to mount Raspberry Pi Zero onto the board
  • Includes SAMD21 CPU for user code, Arduino Zero compatible with remote programming.
  • Bluetooth and NFC
  • FCC and Carrier certified

Pulsar™ – a 4G cellular board – [Link]

Temperature Controlled Fan With LED Status

This is a simple fan controller with single LED temperature status light using an ATtiny85 microcontroller and DS18B20 temperature sensor. The fan is turned on/off based on temperature sensed and the controller goes in sleep mode when the temperature drop below a predefined threshold.

Simple ATtiny85 fan controller to turn a fan on/off based on temperature. Includes an LED as a temperature indicator. LED is dim at start of fan on temperature and blinks when above a max temperature. Fan is not PWM controlled since I am using a small 5V fan which is quiet running at 100%. The controller is in sleep state while the temperature is below the minimum threshold and wakes up every ~8 seconds to recheck the temperature. When temperature is above minimum threshold, the controller will stay awake checking every second till the temperature falls below the minimum threshold. The code uses ds18b20 library by Davide Gironi.

Temperature Controlled Fan With LED Status – [Link]

Open-Q™ 212 Single Board Computer for your IoT Device

Intrinsyc released it’s Open-Q™ 212 SBC, a full-featured, low-cost IoT computer based on a powerful quad-core ARM Cortex A7 (32-bit) 1.267GHz processor, with integrated GPU and DSP. This single board computer has some nice features such as Wifi, Bluetooth, LCD 720p support, HDMI 720p H.264/H.265 playback, an 8MP camera, four microphone inputs and amplified stereo outputs. It also features 4x USB ports, ethernet, serial interface, RTC clock and Li-Ion battery support. The board is ideal for creating voice controlled devices with noise cancellation technology and other internet enabled projects. The board can be used as a development kit or be embedded on final product. On the software side it supports Android 7 and there is a call for Linux support. This board packs some great features and looks promising in the IoT world.  [via]

“We expect our Clients to use the board first as a development kit and then subsequently as an embedded SBC in their final product. It’s also likely that some Clients would want to de-feature or de-populate the SBC to lower the cost or to fit in a particular enclosure. Our team has the experience in hardware, software and mechanical engineering, we can quickly take the SBC’s core technology as is, and adjust the peripheral set. It’s our Client’s choice on how to proceed.” Said Intrinsyc.

Open-Q™ 212 SBC Specifications:

Processor
• Quad-Core ARM Cortex A7 (32-bit) 1.267GHz, GPU, DSP
Memory/Storage
• 1GB LPDDR3 RAM
• 8GB eMCP Flash
• MicroSD card socket
Wireless
• Pre-scanned Wi-Fi 802.11n 2.4Ghz, with chip antenna and U.FL antenna connector
• Bluetooth 4.1 + BLE
LCD/Display
• Up to 720p LCD or up to 720p HDMI Type A
Camera
• Up to 8MP over 2-lane MIPI CSI
Video
• 720p@30fps playback
• Up to 720p playback with H.264 (AVC) and H.265 (HEVC)
• Up to 720p H.264 (AVC) capture
Audio
• 4x microphone inputs
• 2x amplified speaker outputs
• 2x stereo line outputs
Power
• PMIC and Li-Ion battery support
I/O
• 4x USB 2.0 Type A host mode, Ethernet, Serial, RTC, I2S, GPIO, sensor header
OS Support
• Android 7 Nougat, Call for Linux
Operating Environment
• Input 12V/3A or single-cell Li-Ion battery
• Operating Temperature 0° C to +70°C
• Nano-ITX 120mm x 120mm

Open-Q™ 212 Single Board Computer for your IoT Device – [Link]

TRINUS The Affordable 2-in-1 3D Printer

Starting from the fact that most 3D printers under $500 experience technical failures after just few uses, a new powerful 3D printer has been launched to bridge the gap between affordability and professionalism, Trinus!

Trinus can be your 3D printer in a moment and your laser engraver the next one! The $299 2-in-1 printer is all metal, made of high-quality aluminum and steel parts in order to survive with the best performance ever. It also supports many types of filaments like PLA, ABS, PC, Flex, Wood and other materials available at the market.

Check out this video to learn more about Trinus:

Fortunately, you don’t have to spend a lot of time while assembling Trinus thanks to its 11 modular units that can be able to set up easily and quickly

This stable and accurate 3D printer is scaled down from industrial-grade machines giving it the ability to be durable.

“We were able to design a low-cost single-axis slide that delivers extremely high precision but keeps Trinus affordable. With all metal internal components, Trinus does not require constant recalibration. Its parts stay in place. Because it is so stable, Trinus maintains quality printing up to print speeds of 70 mm/sec, and is capable of running at a maximum speed of 150 mm/sec.”

Pause/change color, adjust speed and temperature, check elapsed time and percentage of completion are all accessible while operating thanks to the 3.2-inch LCD screen attached. Check this out in action.

Below are the specifications of each the printer and the laser engraver:

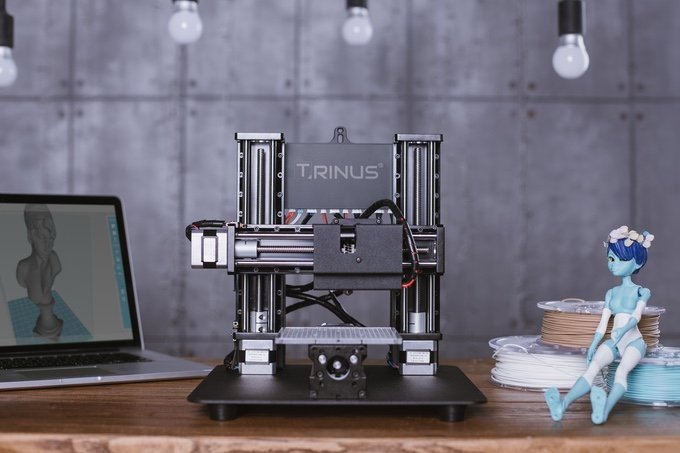
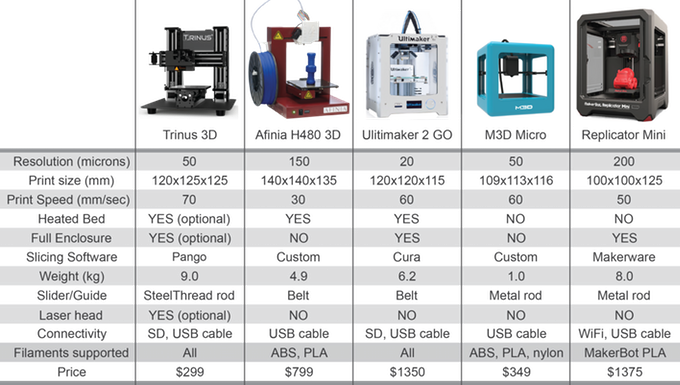
A table of comparison between Trinus and other products showing its huge capabilities with such an affordable price, check it out:

You can order your own TRINUS now at this link. A Kickstarter campaign was the way to market this printer and it had done a great job, $1,621,021 was pledged of $50,000 goal at the end of the campaign. Check it out the campaign to know more details.

New current sensors have no magnetic circuits

Clemens Valens @ elektormagazine.com discuss about LEM’s new current sensors which do not use the Hall effect make the measurement. Instead they integrate conductors for gradient measurement and provide immunity against the external fields. He writes:

Here are some new integrated circuit transducers for AC and DC isolated current measurement up to 300 KHz that offer full isolation, despite their small size, by integrating the primary conductor for nominal current measurements of up to 30 A. The transducers are mounted directly onto a printed circuit board as SO8 or SO16 SMT devices and support overload currents up to 200 A peak for short durations (1 ms).

New current sensors have no magnetic circuits – [Link]

Wooden Digital Clock is controlled over WiFi

androkavo @ instructables.com build a nice looking wooden clock that is able to show time, temperature, humidity and also it has alarm. The clock is controlled through your web browser using wifi connectivity and it also has a vibration sensor to stop the alarm.

Wooden Digital Clock is controlled over WiFi – [Link]

Sound Activated LED Light With Timer

Clap to light switch with timer project is very useful project for power saving applications. The project switches on the LED light for 45 to 60 seconds when receives two clap sound. This project can be used in store room, toilets, dark area where switch is not visible, night lamp, places where light on off switch is not accessible easily.

Single transistor used as microphone preamplifier, diode converts AC signal in to DC , and PIC micro-controller take care of LED On/OFF Time, LED  time depends on two jumpers J1, J2 which provides four options s 45, 50, 55, 60 seconds. MJE3055 transistor used in output to drive LED, one series resistor R10 helps to control the current going through LED, R10 can be alter as per LED Voltage and current. 3V to 12V LED with maximum current 500mA can be used. Use higher current Darlington transistor like TIP147 for higher current Load. Onboard potentiometer trimmer for sound sensitivity adjust. D1 power LED.

Sound Activated LED Light With Timer – [Link]

Sound Activated LED Light With Timer

Clap to light switch with timer project is very useful project for power saving applications. The project switches on the LED light for 45 to 60 seconds when receives two clap sound. This project can be used in store room, toilets, dark area where switch is not visible, night lamp, places where light on off switch is not accessible easily.

Single transistor used as microphone preamplifier, diode converts AC signal in to DC , and PIC micro-controller take care of LED On/OFF Time, LED  time depends on two jumpers J1, J2 which provides four options s 45, 50, 55, 60 seconds. MJE3055 transistor used in output to drive LED, one series resistor R10 helps to control the current going through LED, R10 can be alter as per LED Voltage and current. 3V to 12V LED with maximum current 500mA can be used. Use higher current Darlington transistor like TIP147 for higher current Load. Onboard potentiometer trimmer for sound sensitivity adjust. D1 power LED.

Jumper Settings (Timer)

  • J1 Close J2 Close = 60 Seconds
  • J1 Open J2 Open = 45 Seconds
  • J1 Open J2 Close = 50 Seconds
  • J1 Close J2 Open = 55 Seconds

Specifications:

  • Supply 12V DC @ 500mA
  • On board preset to set the sensitivity
  • On board Microphone
  • D1 1W/3W White LED

Schematic

Parts List

Photos

Video

HealthyPi v3 – Health HAT for Raspberry Pi

An open-source, multi-parameter, full fledged human body vital sign monitoring HAT for Raspberry Pi as well as standalone use.

HealthyPi is a do-it-yourself, open-source vital sign monitor based on the Raspberry Pi. THe HealthyPi board itself is a HAT add-on for the Raspberry Pi 3 which measures all the human body’s vital signs and sends it over to the Raspberry Pi. Couple it together with the official Raspberry Pi touchscreen and you’ve got a full-fledged vital sign monitor.

HealthyPi v3 – Health HAT for Raspberry Pi – [Link]

TOP PCB Companies