A simple and reliable programming & test jig

Pieter @ piconomix.com tipped us with his latest build. Check it out on the link below.

I recently had to create a programming jig for an ATmega328PB based board. 1mm diameter test pads were placed on the bottom of the PCB to give access to the ISP pins. Normally one would add two 3mm diameter holes to locate the PCB on the jig, but this PCB was too small and only had two indents on each side to keep it in place

A simple and reliable programming & test jig – [Link]

Easily Design HMI For Your LCD Projects With Nextion

Nextion display by ITead allows users to design their own interfaces all by themselves, even if they don’t have any coding background knowledge and can go with different platforms. This tool is the best solution to replace traditional TFT LCD and LED Nixie tube. Customers can use the software – Nextion Editor to design interfaces.

With the new capacitive 7-inch Nextion, you can build your own HMI with minimal design effort since all of the data and control signals are provided by the device to interface directly to the display. This offers enormous advantage to the designer in development time and cost saving and takes away all of the burden of low level design.

Nextion will help you quickly design visually in hours not weeks, turn long coding work into simple drag and drop operation, at a reasonable cost. What you only need, is interface a serial port to Nextion disply hardware. Check this demo to see how quickly and easily an application can be designed by dragging and dropping objections to the virtual screen on a WYSIWYG design IDE – Nextion Editor.

This is the second version of Nextion, where you can find a capacitive multi-touch display and a good looking bezel along with additional features in the software IDE. Below are the specifications of new Nextion:

Nextion is now live on a crowdfunding campaign on Indiegogo and still has 15 days to go. You can pre-order Nextion RTP now for $55. More details can be found at the official website.

Carbon Introduces SpeedCell System & Bigger 3D Printers

Since 2013, the additive manufacturing startup Carbon had altered the 3D printing industry. Carbon produced its industry-changing M1 3D printer and CLIP 3D printing technology, bringing never-before-seen printing speed and end-use-quality polymer parts to the market.

Today Carbon is on a mission to help manufacturers and designers cut their costs, waste less energy and materials while speeding up the time it takes to get from concept to product on the market. The company released its ‘SpeedCell’ system, a new service aimed at contract manufacturers, and other high volume manufacturing businesses.

SpeedCell is a system of securely connected products designed to upend traditional methods of manufacturing. The first components of the SpeedCell include two new products that provide a powerful solution for additive manufacturing at scale: The M2 3D printer, and the Smart Part Washer.

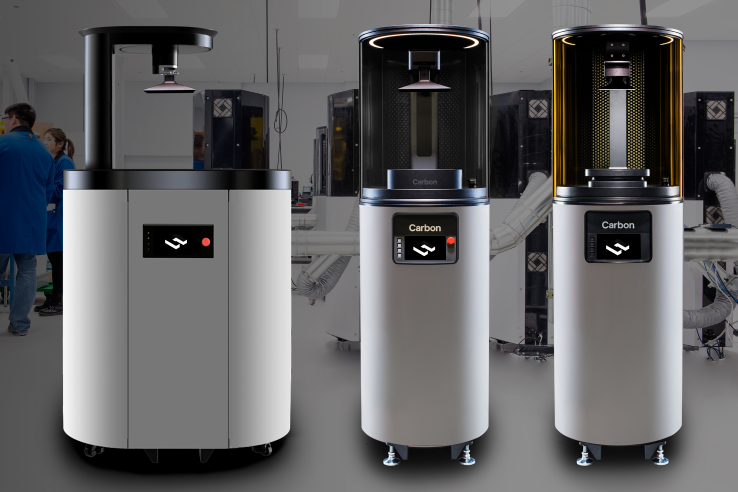
The Carbon M2, with a build volume of 190 x 118 x 326 mm, is twice the size of the M1,  and it enables the printing of larger parts or more parts per build with the same 75 µm resolution and isotropic quality as Carbon’s pioneering M1 printer.

The Smart Part Washer is a novel machine that automatically cleans parts in a fast, repeatable, environmentally friendly and part-specific manner.

The SpeedCell was developed as a response to the needs of Carbon’s customers and strategic partners, including BMW Group and General Electric. Fast Radius, in partnership with UPS, are new Carbon customers and are among Carbon’s SpeedCell launch partners. Additional launch partners include Dinsmore and Associates, Sculpteo, Primary Manufacturing, and The Technology House.

SpeedCell is offered in two configurations:

  • Design SpeedCell: couples one M Series printer with a Smart Part Washer, allowing product designers and engineers to iterate on product concepts with the confidence that their product can be turned into real parts at any volume.
  • Production SpeedCell: specifically designed for industrial manufacturing applications, pairs multiple production floor compatible M2 printers with a Smart Part Washer.

For our customers, this means that their product development cycles no longer need to include the antiquated traditional manufacturing process steps of designing, prototyping, tooling, and then production. Instead, products can be designed and engineered on a platform that is also the means of production, eliminating prototyping and tooling steps. This dis-intermediation is at the core of Carbon’s role in accelerating the much-anticipated digital revolution in manufacturing.

~ Said Dr. Joseph DeSimone, co-founder and CEO of Carbon.

According to Carbon, the combination of CLIP technology and the SpeedCell system allows for the production of previously impossible designs, such as complex assemblies combined into a single part, or lattices that can’t be produced by milling or molding. It also minimizes the tooling and prototyping stages of the design process and enables manufacturers to go directly to end-stage production.

SpeedCell is being marketed with the same subscription model that Carbon used for the M1, with prices as following for 3 years minimum term:

  • M1: $40,000 per year
  • M2: $50,000 per year
  • Smart Part Washer: $10,000 per year
  • SpeedCell Bundle (available until the end of 2017): Includes a free Smart Part Washer with three or more M Series printers

Carbon displayedthe SpeedCell at the Additive Manufacturing Users Group (AMUG) conference that took place in Chicago from March 19 to 23.

For further information, visit the official blog of launching the SpeedCell. You can also view an interview with Dr. Joseph DeSimone, co-founder and CEO of Carbon, about the new system at 3dprint.com.

USB Curve Tracer

A small and inexpensive USB-based curve tracer used for troubleshooting electronics in the style of the Huntron Tracker 2000. by Jason Jones:

This documents a USB-based curve tracer based on the PIC24FV16KM202, which is a modest 16-bit microcontroller. The board uses a PC screen OR an oscilloscope in XY mode as a display and may connect to multimeter probes for functionality.

USB Curve Tracer – [Link]

Coilcraft.com – Power inductor selection tool adds performance data

By Graham Prophet@ edn-europe.com:

Coilcraft has written a Power Inductor Selection Tool that allows users to easily select the appropriate path for their particular search while also providing more application-specific performance data than previously available.

Coilcraft.com – Power inductor selection tool adds performance data – [Link]

Add OLED Display To Your Projects With TeensyView

The Teensy is a complete USB-based microcontroller development system, in a very small footprint, capable of implementing many types of projects. All programming is done via the USB port. You can program for the Teensy in your favorite program editor using C or you can install the Teensyduino add-on for the Arduino IDE and write Arduino sketches for Teensy.

The processor on the Teensy also has access to the USB and can emulate any kind of USB device you need it to be, making it great for USB-MIDI and other HID projects. The 32 bit processor brings a few other features to the table as well, such as multiple channels of Direct Memory Access, several high-resolution ADCs and even an I2S digital audio interface! you can learn more about Teensy by visiting this page.

SparkFun had launched a new add-on to Teensy that can make it possible to add to it display functions. The SparkFun TeensyView brings you an easy way to add a small, white-on-black OLED to your Teensy development board. The 128×32 monochrome display is controlled with the popular SSD1306 IC, and is a great way to display debug information and to visualize data without the need for a serial terminal. The board matches the Teensy 3 form factor perfectly, and was designed from the ground up to be as flexible as possible while still being able to nest down into a low-profile addition for the Teensy.

The TeensyView comes with everything you need except the headers. Additionally, there are jumpers on one side of the board that allow you to configure how the OLED communicates with the attached Teensy. Since this is a headerless board, you have the option to solder on whatever type of header best fits your needs. Headers you may find useful with this product include the Teensy Header Kit, Straight Headers, Long Straight Headers and Female Headers.

Teensy 3.2 is available at SparkFun for $19.95 and TeensyView is available for $14.95. TeensyView right now is out of stock but you can still follow up and get a notification once it returns to stock.

You can know more in-action details by checking this SparkFun tutorial and checking theses links SchematicEagle FilesDrawing BitmapsOLED Memory MapDatasheet (SSD1306), Arduino Library, and GitHub!

Source: SparkFun

Send & Receive Radio With A Single Chip

Fitting transmit and receive capabilities of radio signals into one device may be impossible without using a significant filter, which is needed to isolate sent and received signals from each other.

The major obstacle to achieve that is the weakness of the received signal compared with the much stronger transmitted signal. However, researchers from Cornell University found their way to jump over this obstacle and created a two-way transceiver chip.

Alyosha Molnar, associate professor of electrical and computer engineering (ECE), and Alyssa Apsel, professor of ECE, had come up with a new solution to separate the signals. They made the transmitter consist of six sub-transmitters hooked into an artificial transmission line. Each one sends a weighted signal at regular intervals which combined with others such as a radio frequency signal in the forward direction, and at the same time they cancel each other in the opposite direction (towards to receiver).

The programmability of the individual outputs allows this simultaneous summation and cancellation to be tuned across a wide range of frequencies, and to adjust to signal strength at the antenna.

“You put the antenna at one end and the amplified signal goes out the antenna, and you put the receiver at the other end and that’s where the nulling happens,” Molnar said. “Your receiver sees the antenna through this wire, the transmission line, but it doesn’t see the transmit signal because it’s canceling itself out at that end.”

This research is based on a research reported six years ago by a group from Stanford University, which demonstrated a way for the transmitter to filter its own transmission, allowing the weaker incoming signal to be heard.

One of the sub-transmitter concept enhancements is that it will work over a range of frequencies, and instead of using a filter for every band, signal separation can be controlled digitally.

“You could have a single device that can be anything,” Apsel said. “You wouldn’t have to buy a new piece of equipment to have the newest version of it.”

You can find the full research at the IEEE Journal of Solid State Physics.

Arduino Parking Assistant

addictedToArduino @ instructables.com designed a Arduino based parking assistant.

To appease my frustration I decided to design a device that would allow me to park in the exact spot every time. I love working with arduinos, leds, sensors, and nearly anything else electronic, so I knew from the start that it would probably end up as a contraption with an Arduino inside and a bunch of leds on the front!

Arduino Parking Assistant – [Link]

Raspberry Pi Security System

MWAGNER @ hackmypi.com build a security camera based on Raspberry Pi:

A family member asked me to put a camera in our garage recently, and immediately I decided to use a Pi Zero. Back when I was interviewing for my current job, I was dabbling with the idea of making a wireless, battery powered IP camera that I was going to attach to my dog, and get some cool footage of my dog running around.

Raspberry Pi Security System – [Link]

TOP PCB Companies