Amplifier requires no dc bias

john guy @ edn.com writes:

Intrinsically capacitive transducers and other high-impedance signal sources usually require ac coupling and a buffer amplifier to condition the signal for further processing. Buffers take many forms, but most of them compromise signal quality through the use of external resistors that provide a dc path for the input bias current. Recent improvements in op-amp technology allow ac-coupled inputs without the need for bias resistors.

Amplifier requires no dc bias – [Link]

LiFePO4wered/Solar1 – Solar power supply for IoT devices

Patrick Van Oosterwijck @ hackaday.io writes:

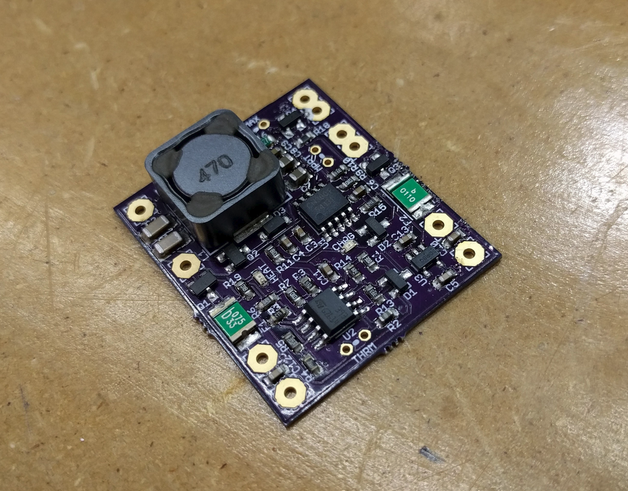
Solar power is not trivial, especially if it needs to be reliable and have a long lifetime for outdoor deployment such as IoT sensor nodes. This project is an effort to create a complete, easy to use solar power system that provides the following features:
– LiFePO4 battery for high charge cycle count, high temperature performance and 3.2V output voltage (compatible with most chips used in IoT).
– Switch mode MPPT charge controller for high efficiency, 5-30V solar input range.
– Charge and output current up to 2A (depending on the battery capacity).
– Automatic heater control to bring the battery up to temperature before charging, ensuring maximum battery life.
– Low voltage cutoff disconnects the load from the battery when the battery voltage becomes too low, again ensuring maximum battery life.
– User can set MPPT voltage, charge current and connect an external thermistor if desired.

LiFePO4wered/Solar1 – Solar power supply for IoT devices – [Link]

Easy ARM Programming With 1Bitsy & Black Magic Probe

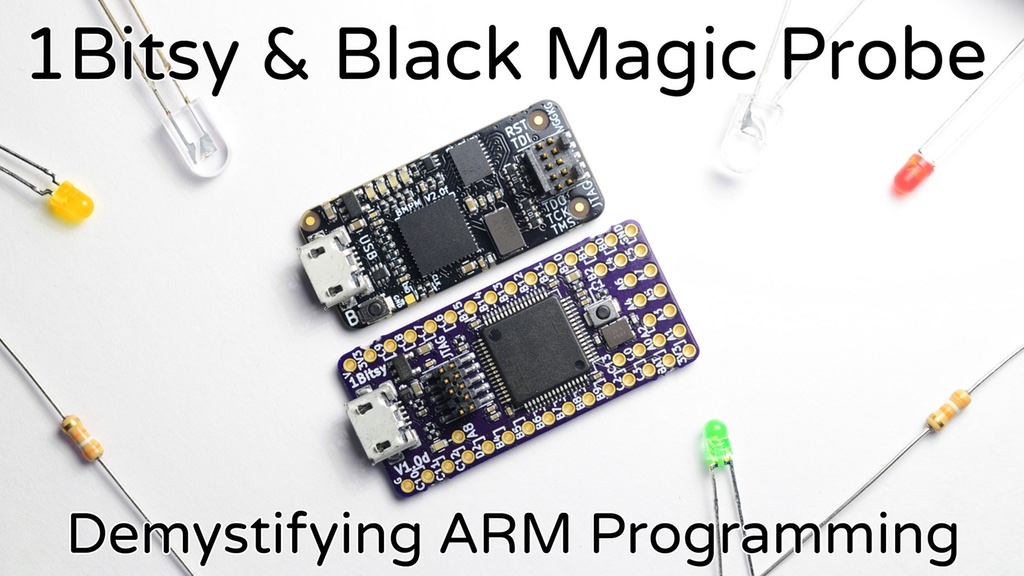
1 Bit Squared executes hardware and software design, development and manufacturing for a wide range of micro to nano UAV systems available on the market: from quadcopters to multicopters as well as airplanes, helicopters and transitioning vehicles. A Kickstarter campaign was launched to unveil  the new Black Magic Probe V2.1 with its companion demo platform 1Bitsy V1.0.

The Black Magic Probe is a JTAG and SWD Adapter used for programming and debugging ARM Cortex MCUs. It’s the best friend of any ARM microcontroller developer. It works like a brain tap, it allows you to inspect and affect any aspect of the program you are running on your 1Bitsy without having to add special code. 1Bitsy is a user friendly open-source ARM Cortex-M4F Development Platform.

Check the campaign video to know more about the new products.

The Plug & Play JTAG/SWD ARM debugger features:

  • On board implementation of JTAG (Joint Test Access Group) protocol
  • On board implementation of the SWD (Serial Wire Debug) protocol
  • High speed data interface to the Device Under Test 4.5MBit
  • On board implementation of the GNU Debugger Server protocol (no need for OpenOCD) works with stock arm-none-eabi-gdb (no patches or plugins needed)
  • Automatic detection of the Device Under Test (no need for config files)
  • Frontend Level shifter. Usable with targets that run on voltages as low as 1.7V and as high as 5V.

In efforts to demystify ARM programming, you are now able to do the following applications while using a Black Magic Probe:

  • Interrupt program
  • Inspect and modify registers and variables
  • Watch variables (the program gets interrupted and reports a variable value change)
  • Breakpoints (you can set a point in your code that will cause the program to stop as soon as it is reached)
  • Call stack and backtrace (you can see what functions, with which parameters brought us to the current point and state of the program)
  • Disassembly (see the machine code and find out exactly what your program is doing)
  • Dump memory (download the RAM and/or flash content to a file)

1Betsy & Black Magic was available as an early bird combo for $65. The campaign has exceeded its $10,000 goal with $47,841 and should be delivering rewards now. More technical details can be reached at the campaign and the official website.

Niryo One, Your Next Affordable 6-Axis Robotic Arm

Two French engineers who are passionate about innovative use cases made out of new technologies and building accessible and collaborative robot, are now mixing last technology progresses in mechanics, electronics and computer science to deliver a new product: Niryo One!

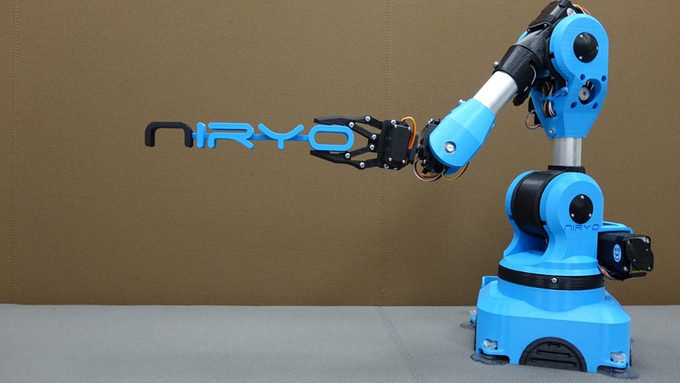
Niryo One is an accessible 6 axis robotic arm, made for makers, education, and small companies, and powered by Arduino, Raspberry Pi and ROS. The 3D printed robot will be customizable since you can print out your pieces and customize them the way you like. STL files will be open source soon.

In a mission to democratize robotics, Niryo One team is working on making it affordable and user friendly. Endless number of applications are possible by using Niryo One, like drilling, pick and place operations, and many other options thanks to the 6-axis available.

Niryo One can be controlled in many ways, whether using a web and mobile application, a joystick, or just your hands in its learning mode. Also you can control it using G-code if you want to use Niryo as a CNC.

Connected with the cloud, each update and project you do with Niryo will be synced there, with the ability to share it with the online community. More gadgets and tools will be added to the cloud and you will also get free app updates.

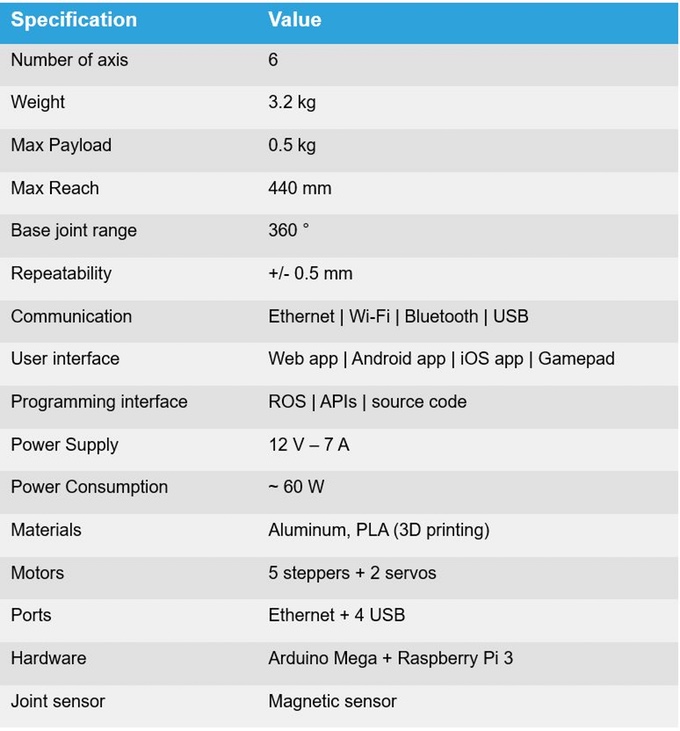
Technical Specifications

As makers ourself, we love 3D printing, Arduino and Raspberry Pi. Those are great to learn robotics, with the help of the online community. We want to go a step further, by embed those technologies and electronics platforms in Niryo One, to show to the world that, yes,  we can make a real useful product with 3D printing, Arduino and Raspberry Pi. We hope that more people will be interested in learning these technologies when seeing what our robot can do, so it will reinforce the community around robotics projects.

Niryo One is now live on Kickstarter and still has 35 days to go. You can pre-order a mini Niryo One kit for $119 and the early bird Niryo One maker kit for $549. More details can be found at the official website.

Body Heat Provides Wearables With Eternal Power

The first watch to make use of the body’s natural heat to uphold battery charge in wearables is now even being crowdfunded on Indiegogo. Who else but researchers from Texas A&M University (a hot place) came up with the solution.


In today’s wearables battery life is a bottleneck, as increasing amounts of technology gets packed into lightweight designs comfortable enough for everyday wear. That’s why Texas A&M professor Choongho Yu and his PhD student, Suk Lae Kim, designed a thermally-chargeable solid-state supercapacitor.

Despite having no apparent links with the researchers, a smartwatch which uses the same thermoelectric concept has arrived on Indiegogo seeking crowdfunding. The MATRIX PowerWatch claims to be the world’s first smartwatch that you never have to charge.

Thermoelectric technology converting heat to electric power is based on the Seebeck effect discovered in 1821. In the absence of an applied voltage gradient, an electric current can still be generated if there is a temperature gradient. A thermoelectric material must have a low thermal conductivity and high electrical conductivity to function efficiently.

PowerWatch runs off your body heat and when you take it off, your data is stored in memory and it goes to sleep. When you put it back on, the watch resumes where you left it. It’s got a power meter that tells you how much electricity your body heat is producing.

The standard Indiegogo pricing is $139, the crowdfunding page is here. On January 14, 2017 the product  was 937% funded.

Source: Elektor

SimpleLink MCU platform Launched By TI For Scalable Product Development

Texas Instruments has announced the SimpleLink MCU platform, which is transforming the pace of product proliferation by uniting a robust set of hardware, software and tools under a single development environment.

The SimpleLink MCU platform offers a new software development kits (SDKs) based on a shared foundation of drivers, frameworks and libraries to enable scalability with 100% code reuse, which will reduce design time and allow makers to invest once and leverage across multiple products.

Developers will be able to choose from any of the 32-bit wired and wireless ARM-based MCU devices, making their products easily adapted to changing design or application requirements.

Features of SimpleLink SDK:

  • 100 percent code compatibility across SimpleLink MCU portfolio
  • TI Drivers offers standardized set of functional APIs for integrated peripherals
  • Integrated TI-RTOS, a robust, intelligent kernel for complete, out-of-the-box development
  • POSIX-compatible APIs offer flexible OS/kernels support
  • Encryption-enabled security features
  • IoT stacks and plugins to add functionality to your design

At the same time, TI also announced a new generation of Wi-Fi chips and modules, the SimpleLink Wi-Fi CC3220 wireless MCU and CC3120 wireless network processor.

The CC3220 features a 80MHz Cortex-M4 application processor, with 256k of RAM and 1Mbyte of flash, and a network processor with a hardware crypto engine. While the CC3220 supports Wi-Fi, the range will be extended in the coming months with devices supporting Bluetooth Low Energy and sub GHz communications, as well as a Bluetooth LE/sub GHz dual band part.

“Developers need to ask what needs to be protected, what they are protecting against and what are the exposure points. The CC3220 provides more than 25 security enablers to handle such aspects as key management and code protection.” Mattias Lange, general manager of embedded connectivity solutions, noted.

The SimpleLink platform delivers the most security features, along with the broadest connectivity protocol support and advanced analog integration, combined with the industry’s lowest power wireless MCUs. Bringing together all of TI’s low-power, connected ARM MCUs, including MSP432™ devices, the platform offers:

  • Bluetooth® low energy: CC2640R2F and CC2640R2F-Q1 wireless MCUs
  • Dual-band (Sub-1 GHz and Bluetooth low energy): CC1350 wireless MCU
  • Host MCU: MSP432 MCU
  • Sub-1 GHz: CC1310 wireless MCU
  • Wi-Fi: CC3220 wireless MCU, CC3120 wireless network processor

The CC3220 wireless MCU LaunchPad development kit [CC3220SF-LAUNCHXL] is available for $49.99 and the CC3120 wireless network processor BoosterPack plug-in module [CC3120BOOST] is available for $29.99. The CC3220 will be priced at $4.99 in 1,000-unit quantities.

SimpleLink Microcontrollers and Network Processors

You can learn more details and discover all SimpleLink processors, development kits and tools at the official website.

Robust C Library and Utility for GPIO sysfs Interface in Linux

by Derek Hildreth – Technologic Systems

This comprehensive and easy to read example C code is designed to work alone or included as a library for dealing with general purpose I/O via the sysfs interface in Linux.  It can easily be applied to any computer which utilizes the GPIO sysfs interface (both pro and maker boards).  Getting started is a breeze.  You just need to decide if you’re going to use it as a library (including it into your existing code) or as a stand-alone utility.  We’ll talk about  in this article, but first and foremost, here’s the source code we’ll be working with:

https://github.com/embeddedarm/gpio-sysfs-demo

To get started, download or clone this repository to your board, extract it, and change your directory to it, like so:

wget https://github.com/embeddedarm/gpio-sysfs-demo/archive/master.zip
unzip master.zip
cd gpio-sysfs-demo-master/

The two important files in this repository came from Technologic System’s GitHub pages:

The included Makefile makes quick work out of compiling the example code mentioned in the sections below, as you’ll see soon enough.

Stand-Alone Utility

As a stand-alone utility, you can easily copy the resulting gpioctl program to a directory in your current PATH and include in a script or use it for those one-off commands.

To do this, we’ll simply run sudo make install.  The Makefile will compile the standalone utility using (essentially) gcc -D CTL gpiolib.c -o gpioctl and then automatically copy it to /usr/local/bin, which is popularly included in PATH.  Then, you can run gpioctl –help for instructions on how to use it.  For example, say you want to output logical high on DIO #59.  You would first set the DIO to be an output, and then you’d set it.  Here’s an example of toggling it:

gpioctl –ddrout 59

gpioctl –setout 59

gpioctl –clrout 59

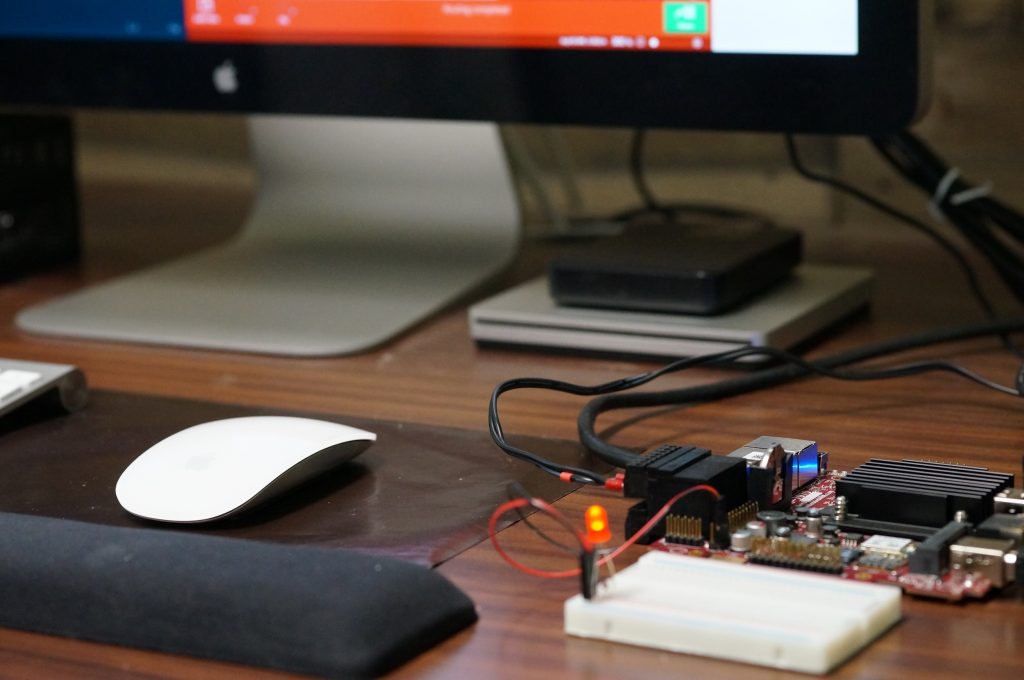
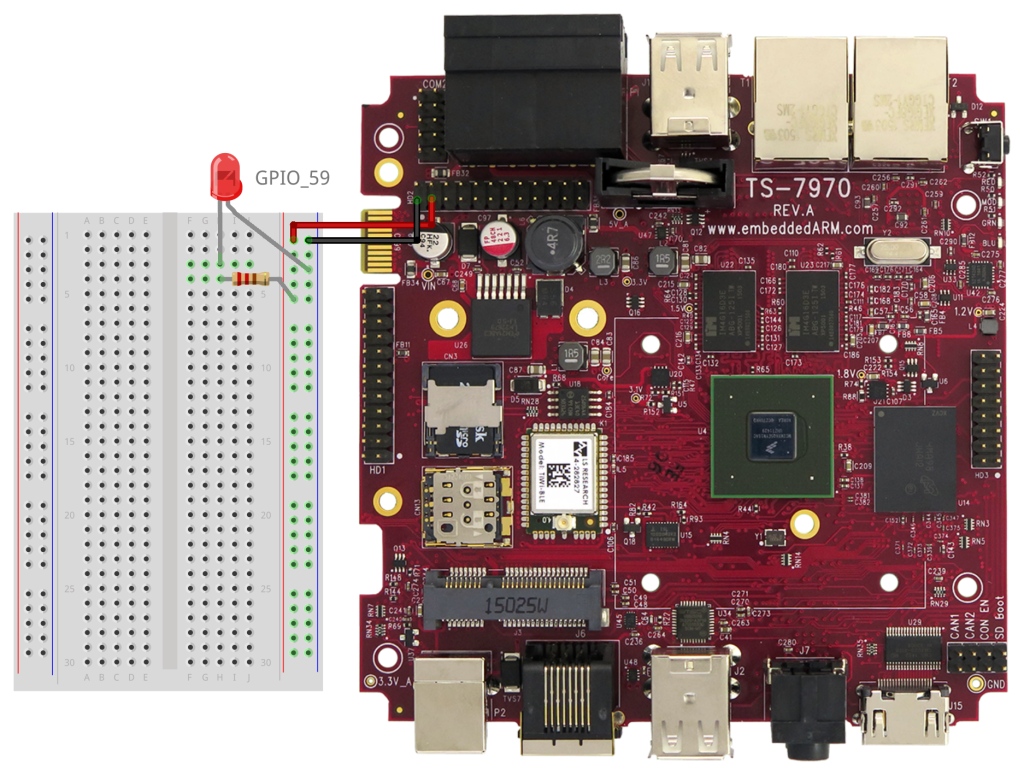
That’s it!  If, say, DIO #59 was tied to an LED, you should see the LED turn on and off again.
 

Now you can easily include these commands into a bash shell script or Python system call or, well, you get the point.

Pro Tip: Keep in mind, the LED may be active low, so you might actually see the opposite (logic high output turns the LED off, logic low output turns the LED on).

Include as Library

Okay, so if you wanted to use this as a library, giving our own C program access to the helpful functions included in gpioctl.c, we need to include it as a source when compiling our program.  You’ll find the example source code gpiodemo.c included in the repository you downloaded earlier:

#include <stdlib.h>
#include <stdio.h>
#include <unistd.h>
#include "gpiolib.h"

int main(int argc, char **argv)  {
    int gpio_pin = 59;
    gpio_export(gpio_pin);
    gpio_direction(gpio_pin, 1);

    for(int i = 0; i < 5; i++) {
        printf(">> GPIO %d ON\n", gpio_pin);
        gpio_write(gpio_pin, 1);

        sleep(1);

        printf(">> GPIO %d OFF\n", gpio_pin);
        gpio_write(gpio_pin, 0);   

        sleep(1);
    }                                                                                                                                                      
    return 0;
}

If you simply run make, you’ll get a compiled gpiodemo binary which simply toggles DIO #59, which is connected to an LED on a breadboard.  Referring to the Makefile, you’ll see it’s compiling the example code by running gcc -o gpiodemo gpiolib.c gpiodemo.c.  Now, you can take this knowledge and example and apply it to your own project.

Bonus: Very Fast GPIO

The sysfs API allows for very simple IO access, but it is not very fast.  For example, on the TS-4900 sending out a square wave on a single CPU GPIO through the sysfs API will toggle at around 160 – 170 KHz.  The same IO accessed through registers will toggle at 1.66 – 1.74 MHz.  FPGA GPIO will always be slow at around 700hz.  If you’re needing higher performance GPIO programming in order to meet very specific timing requirements, you might want to take a look at the gpiolib-fast.c solution.  Basically, instead of going through sysfs, you’ll be using the GPIO memory registers directly.  Take care in doing so, as the operations aren’t atomic and can therefore foul things up in unexpected ways.  Kernel drivers or other processes accessing GPIO in the same bank performing a read/modify/write can rewrite the same register with old values causing unexpected results.  Source code can be found here:

Conclusion

You should now be able to control GPIO through the sysfs interface like a boss!  We hope this article was helpful in getting your project off the ground quickly.  If it made your day, please consider sharing it!  If you have questions, please use the comments below.

Arduino 433Mhz RF Wireless Data Transfer

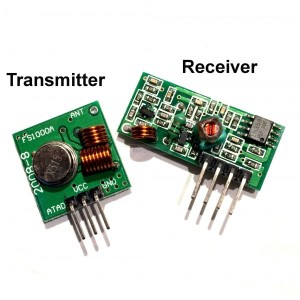
runtimeprojects.com has a tutorial on how to use 433Mhz modules to communicate between 2 Arduinos.

The most practical and cool way of sharing data from 1 Arduino to another is by far using a radio transmitter and receiver. The simplest form of wireless transmission (I could find) is the 433Mhz ASK modules. They come in pairs, a receiver and a transmitter. They are ridiculously cheap, selling at $1 or less a pair!!

Arduino 433Mhz RF Wireless Data Transfer – [Link]

5V Regulator Cap for 9V battery

David Cook built a 5V regulator to sit atop a 9V battery:

For quick portable projects and temporary hacks, it is often faster to reuse a simple 5V regulator circuit than to integrate a power supply into the device design. My toolbox has an LED tester and magnifier light, so why not add a convenient 5V regulator cap to the collection? There are nicer ones on the market that have surface mount components, but half the fun of an electronics hobby is creating something basic in your own style. This double-decker board with flashing LED power indicator allowed me to experiment with flush battery snaps and board interconnects.

5V Regulator Cap for 9V battery – [Link]

TOP PCB Companies