Shahriar @ The Signal Path did a teardown and repair of Tektronix RSA real-time spectrum analyzer.
In this episode Shahriar attempts a difficult repair of a Tektronix RSA real-time spectrum analyzer. This well-equipped instrument reports several error messages during startup POST including LO Unlock as well as Signal Path failures. The service manual of the instrument does not provide any detailed block diagram and no schematics. Most failures require the instrument to be serviced by the Tektronix factory. The equipment has various advanced options including 110MHz analysis bandwidth, digital modulation analysis, wide-band IF output and deep memory.
Teardown, Repair and Experiments with a Tektronix RSA 6114A Real-Time Spectrum Analyzer – [Link]
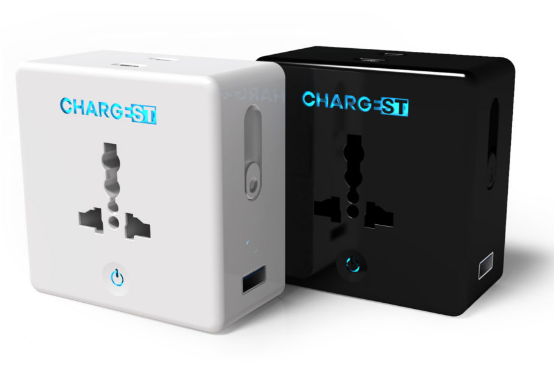
When you travel, it’s a bit frustrating to fill your luggage with lots of chargers, cables, and adapters to fit your charging needs. In addition to the space it takes which makes it harder to bring every kind of charger you may need.
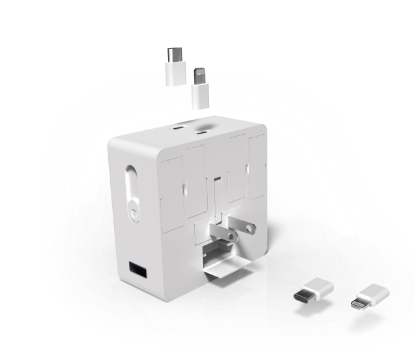
ChargEST is designed to become your charging companion anywhere in the world you might be, so you can power up all your devices with a single accessory. It is compatible with USA, UK, Europe, Australia and 150 other outlet and plug standards, that charges cable-less up to two mobile devices with its fast-charging integrated pins and any other devices with the three USB ports.
The ChargEST is a small 8x8x4 cm portable device that fits in your pocket. It is built using high-quality materials and has three fast-charging USB ports, GoGreen on/off button, two height adjustable MicroUSB pins, and USB-C and Lightning plug extensions. You can charge up to six devices at the same time with 6.3A total charging power.
Safety comes as a top priority for ChargEST. Equipped with child-proof design and protection for overheating, short-circuit, voltage variation, and overcharging, you can be assured of having a safe charging experience every single time.
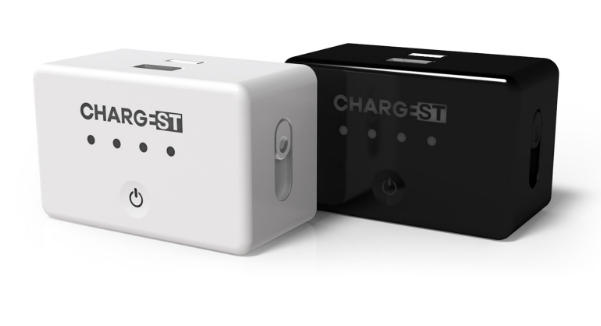
In addition to the ChargEST adapter, there are another two versions: ChargEST Bank, and ChargEST Double. The Bank provides you with extra 6300mA battery for your ChargEST to stay charged wherever you are on the go. It can fully-charge your iPhone or Android smartphone up to 3 times and also has an additional USB outlet to charge any other device.
ChargEST Double is the same of the original ChargEST but with an extra socket to connect other devices.
Six days left for the Indiegogo campaign with a goal of $20,000. However, they raised around $200k till now.
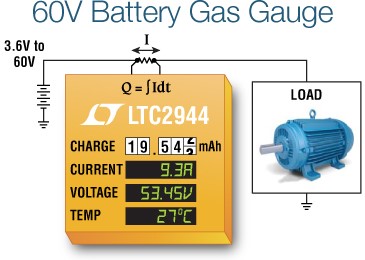
The LTC2944 measures battery charge state, battery voltage, battery current and its own temperature in portable product applications. The wide input voltage range allows use with multicell batteries up to 60V. A precision coulomb counter integrates current through a sense resistor between the battery’s positive terminal and the load or charger. Voltage, current and temperature are measured with an internal 14-bit No Latency ΔΣ ADC. The measurements are stored in internal registers accessible via the onboard I2C/SMBus interface.
LTC2944 – 60V Battery Gas Gauge with Temperature, Voltage and Current Measurement – [Link]
How to Connect to a Raspberry Pi Directly with an Ethernet Cable.
Ethernet is the fastest and most reliable way to connect to your Pi. You can set this up in just a few steps and never get disconnected from network time outs or low bandwidth on your network. You can access your Pi without even being on a network. If you travel with your Pi, all you need is a laptop and an ethernet cable to connect to your Pi!
How to Connect to a Raspberry Pi Directly with an Ethernet Cable – [Link]
A new challenge is posted on Elektor, for building a charger project for 3.6-V single-cell lithium iron phosphate (LiFePO4), a kind of Li-Ion rechargeable battery for high power applications, such as EV car , Power Tool and RC hobby. Elektor magazine has so many DIY projects about battery chargers and none of them is about this battery, so it thinks now the time to make everyone contributes by sharing their inventions. Below sharing some information in order to complete the challenge.
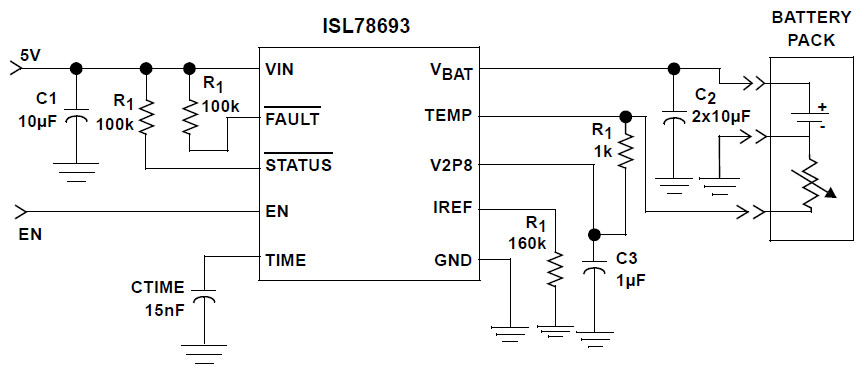
Intersil’s ISL78693 is qualified to AEC-Q100 Grade-3, leaks only 3 µA, and is suitable for eCall back-up battery charging. In the event of a crash, eCall systems are intended to automatically broadcast location and contact the nearest 24-hour emergency call centre for help. They must “be capable of operating reliably and autonomously from the backup battery at a moment’s notice, even if the vehicle is involved in an accident minutes after being parked for several months,” said Intersil. 3 µA is a maximum, with typical leakage of 700 nA.
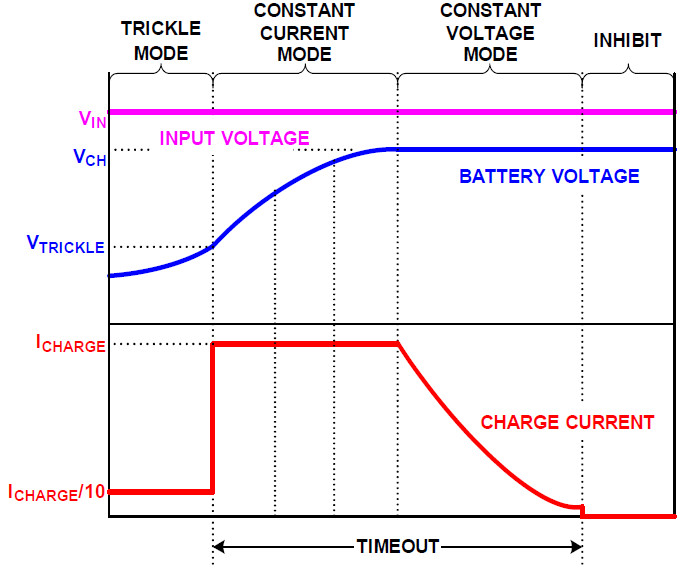
LiFePO4 chemistry needs charging at 3.6 V – less than the 4.2 V typically offed by charge chips aimed at more conventional Li-ion cells. Charging is up to 1 amp. A charge current thermal fold-back feature prevents over-heating by automatically reducing the battery charging current, and low-temperature detection prevents charging if the cell is too cold to accept electrons.
The ISL78693 requires only five external passive components. It’s a linear charger, so none of these are inductors. More good news: the 3.6-V ISL78693 is pin-compatible with the 4.1-V ISL78692 Li-ion battery charger. Neither will work from nominal 12-V car voltages though so you have to slap up some dc-dc converter to bridge the gap.
No articles had been launched yet about making the charger, you can be the first! It is true that no awards are mentioned, but at least you will make the world a better place by sharing your ideas. Go to www.elektormagazine.com/labs, share your LiFePO4 project and be a part of this DIY power supplies challenge by Elektor.
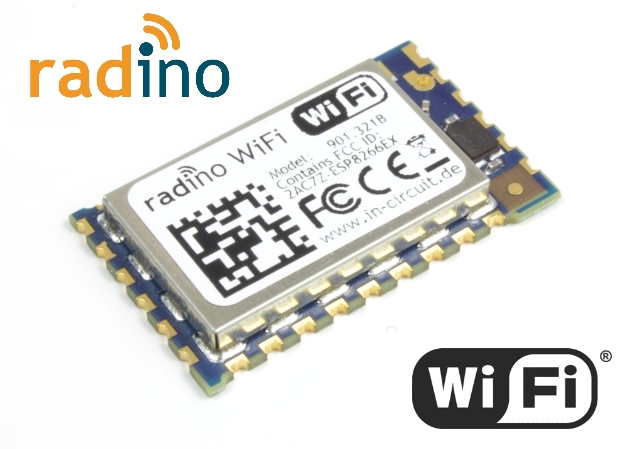
The Internet of Things or IoT technology is booming nowadays. Almost all makers are getting interested towards this field of endless possibilities. The Arduino and the ESP8266 are strong bases of this awesome technology. But, what will happen if we merge an Arduino with an ESP8266EX under the same package? Well, the answer is “Radino WiFi”.
Radino WiFi: The Arduino compatible WiFi Module
The In-Circuit Radino WiFi combines an ATmega32U4 with the popular ESP8266EX WiFi SoC to the small
Radino package. The ATmega32U4 MCU is also used in Arduino Micro. In Radino, the MCU is preprogrammed with Arduino bootloader. Hence, you can use Arduino IDE for uploading codes to this Arduino-compatible device. In-Circuit stated on their website:
It′s part of the radino-series, which provides full Arduino-compatible wireless communication devices in a small form factor, all pins are compatible with each other.
Features:
Arduino-compatible
Fully integrated WiFi Chip ESP8266EX by Espressif
802.11 b/g/n protocol
Wi-Fi Direct (P2P), soft-AP
Integrated TCP/IP protocol stack
Integrated TR switch, balun, LNA, power amplifier and matching network
Radino WiFi consists of two chips. An ATMega32U4 and an ESP8266EX. The ATmega32U4 is used as I/O machine for the ESP8266EX. It performs all the required tasks to control I/Os. In the other hand, ESP8266EX is the main WiFi chip and all WiFi services run only on the ESP.
The Radino comes preprogrammed with an ESP based web server. The default settings are given below:
Access point: RADINO-WIFI
Password: 12345678
TCP/UDP service for UART-Bridge/WiFi
Default IP: 192.168.2.1
The user can change these default settings anytime.
Download the Radino library for Arduino IDE 1.6 from here. Add this library to Arduino IDE and select Radino board from board manager.
This video explains how to use this amazing module.
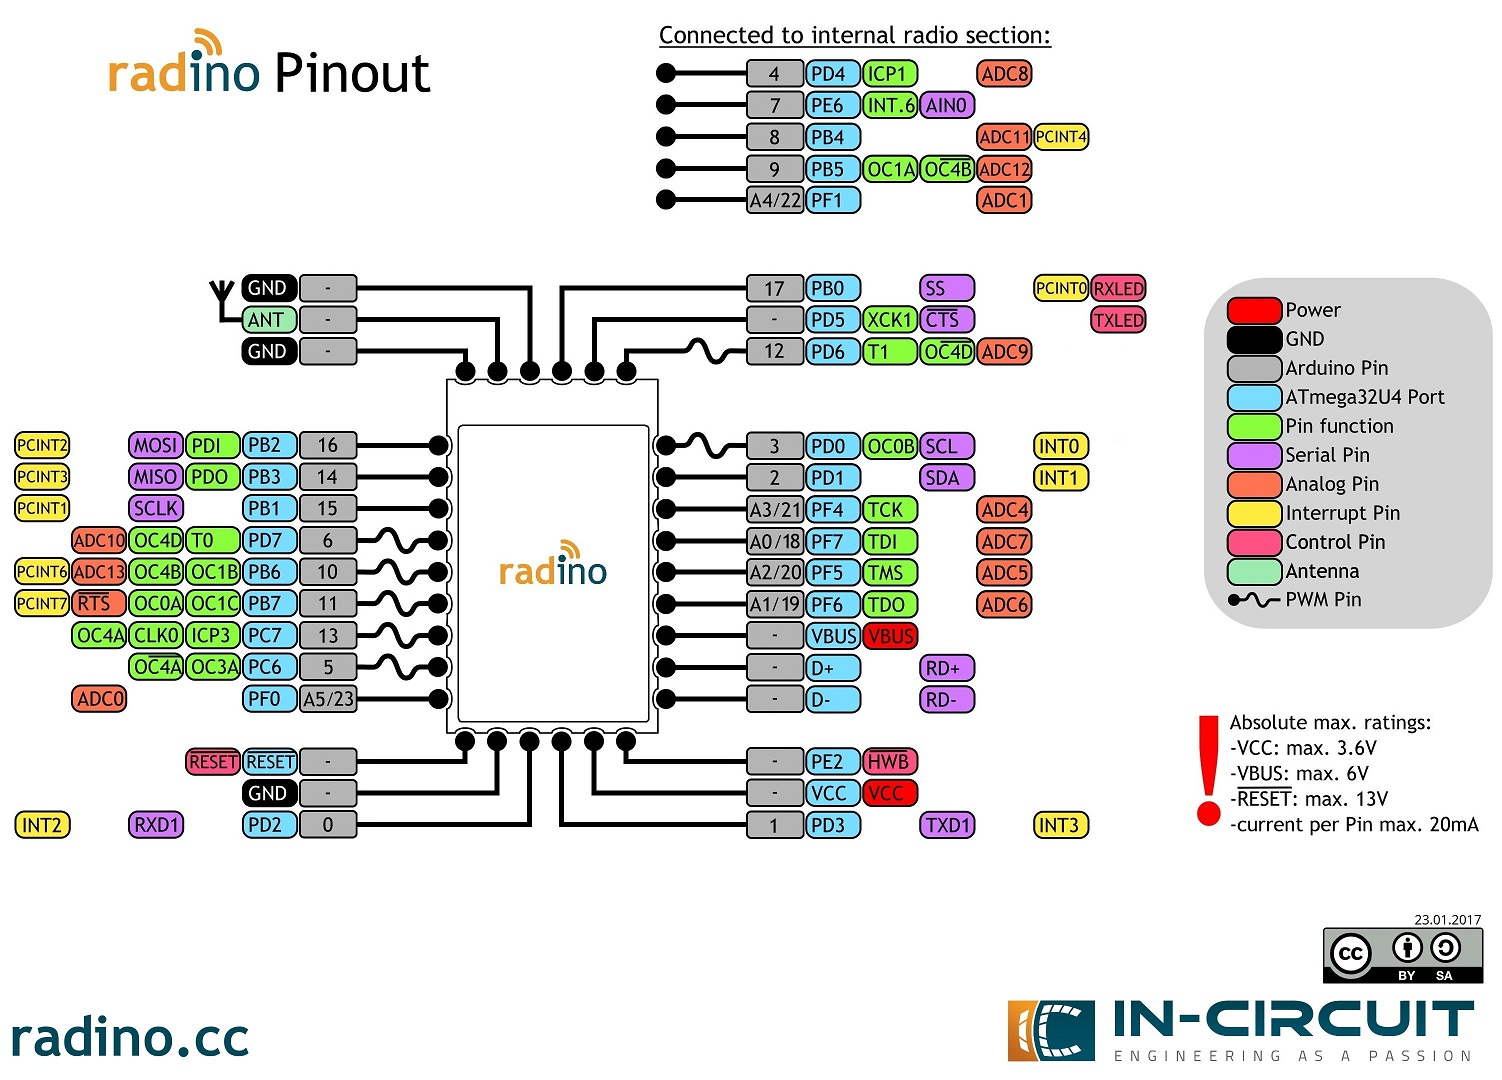
Radino Pinout:
Radino WiFi Module Pinout Diagram
Radino has 15 GPIO pins. Among them, 5 pins can handle PWM signal and 5 pins can take analog signal as input. Radino is powered by a 3.6V power source. Exceeding that value will damage the device.
Important Links:
Wiki for Radino WiFi – Here you will get detailed information about this module and its libraries.
Firmware is a type of software that provides control, monitoring and data manipulation of engineered products and systems. A USB device firmware hack called BadUSB was presented at Black Hat USA 2014 conference, demonstrating how a USB flash drive microcontroller can be reprogrammed to spoof various other device types in order to take control of a computer, ex-filtrate data, or spy on the user. BadUSB is a critical security flaw that can turn any USB device into a cyber threat. Security experts have released the BadUSB code online, giving hackers access to it.
This project on Indiegogo, MalDuino, is an Arduino-powered BadUSB device which has keyboard injection capabilities. Once plugged in, MalDuino acts as a keyboard, typing previous configured commands at superhuman speeds. You could gain a reverse shell, change the desktop wallpaper, anything is possible. MalDuino is targeting penetration testers, hobbyists and pranksters.
Check the campaign video to know more about the project and to see MalDuino in action:
“MalDuino aims to offer the best BadUSB experience. In terms of software, MalDuino is programmed via the arduino IDE using open source libraries. Scripts written in DuckyScript can easily be converted into code the MalDuino can understand”
Ducky Script is the language of the USB Rubber Ducky, and writing the scripts can be done from any common ascii text editor such as Notepad, vi, emacs, nano, gedit, kedit, TextEdit, etc. Each command resides on a new line and may have options follow.
Source: www.gadgetify.com
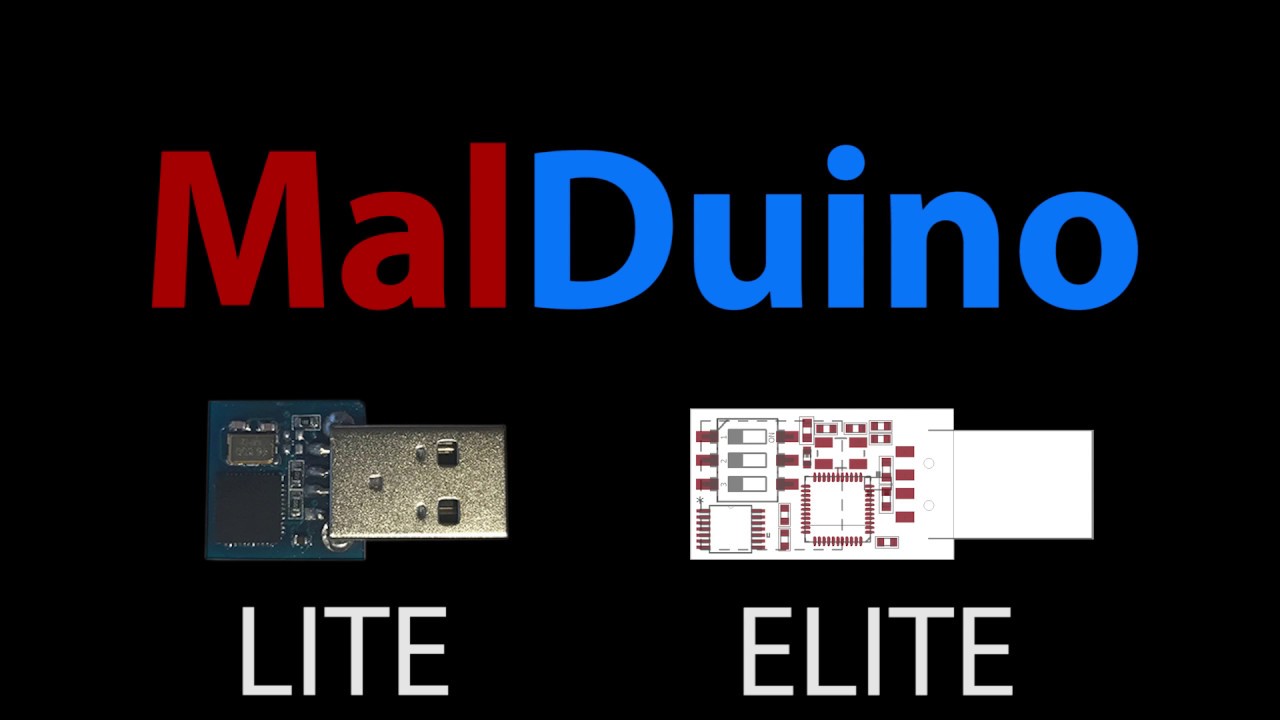
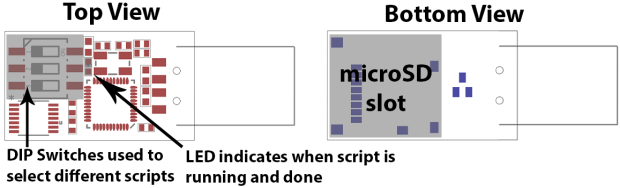
MalDuino comes in two editions: Elite and Lite. Elite depends on a SD card to save scripts, thus no need to program the board each time you want to change the script running. With DIP switches provided, you can choose which script to run easily.
The second edition is Lite: a smaller one that can be disguised in most of USB flash disk cases. It has an internal memory of 30 kb to store scripts.
Similar to Arduino Leonardo, you can run MalDuino and operate it anywhere a Leaonardo can run. Some issues were reported by Windows 7 users while running the scripts, but these problems are going to be considered and solved. Another issue is the keyboard different layouts, so if you try to run an English script on a computer with a Spanish keyboard, the wrong characters may be pressed. The English/American keyboards are the only guaranteed up till now
The campaign still has 21 days to go and it has already achieved %1800 of its £500 goal! You can pre-order Lite edition for $16 and Elite for $29. Hardware designs and source codes will be available at Github once the project is launched. More detailed information can be reached at the campaign page.
In this Arduino Tutorial educ8s.tv is going to modify this analog Voltmeter and convert into an Analog Thermometer using Arduino and a DS18B20 temperature sensor.
Today we are going to learn how to use this analog voltmeter with Arduino and make it show the temperature instead of the voltage. As you can see, in this modified voltmeter, we can see the temperature in degrees Celsius. The temperature is measured by this digital sensor, a DS18B20 and it is then displayed on the voltmeter. I really like analog dials like this one, because they give a vintage look to the projects. Let’s now see how to achieve that result.
How to make an analog Thermometer with Arduino a DS18B20 and an analog Voltmeter – [Link]


 The second edition is Lite: a smaller one that can be disguised in most of USB flash disk cases. It has an internal memory of 30 kb to store scripts.
 Similar to Arduino Leonardo, you can run MalDuino and operate it anywhere a Leaonardo can run. Some issues were reported by Windows 7 users while running the scripts, but these problems are going to be considered and solved. Another issue is the keyboard different layouts, so if you try to run an English script on a computer with a Spanish keyboard, the wrong characters may be pressed. The English/American keyboards are the only guaranteed up till now