+9V TO 60V PWM 2.3A SOLENOID VALVE DRIVER USING DRV101

The DRV101 is a low-side power switch employing a pulse-width modulated (PWM) output. Its rugged design is optimized for driving electromechanical devices such as valves, solenoids, relays, actuators, and positioners. The DRV101 module is also ideal for driving thermal devices such as heaters and lamps. PWM operation conserves power and reduces heat rise, resulting in higher reliability. In addition, adjustable PWM potentiometer allows fine control of the power delivered to the load. Time from dc output to PWM output is externally adjustable. The DRV101 can be set to provide a strong initial closure, automatically switching to a soft hold mode for power savings. Duty cycle can be controlled by a potentiometer, analog voltage, or digital-to-analog converter for versatility. A flag output LED D2 indicates thermal shutdown and over/under current limit. A wide supply range allows use with a variety of actuators.

+9V TO 60V PWM 2.3A SOLENOID VALVE DRIVER USING DRV101 – [Link]

+9V to 60V PWM 2.3A Solenoid Valve Driver using DRV101

The DRV101 is a low-side power switch employing a pulse-width modulated (PWM) output. Its rugged design is optimized for driving electromechanical devices such as valves, solenoids, relays, actuators, and positioners. The DRV101 module is also ideal for driving thermal devices such as heaters and lamps. PWM operation conserves power and reduces heat rise, resulting in higher reliability. In addition, an adjustable PWM potentiometer allows fine control of the power delivered to the load. Time from dc output to PWM output is externally adjustable. The DRV101 can be set to provide a strong initial closure, automatically switching to a soft hold mode for power savings. The duty cycle can be controlled by a potentiometer, analog voltage, or digital-to-analog converter for versatility. A flag output LED D2 indicates thermal shutdown and over/under current limit. A wide supply range allows use with a variety of actuators.

Features

  • HIGH OUTPUT DRIVE: 2.3A
  • WIDE SUPPLY RANGE: +9V to +60V
  • COMPLETE FUNCTION
  • PWM Output
  • Internal 24 kHz Oscillator
  • Digital Control Input
  • Adjustable Delay (Capacitor C1)
  • Adjustable Duty Cycle P1 Potentiometer
  • Over/Under Current Indicator
  • FULLY PROTECTED
  • Thermal Shutdown with Indicator
  • Internal Current Limit

Applications

  • ELECTROMECHANICAL DRIVERS:
  • Solenoids Positioners
  • Actuators High Power Relays/Contactors
  • Valves Clutch/Brake
  • FLUID AND GAS FLOW SYSTEMS
  • INDUSTRIAL CONTROL
  • FACTORY AUTOMATION
  • PART HANDLERS
  • PHOTOGRAPHIC PROCESSING
  • ELECTRICAL HEATERS
  • MOTOR SPEED CONTROL
  • SOLENOID/COIL PROTECTORS
  • MEDICAL ANALYZERS

Schematic

Parts List

Measurements

Photos


DRV101 Datasheet

Wireless sensor module speeds IoT product development

Using standard ICs and open software ecosystem from STMicroelectronics, Samtec has introduced its first Samtec nMode wireless sensor module. The production-ready solution allows engineers to remotely sense and measure inertial, environmental and acoustical parameters. By Graham Prophet @ edn-europe.com

The 13.5 x 13.5 mm nMode module contains a MEMS accelerometer, gyroscope, magnetometer, pressure sensor, and a MEMS microphone — all from STMicroelectronics. The small size suits the nMode to use as a standalone node for products such as wearables, gaming accessories, and smart-home or Internet-of-Things (IoT) devices.

Wireless sensor module speeds IoT product development – [Link]

Butterfly & Ladybug, STM32L4-Based Arduino-Programable Development Boards

Arduino boards are very useful for beginners to get started with building hardware projects. But at some point, more powerful controller than the Arduino’s 8 MHz one will be needed, featuring faster clock rate, floating point engine, and rich peripherals.

As Kris Winer found, the code editors and compilers for these controllers aren’t as simple as Arduino IDE. So using them may be a very frustrating experience.

Kris collaborated with Thomas Roell to solve that by developing new development boards that allow developers to use and program STM32L4 MCUs with the simplicity of Arduino IDE.

They started on Tindie with Dragonfly, a small (0.7” x 1.4”) development board for the high-performance, ultra-low-power line of 32-bit microcontrollers, STM32L4X6 family. Dragonfly uses the STM32L476RE 64-pin LQFP chip package with 512 kB of high-speed flash memory, 128 kB SRAM, running at up to 80 MHz with a single-precision floating point unit.

Dragonfly Development Baord

Two new boards are added to the Dragonfly family, the Butterfly and the Ladybug. These boards are small, low-cost development boards with simple, open-source designs that will allow approximately anyone to make use of the STM32L4 in their own custom applications. They rely on a single, inexpensive 32.768 kHz crystal oscillator and don’t require the ST-Link built into the STM32 Nucleo boards. Applications can be developed using the Butterfly and Ladybug development boards which provide access to all GPIOs and peripherals of the STM32L4.

Butterfly (Top) & Ladybug (Down) Development Boards

The Butterfly is 0.7” x 1.4” board and it uses the STM32L433 80 MHz ARM Cortex M4F 48-pin QFN package. While the Ladybug is 0.6” x 1.1” and uses the STM32L432 QFN package for more rational routing.

Technical specifications:

  • Microcontroller: STM32L4 ARM Cortex M4F
  • Clock speed: 1, 2, 4, 8, 16, 24, 32, 48, 64, 80 MHz
  • Operating voltage: 3.3V
  • I/O pin limits: most pins 5.0 V tolerant, 20 mA
  • Digital I/O pins: 22, with 11 PWM (Butterfly), 13, with 10 PWM (Ladybug)
  • Analog input pins: 6 (Butterfly), 5 (Ladybug), 12-bit ADC channels
  • Analog output pins: 2 12-bit DAC
  • RTC: 1 ppm accuracy
  • Flash memory: 256 KB SRAM: 64 KB
  • Voltage regulator: 3.3-5.5V input / 3.3V, 150 mA output
  • Dimensions: 1.4 x 0.7″ (Butterfly), 1.1 x 0.6″ (Ladybug)

A kickstarter campaign had been launched to increase the production volume to allow rock bottom pricing. But unfortunately, the campaign ended without reaching the specified goal.

Butterfly and Ladybug were designed for ultra-low-power applications and for small LiPo battery operation. There is a port for a JST battery connector on the board as well as a Vin at the board edge that connects to the battery anode so peripherals like haptic motors or displays can be powered directly from the battery, or the board can be directly powered from Vin.

Butterfly Board Pinout
Ladybug Board Pinout

The boards are fully open source so anyone can get the source files and make his own easily. To find more details about the project visit its page at hackaday, and at OSH Park.

Dobot M1, All-in-One Multifunctional Robotic Arm

Shenzhen Yuejiang Technology Co. Ltd (“Yuejiang”) is a leading robot arm solution provider in China. Yuejiang is established in July 2015 in Shenzhen, China by 5 dedicated robotics engineers with the mission of facilitating the development and upgrading of the industrial robotic arms solutions in China and continuously developing the extensive applications in this arena. Yuejiang’s newest product is Dobot M1!

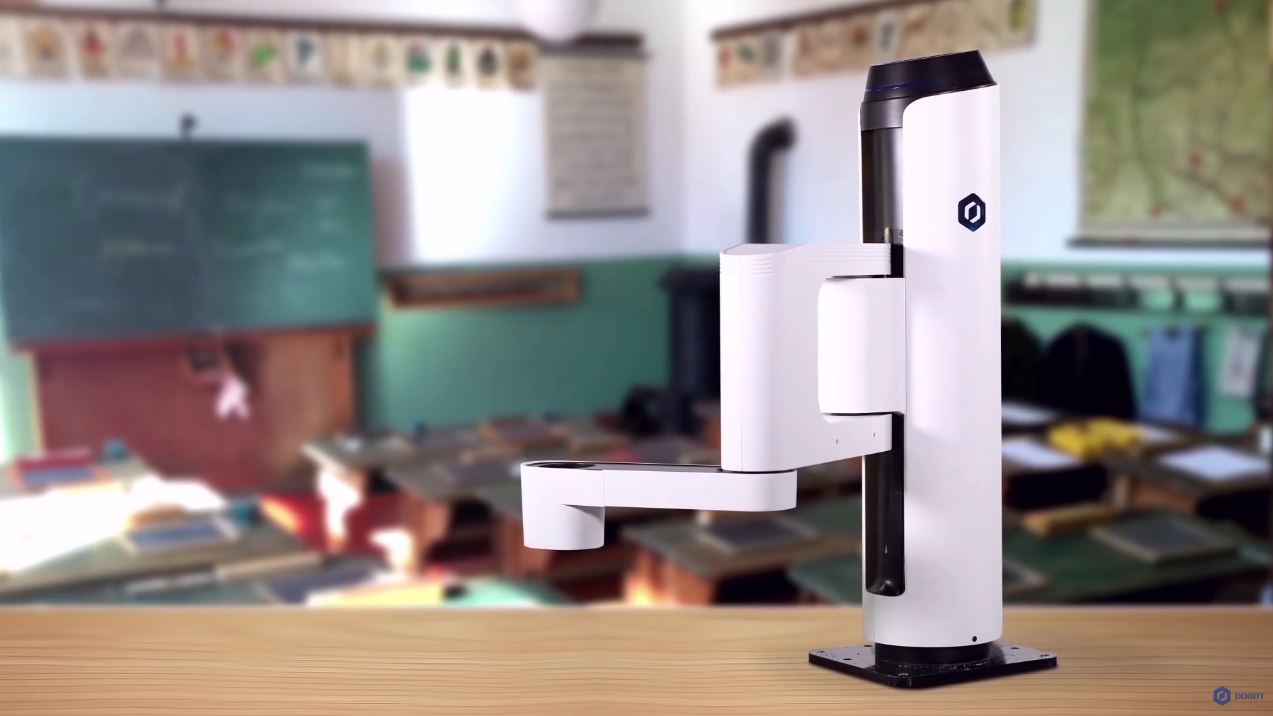
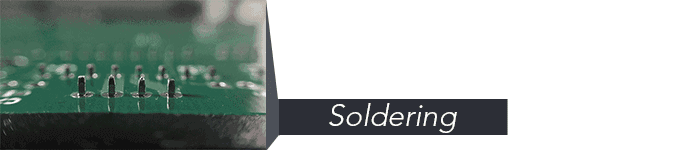
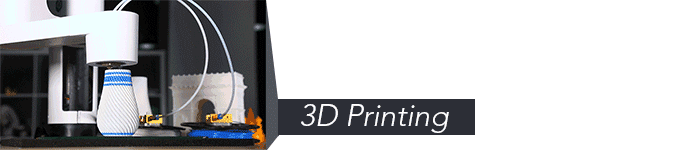
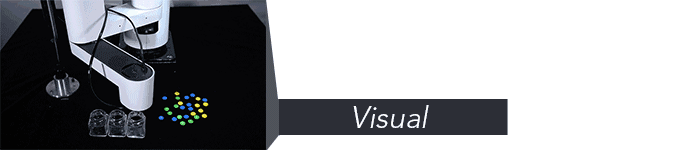
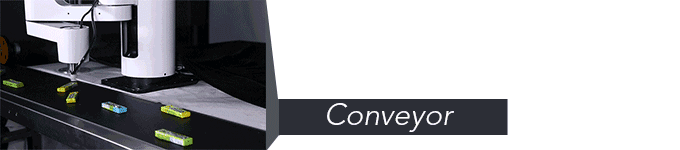
Dobot M1 is an all-in-one industrial robotic arm based on SCARA, with many interchangeable heads to 3D print, laser engrave, solder and pick & place unlimited applications. It also has computer vision ability.

Check this video featuring the amazing capabilities of Dobot M1:

Dobot M1 is the second edition of Dobot 1.0. Dobot 1.0 featured 7 different ways of controlling a robotic arm, including mouse control, vision control, EEG control, mobile APP, Leap motion control and gesture control, that was targeting makers as a new way of personal fabrication. Dobot 1.0 Kickstarter campaign raised an incredible $615,000, shattering a goal of only $36,000, Now Dobot M1 is extending its audience to the education, self-employers and factories sectors providing them an enhanced edition of the multifunctional arm.

Dobot M1 comes to solve the problem that industrial robot arms with such specifications are usually very expensive. Providing Dobot M1 with a price around $2000 will change the manufacturing equation forever. Dobot M1 will be the greatest tool to be added to your working space to try some light manufacturing professionally.

The toolheads included with the arm give multiple choices of operation, whether a 3D printer, gripper hand, laser engraver and 4th axis attachment. Once, it is a 3D printer with 400mm radius and 200mm height printing area itself, and you can extend this printing area with a 1m long trail. Then it is a laser engraver that line engrave and shade engrave your favorite symbols and pictures precisely thanks to the PWM laser it uses.

Attaching it with a camera, you are giving Dobot M1 eyes to process the mission given. It has integrated visual API that can be simply work with OpenCV or your own visual system. It also can be a precise pick and place machine, can do two things at the same time with the dual arm operation feature and can move around!

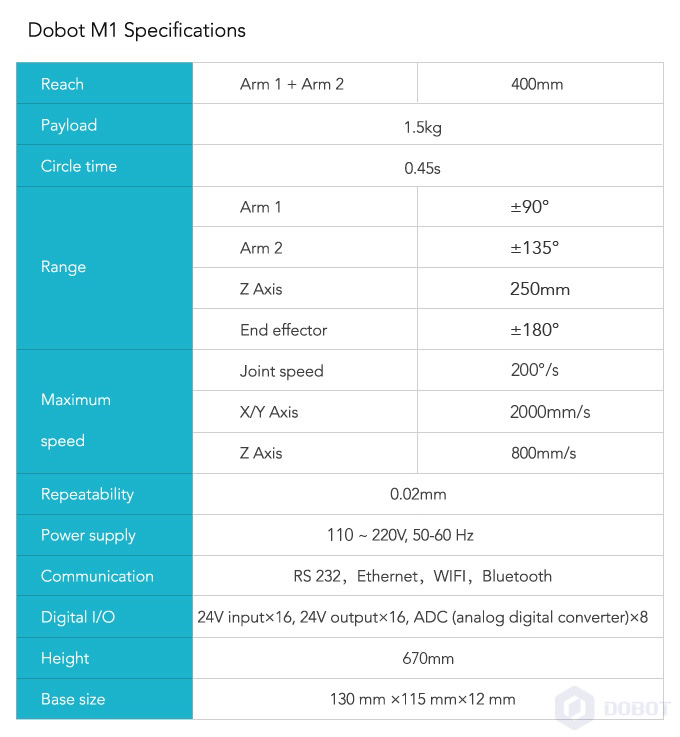
Dobot M1 support Bluetooth and WiFi, you can connect more than one Dobot together to function simultaneously with the same of multi functions. You can also control them using a mobile app. No need to worry about bein an expert to cope with Dobot M1, you can program it with a visual and easy programming language, and furthermore you can teach it the moves you want it to do with handhold teaching and then it will mimic them. These are the full specification of Dobot M1.

What makes Dobot M1 special is its expandability, it has a standardized head tool port, protocol, API, SDK, and extension ports. It is also considered affordable in comparison with its competitors.

“One simple fact: an industrial SCARA type robotic arm prices between $10,000 and $20,000, two-year payback period. For many small businesses constantly adjusting their production technique, this is too much to afford, not to mention those creative individuals who want a professional making machine. With less than $2,000, and 3 months of payback period, Dobot M1 is here to fill the missing puzzle. With more functions and features, Dobot M1 is able to integrate in more steps of production, helping you save more budget.”

Dobot M1 is now live on a Kickstarter campaign and it only has 3 days to go! Hurry up and pre-order an amazing addition to your fablab or co-working space. You can get the standard kit with two toolheads of your choice with around $1600. It will be a nice automated all-in-one tool for hardware startups that are wasting time and money on different tools and materials doing most of the work by themselves.

For more details about Dobot M1 check the official website and the crowdfunding campaign page.

PIC SD CARD DATA LOGGER

Some time ago I decoded to make a simple general purpose Data Logger with the following parameters for the project.

  • it should have very simple design that should be doable by most amateurs
  • the Data Logger should write the data in a SD memory card in simple text files
  • minimum 2 ADC channels
  • simple to use and simple settings
  • energy efficient
  • low cost

PIC SD CARD DATA LOGGER – [Link]

The Making of a Cooled CMOS Camera

landingfield.wordpress.com shows us their progress on how to make a cooled CMOS camera able to be used for astrophotography.

In the last post, I uncovered a bug in the Vivado implementation which accidently removes the DIFF_TERM from my input buffer. With that problem solved, I picked up the project again with a goal to achieve high speed imaging. Now I’m going to cover the design principal and its intermediate steps to achieve it.

The Making of a Cooled CMOS Camera – [Link]

Turn Arduino into an AVR TPI Programmer

Elliot Williams @ hackaday.com show us how to use your Arduino to program AVR TPI enabled microcontrollers.

Turning an Arduino of virtually any sort into a simple AVR 6-pin ISP programmer is old hat. But when Atmel came out with a series of really tiny AVR chips, the ATtiny10 and friends with only six pins total, they needed a new programming standard. Enter TPI (tiny programming interface), and exit all of your previously useful DIY AVR programmers.

Turn Arduino into an AVR TPI Programmer – [Link]

TOP PCB Companies