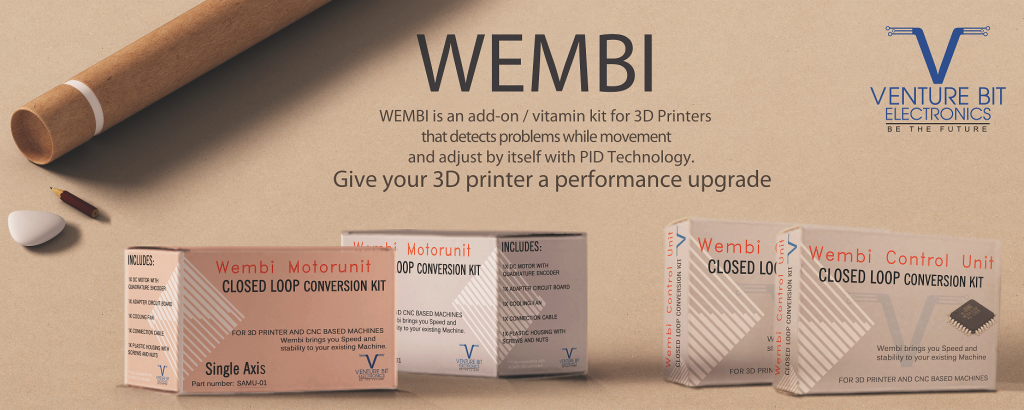
The future of 3D printing is here and it has a name – Wembi. Boasting an advanced PID compensation system that detects issues while your 3D printer or other CNC based machine is moving, Wembi readjusts itself to eliminate printing problems and help you get the perfect prints fast!
Think of Wembi like a unique vitamin kit for your 3D printer that can boost its performance and take 3D printing to a whole new level.
A Sophisticated System That Revolutionizes DC Motor Control
Being faced with inadequate Open Loop and low precision printing in standard stepper motor technology, we decided to create a brand new, sophisticated controller that could achieve an unbeatable degree of accuracy. And we made it:
A Quantum Leap In 3D Printing Technology
By developing a revolutionary firmware and embedding it into a very simple hardware, we managed to tackle the problem of low accuracy levels and achieve unparalleled accuracy in 3D printing, unlike anything the world has ever seen so far. With important advantages over standard stepper motor technology, Wembi offers outstanding benefits.
Meet Wembi – The World’s First, Closed Loop Conversion Kit for 3D Printer – [Link]
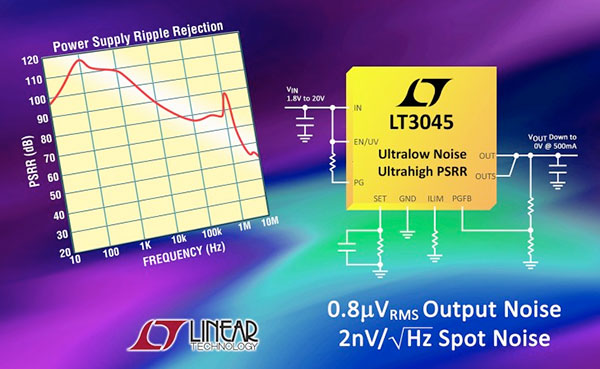
In addition to low noise, the LT3045 linear regulator from Linear Technology provides a PSRR (power supply rejection ratio) of >90 dB to 10 kHz and >70 dB to 2.5 MHz, quieting noisy or high-ripple input supplies. The LDO regulator’s ultralow spot noise of only 2 nV/√Hz at 10 kHz and RMS noise of just 0.8 µVRMS from 10 Hz to 100 kHz make it well-suited for noise-sensitive applications, such as PLLs, VCOs, instrumentation, and medical equipment.
Most of hardware developers have used a temperature sensor in one or more of theirs projects. There are many types of temperature sensors, such as LM35, thermistors, and resistance thermometers. These types differ in response speed, temperature ranges, accuracy, and other factors.
Resistance thermometer, which also known as Resistance Temperature Detector (RTD), is a device used to measure temperature by changing its resistance depending on the surrounding temperature. It has a slow response time but provides accurate values. A RTD consists of a length of fine wire wrapped around a ceramic or glass core. The RTD wire is a pure material, typically platinum, nickel, or copper.
This instructable shows a full guide of how to use a RTD with Arduino, it uses a two wire PT100 RTD, an Arduino, 3 LM741 operational amplifiers, and resistors.
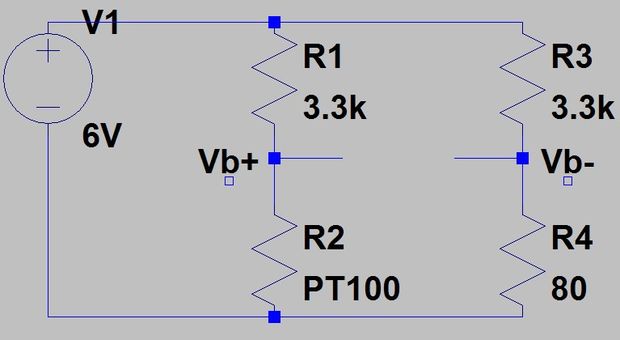
The first part of the circuit is about converting the resistance change of PT100 to a voltage change so the Arduino can read it. This operation can be done using a voltage divider, but for a specific range of 80 to 150 ohms (-51.85 to 129.87 degrees C) the divider has a DC offset which will decrease the sensitivity when amplifying this voltage.
To solve this issue you can use a Wheatstone Bridge, an electrical circuit used to measure an unknown electrical resistance by balancing two legs of a bridge circuit, to get rid of the DC offset and to increase output sensitivity. The values of Wheatstone resistors had chosen to limit current flow and to increase linearity of the output.
Wheatstone Bridge
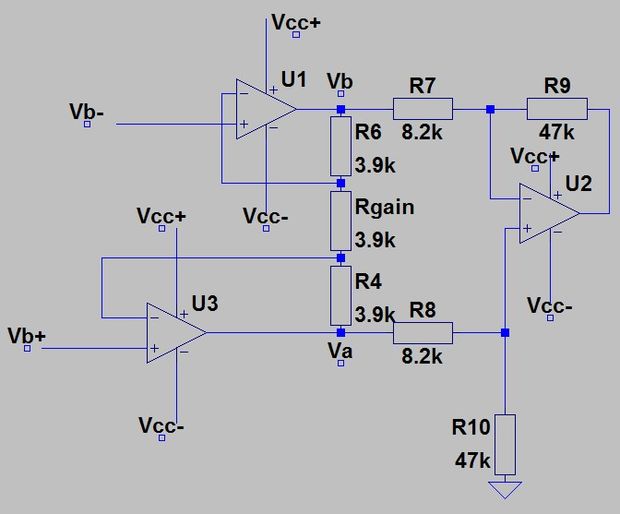
The output of the previous circuit is calculated by subtracting Vb+ and Vb- and then amplifying the result to be readable. To do this you need a differential amplifier, but there are two problems will occur when connecting this amplifier to the output of the bridge: the loading effect and changing the gain.
The loading effect means that the input resistors into the amplifier are affecting the voltage drop across the PT100 and changing the results. Changing the gain of the amp requires you to change at least two resistors, so having two potentiometers which have the same value will be annoying.
This problems had been solved by an instrumentation amplifier which acts as a buffer amplifier to separate the two halves of the circuit, the bridge and amplification, as well allows amplifying the input by changing just one potentiometer.
Instrumentation Amplifier Circuit
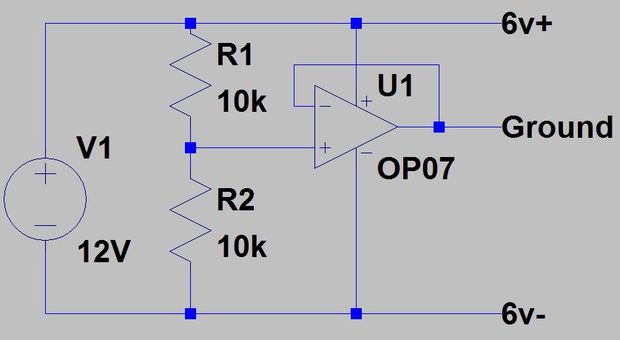
The last step is powering the circuit. As shown in the past circuit, there are Vcc+ and the Vcc-, because it needs both positive and negative voltage to function properly. These voltages can be generated using only one 12V power source, its circuit uses a buffer amplifier of gain 1 to create a virtual ground by passing half the supply voltage through the buffer amp which will act as the ground. Then the 12V will work as the +6V and the actual GND terminal will be -6V.
Powering Circuit
The full circuit was designed using Autodesk Circuits.io, a platform that lets you create circuits on breadboard, edit circuit diagram and pcb diagram, and it also lets you simulate the circuit from the breadboard. You can even program an Arduino and connect it in the breadboard mode. If you want to duplicate the circuit and add your own values, just edit the design here.
This project is open source, you can find a detailed description of how the circuit works, circuits diagrams, equations, and source code at the project page at Instructables.com.
PragmatIC is a world leader in manufacturing ultra low cost flexible electronics enabling the potential for trillions of “smart objects” that can interact with their environment.
It has developed a unique platform of patented technologies to design and manufacture flexible integrated circuits (flexICs), also known as “printed logic”.
These flexICs deliver intelligent electronics without the need for rigid, bulky and expensive silicon chips and can be easily embedded in any surface, introducing interactivity into a wide range of everyday items.
PragmatIC’s unique advantage derives from several key innovations:
Functional electronic materials that are much cheaper than silicon, and able to be formed on flexible plastic substrates in extremely thin films – less than 100 nm thick, about 1000 times thinner than a human hair!
Patterning processes that are able to accurately define features in these thin film materials, also at very fine scale (less than 100 nm), but are dramatically simpler and faster than the processes used in an expensive silicon fabrication plant.
Novel architectures for transistors (and other key electronic devices) that ensure perfect alignment of all critical device features, even when fabricated on plastic substrates that expand, contract or move during processing.
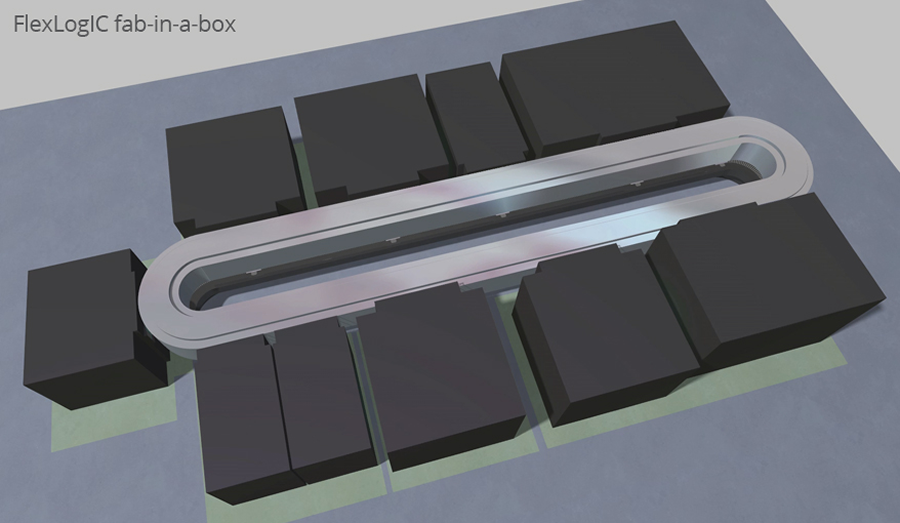
Now PragmatIC is developing FlexLogIC: a unique “fab-in-a-box” model for low capital, high capacity manufacturing of flexICs. This model will allow PragmatIC to scale up production capacity dramatically, and specifically to do so with a very low capital cost and per-unit production cost, as well as automating the complete process to allow it to sell this equipment to supply chain partners.
“We incorporated the processes that we developed for our ICs and created the FlexLogIC system to manufacture our products” PragmatIC CEO Scott White said. “FlexLogIC incorporates a mix of printing and conventional techniques that deliver the optimum process for each step of production, along with full automation of the end-to-end manufacturing process.”
Concept drawing of FlexLogIC system
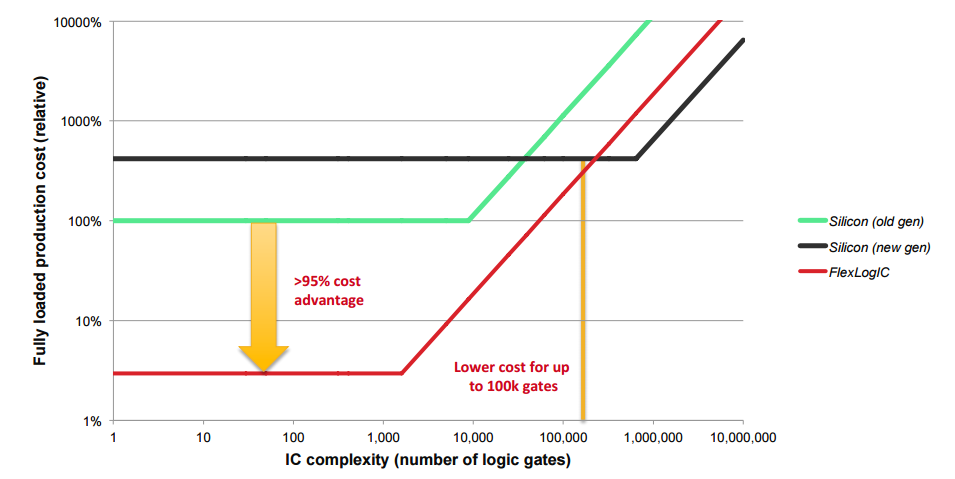
FlexLogIC offers important advantages, beginning with its high capacity that can produce billions of flexible ICs. There is a low up-front capital cost that White said is 100 to 1000 times less than a silicon fab, and a low production cost of less than 1 cent per flexIC for typical applications!
FlexLogIC production costs vs Silicon
In addition, FlexLogIC will offer a fast production cycle time of less than 24 hours versus typically more than one month for a silicon fab, allows modular scalability of capacity in geographically diverse supply chains and also allows non-electronics companies the capability to integrate manufacturing of intelligent flexible electronics.
“One of the most compelling aspects of our flexIC production process is the potential for it to be implemented in a self-contained, fully automated manufacturing system,” White added. “It has many similarities with the production of optical discs, which several decades ago migrated very successfully from batch production in a cleanroom to this type of modular manufacturing equipment.”
The company promises that its technology will change the game for IoT and will, according to Mike Muller, CTO of ARM, “open up a whole new world of computing”.
It has attracted funding of £18 million (UK Pounds) to take the technology to production readiness. As shown in the timeline, the first FlexLogIC production system will be installed in 2017 in order to support mass-market applications by 2018.
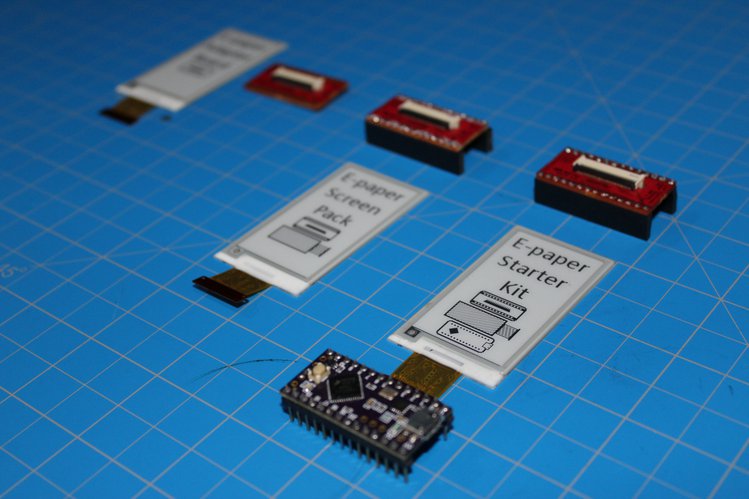
Jarek tipped us with his latest project, an E-paper screen shield kit for Teensy. He writes:
E-paper screens have been hacked out of Kindles and store price tags for a while, but this is the first ( to my knowledge ) open-source project which offers a simple and cheap interface for E-paper. After you prototype your idea with this board, you can get the plans from my project page and integrate the solution into a project or commercial product without having to iterate fives times as I have to get the E-paper driving circuitry just right. The shield fits over most Teensy boards, and the female headers mean you can plug wires right into a breadboard or any other 3.3V microcontroller board. E-paper is sensitive to temperature, so there is an I2C sensor on board that can be used if you need to use your E-paper in harsh environments.
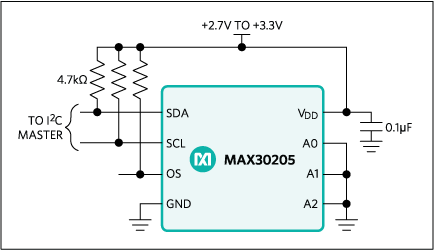
Maxim Integrated has posted details of the MAX30205 temperature sensor for thermometer applications. The sensor accurately measures temperature and provide an overtemperature alarm/interrupt/shutdown output. by Graham Prophet @ edn.com
The chip converts the temperature measurements to digital form using a high-resolution, sigma-delta, ADC. Accuracy meets clinical thermometry specification of the ASTM E1112 when soldered on the final PCB. Communication is through an I ²C-compatible 2-wire serial interface that accepts standard write byte, read byte, send byte, and receive byte commands to read the temperature data and configure the behaviour of the open-drain overtemperature shutdown output.
Clinical-grade human body temperature sensor has ±0.1°C accuracy – [Link]
Silicon Labs, the leader in energy-friendly solutions for a smarter, more connected world, has been constantly making silicon, software and tools to help engineers transform industries and improve lives since 1996.
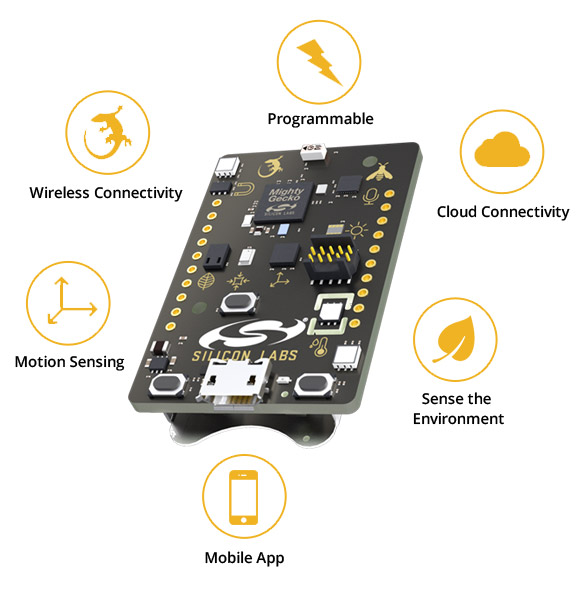
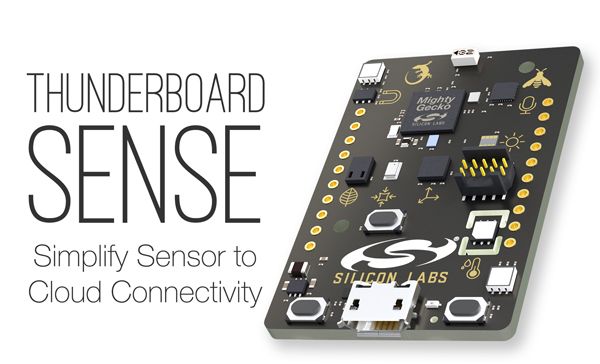
Silicon Labs has just launched its newest development platform, The Thunderboard Sense Kit. Thunderboard Sense is a small and feature packed development platform for battery operated IoT applications. It is partnered with a mobile app that seamlessly connects Thunderboard Sense to a real time cloud database.
The mobile app enables a quick proof of concept of cloud connected sensors. The multi-protocol radio combined with a broad selection of on-board sensors, make the Thunderboard Sense an excellent platform to develop and prototype a wide range of battery powered IoT applications.
The 30 mm x 45 mm board includes these energy-friendly
components:
Silicon Labs EFR32 Mighty Gecko multiprotocol wireless SoC with a 2.4 GHz chip antenna, with an ARM Cortex-M4 core plus support for Bluetooth low energy, ZigBee, Thread and proprietary protocols
Silicon Labs EFM8 Sleepy Bee microcontroller enabling fine-grained power control
Silicon Labs Si7021 relative humidity and temperature sensor
Silicon Labs Si1133 UV index and ambient light sensor
Onboard Segger J-Link debugger for easy programming and debugging
USB Micro-B connector with virtual COM port and debug access
Mini Simplicity connector for access to energy profiling and wireless network debugging
20 breakout pins for easy connection to external breadboard hardware
CR2032 coin cell battery connector and external battery connector
Onboard sensors measure data and transmit it wirelessly to the cloud. Thunderboard Sense comes with Silicon Labs’ ready-to-use cloud-connected IoT mobile apps, to collect and view real-time sensor data for cloud-based analytics and business intelligence.
“We’ve designed Thunderboard Sense to inspire developers to create innovative, end-to-end IoT solutions from sensor nodes to the cloud,” said Raman Sharma, Director of Silicon Labs’ IoT Developer Experience. “Thunderboard Sense helps developers make sense of everything in the IoT. They can move quickly from proof of concept to end product and develop a wide range of wireless sensing applications that leverage best-in-class cloud analytics software and business intelligence platforms.”
Check out the official intro video by Raman Sharma
To start using Thunderboard Sense you have to place your CR2032 battery in the right polarity, install the mobile app from Google Play or Apple store, find your board listed on the main screen of the app, and then you will be ready to explore the Thunderboard demos and start your own project! You can program Thunderboard Sense using the USB Micro-B cable and onboard J-Link debugger. You do not need RF design expertise to develop wireless sensor node applications.
Thunderboard Sense kit is available for $36 and you can buy it from here. All hardware, software and design files will be open and accessible for developers. You can visit Silicon Labs Github to download Thunderboard mobile app and cloud software source code.
A new prototype of a lithium-sulphur battery – which could have five times the energy density of a typical lithium-ion battery – overcomes one of the key hurdles preventing their commercial development by mimicking the structure of the cells which allow us to absorb nutrients. @ cam.ac.uk
This gets us a long way through the bottleneck which is preventing the development of better batteries.
Next-generation smartphone battery inspired by the gut – [Link]
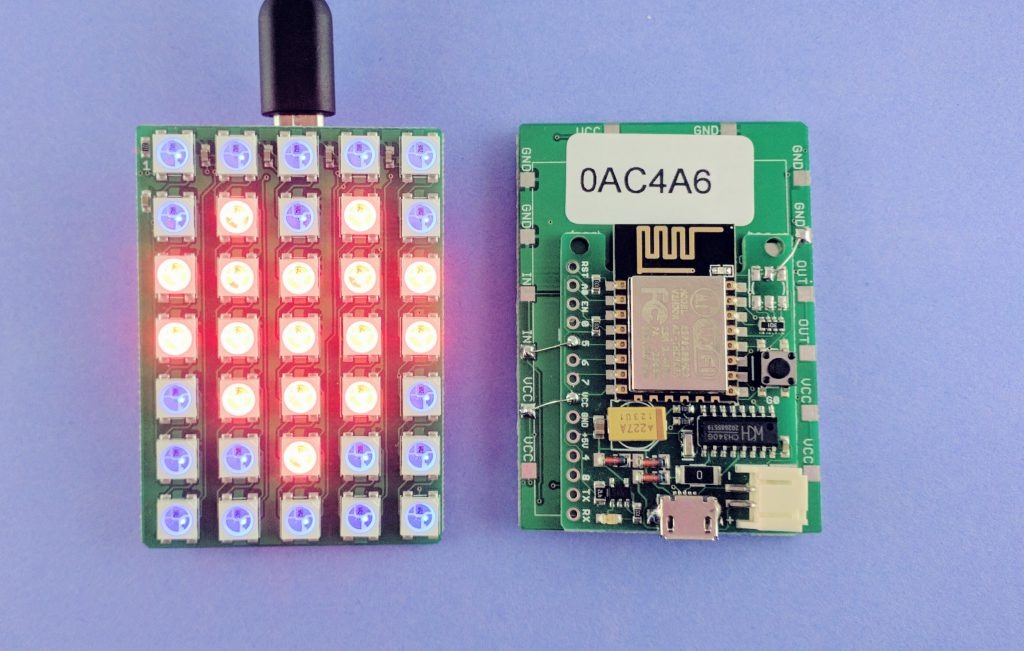
ray @ rayshobby.net build a wifi enabled color led matrix using ESP8266. He writes:
Last Thursday I had a lot of fun doing a workshop at my college (UMass Amherst) where I taught students to use a WiFi-enabled Color LED matrix combined with Javascript programs to create animations displayed onto the LED matrix. The matrix is made of 5×7 WS2812 (NeoPixel) LEDs.
WiFi-enabled Color LED Matrix using ESP8266 and WS2812 LEDs – [Link]


 PragmatIC
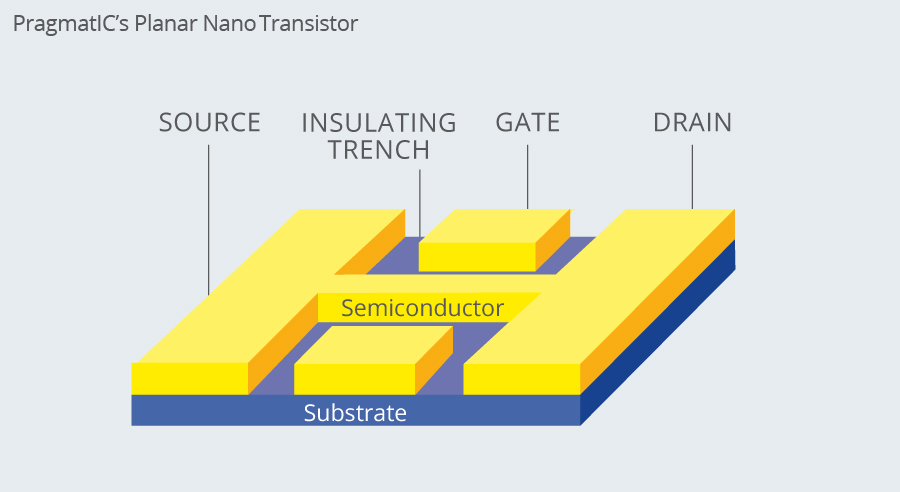


 The mobile app enables a quick proof of concept of cloud connected sensors. The multi-protocol radio combined with a broad selection of on-board sensors, make the Thunderboard Sense an excellent platform to develop and prototype a wide range of battery powered IoT applications.