iBreathe, A Breathalyzer Based on Hexiwear

Knowing the amount of alcohol you drunk is becoming easier using the iBreathe Breathalyzer project by Dave Clarke. You just have to blow in the alcohol sensor, then it pings the result to a smartphone app and to the cloud to document it as a table so you can see alcohol intake through time.

4b97aef17d4668b96ae71a9e031c8ba0_preview_featured
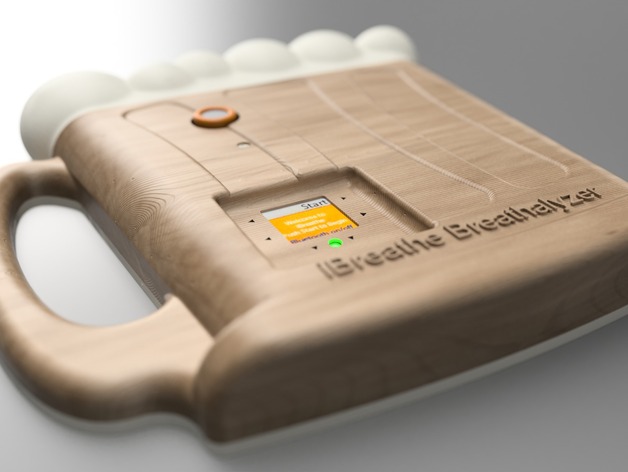
This breathalyzer with a custom Beer mug casing will let you know where do you stand on the scale form “Sober as a judge” to “Hangover incoming”!
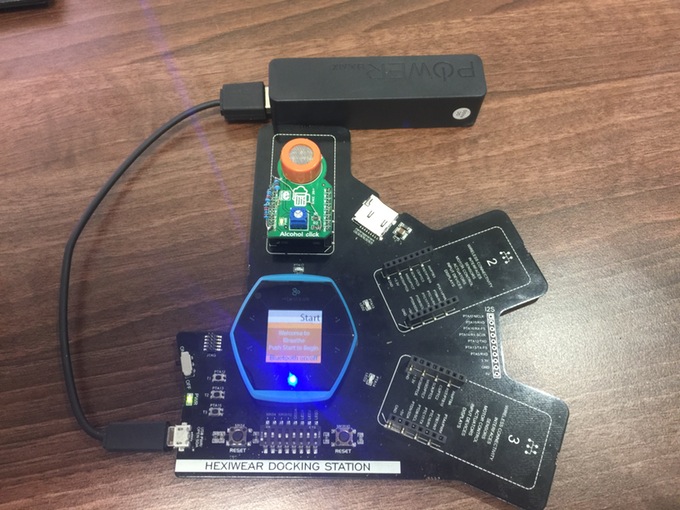
Below the (foamy) surface, it has substance too: along the 3D-printed casing, it features an Alcohol click sensor hacked to work with 3.3V, a customized Hexiwear interface, and a smartphone app.

Trailer Video, you can check the full demo here

iBreathe Breathalizer took place at Hackster.ioHexiwear: The Do-Anything Device!” contest in partnerships with NXP, AutoDesk, Mouser, MikroElektronika, and ARM mbed. Amazing prizes like Oculus Rift and JD humanoid robotic kit will be awarded to 6 winners.

Developed by MikroElektronika, Hexiwear platform combines the style and usability found in high-end consumer devices, with the functionality and expandability of sophisticated engineering development platforms, making Hexiwear the ideal form factor for the IoT edge node and wearable markets. It is completely open-source and developed in partnership with NXP.

This contest emphasizes the role of Hexiwear as the foundation for future IoT inventions. This powerful IoT development kit is a small and sleek, low-power device packed with sensors to quantify yourself and the world around you. Wirelessly enabled, it can connect both to devices nearby – or to cloud servers far away. With Hexiwear you can create your own smartwatch, remote sensor tag, or sophisticated home controller. Plus, it comes with preloaded apps to give you a fast start.

img_3258

In order to build this project you will need:

For software development you need access to these platforms ( iOS compatible)

The Hexiwear Docking Station is an expansion board for Hexiwear, the wearable IoT development kit. It provides an interface for programming, debugging, and enhancing Hexiwear with additional functionalities by adding click boards.

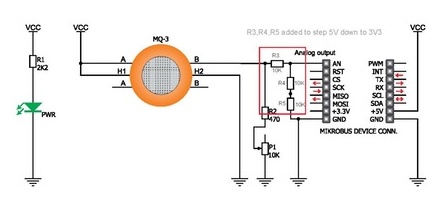
Alcohol click carries an MQ-3 Semiconductor sensor for alcohol. 
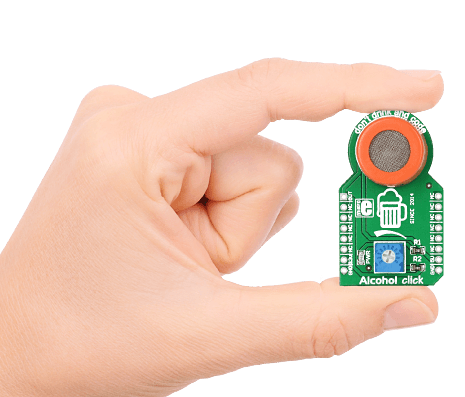
The gas sensing layer on the sensor unit is made of Tin dioxide (SnO2), an inorganic compound which has lower conductivity in clean air. The conductivity increases as the levels of alcohol gas rise. Alcohol click has a high sensitivity to alcohol and it can be used to detect alcohol in concentrations from 0.04 to 4mg/l. To calibrate the sensor for the environment you’ll be using it in, Alcohol click has a small potentiometer that allows you to adjust the Load Resistance of the sensor circuit. Alcohol click communicates with the target board through AN (OUT) mikroBUS line. It’s designed to use a 5V power supply only. While Hexiwear’s analog input is 3.3V, this sensor was hacked by adding a voltage divider on the output pin of the Click Board.

Modified Alcohol Click Schematics with 3V3 output

A speaking version is an update to the original project. For more details and step-by-step tutorial go to the project page on hackster.io to get a complete walkthrough, including descriptions, 3D models, and code snippets.

The deadline for the contest has passed and winners will be announced on 21 Oct 2016. More information about other contestants are available here.

A Multi-Use Mini Sensor Platform

While developing a smart hardware project, such as control and automation systems, you will almost need to use different types of sensors for collecting and gathering necessary data. LastSamurai had designed a platform that aims to simplify the use of digital and analogue sensors.

img003The platform was developed based on MySensors Hardware, hardware components that ease up building of the DIY sensors. It tries to solve some issues that other platforms still have like housing. The developer wants to make it smaller than 5x5cm with SMD parts so it can fit in a small case along with a sensor and a battery.

This multi-sensor platform can be powered by a CR2032 battery, external batteries, or an external power brick. Its PCB contains these components:

  • Atmega328P, a high-performance Atmel 8-bit AVR microcontroller combines 32KB ISP flash memory, 1024B EEPROM, 2KB SRAM, and operates between 1.8-5.5 volts.
  • NRF24L01+, an ultra low power RF transceiver IC for 2.4GHz band and 2 Mbps data rate.
  • ATSHA204A, a crypto full turnkey security device with 4.5Kb EEPROM protected hardware-based key storage.
  • AMS1117,  an adjustable and fixed voltage regulator to reach the desired voltage level.
  • SDA/SCL pins for I2C sensors like the HTU21D and Si7021.
  • D2/D3 pins of the atmega which are the digital pins that controller the interrupts 0 and 1.
  • A1 and A2 to be able to connect analog sensors like a plant/soil humidity sensor.
  • Serial connection pins for debugging.
  • 6 pin ISP connection for programming.
OH Mini-Multi-use Sensor Platform

The platform can be programed using Arduino pro mini settings, and can run either on 3.3V or 1.8V and 8MHz.

It is an open source project, so everyone can contribute on enhancing it  and adding more features. Anyone interested can build it himself by having access to all hardware and software resources at the project page and github repository.

ATtiny85 Light Sensor – I2C slave device

attiny-light-sensor-with-i2c-1024x650

Paweł Spychalski build a photoresistor based daylight meter sensor connected via I2C bus using ATtiny85:

I love AVR ATtinyx5 series microcontrollers. They are cheap, easy to use, they can be programmed just like Arduinos and comparing to their size they offer great features. For example, they can be used as remote analog to digital converters connected to master device using I2C bus.

ATtiny85 Light Sensor – I2C slave device – [Link]

Regulator offers independent outputs

1474473440-umodule

Susan Nordyk @ edn.com writes:

Housed in a 15×9×2.42-mm over-molded BGA package, the LTM8049 µModule dual-output DC/DC converter from Linear Technology is configurable for a combination of SEPIC and/or inverting operation by simply grounding the appropriate output rail. All that is needed to complete the design are input and output capacitors and a few resistors—a total of 7 components compared to approximately 30 components for a comparable discrete design.

Regulator offers independent outputs – [Link]

Program AVR Using Arduino the easy way

pn3

rik @ riktronics.wordpress.com show us how to program AVR microcontrollers using an Arduino board.

Advanced hobbyists like me (and you, of course 😉) love to play with microcontroller. And the most famous microcontrollers for beginners are AVR series from Atmel™.  Almost all beginners in microcontroller-world have their Arduino boards lying on work table. Because it is so much easy, so much fun, and so much famous. Here I explained How to Burn Programs In Your AVR Microcontroller Using An Arduino.

Program AVR Using Arduino the easy way – [Link]

LC709501F – Li-ion, intelligent charge controller for next-generation power banks

yui56h

by Graham Prophet @ edn-europe.com:

ON Semiconductor has introduced a highly integrated single chip power bank charge controller for the development of next generation Li-Ion powered products. The LC709501F provides broad power and voltage/current output range of 5V, 9V and 12V operation, with a maximum charge/discharge capability of up to 30W through FET selection.

LC709501F – Li-ion, intelligent charge controller for next-generation power banks – [Link]

433MHz wireless module configuration

pic-hc-12-433mhz-wireless-module-600

Dziku discuss how to configure a cheap 433MHz wireless module for serial communication:

HC-12 are cheap 433MHz wireless serial port communication modules with a range up to 1800m in open space. Each costs about $5 when bought from China, and 2 of them can create wireless UART link that can be used, for example, to transfer telemetry data from UAV. Or drive IoT device. Or connect sensors. Or whatever else one can think of.

433MHz wireless module configuration – [Link]

$4 Coin-sized Linux Computer with WiFi

VoCore is a small Linux computer with Wifi that can work as a full functional router. It runs OpenWrt on top of Linux. It contains 32MB SDRAM, 8MB SPI Flash and uses RT5350 (360 MHz MIPS) as its heart. It provides many interfaces such as 10/100M Ethernet, USB, UART, I2C, I2S, PCM, JTAG and over 20 GPIOs but its size is less than one square inch (25mm x 25mm). VoCore was launched in 2014 in a crowdfunding campaign and eventually it was 1937% funded! The $20 module had a lot of fans but most of them, such as students, were not able to afford it.

Designers of VoCore came up with a great solution!vocore2-raw-3-768x512 
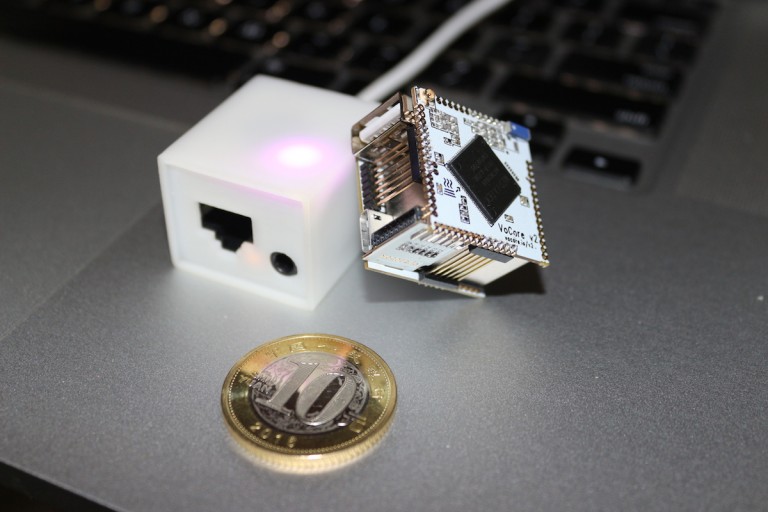
VoCore2 Lite is the newest product of the Chinese startup for just $4! A Coin-sized Linux computer, smart router and it is fully open source. With such an affordable module, wireless life will become easier and it will push forward the development of new IoT applications.

It is now live in a new crowdfunding campaign and again it is exceeding expectations with 400% funds in the first 10 days!
Campaign video

It has 300Mbps WIFI, 5 x ETHERNET, USB 2.0 Host, 3 x UART, 1 x SD, 2 x High Speed SPI, 3 x I2C, and 40+ GPIOs. It can be programmed in C, Java, Python, Ruby, Javascript and etc. It has various of docks and thousands of software to enhance its functions and the wireless life.

VoCore2 Pinout Diagram

“People may ask, is that price lower than the cost? The answer is it is not, but it is very very very close to the cost, and only for us with the experience of production VoCore2(we reuse  the VoCore2 tech, test jig, test app, to save cost etc…). Just hope students and other cost sensitive people will have a chance to play with the most advanced IoT board.” – Qin Wei, VoCore co-founder

Using VoCore2 as a router

Compared to Vocore2, Vocore2 Lite has a cheaper Mediatek MT7688N MIPS processor, less memory and storage, WiFi is limited to 150 Mbps and an external antenna is required. With only 74 mA power consumption, VoCore2 will be more efficient than ESP8266, that consume around 250 mA, and it will be easily implemented in various projects.

This is a comparison between the three editions of VoCore

compare_zpsl4mwqe90

The crowdfunding campaign still have 1 month to go and  you can pre-order VoCore2 ($12), VoCore2 Lite ($4), and other docks starting from $29.

More details, updates and resources can be reached at the official site , the documentation, and the blog.

$15 Arduino-Based Reflow Oven Controller

A reflow oven is one of the most useful tools for hardware developers, a machine used primarily for reflow soldering of surface mount electronic components to printed circuit boards (PCB). ESTechnical, a hardware manufacturer based in UK, works hard to produce open source hardware gadgets and contribute its best to make the hardware tools much better, had made a great product, the $15 Reflow Oven Controller. Having an Arduino based reflow oven controller with a graphic LCD opens up a world of possibilities to solder surface mount devices.

cyclewithoverflow
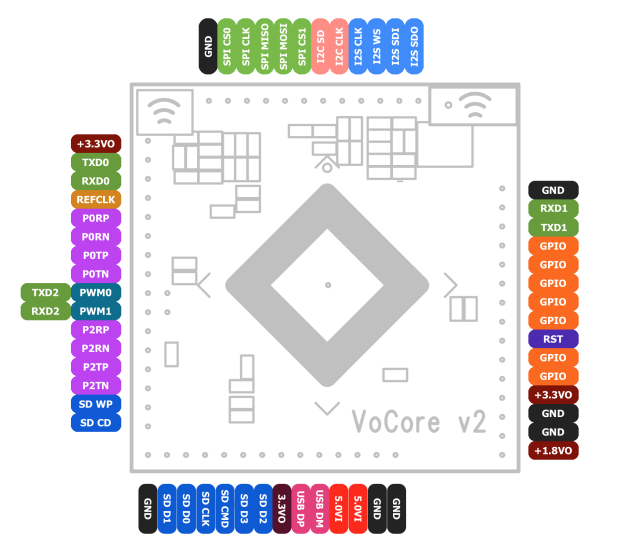
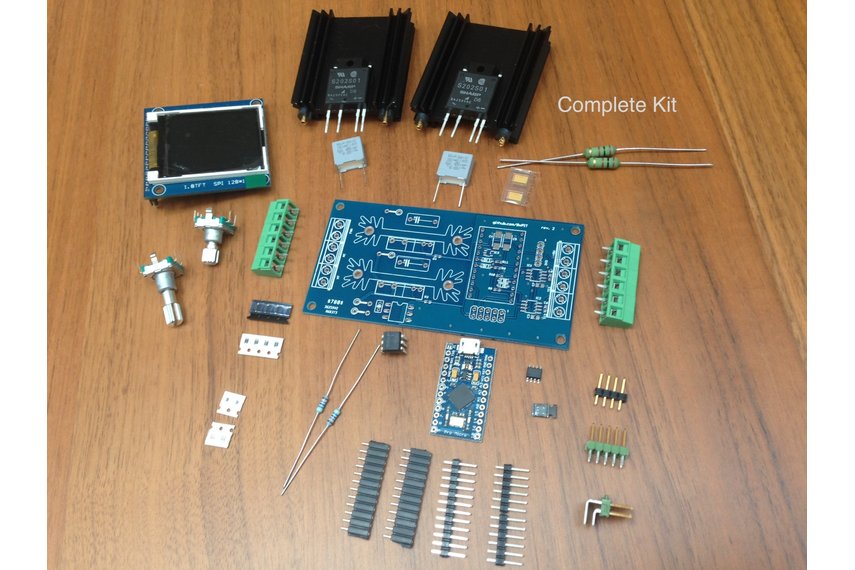
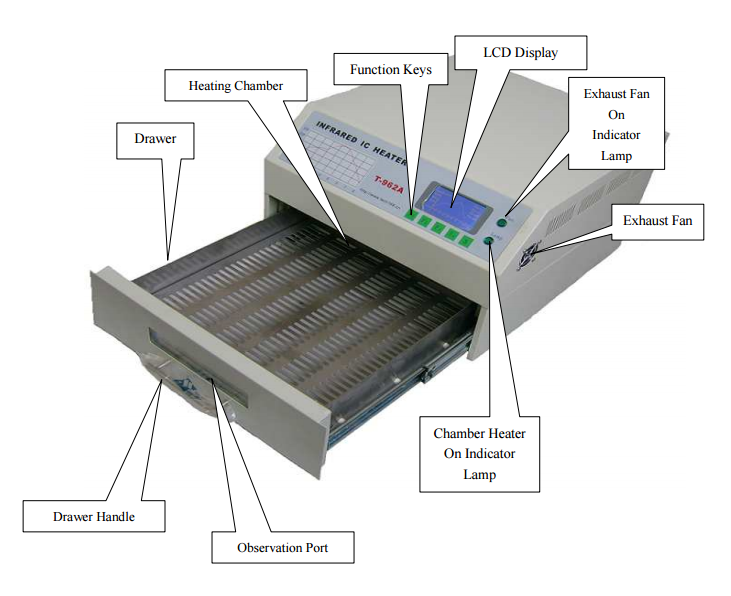
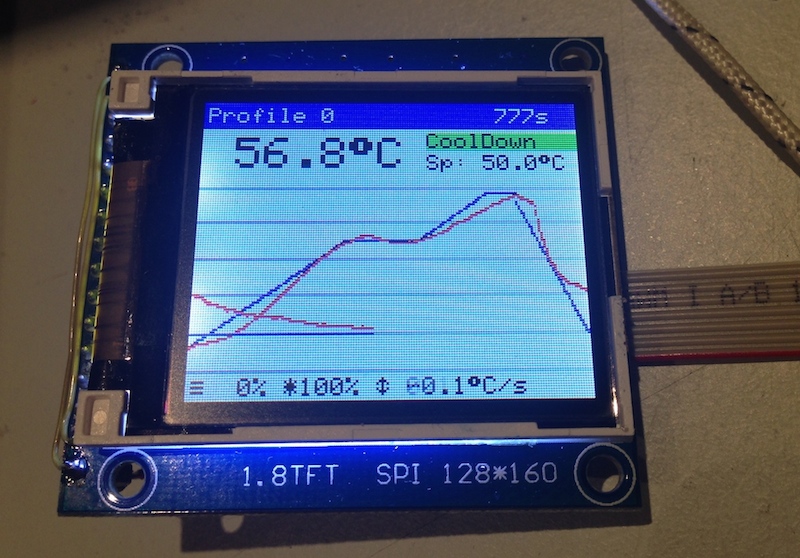
This reflow oven is built around the Arduino Pro Micro, an Adafruit TFT color LCD, and around two solid state relays, one for the heating elements and one for the convection fan. The board contains a very simple Zero crossing detection circuit, used to align control logic to mains frequency, two MAX31855 thermocouple-to-digital converters and two Sharp S202S01 PCB-mount solid state relays, mounted on Fischer SK409 50,8 heat sinks.


2014-08-03t12-36-40-845z-photo-jpg-855x570_q85_pad_rcrop

The Arduino-based reflow oven controller comes with:

  • PID loop control
  • Wave Packet and Phase Fired control for AC outputs
  • graphic TFT LC-Display, drawing the temperature curves
  • using an Adafruit 1.8″ TFT or derivate display
  • solely controlled using a cheap rotary encoder and its single button
  • stores up to 30 temperature profiles in EEPROM
  • configurable PID-parameters
  • simple, small hardware to drive loads up to 600V and up to 8A
  • hardware can
    • measure two temperatures independently
    • drive two AC loads, such as heater and fan
  • Note: Requires Arduino IDE 1.5.x or newer

The software uses PID control of the heater and fan output for improved temperature stability. The heater AC load is controlled using Wave Packet control in order to minimize RF interference and load on the relay. For the fan motor, Phase Fired control has been implemented.

In order to fit your ESTechnical Reflow Oven Controller to T962A, SMTHouse reflow oven infrared IC Heater soldering machine, you will need some tools that are not included in the packing list. You can check the Reflow Oven Accessories Package.
Detailed steps of the installation process are listed here.

T962A Reflow Oven
T962A Reflow Oven

To follow the tutorials make sure of each step or get help from an expert because this project operates with possibly lethal mains voltage.

More details and documentation are available at Github and at ESTechnical official website.

UPDATE 23/12/2019 -> Also check the following reflow controllers:

Raspberry Pi action camera

Action cameras are light and portable camcorders that are great for filming outdoor sports and activities. While there are varieties of commercial action cameras available in the market, makers and tinkerers prefer an alternative route of making their own version of any piece of hardware. Connor Yamada‘s Raspberry Pi based DIY action camera can shoot both video and still photos using a Pi camera board and also features integrated bluetooth and wifi modules for file transfers. A 3D-printed durable enclosure is used to house everything including a high-capacity (2000mA-hour) rechargeable battery that would give multi hours of recording the outdoor fun. The camera also includes a LiPO charger and voltage booster module for easy charging of the battery through a micro USB port.

Raspberry Pi action camera

In order to obtain the compact form factor of an action camera, all the peripherals must be fit as tightly as possible inside the enclosure. Connor tried to keep the size of the enclosure not to exceed that of the Raspberry Pi A+. Because the USB WiFi module can easily stuck out quite a bit when inserted in to the USB port, he managed to remove the USB jack with some side cutters and solder a ribbon cable to the exposed USB lines to connect the WiFi adapter directly to the board. He also hot glued the Bluetooth module on the top of the Raspberry Pi board and ran another ribbon cable to connect it to the serial port pins. Two pushbuttons with slightly longer pieces of cable provide basic control functions for the camera. Following video shows some test recordings of this action camera.

TOP PCB Companies