12V NE555 PWM Controller

FBL1YSEISCAQG0A.MEDIUM

baelza.bubba @ instructables.com build his own PWM controller which is able to operate as a 12V Motor Speed Controller, LED Dimmer, Heat controller, voltage controller for an electrolytic etcher etc.


I did some hunting around on the interweb and found a pretty good starting point in Circuits Today, but then, I needed to make some modification and tweaking of the circuit. I wanted to add in a toggle switch, a DC power socket and a 2 pin screw terminal into the design to make it easier to make and use.

12V NE555 PWM Controller – [Link]

Arrow Certification Makes Your Next Product Crowd-funding On Indiegogo Easier

ArrowCertified_Large@3x

Arrow Electronics, the well known company specialized in distribution and services related to electronic components and computer products, and Indiegogo crowd-funding website announced the “Arrow Certification”.

ArrowCer

Crowd-funding a hardware product is something not so easy and complicated especially when we talk about manufacturing, supply chain management, packaging and warehousing. For this reason Arrow decided to help hardware entrepreneurs with this new certificate.

‘Arrow Certification” benefits are in a lot of aspects needed in your crowd-funding campaign like marketing and engineering.
Arrow engineers will evaluate and consult you especially in the fields Arrow are good at like Bill of Materials Optimization and Design for Manufacture. Arrow will help you in manufacturing, managing supply chain, packaging and warehousing.

“Arrow Certification” will allow you to access to a lot of Arrow engineering tools like:

  • 6 Free months access to SiliconExpert part search engine the largest electronic component database according to Arrow.
  • Access to Arrow Testdrive™ to try new tools from leading semiconductor manufacturers before you buy them free of charge for 21 days.

You will save money using this certification up to $1,000 for BOM (Bill of Materials) and 10% discount on Arrow.com beside free domestic ground shipping.

https://www.youtube.com/watch?v=8v2Nxkc9hDc&rel=0

If your product successfully certified by Arrow, then your Indiegogo campaign page will receive an “Arrow Certified” badge and you’ll receive instructions to claim “Arrow Certified” special benefits. For more information about the Arrow Certification, read the following pages:

4Duino – A 2.4″ TFT LCD IoT Display Module

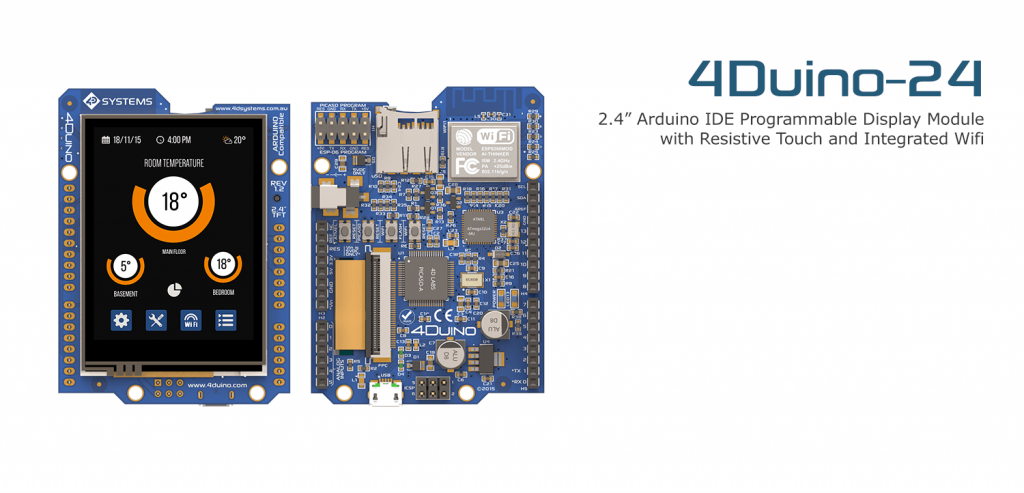
If your application needs a controller with display interface and a network connectivity, then you need to think about using 4Duino from 4D Systems, a 2.4″ TFT LCD IoT display module.

4Duino-slide-1

4Duino key features

4Duino

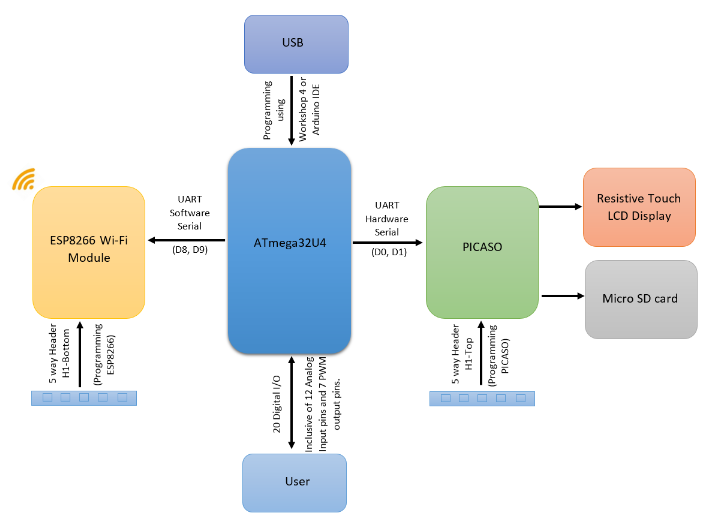
4Duino has ATmega32U4, a 8-bit MCU from Atmel, which is the same microcontroller inside Arduino Leonardo. 4Duino also preserves Arduino UNO pinouts.

ESP8266 WiFi module ESP-06 model is embedded in 4Duino making it suitable for IoT (Internet of Things) applications.

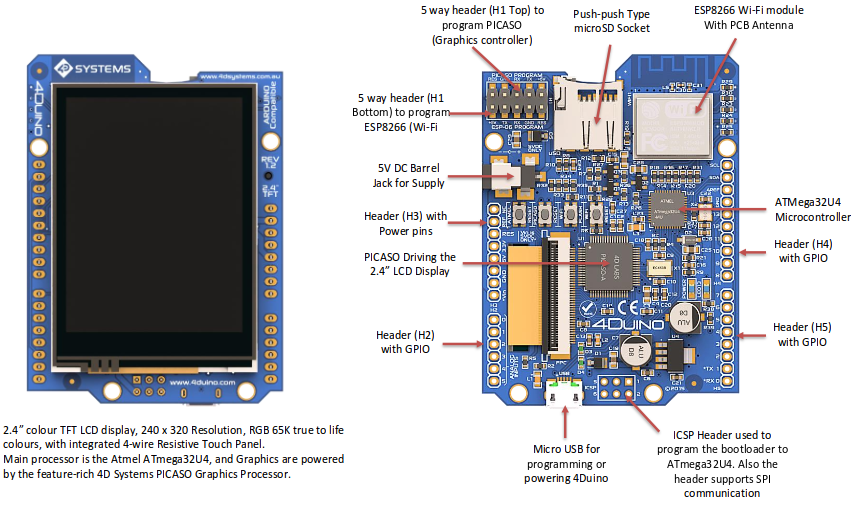
4Duino features a 2.4” 320 x 240 pixels with 65K colors TFT LCD display, with resistive touch. LCD is powered by the feature-rich 4D Systems Picaso Graphics Processor.

A SD Card socket is connected also with Picaso for multimedia storage and data logging purpose, memory card storage size can be up to 32GB.

4duino_BD

  • ATmega32U4 with
    • 32KB Programmable Flash
    • 2.5KB Internal SRAM
    • 1KB Internal EEPROM
    • UP to 16 MIPS Throughput
  • Powerful 2.4” Intelligent LCD-TFT display module powered by PICASO with
    • 14KB Programmable Flash
    • 14KB Internal SRAM
    • 240 x 320 Resolution, RGB 65K true to life colours, TFT LCD Display with integrated 4-wire Resistive Touch Panel.
  • ESP8266 Wi-Fi Module with
    • 802.11 b/g/n
    • Wi-Fi Direct (P2P), soft-AP
    • TCP/IP protocol stack
    • 1MB Flash
  • General Purpose I/O pins for user interfacing, which include
    • 20 Digital IO pins
    • of which 7 are capable of PWM
    • and 12 are capable of Analog input
  • On-board USB for powering the 4Duino and programming the ATmega32U4.
  • 2×5 way header for programming Picaso and ESP8266 via a 4D Systems Programming Cable or Adaptor
  • On-board latch type micro-SD memory card connector for multimedia storage and data logging purposes.
  • DOS compatible file access (FAT16 format) as well as low level access to card memory.
  • Module dimensions: 72.8 x 53.3 x 14.6mm.

Programming 4Duino

There are two IDEs available to program the 4Duino. Using the Arduino IDE, or using the Workshop4 IDE  which provides additional customized graphical tools allowing the user to take the advantage of the features of the Atmel processor and the Picaso processor, by utilising the Picaso Serial Library and the hundreds of graphics commands.

If you want to program the Atmega32U4, there is no need to any additional hardware tools, but if you want to update ESP8266 or Picaso processor firmware, or if you want to use some tools from Workshop4 IDE like Genie environment, which provides Drag/Drop graphics building, then you need to have uUSB-PA5, a serial-TTL UART bridge converter, or any other Serial-TTL bridge.

Price and Documentation

4Duino price is 80$, also a starter kit is available for 110$, it includes some accessories like power adapter, SD card memory and uUSB-PA5-II (Programming Adaptor).

Product Page

4Duino Datasheet

4Duino Schematic

Workshop4 IDE
Via: HackerBoards

PartSync – Full featured Desktop Electronics Parts Database

partsync

PartSync is a desktop database application used to manage electronic part data, Bill of Materials (BOM), component kits and vendor purchase lists. PartSync provides advanced features for labeling, material storage and bar coded labels. Search engines make finding parts and part information fast and easy. A datasheet librarian organizes component documents and a PCB Footprint library supports PCB design activities.

PartSync – Full featured Desktop Electronics Parts Database – [Link]


Open source 25-core processor can be stringed into a 200,000-core computer

index

Researchers at Princeton University have built a 25-core chip that can scaled easily to create a 200,000-core computer. by Agam Shah @ pcworld.com:

It won’t happen anytime soon, but that’s one possible usage scenario for Piton. The chip is designed to be flexible and quickly scalable, and will have to ensure the giant collection of cores are in sync when processing applications in parallel.

Open source 25-core processor can be stringed into a 200,000-core computer – [Link]

Meet NanoPi NEO The New Hero – The 8 $ Computer

Meet NanoPi NEO the latest member in NanoPi family from FriendlyARM.

NanoPi-NEO-layout

NanoPi NEO features Allwinner H3 CPU, a Quad-core Cortex-A7 Up to 1.2GHz CPU.
It’s available with 256MB DDR3 RAM or 512MB one with additional 2$ for the last one.

The board has 10/100M Ethernet RJ-45 jack, USB host type A connector, MicroUSB connector for data transmission and power input, one MicroSD slot, serial debug header and 36 pins for GPIO.

NanoPi-NEO_en_pinout

The supported OS for NanoPi NEO are: Ubuntu Core, armbian and FreeBSD.

Raspberry Pi Zero - Image courtesy of Adafruit
Raspberry Pi Zero – Image courtesy of Adafruit

Raspberry Pi Zero, the 5$ computer, had  Broadcom BCM2835 1GHz ARM11 single-core processor, 40-pin GPIO header, mini-HDMI socket for 1080p60 video output and two MicroUSB one for power and one for data transmission with 40mm  x 40mm dimension.

NanoPi price is 8$ plus 5$ for shipping, you can order some accessories like MicroSD card memory and USB power adapter from the product page.

Product Page

NanoPi NEO Schematic
Via: elektormagazine

1Hz to 30KHz Wave Generator Using Arduino

Wave generator is one of the most needed tools in our electronics labs, you can buy a fully functional ready made one or make a simple one using your Arduino.

Ard_waveGen

Joekutz over Hackaday.io created a simple wave generator using Arduino powered from 9V battery and produces amplified and non amplified signals. This generator uses the 8-bit resistor ladder, aka R2R, DAC with 0.0195V step, knowing that Vout of R2R DAC is Vout = Vref × VAL / 2^N  Where N = 8 (hence 2^8 = 256) and Vref = 5.0 V.

R2R_sch
Image Source – “Arduino Waveform Generator” Instructable

Joekutz used the “Arduino Waveform Generator” instructable, but he added to the original project design a LCD display, a speaker to hear the generated wave and edited the way how user sets the waveform and frequency.

Joekutz decided to hack a cheap calculator LCD and to use it in his project, he found out how to emulate a press of “CE, +, = and 1” Keys using Arduino, so he can display any number using this hack, for example displaying 123 on the LCD means the following sequence: 111 + 11 + 1.

Ard_waveGen_parts

He created an Arduino library for his hack. You can see the below video from Joekutz explaining LCD hack:

In the below video Joekutz demonstrates the project:

The mechanical work in this project included designing a cheap plywood case using Inkscape and designing a switches knobs using FreeCAD.

You can download the Arduino Library and sketch files from the project page on Hackaday.

How to control Arduino board using an Android phone

Arduino_android

Kerimil, user on Arduino Forum, submitted his project which focuses on establishing communication between an Arduino board and an android mobile using bluetooth:

The idea is to gain access to hardware on Android devices (accelerometers, gyro, wifi connectivity, gps, GPRS, touchscreen, text to speech and speech to text) and/or use it to relay data to the internet. MIT’s app inventor was used to write a custom app in this example. The code can be easily modified to create your own apps.

How to control Arduino board using an Android phone – [Link]

Filtering Noisy Arduino Measurements

All
@ megunolink.com discuss about noise in analog input of arduino and how to filter it. He examines 3 filtering algorithms: Averaging, Running average, Exponential filter and provides the code to achieve that.

Measurements from the real world often contain noise. Loosely speaking, noise is just the part of the signal you didn’t want. Maybe it comes from electrical noise: the random variations you see when calling analogRead on a sensor that should be stable. Noise also arises from real effects on the sensor. Vibration from the engine adds noise if you’re measuring the acceleration of a go-kart, for example. Filtering is a method to remove some of the unwanted signal to leave a smoother result.

Filtering Noisy Arduino Measurements – [Link]

TOP PCB Companies