Limiting Inrush Current

limiting_inrush_current

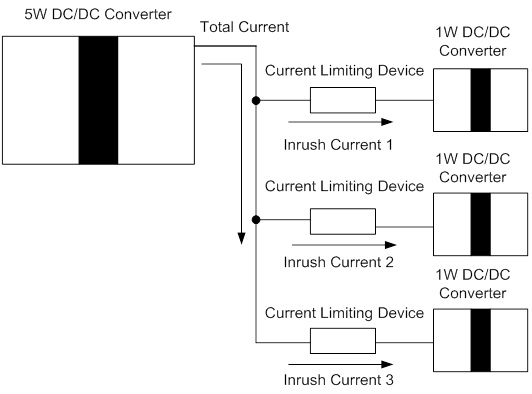
aimtec.com has a basic article on how to limit inrush current using passive components.

Inrush current or input surge current refers to the maximum, instantaneous input current drawn by an electrical device during its initial turn on.

Power converters also feature high inrush currents relative to their steady state currents that may be several times their normal full-load current when first energized.

The inrush current of a power converter is typically the charging current of the input capacitance.

Limiting Inrush Current – [Link]

Wireless mood light with Arduino & BLYNK

F1DBA17IQ6WV78L.MEDIUM

sagnikb7 @ instructables.com show us how to build a wireless mood lamp using Arduino and BLYNK app.

In this tutorial we will be creating a MOOD (you can create any color you can imagine to fit your mood) light, that can be controlled from your smartphone, we will be creating the APP too (NO ANDROID APP CODING required)

Wireless mood light with Arduino & BLYNK – [Link]

Bifacial solar cells boost efficiency

20160620111345_Imec-bifacial-solar-cell

by Harry Baggen @ elektormagazine.com:

The Belgian nanoelectronics research center Imec has developed a very efficient bifacial n-PERT (BiPERT) solar cell technology with a bifaciality factor of nearly 100%. The cell efficiency at the rear is nearly as high as the efficiency at the front.

Bifacial solar cells capture not only the light falling on the front of the solar panel, but also the light falling on the rear – including light reflected from clouds or the background, diffuse light, and even direct light at sunrise and sunset. Bifacial module are therefore able to generate more electricity than conventional monofacial modules.

Bifacial solar cells boost efficiency – [Link]

Arduino 8 Digit, 7 Segment BCD Counter using MAX7219

F5KDP2NIQ6VGNXD.MEDIUM

PugazhM @ instructables.com show us how to make a 7 segment BCD counter using MAX7219 and Arduino.

In Embedded system design, seven segment displays are playing a major role as numerical visual indications. Seven segment LED displays are brighter, more attractive and provide a far viewing distance as well as a wider viewing angle as compared to LCD displays. Its available wide dimensions (0.3 inch to 6 inch) and different colors (RED, GREEN, BLUE, ORANGE, WHITE). It can display digits from 0 to 9 and quite a few characters like A, b, C, d, E, e, F, n, o, P, t, u, etc. This intractable is about interfacing 8 digits of 7 segment display by using popular MAX7219 display driver with Arduino Uno.

Arduino 8 Digit, 7 Segment BCD Counter using MAX7219 – [Link]

LT8335 – Low IQ Boost/SEPIC/ Inverting Converter with 2A, 28V Switch

lt8335col_1
LT8335 is a current mode, 2 MHz step-up DC/DC converter with an internal 2A, 28V switch. It operates from an input voltage range of 3V to 25V, suitable for applications with input sources ranging from a single-cell Li-Ion to automotive inputs.

The LT8335 can be configured as either a boost, SEPIC or an inverting converter. It uses a fixed 2 MHz switching frequency, enabling designers to minimize external component sizes and avoid critical frequency bands, such as AM radio. Burst Mode operation reduces quiescent current to 6 µA while keeping output ripple below 15 mVP-P. The combination of a 3 x 2 mm DFN package and tiny externals ensures a very compact footprint while minimizing cost.

LT8335 – Low IQ Boost/SEPIC/ Inverting Converter with 2A, 28V Switch – [Link]

Puck.js – the ground-breaking bluetooth beacon

Puck

A JavaScript microcontroller you can program wirelessly – perfect for IoT devices! No software needed so get started in seconds

With our custom circuit board, the latest Nordic chip, Bluetooth Smart, Infra-red and much more, all enclosed in a tiny silicone case, Puck.js is a smart device which is both multi-functional and easy to use.

Puck.js comes pre-installed with JavaScript and we have an easy to use graphical editor, so it’s perfect for any maker, whether you’re just starting out or have been making for years. You can start programming straight out of the box – no wires or software required!

Puck.js – the ground-breaking bluetooth beacon – [Link]

Make the PCB from your design using Altium CircuitStudio

pastedImage_17

AshokRao guide us through the process of creating a PCB out of your Schematic, using Altium – CircuitStudio

OK, further to Part 1 of this blog where we created a schematic, now it’s time to move to the PCB.

If you still don’t have your license, get a trail from here:

Professional PCB design tool | CircuitStudio

Make the PCB from your design using Altium Circuit Studio – [Link]

Wemos D1 mini: A first look at this ESP8266 based board

educ8s.tv has a new video discussing about the Wemos D1 mini board.

In this video we are going to take a first look at the Wemos D1 mini board. The new impressive ESP8266 based board. It is very small in size, very inexpensive but very powerful!

If you have watched some of my previous videos you will remember that I recently tested the WeMOS D1 board which resembles an Arduino Uno but uses the much faster and capable ESP8266 chip. Recently I discovered on Banggood.com another very promising board, the D1 mini board which also uses the ESP8266 chip. This board costs $5.6 and Banggood.com was kind enough to send a sample unit in order to test it and share my opinion about it with you.

Wemos D1 mini: A first look at this ESP8266 based board [Link]

TOP PCB Companies