3.3V @ 1.5A Buck Regulator

The circuit presented here is based on LTC3601, a high efficiency, monolithic synchronous buck regulator from Linear Technology. The circuit operates at an input voltage ranging from 4V to 15V, this makes it suitable for a wide range of power supply applications. It is capable of producing a output voltage of 3.3V. Burst Mode operation and forced continuous mode are the two types of operational modes available in LTC3601.

Features:

  • Input(V): 4VDC to 15VDC
  • Output(V): 3.3VDC
  • Output load: 1.5A
  • PCB:35mm X 25mm

Parts list

AmpStrike – Battery Powered Bench Power Supply

Introduction

This is a small bench power supply that is powered by two lithium-ion batteries. The project was inspired by Dave Jones from EEVblog but the design is completely mine. The voltage range is 0-20V regulated in 10mV steps and maximum current is 1A with current limit set in 1mA steps.
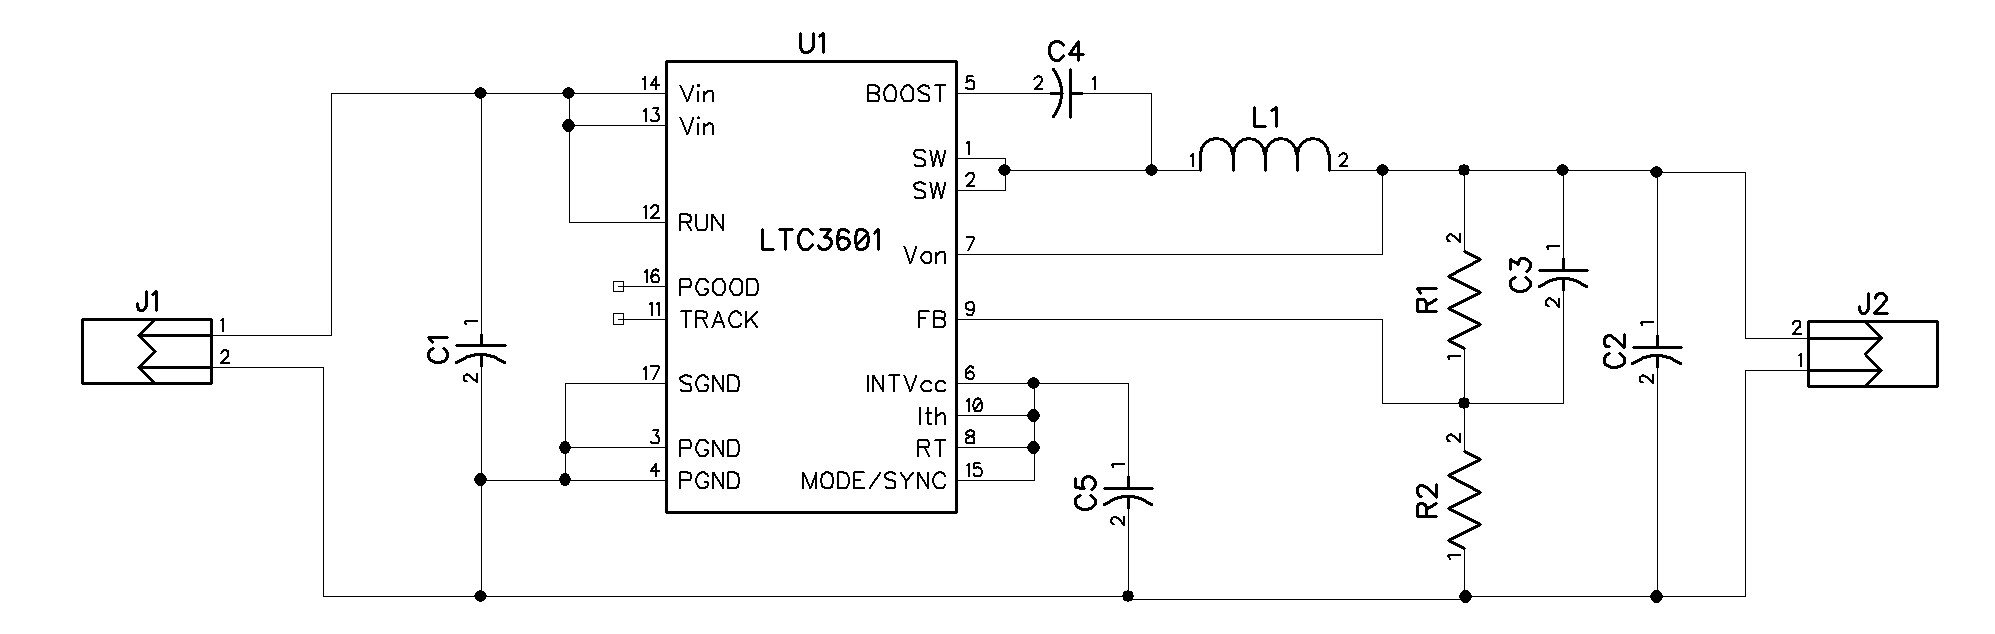
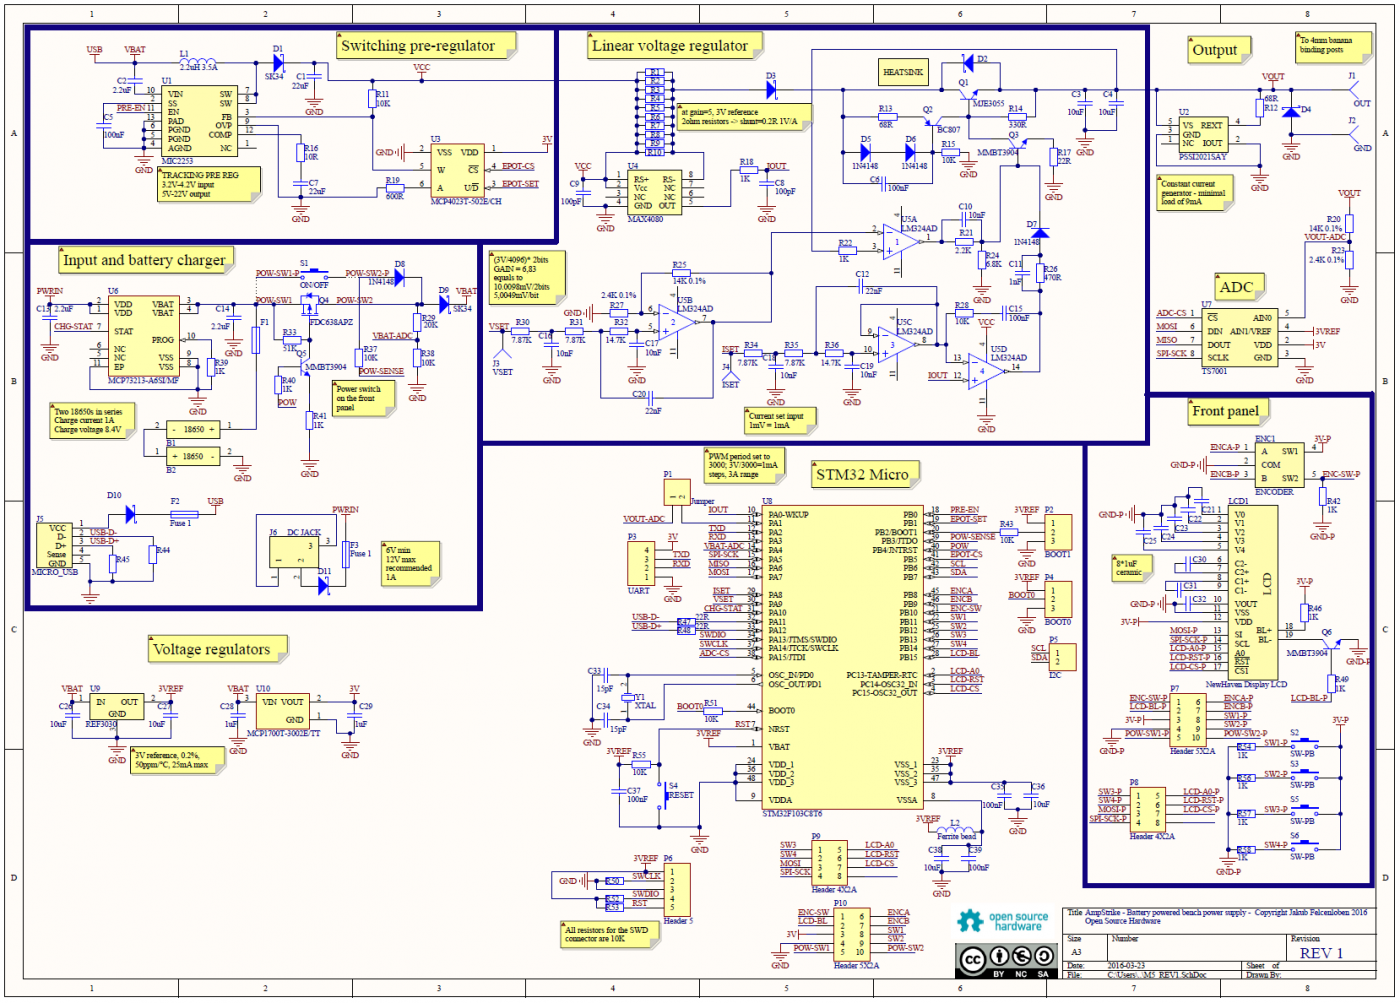
Schematic

ampStrike_schematic


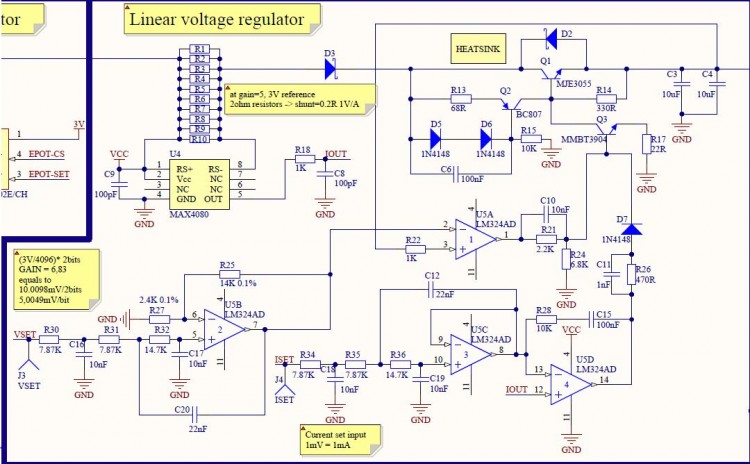
Linear Voltage Regulator

The power supply runs on a linear voltage regulator built on discrete components. The design of the linear regulator was inspired by the user Amspire from the EEVblog forum. The basic idea is that the Q1 pass transistor and U5A op amp act in a classic voltage regulating loop. U5A gets feedback from the output voltage and acts on Q1 in such a way that the output voltage equals the reference voltage on the inverting input. U5D acts as a comparator and switches the base of Q1 low to set the output voltage to 0V. It acts as a current limiter which is quickly switching on and off the output to maintain the set current limit. The current drawn by the load is measured by a MAX4080 current sense amplifier using a shunt resistor which is made up of 10 smaller resistors to get better power dissipation and current capability. U5B and U5C combined with the adjacent resistors and capacitors act as filters to smooth out the PWM signal from the microcontroller. The output contains two 10uF ceramic capacitors, a protecting diode and a small current source that acts as a small load to make the power supply more stable.
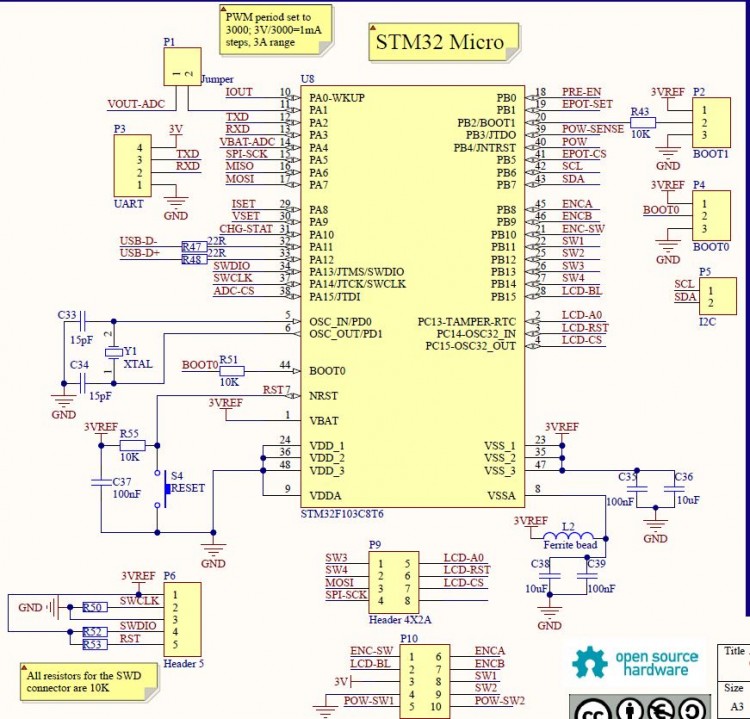
reg

Microcontroller

The entire voltage and current limit is controlled by a STM32F103 microcontroller. It might seem as a bit of an overkill for such a project, but actually these microcontrollers are quite cheap and they have the 12 bit PWM required for this project. The STM32 controls pretty much the entire power supply, including the switching pre-regulator, the output voltage and current limit and the front panel with an LCD, swtches and a rotary encoder used to set the desired values.  Some USB capability can be added in the future. The user can also make use of the UART connector to plug in some bluetooth or Ethernet modules (with some additional code).
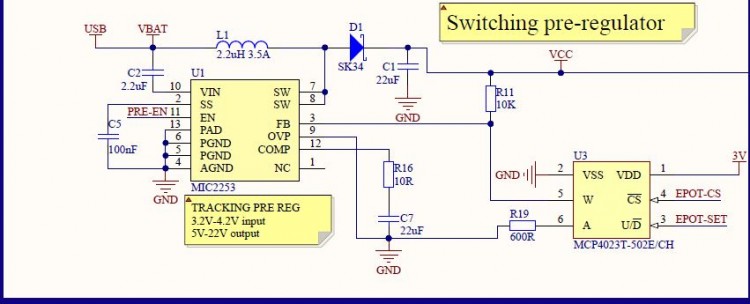
micro

Pre-Regulator

Since two batteries in series give only 8.4V maximum, the power supply needs a boost converter to get the 20V output, and it obviously has one. The MIC2253 with a couple of adjacent components provides the required voltage. The idea is that the DC-DC converter boosts the voltage and the linear regulator provides a smooth output.  The bonus is, that with a small digital pot, the microcontroller can keep the input voltage just at the required level (about 2V above desired output) which minimises losses of energy from the battery and the heating of MTB3055 pass transistor.

The STM32 can even switch the pre-regulator off if required and just rely on the batteries powering the linear regulator directly.

pre-reg

You can find in the design two 3V rails. One, denoted on the schematic as 3VREF is a precise voltage reference for the microcontroller’s PWM and ADC, and also for the external ADC. The other is normal 3V line used to power the peripherals.

Input and Battery Charger

The batteries can be charged from DC input only, since the USB has too low a voltage to be able to charge batteries at 8.4V. However, when you plug the USB, the STM32 switches the batteries off and the entire power supply can be powered from USB (with power limited to 2.5W obviously). So in theory the AmpStrike can operate just on USB, without the batteries. The disadvantage of my design is that the USB is in no way isolated from the rest of the circuit. But provided that the microcontroller continously prevents the circuit from drawing more than 2.5W it shouldn’t be a huge problem especially since USB, DC input and batteries are all protected with resettable fuses.

input + charger

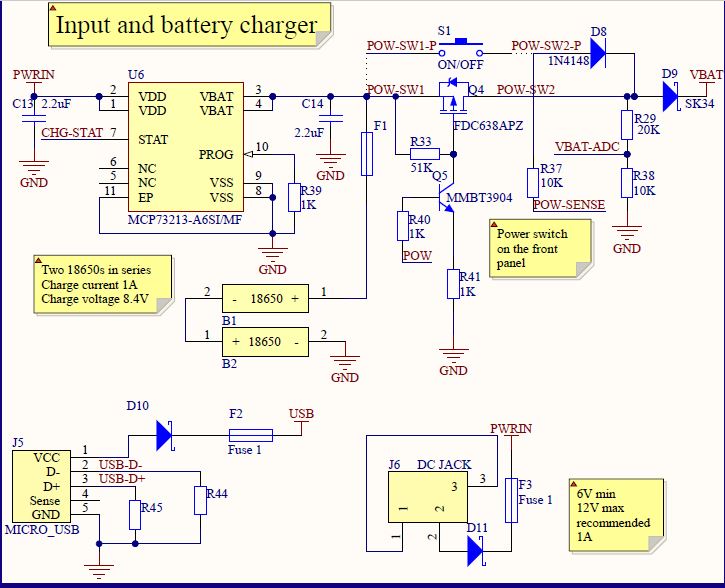
The schematic also contains an external TS7001 12 bit ADC for measuring the output voltage, but I probably will end up measuring the output with the internal ADC in STM32. I am not sure yet, since I’m not really that familliar with the internal ADCs in these microcontrollers.

The PCB is designed with a front panel, which is v-scored to break it off and to mount it at a right angle on the main board. The power supply will be encased in a small aluminium enclousure.

I realise that the ideology and some parts are the same that Dave Jones used in his design, but I actually went through the entire design proccess myself and made decisions that made the most sense for me.

Note

The project is far from finished. Next step is making a prototype, trying to make the regulator stable and most importantly, writing the software. All sugestions are welcome, I’ll be sure to take them into consideration. I should also point out that I hope to be able to sell this power supply in the near future.

High-performance scope probes top out at 20 GHz

Tektronix, Inc., the world’s leading manufacturer of oscilloscopes, introduced the P7700 series of TriMode™ probes for use with Tektronix performance oscilloscopes. Offering up to 20 GHz bandwidth, the new probes ease the challenges designers face when debugging circuits found in the latest mobile and enterprise designs by minimizing probe loading, improving access to smaller, more-densely packed test locations and lowering overall cost of ownership.

The new P7700 series of probes from Tektronix takes a completely different approach, with the input amplifier integrated into the probe tip less than 4 mm from the connection point. This minimizes signal loss as well as probe capacitance and reduces noise susceptibility.

With prices starting at $8,500, the P7700 probes are intended for professional users.

High-performance scope probes top out at 20 GHz – [Link]

21.1% efficiency with Perovskite solar cells

20160317101746_perkovskite

Scientists have successfully developed a Perovskite solar call containing Cesium which has attained an efficiency of 21.1%, as well as a world record for reproducibility. by Denis Meyer @ elektormagazine.com:

In adding Cesium, the scientists at EPFL, let by Michael Saliba, have developed the first Perovskite compound with triple cations (Cs/MA/FA). These new films are more stable in hot conditions and less affected by fluctuations in environmental variables. They have confirmed efficiencies of 21.1%, and exit efficiency of 18% in operational conditions, even beyond 250 h.

21.1% efficiency with Perovskite solar cells – [Link]

‘Circuit Cobbling’ the Riffle Data Logger

medium_completed_board

John Keefe has designed an open source data logger that is able to monitor conductivity, temperature and turbidity of water in lakes and fits inside a plastic bottle.

The board is designed to monitor the conductivity (and, possibly, contamination) of water in lakes and streams, with the wonderful feature that it fits through the mouth of a regular water bottle. It’s called Riffle and it is the brainchild of Don Blair, who’s working with Public Lab and the MIT Center for Civic Media. This week I had the honor of working with Don at MIT.

‘Circuit Cobbling’ the Riffle Data Logger – [Link]

Get ready for MPLAB Express

image1-600x450

Chas from iradan.com discuss about MPLAB Express, the new cloud IDE from Microchip for PIC microcontrollers. He writes:

I credit the maker movement with bringing electronics back from the crusty old and lonely electronics hobby back into the main stream. The Arduino is the micro of choice for this army of makers and I conceded it made sense… you install the IDE, plugged in your board into the USB port and a couple clicks later and you have an LED blinking.. the most exciting blinking LED you’d ever seen in most cases. I stuck with the PIC micros because I didn’t see any need to put back on the training wheels.

Get ready for MPLAB Express – [Link]

Monolithic linear battery charger operates from inputs up to 60V

DN535f1

Joshua Yee @ edn.com discuss about LTC4079 250mA Linear Li-Ion Charger IC that can be powered with voltages up to 60V.

For charging relatively low capacity batteries, or maintenance charging backup and keep-alive batteries, linear topology battery chargers are valued for their compact footprints, simplicity and affordability. Even so, there is a dearth of linear chargers that accept a 10V or higher input voltage, leaving many industrial and automotive systems underserved.

Monolithic linear battery charger operates from inputs up to 60V – [Link]

LT8391 – 60V Synchronous 4-Switch Buck-Boost LED Controller

LT8391

The LT8391 is a synchronous 4-switch buck-boost LED controller that regulates LED current from input voltage above, below, or equal to the output voltage. The proprietary peak-buck peak-boost current mode control scheme allows adjustable and synchronizable 150kHz to 650kHz fixed frequency operation, or internal ±15% triangle spread spectrum operation for low EMI. With 4V to 60V input, 0V to 60V output, and seamless low noise transitions between operation regions, the LT8391 is ideal for LED driver and battery charger applications in automotive, industrial, and battery-powered systems.

LT8391 – 60V Synchronous 4-Switch Buck-Boost LED Controller – [Link]


Wireless communication between two Arduinos using inexpensive RF modules

Title-580x294

Raj from Embedded Lab has posted a new article exploring an easy wireless communication setup between two Arduinos using low-cost ASK RF transmitter and receiver modules. He used a 433MHz Tx/Rx pair with two Arduino boards to illustrate how to construct a low-range wireless temperature and humidity monitor.

Wireless communication between two Arduinos using inexpensive RF modules – [Link]

TOP PCB Companies