IoT IP camera teardown and getting root password

2016-03-11-IoT-IP-camera-teardown-and-getting-root-password-7-small

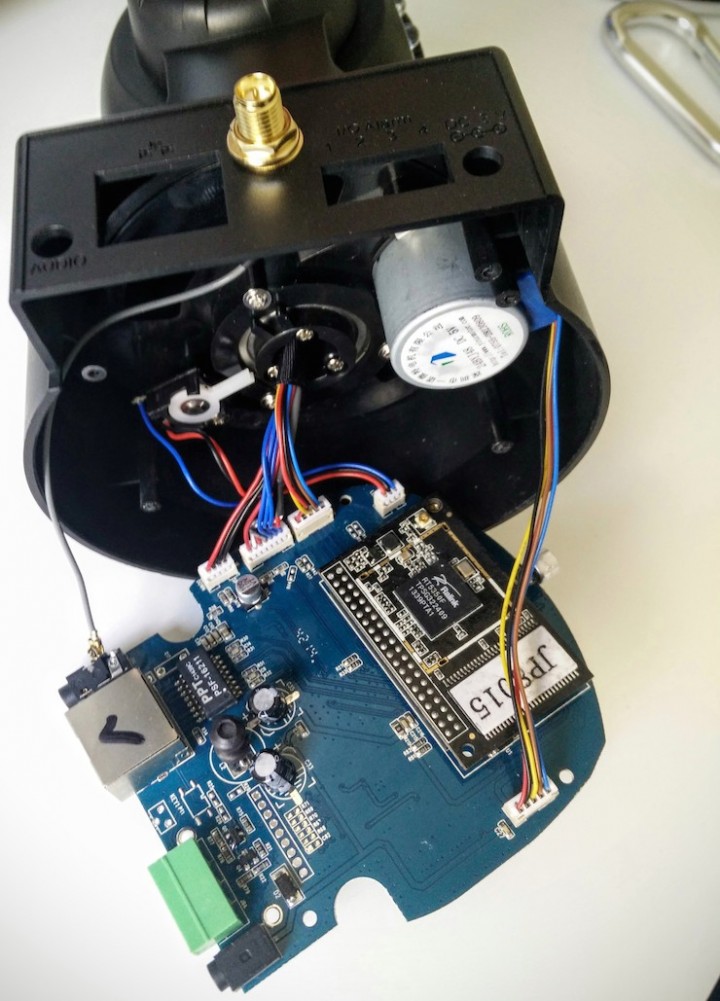
Jelmer @ jelmertiete.com did a teardown on a cheap IP camera and also obtained the root password of it with the goal to investigate the security of such a devices. He writes:

IP Cameras have become extremely cheap in the last couple of years. Mass production made the prices of decent quality image sensors, and very capable SoCs, drop significantly. Our victim in question is currently still available for about €43, but clones/copies/similar models are available from China for even cheaper.

IoT IP camera teardown and getting root password – [Link]

DIL-Duino – Arduino in a DIL shape

3895531450822949600

DIL-Duino is a complete Arduino environment in a DIL-8 form factor based on the DigiSpark Hardware. by Daniel Grießhaber:

DIL-Duino uses the QFN Version of the ATTiny85 and a USB Bootloader to provide the easy to use Arduino stack in a single DIL-8 Package Footprint.
To fit the Micro-USB socket on the board, it was necessary to make the actual board bigger than the DIL Package, but after development the Board is perforated to break the USB Socket and get the desired footprint.

DIL-Duino – Arduino in a DIL shape – [Link]

ESP8266 superfast flashing: flash ESP in 5 seconds

-home-kanishka-apps-esptool-esptool

Deomid Ryabkov introduces us a method of flashing ESP8266 in 5 sec. To achieve that he used a modified ESPTool. More details on the link below.

If you are developing for ESP8266, you may be familiar with esptool, which is a tool that you use to upload your code to the device. And it will do so, but if, like Smart.js, your firmware is non-trivial in size, you’ll be waiting a non-trivial amount of time for it to upload:

ESP8266 superfast flashing: flash ESP in 5 seconds – [Link]

LiFePO4wered/Pi – LiFePO4 battery for Raspberry Pi

4853551455579281898

Patrick Van Oosterwijck has published a LiFePO4 battery solution for Raspberry Pi that will also act as UPS power supply:

The project is built on top of a LiFePO4wered/USB module. A small board is added with an MSP430G2131 microcontroller that takes care of monitoring input and output voltage, monitoring a PCB touch button, driving a power indicator LED and switching the load (the Raspberry Pi power). The microcontroller is also connected to the Pi’s I2C bus and monitors the Pi’s running state. The small board connects to 8 of the Pi’s GPIO pins but leaves the rest free to allow prototyping using fly leads.

LiFePO4wered/Pi – LiFePO4 battery for Raspberry Pi – [Link]

External antenna modifications for the Raspberry Pi 3

Top_3.preview

In this post dorkbotpdx.org show us a couple of different ways that an external antenna can be added to the Raspberry Pi 3.

It’s not clear why an external antenna is not an option for the Pi 3, there are a number of possible reasons and I don’t presume to know the Raspberry Pi Foundation’s exact rationale. It could be to improve the out-of-box experience, an integrated antenna “just works” and there’s no potential for the antenna connector to be broken plugging in an antenna. It could be to reduce complexity, the unit with an integrated antenna is compact and self-contained.

External antenna modifications for the Raspberry Pi 3 – [Link]

Teensy 3.2 VS Arduino Due and Arduino Mega. Which one is faster?

our friends at educ8s.tv wanted to test out how fast the  Teensy 3.2 is, so he build the project above.

I wanted to find out if Teensy 3.2, despite its small size, is faster than the Arduino Due, the fastest Arduino board available today. So I build a simple project where both boards run the same sketch, the Newton’s approximation of Pi for 500.000 iterations. Which one is faster? The board that finished first. Teensy or Arduino Due?

A few weeks ago, I published a video about the impressive Teensy 3.2 board! The specs of the board look fantastic! It uses a 32bit ARM processor that can run at 96 MHz and has plenty of memory for our projects. From the specs I thought that the performance of this tiny board would be similar with the performance of an Arduino Due which is the fastest Arduino board available today. But is that right? Let’s find out.

Teensy 3.2 VS Arduino Due and Arduino Mega. Which one is faster? – [Link]

SMD Soldering Reflow Oven

F2FAAMTIM53QPAP.MEDIUM

Here is a nice tutorial on how to build your own reflow soldering oven using ControLeo2 reflow oven controller.

This particular instructable is based on the ControLeo2 reflow oven controller by Peter Easton. This is by far the best I’ve come across and the software is fully open source. It can control up to 4 solid state relays (SSRs), a servo motor (to open the door for cooling at the end of reflow process) and a buzzer. Most impressive is that it is self-learning. That means, it can adapt to your oven heating elements and their behavior. Thanks Peter for putting this out there! The electronics hardware design is based off Brian Barrett’s design. He is super helpful and I suggest reading his build guide (multiple times). Thanks Brian! 🙂

SMD Soldering Reflow Oven – [Link]

1.3V – 15.5V @ 2 Amps Power Supply

FY8XE3NIM55ZVU6.MEDIUM

Here is a low cost and easy to build power supply based on a some Chinese DC-DC converter modules:

This is a small size power supply with low cost and easy to make that only taking about 5 more hours. I was very happy with it and would share with you.

Power Supply Specifications

Input: 5v-16v/3A DC

Output: 1.3V – 15.5V/2 Amps

1.3V – 15.5V @ 2 Amps Power Supply – [Link]

AC Motor Speed Controller using U2008B

AC-Motor-Speed-Controller-500x500

This low cost current feedback phase control AC motor driver based on U2008 IC, The U2008B is designed as a phase control circuit in bipolar technology. It enables load-current detection as well as mains-compensated phase control. Motor control with load-current feedback and overload protection are preferred application.

Specifications

  • Supply In-put: 230V AC
  • Load: Up to 500W (Triac Required Heat sink for Higher Load)
  • Jumper J1 Selection: A-Load Current Compensation or B-Soft Start
  • PR1: Preset for Phase Control ( Ramp Current Adjustment)
  • P1 : Potentiometer Set Point

AC Motor Speed Controller using U2008B – [Link]

TOP PCB Companies