Maxim Reference Design – Wearable, Galvanic Skin Response System

20151221174211_MAXREFDES73

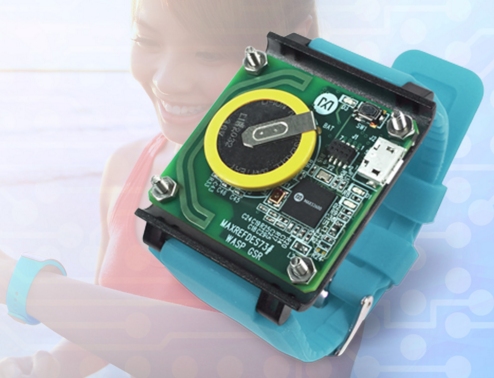
The MAXREFDES73# reference design from Maxim Integrated is a wearable, mobile galvanic skin response (GSR) system featuring the MAX32600 wellness measurement microcontroller.

his battery-powered platform takes high-precision AC impedance measurements while consuming minimal power. The MAX32600 microcontroller features the industry-standard ARM® Cortex®-M3 32-bit RISC CPU that operates at up to 24MHz, while integrating multiple high-performance analog peripherals.

Maxim Reference Design – Wearable, Galvanic Skin Response System – [Link]

Better 3D graphics on the Arduino – ILI9341 LCD

Montage

M Rule @ crawlingrobotfortress.blogspot.com discuss about ways to optimize 3D rendering on ILI9341 LCD and Arduino:

Both optimizing ILI9341 LCD drivers and rendering basic wireframe meshes have been done before. XarkLabs provides an optimized fork of Adafruit’s library. Youtube user electrodacus has also implementd an optimize driver for the ILI9341 communicating over SPI.

Better 3D graphics on the Arduino – ILI9341 LCD – [Link]

Building a piCentr home media center

FDILV6LII3H879T.MEDIUM

mjrice @ instructables.com shows us how to build a Raspberry Pi home media center. The layout of the enclosure is meant to keep all cabling tidy and inside out of view, with accessible ports for everything you need.

A 3D printed internal chassis is part of the design, which holds the Pi 2 and up to two 2.5” HDDs, and is specially suited to use with the Western Digital pidrive. Remote control of the appliance is supported by installing a FLIRC USB device and the remote of your choice. The design also sports a power-wake button and a cooling fan.

Building a piCentr home media center – [Link]

Isolated USB-to-UART converter

DI5499f4

Jacob Beningo shows how to build an isolated USB to UART converter using Sparkfun’s modules.

A simple isolation circuit that costs only a few dollars could have been used to protect the USB port on the computer. Embedded system developers get used to plugging strange hardware and components into their computers on a daily basis and rarely consider the consequences of what their actions might bring.

Isolated USB-to-UART converter – [Link]

Inside the ALU of the first ARM microprocessor

silicon-regions

Dave @ daveshacks.blogspot.co.uk takes a look inside the first ARM microprocessor and explains it’s design.

With that in mind I embarked on my own attempt to reverse-engineer parts of the armv1. Some background knowledge of the processor’s architecture is helpful, and googling for “ARM Architecture Reference Manual” will lead you to very detailed descriptions of the more modern versions of the processor. By just looking at the masks and knowing a little about the processor’s architecture it’s possible to make some good guesses at what some of the blocks are.

Inside the ALU of the first ARM microprocessor – [Link]

INA219 current sensor DIY Breakout board

23577455661_4c48a0beca_z-600x450

Juan Ignacio has designed a INA219 current sensor DIY Breakout board:

Another small board, this time for a INA219. The INA219 is a high-side current shunt and power monitor with an I2C interface.
For testing I used Rei VILO library with a MSP430G2553 and Energia, and I measured the power consumption for this simple circuit.

INA219 current sensor DIY Breakout board – [Link]

UCload new PCB build

ucload_rev2a-1080x675

Sjaak has published a new PCB build, uC controlled dummy load:

With no snow outside I finally got around to solder the 3rd PCB. It is the second revision of a microcontroller dummy load. It is loosely based on the arachnidlabs uc:load. It uses the same base ciruit and adds a microcontroller (PIC16F1825), rotary encode switch, external powersupply and offcourse a 128×32 OLED.

UCload new PCB build – [Link]

Adding a USB power port to a switch for IoT

IMG_20151112_241802200-624x351

Jesus Echavarria @ jechavarria.com has tipped us with his latest project. In this project he adds a USB power port to a switch.

Also I need a power supply for the Arduino board, and I think that, better than a external USB AC wall adaptor or power supply, is modify the switch to add it a USB power port that can power the Arduino board. I’ve got at home a TP-Link TL-SF1008D, a simple 8 port 10/100 Mbps switch. So, let’s go to open it and add it the USB port!

Adding a USB power port to a switch for IoT – [Link]

TOP PCB Companies