leandro4b @ instructables.com shows us how to control some LED using your voice. He used an Arduino board and BitVoicer server to make this happen.
In this Instructable I am going to show how to use an Arduino board and BitVoicer Server to control a few LEDs with voice commands. I will be using the Arduino Micro in this Instructable, but you can use any Arduino board you have at hand.
Speech Recognition with Arduino and BitVoicer Server – [Link]
Davide Gironi demonstrates his DIY A4 laser engraver made from a scanner and a printer using ATmega328:
This “Get Ready For Win98″ Laser Engraving Machine it’s built using an old scanner, and an old printer.
A laser engraving machine is a tool that uses lasers to engrave an object.
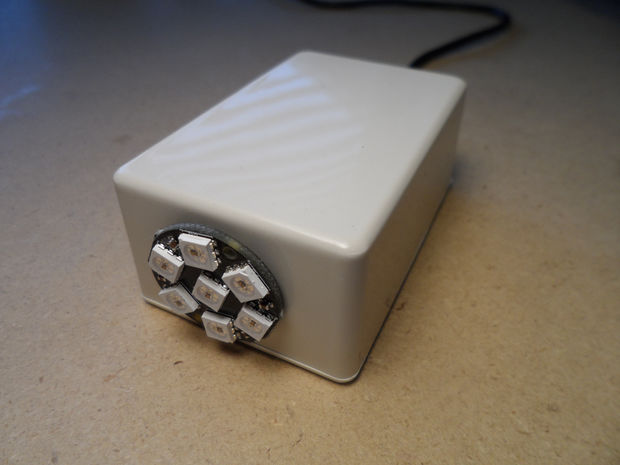
RonM9 @ instructables.com has build a fake led TV security light based on Arduino and NeoPixel WS2812 LED ring.
Fast & Easy Fake-TV Light module built for under $5; with enhanced features. With the use of this device you can go on vacation leaving your home with a lived in appearance and thus an added layer of security. “I’m up and I am a night owl … or perhaps asleep on the coach in front of the TV, ready to be awakened.”
JTAdams @ jtadams.ca has build an interface for his geophones using Raspberry Pi and managed to record some seismic events on this. He writes:
I have always been fascinated with how seismic detection can see what is under the ground. So much so, that I decided to try it for myself. It works by generating a wave from the surface and measuring the reflections bouncing back from the layers below use something similar to a microphone, called a geophone. I created some amplifiers to amplify the signals from the geophones, and read them with a raspberry PI. I will show how I did all this, and what the results were.
Using Geophone Sensors to detect seismic events – [Link]
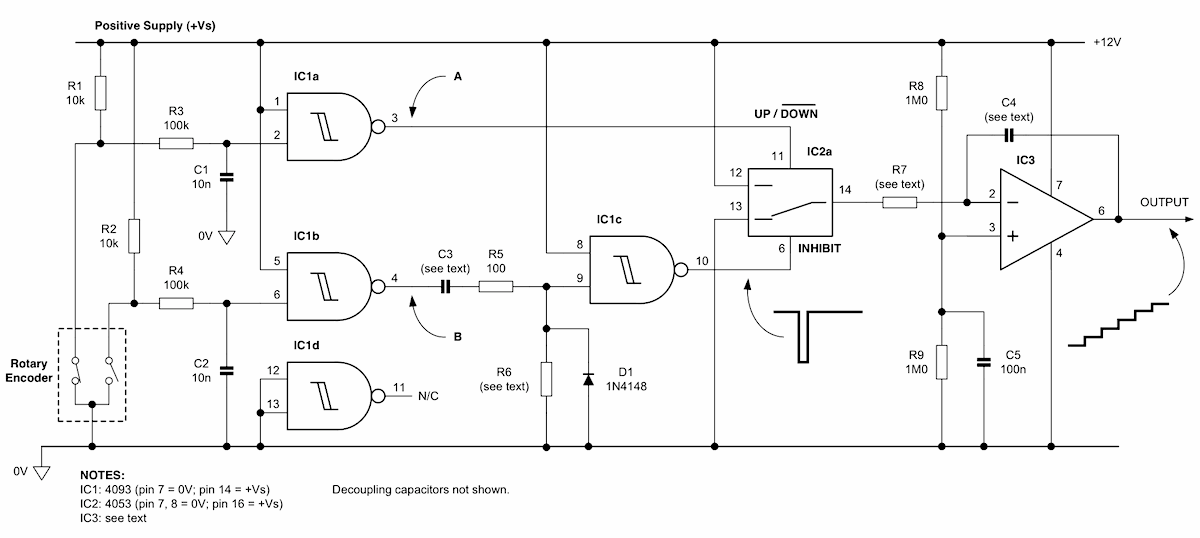
Experimenting with an HF oscillator, I needed to control the varactor diode voltage in precise increments over a 2V-10V range. A buffered potentiometer was the obvious choice, and connecting two pots in series to give coarse/fine control (or using a multiturn pot) would offer improved control over the varactor voltage. However, this approach still didn’t allow me to generate uniform increments and decrements of the control voltage in a reliable, repeatable manner.
Control accurate incremental voltage steps with a rotary encoder – [Link]
The TJA1042 of NXP Semiconductor is a CAN transceiver with high-speed capabilities that provides a physical link between physical transmission medium and the protocol controller. The transceiver is designed for high-speed (up to 1Mbps) CAN applications in the automotive industry, providing the differential transmit and receive capability to a microcontroller with a CAN protocol controller.
The NXP high-speed CAN transceivers provide the interface between a Controller Area Network (CAN) protocol controller and the physical two-wire CAN bus. This ensures full interoperability with other ISO11898 compliant transceiver products. These transceivers offer a significantly improved ESD robustness, a further reduction in Electromagnetic Emission (EME), an improved Electromagnetic Immunity (EMI), a higher voltage robustness in order to fully support 24V applications, and a predictable undervoltage behavior at all supply conditions.
The circuit shows how to integrate the TJA1042T within a typical application. The application example assumes either a 5V or a 3V supplied host microcontroller. There is a dedicated 5V regulator supplying the TJA1042T transceiver on its VCC supply pin (necessary for proper CAN transmit capability).
David Scheltema @ makezine.com compares the C.H.I.P computer with Pi Zero to find our which is the best option for your next project:
Now that there are two capable, sub-$10 computers for Makers — the $5 Pi Zero and the $9 C.H.I.P. — the debate will rage online over which board is faster, cheaper, and the right one to use in a project. These debates are often unproductive, but they don’t have to be. Let’s take a look at some of the pros and cons of each board.
C.H.I.P. vs Pi Zero: Which Sub-$10 Computer Is Better? – [Link]
FutureSharks @ github.com has another great project on it’s repository, it’s a solar powered particle photon enviroment monitor.
Here is the Photon code and hardware details to build a solar powered environment monitor. It uses a combo module of 3 separate sensors that are read via I2C protocol to periodically measure and record:
Temperature
Humidity
Light level
Air pressure
Battery charge
Solar powered Particle Photon environment monitor – [Link]