Build Your Own PICKit 2 Programmer

7316084

pulsetronics.blogspot.com.ng has build a nice version of PICKIT Programmer:

This is my PICkit 2 clone design. Its based on a simplified version of the Microchip PICkit 2 schematic and only supports 5v parts. It works with all the Microchip software including MPLAB, MPLABX,the PICkit 2 GUI Programming software and the PICkit 2 command line software.

It can be used with the PICkit 2 GUI Terminal Software and the PICkit 2 GUI Logic Analyzer. Best of all its an all leaded design that you can build in about an hour if you have of the parts.

Because this design is simplified and uses a fixed voltage reference, the programmer voltage cannot be controlled by the PICkit 2 software settings to lower the voltage. It also cannot do the “Vpp First” mode which in rare cases you may need to re-program a PIC that has a very fast internal oscillator and internal MCLR enabled.

Build Your Own PICKit 2 Programmer – [Link]

Arduino Project: MP3 player using Arduino and DFPlayer mini MP3 player module

Building an MP3 player with Arduino is extremely easy. We use the DFPlayer mini in order to build a simple MP3 player. The MP3 player has 3 buttons, in order to Play/Pause, to load the next song and one in order to load the previous song. In this video we are using an Arduino Uno, but you can use any Arduino board you like.

Arduino Project: MP3 player using Arduino and DFPlayer mini MP3 player module – [Link]

Understanding silicon circuits: inside the ubiquitous 741 op amp

clean-scaled-small

Ken Shirriff’s blog looks inside the famous 741 OPMAP and discuss how it’s made and how it’s working:

The 741 op amp is one of the most famous and popular ICs[1] with hundreds of millions sold since its invention in 1968 by famous IC designer Dave Fullagar. In this article, I look at the silicon die for the 741, discuss how it works, and explain how circuits are built from silicon.

Understanding silicon circuits: inside the ubiquitous 741 op amp – [Link]

Elektor DDS Function Generator

DDS_Function_Generator

this is a DDS Funtion Generator by Theodorou Gerasimos:

DDS chips are readily available, greatly simplifying the design of the analog part of a wide-range function- or signal generator. All you need to do (they say!) is choose one, add some suitable output circuitry, pick a microcontroller, provide a user interface and start programming. To which we reply: sweet dreams, here is the real story: power to the AD9834!

Elektor DDS Function Generator – [Link]

19″ system of enclosures will provide you unexpected space

obr1773_uvod

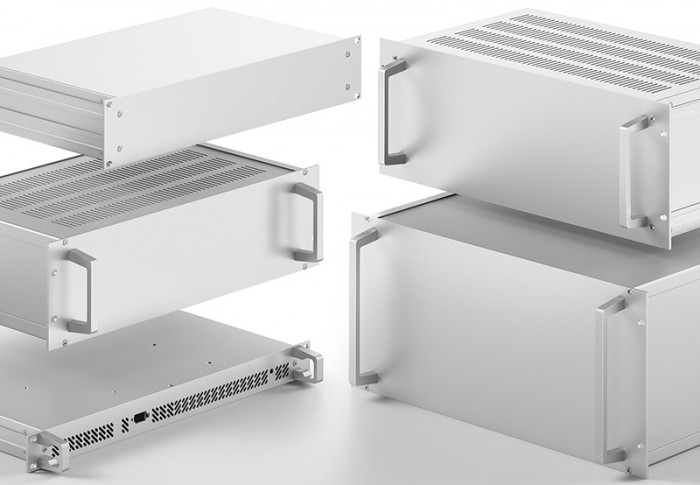
With plug-in enclosures from Fischer Elektronik, it´s easy to solve placing your device into a 19“ „rack“.

What enclosure to use for your electronic device and how to sort them when there are several ones on one place? That´s the question reaching almost to beginnings of electronics. No wonder, that since those times a lot of solutions were developed, which were so good, that they´re actual even nowadays. One of such examples is also a known modular 19“ system (482,6 mm wide), where various electronic devices are placed into a carrying rack.
This system is highly modular and at a fixed width it enables to use various height of devices. That´s why in a 19“ system can often be found thin (slim) devices only few centimeters high, but also giants with a height of several tens of centimeters.

Company Fischer Elektronik as a well known producer of device enclosures, heatsinks and connectors, produces a wide range of enclosures suitable for the 19“ system, where you certainly can find a type suitable for your application. A good example is the VESA series. VESA is a universal series of robust enclosures with removable top plate (cover). It´s available in width of 1U to 6U, what represents 43,8 – 264 mm.

Available are three various depths – 260, 300 and 360 mm. The enclosure consists of easy-to-assemble aluminium profiles. Guiding slots inside enable easy installation of PCBs and also available are various accessories and modifications like hands, lock and panels with ventilation openings. Into the enclosure, it´s possible to place a mounting plate (MPH) into the enclosure, which creates as if a double deck and also TS CE mounting rail. Drawings and detailed information about this enclosure can be found on page N8 in the Fischer enlosures catalogue.


19″ system of enclosures will provide you unexpected space – [Link]

Sensor Technology for Health and Fitness Applications

article-2015october-sensor-technology-for-fig2

By Jon Gabay @ digikey.com:

Determining the state of our health has always been a matter of finding a way to monitor and measure the body’s most basic functions. Before instrumentation, visual indicators were used that allowed us to know, for example, what our body temperature should be, what a healthy pulse is, and what an acceptable respiration rate is.

Today, with an aging population more people now need some sort of portable health monitoring, which could take the form of devices that, among other things, dispense medication at regular intervals, stimulate the heart, or measure blood sugar levels and inject insulin. This article looks at medical- and fitness-sensor technology—contacted and contact-less, placed on the skin, subcutaneous, or internal—that now or soon will be available to design engineers. All parts, tools, and data referenced here can be found on the Digi-Key website.

Sensor Technology for Health and Fitness Applications – [Link]

Website is Down Detector

FWUSYL9IG9QWODU.MEDIUM

by jckelley @ instructables.com:

If you work in a company that has a website, you know how important it is that the website always be up and running. That’s why you constantly see “99.99999% reliability!” all over the fancy server hosting sites. A website can’t make money if the system is down, so knowing when that happens and reacting quickly is super important. In this Instructable, we will use the LinkIT ONE board to make an alert system that will play a loud alert siren and send us a text message. This way no matter where we are, we can respond as fast as possible!

Website is Down Detector – [Link]

How to Make an Internet Speed Analyzer

NewImage294

This is an internet speed Analyzer based on Raspberry Pi:

This application will run speedtest-cli against speedtest.net’s servers using cron. It will then email the results daily and weekly.

Also – using http://www.percheron-electronics.uk/shop/ e-paper hat – you can utilize the buttons to run the speed-test manually and display the results to the screen.

To use the device you will need a few bits installed to your Raspberry Pi. You can see the full list below, but if you just want to get started, see the simple instruction below:

How to Make an Internet Speed Analyzer – [Link]

Lie Detector and Biofeedback Arduino Based

FN6YDJIIE7JBRMO.MEDIUM

by masteruan @ instructables.com:

This tutorial will explain how to build a machine for biofeedback. But first a bit of theory.

What is biofeedback?

Biofeedback is the process of gaining greater awareness of many physiological functions primarily using instruments that provide information on the activity of those same systems, with a goal of being able to manipulate them at will. Some of the processes that can be controlled include brainwaves, muscle tone, skin conductance, heart rate and painperception.
Biofeedback may be used to improve health, performance, and the physiological changes that often occur in conjunction with changes to thoughts, emotions, and behavior.

Lie Detector and Biofeedback Arduino Based – [Link]

Wrist Mount Digital Altimeter

This project is a simple wrist mount digital altimeter which is a device used to determine altitude. This design uses atmospheric pressure to calculate the altitude of its location. The lower the atmospheric pressure, the higher the altitude. The project is comprised of a microcontroller (MCU), an 84×84 pixel graphic LCD and a barometric pressure sensor.

The barometric pressure sensor used in the design is the MS560702BA03-50 from TE Connectivity Measurement Specialties. It consists of a piezo-resistive sensor and a sensor interface IC. Its main function is to convert the uncompensated analogue output voltage from the piezo-resistive pressure sensor to a 24-bit digital value, as well as providing a 24-bit digital value for the temperature of the sensor. It is optimized for altimeters and variometers with an altitude resolution of 20cm. The MS560702BA03-50 measures the atmospheric pressure on its location then converts it to a 24-bit value through its internal ADC. The sensor reading is then transmitted to the MCU through SPI. Then the MCU calculates the altitude by using the pressure reading. The calibration of an altimeter follows the equation z = cT log (Po /P), where c is a constant, T is the absolute temperature, P is the pressure at altitude z, and Po is the pressure at sea level. The calculated altitude is then displayed through an 84×84 pixel graphic LCD which is mostly found on old phones. The circuit is powered through a 3.3V battery.

The altimeter is used to aid navigation and is mostly used in skydiving, mountaineering and hiking applications. It is usually hand-held or in wrist-mount form for the ease of use. Altimeters can also be found in aircrafts such as planes and helicopters and others that needs altitude indication.

Wrist Mount Digital Altimeter – [Link]

TOP PCB Companies