Hyper-local Weather Dashboard: Wunderground + Pi Sense HAT

sensehat_dashboard

by InitialState @ github.com:

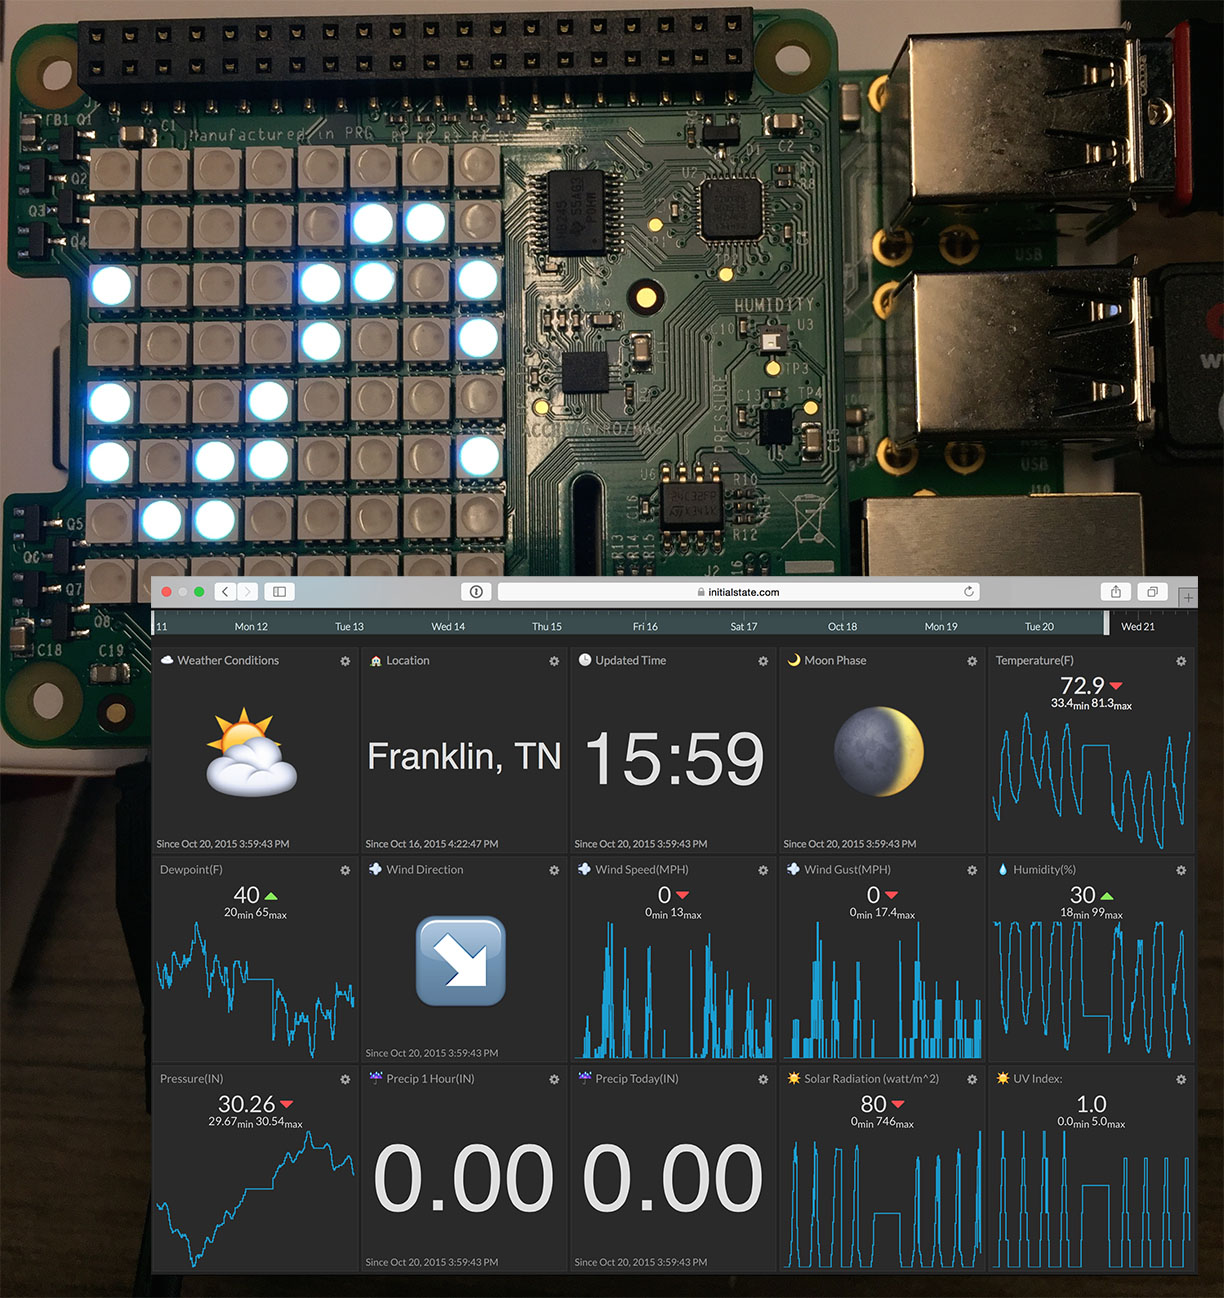
Let’s face it, we humans talk about the weather a lot ⛅. The average person talks about the weather four times a day, for an average of 8 minutes and 21 seconds. Do the math and that totals 10 months of your life that you will spend yapping about the weather. The weather ranks as the #1 go-to topic for conversation starters and uncomfortable silence breakers. If we are going to talk about it that much, we might as well take our weather street cred to a whole new level. This super-fun and easy project will leverage the Internet of Things (IoT) and a Raspberry Pi to do just that.

Hyper-local Weather Dashboard: Wunderground + Pi Sense HAT – [Link]

DIY Capacitance Meter

diy-capacitance-meter-picofarad-620x471

electro-labs.com published another great project based on Atmega328P:

We are building another opensource SoloPCB project which is very enjoyable to build and use. In our electronics works, we frequently need to know the actual value of a capacitor. As you know, small sized SMD capacitors have no markings showing their values. Or there are lots of fake electrolytic capacitors which are rated much lower than their stated values. Sometimes the capacitors have large tolerances and we want to choose the best fit for our circuit. What we need is an accurate capacitance meter.

This is a capacitance meter which can measure capacitors rated from picofarads to millifarads. The principle of operation is simple. Just apply voltage to the capacitor and measure the elapsed time to charge it. The circuit is based on Atmega328P and it is Arduino IDE compatible. It includes the voltage regulators which output 5V and 3.3V from 9V input. A Nokia 5110 LCD is used to display the measured information. Thanks to the 4mm banana jacks, various kinds of probes can be used such as SMD probe, crocodile probe etc.

DIY Capacitance Meter – [Link]

OpenduinoGSM an open source tool Arduino IDE compatible with Opengate project inside

Openduino_opengate

Emanuele @ dev.emcelettronica.com:

OpenduinoGSM is an open source tool for hobbyists & professional makers. The first project realized is the useful opengate (one ring with your phone and the gate is open). Inspired with OpenduinoGSM!

With OpenduinoGSM you have the option of using the Arduino development environment, so anyone, even those who are unfamiliar electronics and circuits, can try to realize the automation they want by writing simple code in C ++ or by using one of the many open source projects published and modifying it according to their needs. The steps to make a control and/or a wireless automation are few and simple:

OpenduinoGSM an open source tool Arduino IDE compatible with Opengate project inside – [Link]

Arduino Project: Flappy Bird game Clone with a 1.8″ color TFT display (ST7735)

Educ8s.com @ youtube.com:

Playing the Flappy Bird game on Arduino is extremely easy. With a cheap Arduino Uno and a very cheap 1.8″ color TFT display (ST7735) you can enjoy the classic game, the best part? It is going to be a DIY project. Actually you can build your own gaming console using Arduino, like the popular Gamebuino.

The code of the project is by Themistocles Benetatos who shares the code with us. In his blog he describes how he managed to achieve that result. Don’t miss it: http://www.mrt-prodz.com/blog/view/20…

All you have to do is to buy the following parts, if you don’t own them already. The cost is around 10$:

Arduino Project: Flappy Bird game Clone with a 1.8″ color TFT display (ST7735) – [Link]

STM extend Nucleo range

20151019003327_STM32-Nucleo-32pin

by Martin Cooke @ elektormagazine.com

STMicroelectronics has extended its range of STM32 Nucleo development boards with scalable, small-form-factor variants to support the 32-pin members of its STM32 microcontroller family. The STM32 Nucleo-32 boards come with support from a choice of IDEs and access to mbed online resources. The STM32 Nucleo open platform is said to enable affordable prototyping using STM32 MCUs combined with a range of hardware plug-ins using Arduino Nano connectors.

Developers can also take full advantage of the STM32 software libraries as well as STM32Cube tools to facilitate software development and port designs from one STM32 variant to another. The STM32 Nucleo boards include the ST-LINK debugger/programmer, which enables drag-and-drop flash programming, so there is no need for a separate debug probe. Since the STM32 Nucleo boards are mbed-enabled, developers can make use of the mbed online tools and collaboration infrastructure at the mbed website.

STM extend Nucleo range – [Link]

Cranial Electrotherapy Stimulator

This cranial electrotherapy stimulator is a medical treatment that makes use of electrical energy to treat anxiety, depression and insomnia. It is a therapeutic tool to help heal the body, which primarily uses an electrical current to stimulate nerves and muscles through the skin. This device uses a few components such as 555 timer, decade counter and the TE connectivity’s slide switch and trimmer. This TE connectivity components offer high-performance designed to withstand extreme shock, vibration, temperature and altitude.

The circuit generates an adjustable current that flows through the clips that are placed on the earlobes. The waveform of this device is 400 milliseconds positive pulse followed by a negative one of the same duration, then a pause of 1.2 seconds. The main frequency is 0.5 Hz and doubles the pulse every 2 seconds. This specialized electrical impulse achieves a state of relaxation.

Electrotherapy stimulator is a simple device that can be easily constructed by electronics enthusiasts. It only needs a few components that are readily available in the market. This device can be applied to variety of treatments that include chronic pain and other medical conditions such as headaches and gout. See also some designs running on 9V.

Cranial Electrotherapy Stimulator – [Link]

DIY Oscilloscope using Arduino and Graphic LCD

Prasad Pandit @ youtube.com:

I have designed an Oscilloscope using Arduino Mega 2560 and 128×64 GLCD. It works pretty good for verification of signal the range of input frequency is upto 10-12MHz and Sampling rate is 200KSPS. It has no Attenuation so you will have to convert highvoltage signal to 5 v pTp signal. And yes for Sine wave or Cos wave or signal which is below ground voltage you will have to DC shift the signal. You can set the Time/Division for studying signal. It gives Peak to Peak voltage value of signal in Real Time till two decimals.

All the Arduino GLCD libraries used are freely available. If you have suggestions mail me on: prasadp4009@gmail.com
Code Link: www.dropbox.com

DIY Oscilloscope using Arduino and Graphic LCD – [Link]

Touchscreen-controlled Arduino Geiger Counter

687474703a2f2f7777772e706c617973706f6f6e2e636f6d2f77696b692f696d616765732f7468756d622f332f33312f494d4750303131382e6a70672f35303070782d494d4750303131382e6a7067

by Toumal @ github.com:

A touchscreen-controlled Geiger Counter for Arduino. Requires a Radiation Watch Pocket Geiger sensor, a ITDB02 Display from SainSmart and an Arduino Mega.

Software needs my fork of the RadiationWatch library, the ITDB02 library as well as the UTouch library

Touchscreen-controlled Arduino Geiger Counter – [Link]

An Edison-Based Password Keeper

F9NRUTDIG144292.MEDIUM

by DanielGilbert @ instructables.com:

With this instructable, I try to solve a problem everyone has: Passwords. Accounts. Logins. All the stuff you need to get into your favourite social media site, shopping site, blog or forum (they still exist, huh?). Now, there are several ways to control your accounts:

Use always the same credentials: No. Never ever do that. Seriously. If your account gets hacked on one site, chance is that the hacker(s) will try the credentials on other, popular sites also. Don’t underestimate them. They are smart. Criminals, but smart.
Use a software on every device: You can do that. And if you are lucky, this software will run forever on this device. But maybe, at some point, you will get rid of the devices. Uh-oh…
Write them down: Yepp. You can do that. But – everyone who finds your book will be able to read your passwords. That wouldn’t be that great, right?

To solve all of this, I created a device called “The PinTin Nano”. It has it’s name from the fact that it’s a) pretty small and b) fits in a mint tin. I love that, because that makes the device easy to carry around.

An Edison-Based Password Keeper – [Link]

TOP PCB Companies