Last week, Codasip, known for edge tools and IPs, has announced RISC-V-based embedded cores for AI/ML edge customizations – L31 and L11 RISC-V processor cores. In addition to the existing low-power embedded cores, the L31 and L11 are aimed towards easing the customization process using Codasip Studio tools for deep neural network applications with low-power and limited space constraints.
The growing demand for real-time edge processing, security, and power consumption has been a top priority for researchers. The way software and hardware integration have solved these challenges are incredible while delivering sufficient performance with limited resources. The new Codasip L31 and L11 embedded cores are capable of running Google’s TensorFlowLite for microcontrollers when combined with Codasip Studio tools, enabling flexibility to customize the embedded AI cores for IoT applications.
“Licensing the CodAL description of a RISC-V core gives Codasip customers a full architecture license enabling both the ISA and microarchitecture to be customized,” says Codasip CTO, Zdeněk Přikryl. “The new L11/31 cores make it even easier to add features our customers were asking for, such as edge AI, into the smallest, lowest power embedded processor designs.”
The novel Design for Differentiation design approach by Codasip allows customers to customize their processor cores using Studio tools for a specific system, software, and application requirements. Due to the customizable option, Codasip cores have witnessed immense success with over 2 billion processor IPs present in the market.
As the new embedded cores support neural networks through the TensorFlowLiteAI framework, the L31 and L11 are considerably good choices for system developers looking for high-performance processor cores for AI/ML edge devices. Featuring all the edge computing features, Codasip’s custom-designed performance delivers real-time processor capabilities for mission-critical and embedded IoT applications.
For more details on the processor cores, visit the press release. You can also take a look at the research article titled “Embedded AI on L-series cores: Neural Networks empowered by custom instructions.”
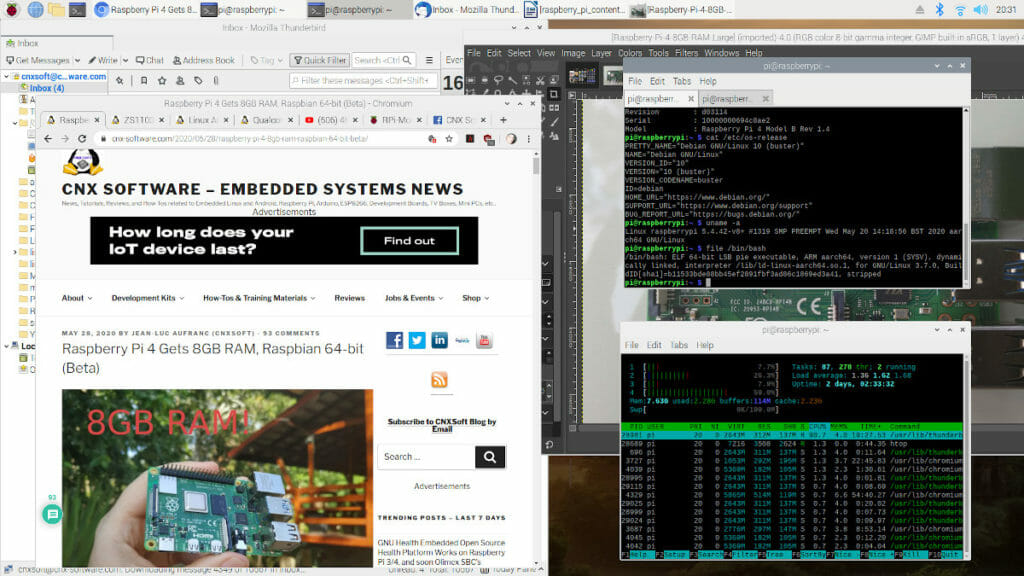
Even after the release of a 64-bit Raspberry Pi single-board computer, the Raspberry Pi OS remained with the 32-bit version– but in the making of a 64-bit OS. After a series of testing and validation from in-house engineers, while taking feedback from the community after the beta launch, Raspberry Pi officially announces the availability of a 64-bit Raspberry Pi OS version for download to a wider audience. While developing the upgraded operating system, the main focus of the company was on the compatibility of the devices and “avoid customer confusion.”
There is a long list of Raspberry Pi models that are capable of running the 64-bit OS, including the popular Raspberry Pi 4B single-board computers and the compute module 4 while not forgetting the latest Raspberry Pi Zero 2 W tiny computers. Also, you will be requiring an external storage device, such as a MicroSD card with at least 8GB of storage space, to install the new 64-bit operating system. The Raspberry Pi Foundation realized the reasons why developers want to choose a 64-bit operating system for their application as they not only offer performance benefits but also provide flexibility to utilize many closed-source applications that are only available for arm64.
CNX-Software Team tests the 64-bit operating system [Image Source CNX-Software]In the design of Raspberry Pi 4 hardware, the team had to solve the problem concerning 32-bit pointer only allowing the user to address 4GB of memory from a single process. To solve this, the use of an ARM large physical address extension can provide access to up to 8GB of memory, but with constraining that any process is limited to accessing 3GB. Even though this was enough for most of the applications, for memory-intensive applications in Raspberry Pi OS, Chromium, several use cases will now benefit to allocate the entire 8GB of memory of Raspberry Pi from a single process.
However, if you are wanting to stream OTT applications, like Netflix and Disney+, the default version of 64-bit Chromium does not have a WidevineCDM library, in which case you will be required to choose a 32-bit version. For those who have used Mathematica on Raspberry Pi as a computational programming tool used in science, math, computing, and engineering, the Chief Product Offer at Raspberry Pi, Gordon Hollingworth notes, “currently that is available on the 32-bit OS. Will ask about supporting 64-bit.” Even though we don’t have a timeline for the support, you should be expecting it very soon.
Several known hardware developers, including Jeff Geerling, mentions
“it will cause a bit of short-term strife for some users (especially on older boards), this is a great long-term improvement so many users don’t have to spend as much time trying to get newer software working on ancient 32-bit architectures.” He goes on to add, “the efforts are often less appreciated, but go far in recommending Pis vs other SBCs.
The Raspberry Pi 64-bit operating system is available for download and a download link is available, just head to the download page for various installation options.
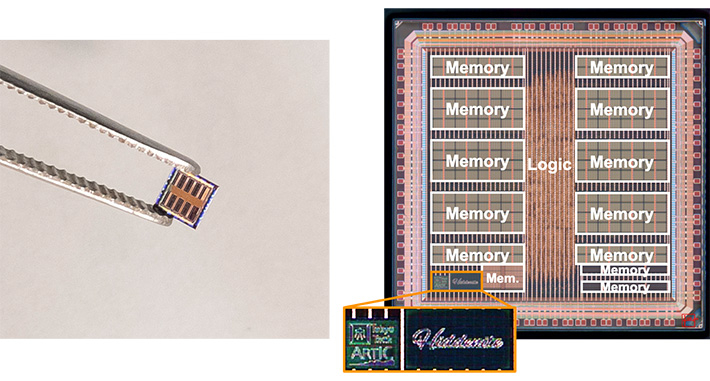
AI accelerators are specialized hardware designs that are built for computing complex AI workloads in the field of edge computing. While deep neural networks are assumed to be the optimized solution for image recognition and object detection, AI tasks, a group of researchers from the Tokyo Institute of Technology in Japan, proposed a hardware accelerator chip design, Hiddenite, to achieve high accuracy for the calculation of sparse hidden neural networks.
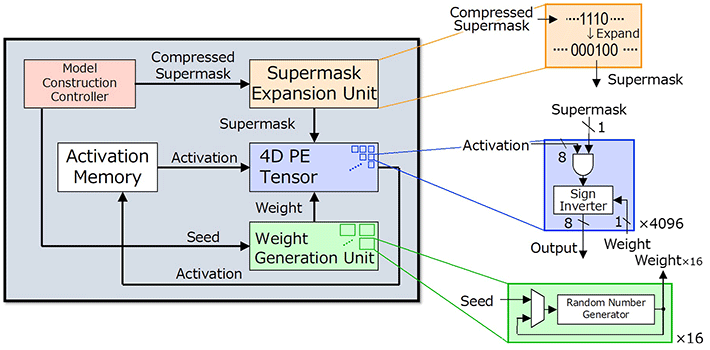
Hiddenite combines weight generation and super mask expansion to significantly reduce external memory access for improved computation efficiency. The super mask is defined by the top-k% highest scores, denotes the unselected and selected connections as 0 and 1, respectively. The hidden neural network helps reduce computational efficiency from the software side.
“Reducing external memory access is key to reducing power consumption. Currently, achieving high inference accuracy requires large models. However, this increases external memory access to load model parameters. Our main motivation behind the development of Hiddenite was to reduce this external memory access,” explains Prof. Motomura.
Hiddenite stands for Hidden Neural Network Inference Tensor Engine (Hiddenite) is the first HNN inference chip to offer benefits in reducing external memory access and increasing energy efficiency. On-chip weight generation is capable of re-generating weight using a random number generator to eliminate the requirement to access and store weights in external memory. The provision of “on-chip supermask expansion,” will considerably decrease the number of supermasks that must be loaded by the accelerator. The Hiddenite chip’s high-density four-dimensional (4D) parallel processor maximizes data re-use during the computational process and thereby improves efficiency.
“The first two factors are what set the Hiddenite chip apart from existing DNN inference accelerators,” reveals Prof. Motomura. “Moreover, we also introduced a new training method for hidden neural networks, called ‘score distillation,’ in which the conventional knowledge distillation weights are distilled into the scores because hidden neural networks never update the weights. Accuracy using score distillation is comparable to the binary model while being half the size of the binary model.”
The team used the Taiwan Semiconductor Manufacturing Company’s (TSMC) 40 nm technology to fabricate the prototype chip. With size at 3×3 mm, the chip is capable of doing 4,096 MAC (multiply-and-accumulate) operations simultaneously with the computational efficiency of up to 34.8 tera operations per second(TOPS) per watt of power while reducing the amount of model transfer to half that of binarized networks.
The research article was presented in the International Solid-State Circuits Conference 2022 under the title “Hiddenite: 4K-PE Hidden Network Inference 4D-Tensor Engine Exploiting On-Chip Model Construction Achieving 34.8-to-16.0TOPS/W for CIFAR-100 and ImageNet.”
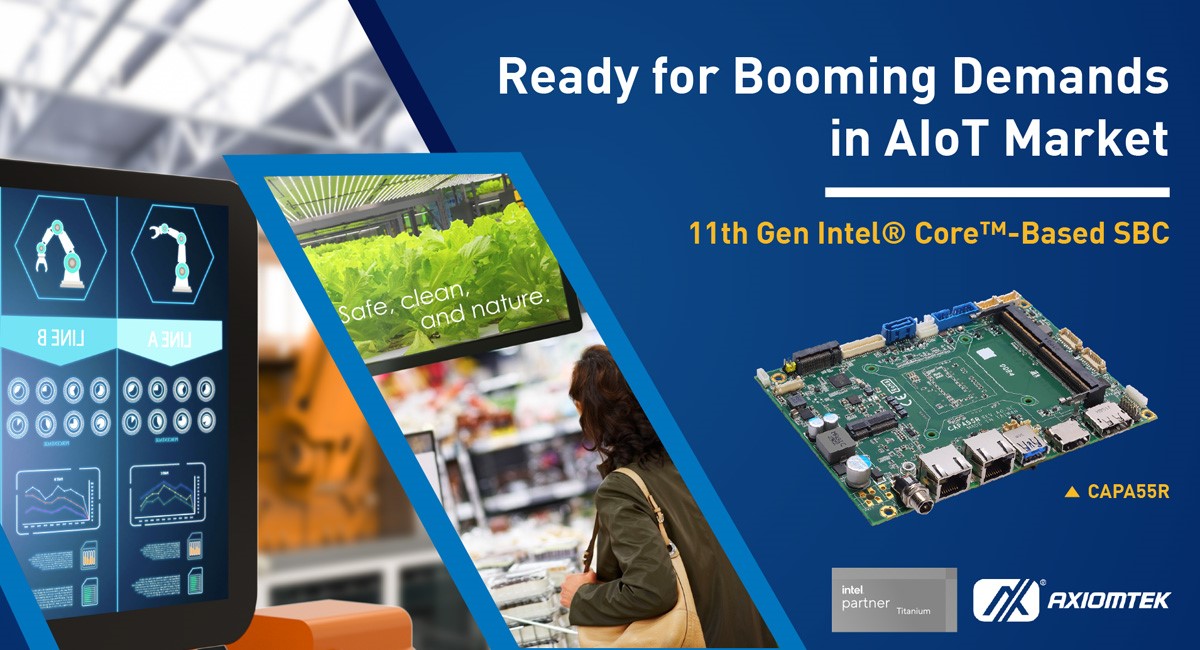
Axiomtek – a world-renowned leader relentlessly devoted in the research, development and manufacture of series of innovative and reliable industrial computer products of high efficiency – is proud to announce the CAPA55R, a high-performance 3.5” embedded SBC powered by the 11th Gen Intel® Core™ i7/i5/i3 & Celeron® processors (code name: Tiger Lake-UP3) with 28W cTDP and Intel® Iris® Xe Graphics. The industrial-grade embedded board features triple-display capability through HDMI 1.4, LVDS and DisplayPort++ interfaces, making it well-suited for graphics-intensive applications. This industrial motherboard is designed for operational stability with a wide operating temperature range from -20°C to +60°C. The CAPA55R is optimized for various industrial IoT-related applications in the embedded market, such as industrial control, machine vision, self-service terminal, digital signage, and medical imaging.
Advanced Features:
11th gen Intel® Core™ i7/i5/i3 & Celeron® processor (Tiger Lake-UP3)
Two DDR4 SO-DIMM for up to 64GB of memory
One GbE LAN and one 2.5 GbE LAN ports
Three M.2 expansion slots
The feature-rich CAPA55R has two 260-pin SO-DIMM sockets for up to 64GB of DDR4-3200. To fully join the IoT world, this 3.5-inch SBC is equipped with one M.2 KeyE slot (PCIe x1, USB 2.0 in 22 x 30) for wireless modules, one M.2 Key B (PCIe x1, USB 3.2 Gen2, USB 2.0 in 30 x 42 or 30 x 50) slot for cellular network cards such as 4G/LTE/5G modules, and one pin-header SIM connector to expand the SIM socket with the AX93A19 module. Keeping up with the fast transmission of massive data, it also has one M.2 Key M (PCIe x4, 22 x 80) for NvME storage cards. To satisfy the increasing demands of connecting more peripheral devices, the CAPA55R also provides three USB 3.2 Gen2, four USB 2.0, one GbE LAN, one 2.5 GbE LAN, two RS-232/422/485, one SATA-600, 8-channel DIO, and one HD audio via the daughter I/O board AX93A22. In addition, the 3.5-inch embedded SBC provides a 12-24 VDC input. It supports Windows® 10 and Linux operating systems.
“The highly integrated CAPA55R is equipped with 11th gen Intel® Core™ CPUs and offers up to 64GB DDR4, 4K HDMI, 2.5 GbE LAN, three M.2 slots, and up to seven USB ports. This compact embedded board is ideally suited to embedded solutions requiring multi-tasking capabilities and full-graphics feature,” said Michelle Mi, a product manager of the Product Planning Division at Axiomtek. “Its reversed onboard CPU is attached on the rear side of the board to aid with heat dissipation and offers flexibility for easy system integration, especially in space constraint enclosure. The CAPA55R was designed to shorten the time to market and reduce development costs.”
The CAPA55R is available in April for purchase. For more product information or pricing, please visit our global website at www.axiomtek.com or contact one of our sales representatives at info@axiomtek.com.tw.
Aspinity‘s analogML core features the improved capabilities of a tinyML chip with low-power analog neuromorphic computing architecture– with a system-level approach to low-power edge processing. Without making use of power-hungry digitization and digital processors, the analogML core is a fully analog inferencing solution built on the RAMP technology platform that classifies raw, unstructured sensor data in the domain of analog systems.
The elimination of extraneous data at the very beginning of the signal chain enhances the battery life of the analogML core by 10x or more. This feature is attributed to the implementation of always-on edge applications like voice activity detection, acoustic event detection, and vibration monitoring.
In the classic always-on edge system, data relevance can only be established after digitization as the ADC and digital processors consume the majority of system power. A digitize-first architecture is inefficient and wastes significant resources in evaluating data that will be discarded. On the other hand, in an analyze-first design, the analogML core reduces this inefficiency by introducing near-zero-power inferencing into the analog domain. Data relevance is evaluated prior to digitalization, allowing higher-power digital systems to remain off unless important data is identified.
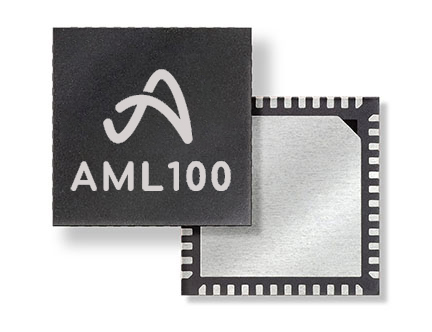
“We’ve long realized that reducing the power of each individual chip within an always-on system provides only incremental improvements to battery life,” said Tom Doyle, founder and CEO, Aspinity. “That’s not good enough for manufacturers who need revolutionary power improvements. The AML100 reduces always-on system power to under 100µA, and that unlocks the potential of thousands of new kinds of applications running on battery.”
Made up of a number of software-controlled analog processing blocks, the analogML core can be activated, altered, and customized for a variety of analyze-first applications, including smart home, IoT, consumer, industrial, and biological applications. Since it is a purely analog-based processing device, each of the processing blocks can be powered individually as needed, hence there is no clock on the analogML core. The functionalities offered by the analogML core include interfacing of sensors, analog feature extraction, analog neural network, analog data compression.
Engineers can construct, assemble, and install application-specific analog machine learning models onto the analogML core using Aspinity’s efficient development environment. The analogML core was created for engineers without analog experience in mind, this allows the engineers to use conventional training data and programming interfaces that they are currently familiar with.
For more details on Aspinity’s AnalogML core, head to the product page.
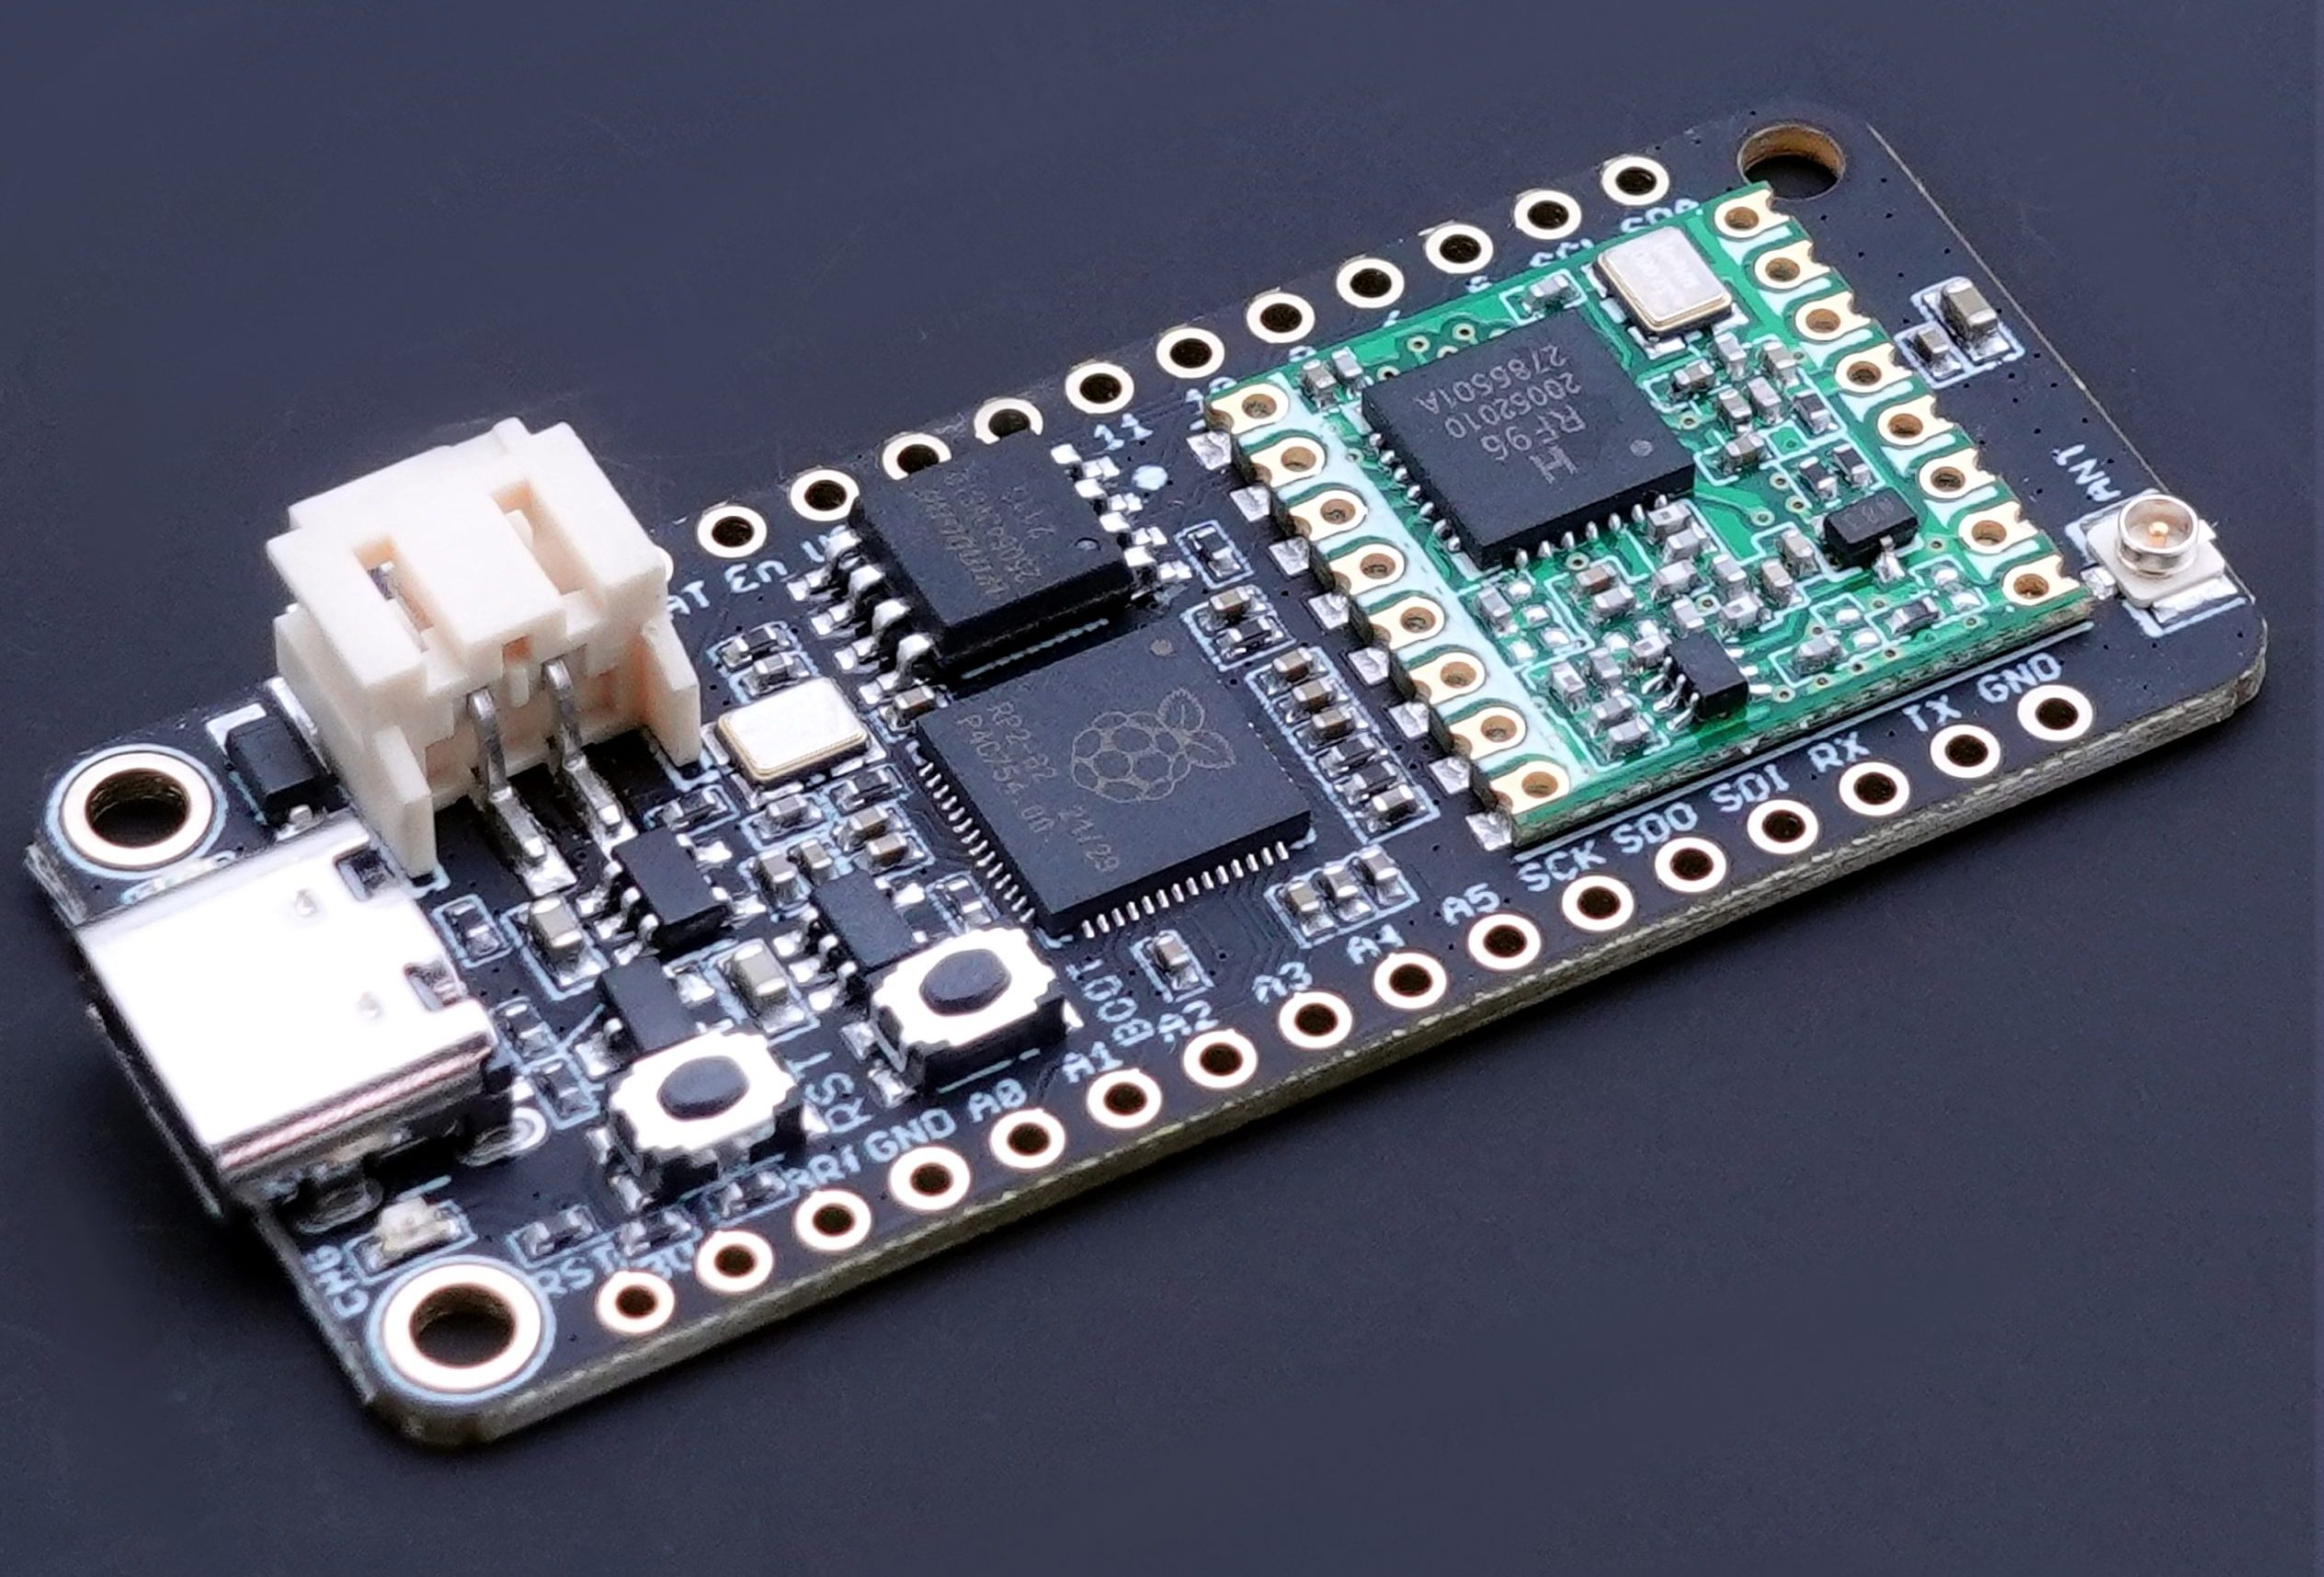
Released a few months earlier, the Challenger RP2040 Wi-Fi board comes in an Adafruit Feather form factor integrated with a Raspberry Pi RP2040 dual-core Arm Cortex-M0+ microcontroller with 8MB of flash and a Wi-Fi radio.
“This is a spin-off from our Challenger RP2040 Wi-Fi board, but we have replaced the Wi-Fi module with a low power LoRa radio module from Hope RF,” says Invector Labs in their latest board design. “The transceiver features a LoRa long range modem that provides ultra-long range spread spectrum communication and high interference immunity whilst minimizing current consumption.”
The Challenger RP2040 LoRa is almost a carbon copy of the layout and pinout, except for the LoRa transceiver module and a tiny U.FL connector for an external antenna. Physical boot and reset buttons, a connector and charge circuit for an optional battery, a USB Type-C connector for power and transmission, and sparsely populated connectors across both sides that match the Feather pinout are all still present.
Specifications of Challenger RP2040 LoRa
MCU – Raspberry Pi RP2040 dual-core Cortex-M0+ MCU at 133MHz with 264KB SRAM
Wireless module – RF RFM95W connected to RP2040 via SPI channel and some GPIOs
Power Supply: 5V via USB Type-C port
Features a 2-pin LiPo battery connector in addition to the LiPo charger circuit with 250mA charging current
The integrated LoRa module in the RFM95W transceiver offers the provision of a long-range spread spectrum communication and high interference immunity while consuming minimal current. Outperforming the classic modulation approach in terms of blocking and security, LoRa resolves the traditional design compromise involving range, interference immunity, and energy usage.
When it comes to software compatibility, the Challenger RP2040 LoRa follows the same software support as the RPi Pico due to the identical microcontroller integrated both the hardware– compliant with Arduino IDE, Circuitpython, Micropython.
Listed on the Invector Lab store, the product is currently out of stock, however, more information on the product can be found on the official website of ILabs.
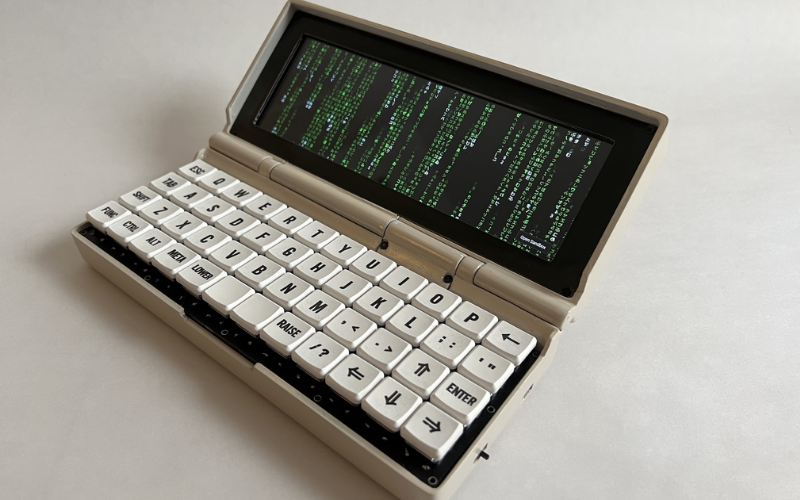
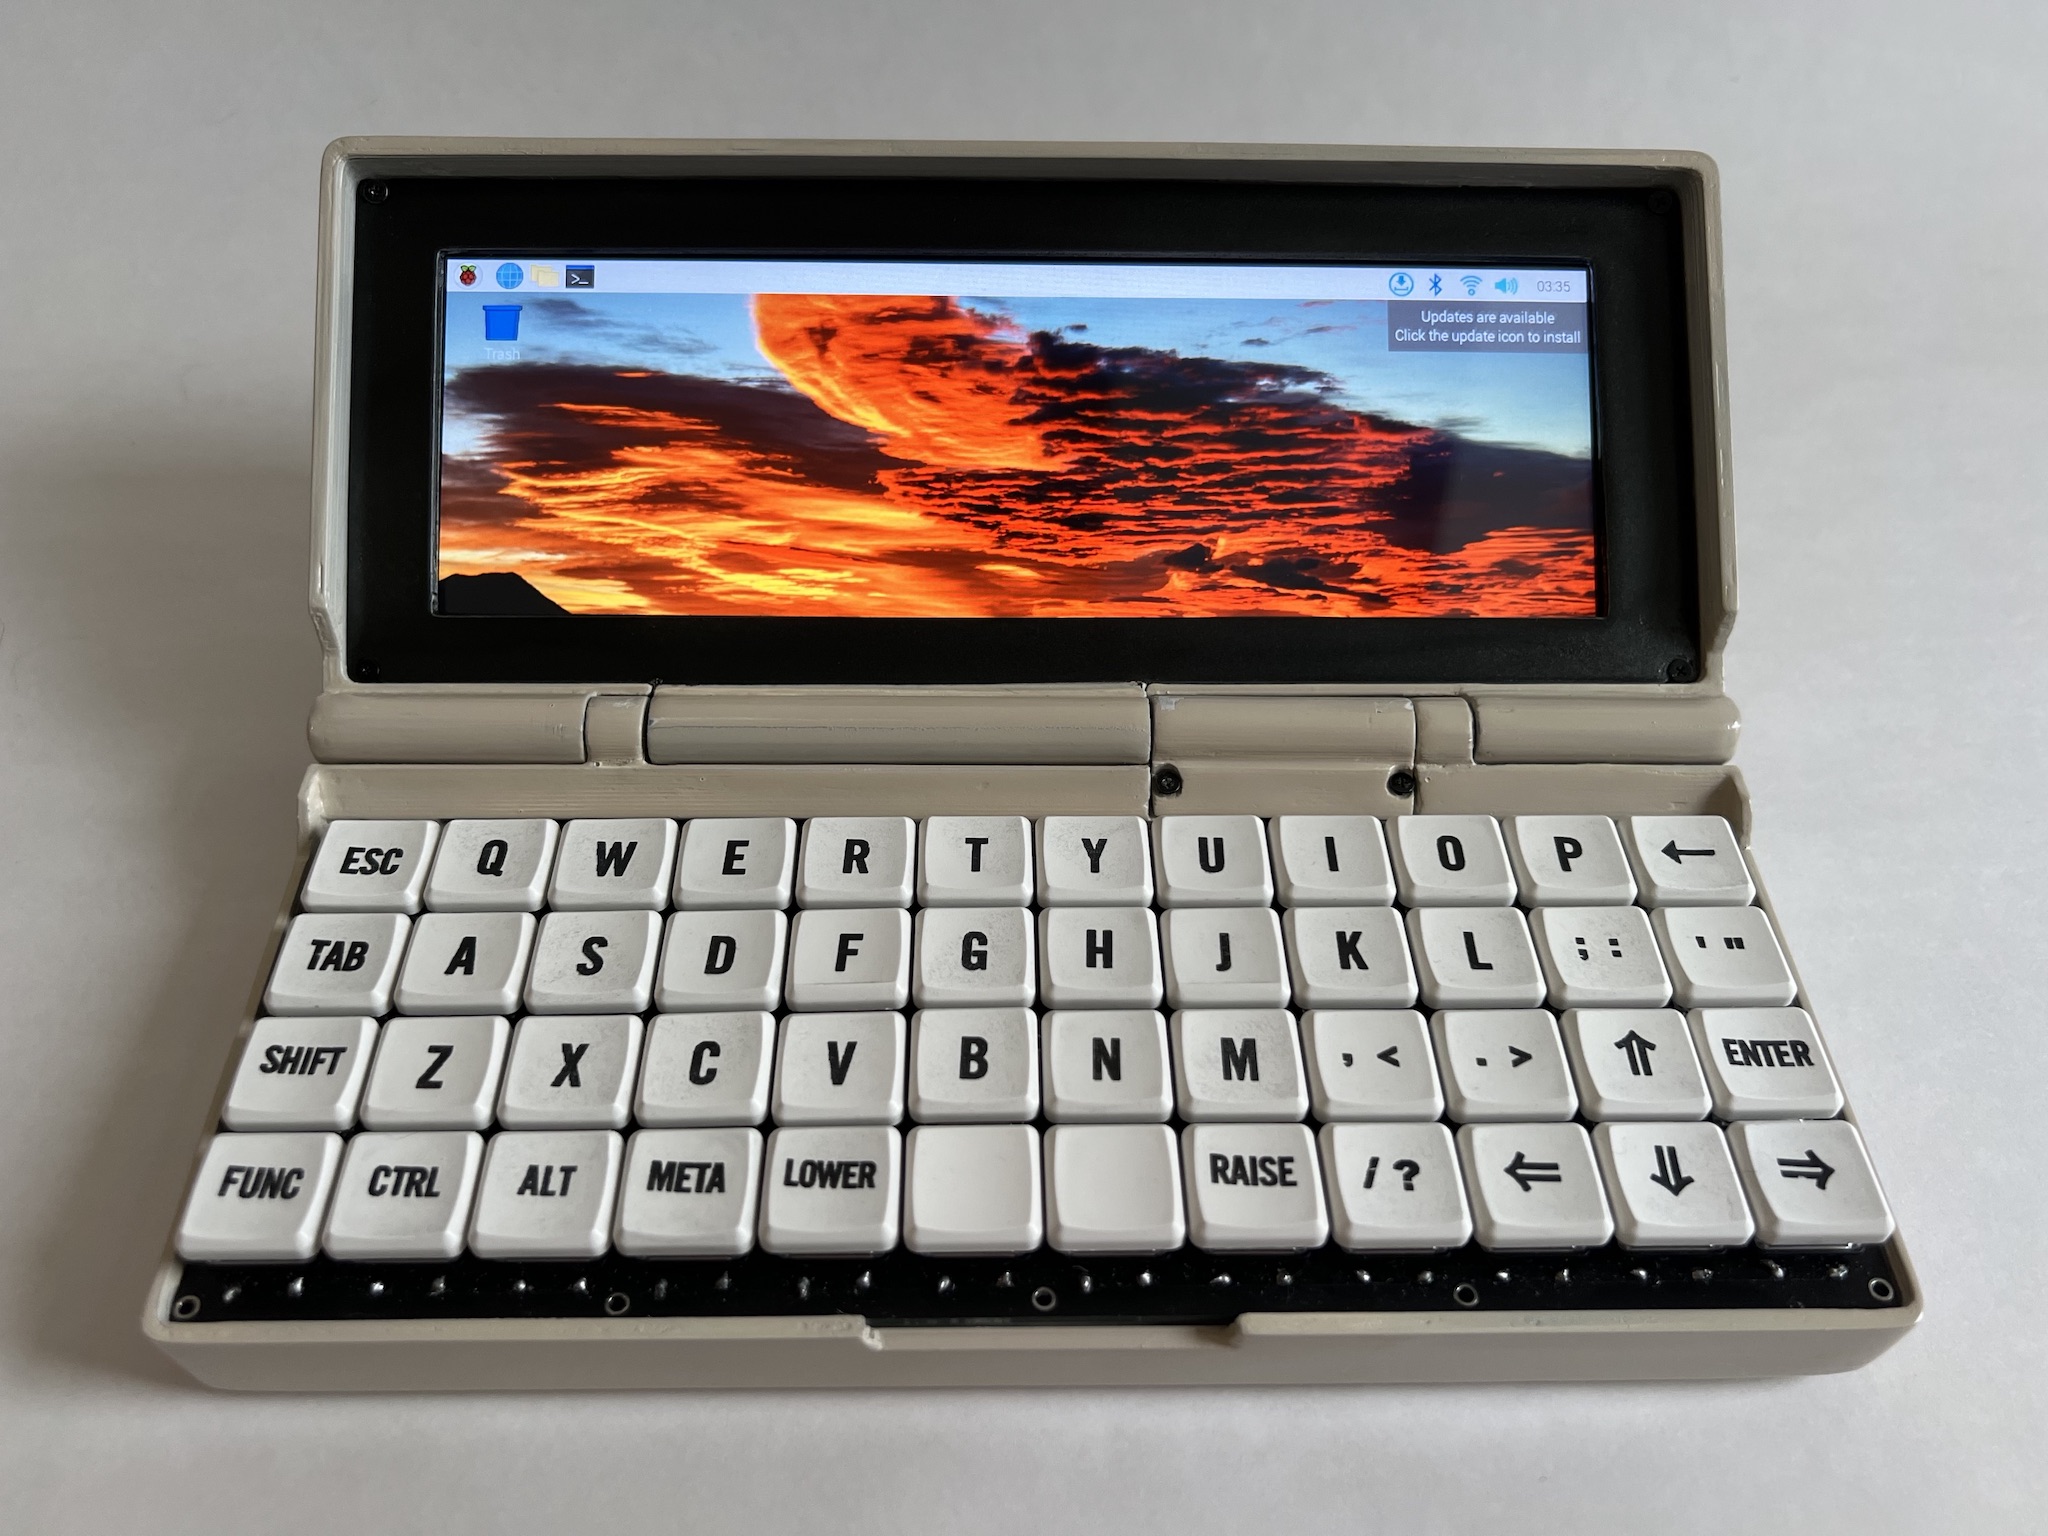
Penk Chen designed a pocket-sized computer with a retro appeal, built from either off-the-shelf parts or 3D-printed structures. Inspired by the retro-style, powered by the Raspberry Pi Zero 2 W, Penkesu is a portable computer with a 7.9-inch widescreen display and a 48-key ortholinear mechanical keyboard.
Penkesu isn’t Chen’s first attempt at building a Raspberry Pi-powered portable tablet while Chen had already designed the CutiePi tablet. This commercial tablet-style device solved the problem of the cumbersome and messy desks covered in development boards and peripherals. Staying confined to a charging station or a desk was now a thing of the past, with its 8-inch touchscreen, CutiePi came with a 5000 mAh battery allowing you to work on the go.
The enclosure for the Penkesu computer is built around the monitor and keyboard, thereby resulting in relatively smaller physical dimensions. Like most portable computers, Penkesu is designed to fold in half when not in use, safeguarding the ultra-wide display. Furthermore, with the intent to keep the hinge design minimal, the repurposed Gameboy Advance SP hinges and HDMI ribbon cable are utilized, they efficiently bear the weight of the display so it doesn’t tip over.
The Arduino Pro Micro powers the board, which enables it to run the QMK open-source keyboard firmware. The compact design of the keyboard was originally developed by the [larrbo] that had been open-sourced– later tweaked the layout so it fits the requirements of Penkesu.
All the 3D printable files, bills of the materials, and the instructions for assembly are all accessible on the project’s website. More information on the same can be found on Chen’s GitHub repository.
Picking which of the many digital signage players to use is going to depend on your priorities. It may also depend on how many digital signs you wish to use, along with where they are located. For example, if you want to set up digital signs in numerous locations across the country, then it will require different software than if you wanted to set up tens of signs in a single place. Also, some companies want different things playing on different signs, some want the same things playing on signs dotted around a single location. Then there are those who wish to turn their tens of signs into a large cinema screen where all the signs work together to create a single image. All of these options require different types of digital signage software.
What Are The Costs Relating To The Software?
You have to ask yourself if there is a subscription fee or a one-off fee. Is it free, does it come with bloatware, does it add security holes in your systems? The cost of the program alone may not be the only cost, what about deployment costs, does it need a network, does it need a constant Internet connection?
Some are going to tell you that you shouldn’t make your decision based on the cost, but there is no point in wasting money on subscriptions you don’t need or functions you will never use. In addition, how the software is paid for may lend some degree of credibility to it. If the software keeps trying to sneak in additional charges, like service fees, update fees, etc., then it is probably not a very good or reliable piece of software.
Does it Have Workflow Management and Content Scheduling Tools?
Let’s lump these two into the same consideration since one is not as robust without the other. If you have a piece of software that allows for intuitive and useful workflow management, then it makes the whole process of content creation and scheduling a lot easier. On the other hand, if your software doesn’t have content scheduling features and tools, then it is probably not worth getting the software at all. Content scheduling may work well with workflow management tools if you have projects where you have to create brand new content over a series of weeks and months.
Are There Network Monitoring and Reporting Tools?
If you set up a number of digital signs and you put them on a network, then some sort of monitoring and reporting tools are required. You need a central hub where you can monitor which digital signs are active, which are receiving new information, which is rerunning old information.
Knowing which are down, which are active, and which are displaying your most current content is important. This is especially true if you have time-sensitive information and/or if you don’t like the idea of some of your digital signs being down.
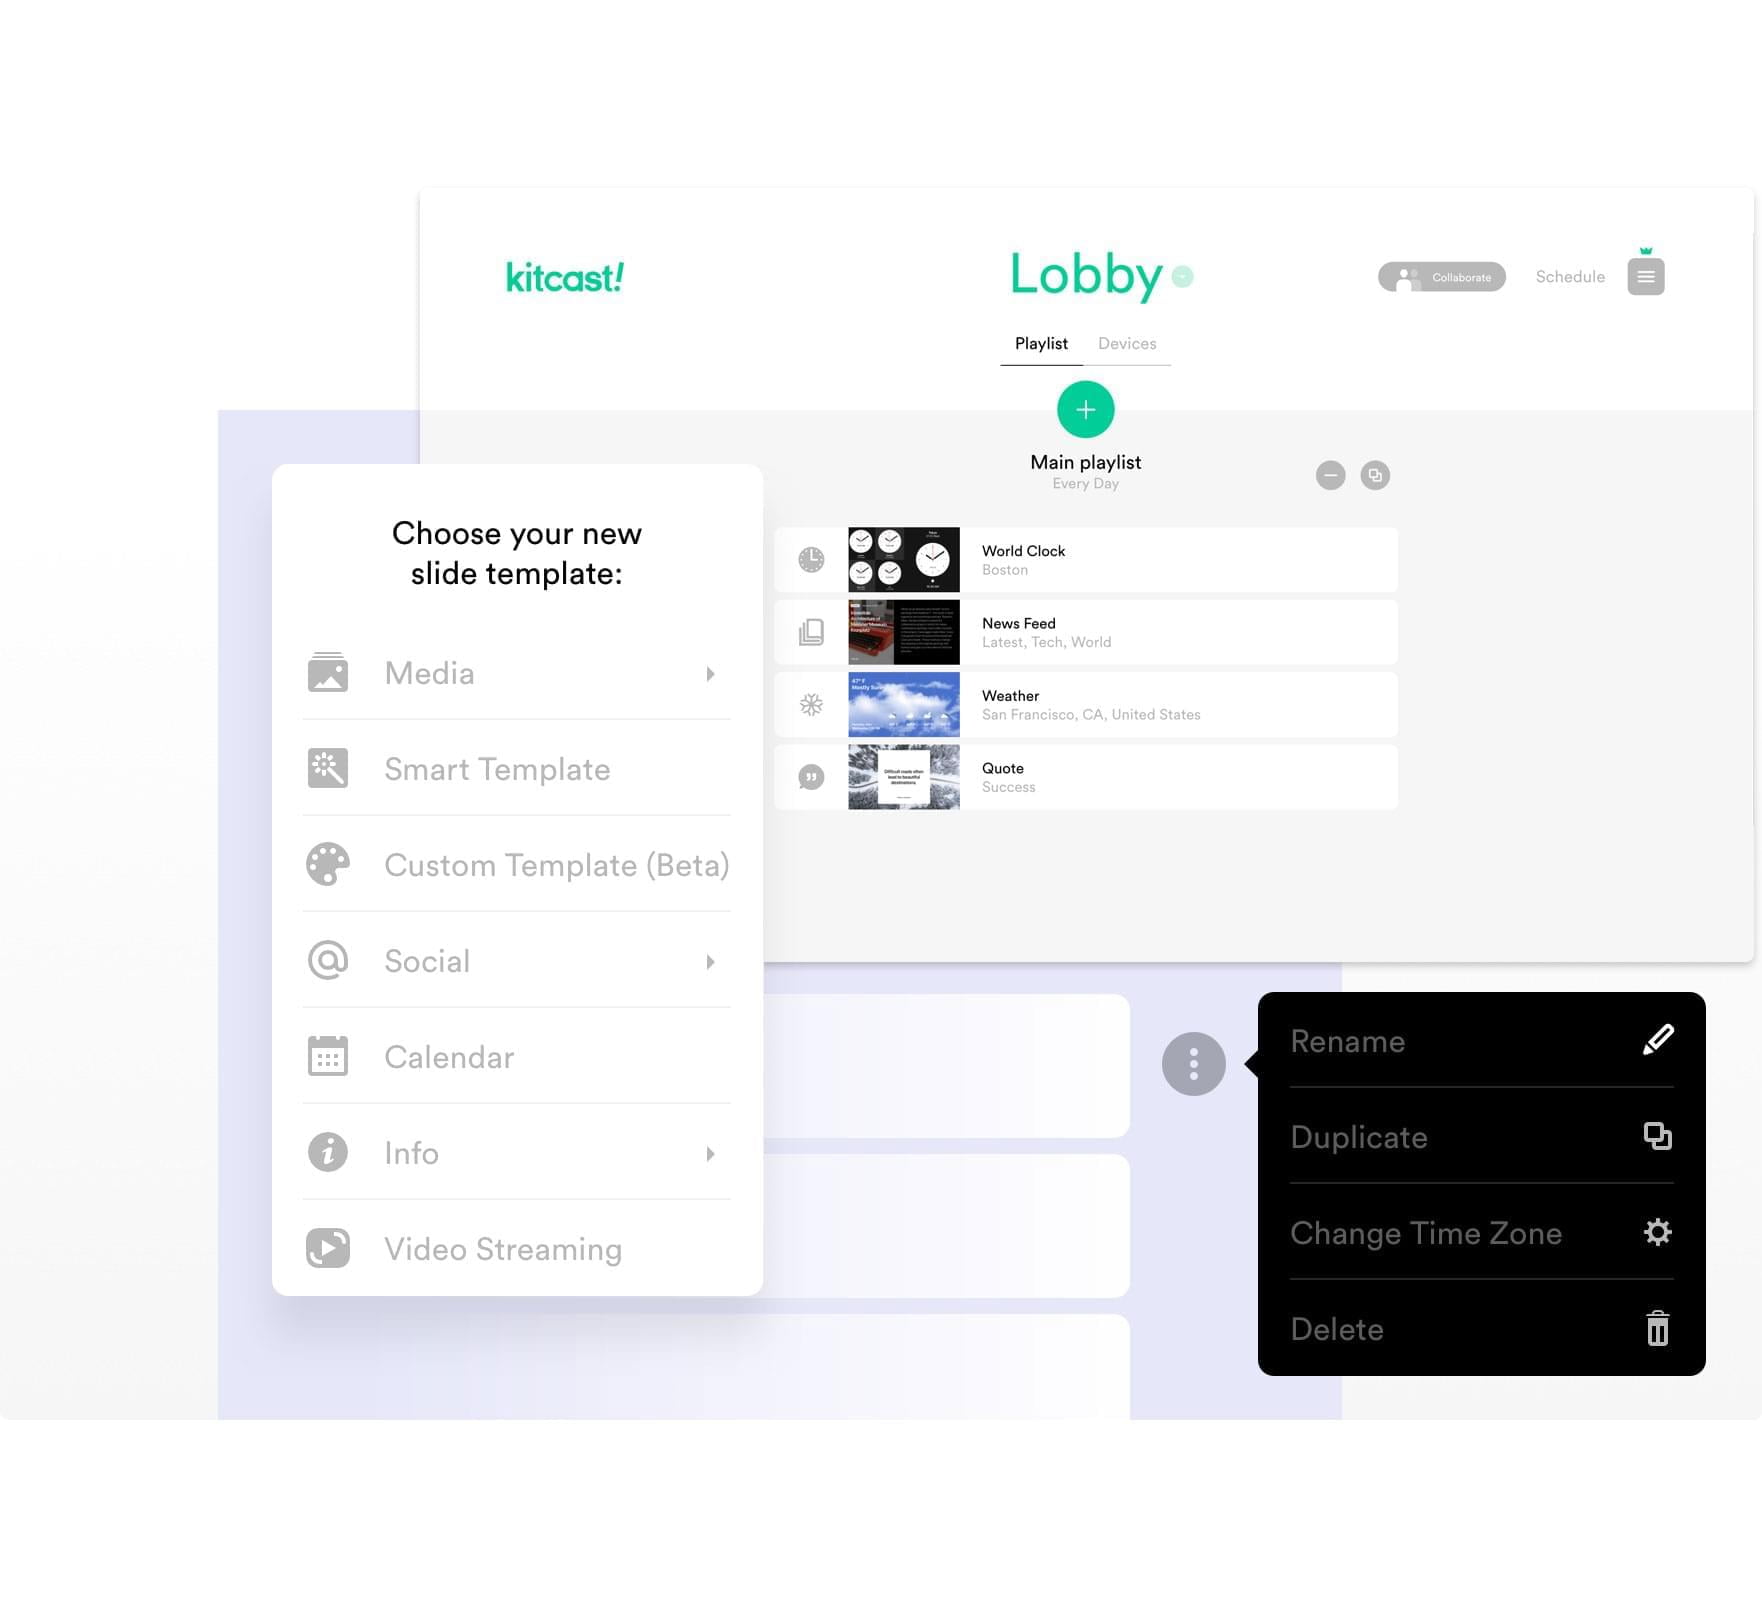
How Compatible is the Software?
In essence, you want your software to work with everything. You want it to work with every type of PC and server operating system, and every type of mobile device operating system, along with TV stick devices from companies like Amazon and Apple. Software like kitcast.tv is able to run on any system and is able to run via remote services too, such as if it were mounted on a cloud platform. Having a highly adaptable piece of software that works on everything is very important unless you are certain you will only ever use one type of device and operating system. If not, having something that is flexible is a big help.
What About Multi-Screen Support?
How you use your digital signs will determine how important things like multi-screen support are. If you want to play the same thing on all your signs, then basic multi-screen tools are all that is needed. Then, if you need things to jump from one screen to another, then a good scheduling program can help you achieve that. However, if you want things like having multiple signs pushed together to create a single screen, then that is going to take some fancy multi-screen support.
The image needs to be broken up into pieces and then distributed among your digital signs. Having the easy-to-use tools is also helpful here because the process of spreading a single stream over multiple signs is tough enough without the software’s GUI tools making it more difficult.
Does it Have Content Creation Tools?
As mentioned in the introduction, this is the sort of thing that matters depending upon your priorities. For example, if you are already creating amazing content with free tools like Blender and Audacity, then you won’t need or want software with content creation tools. On a similar note, keep this in mind when you are paying for subscription packages. If there is the option for content-creation tools and they want you to pay extra for them, then consider creating your content outside of the software and then uploading it.
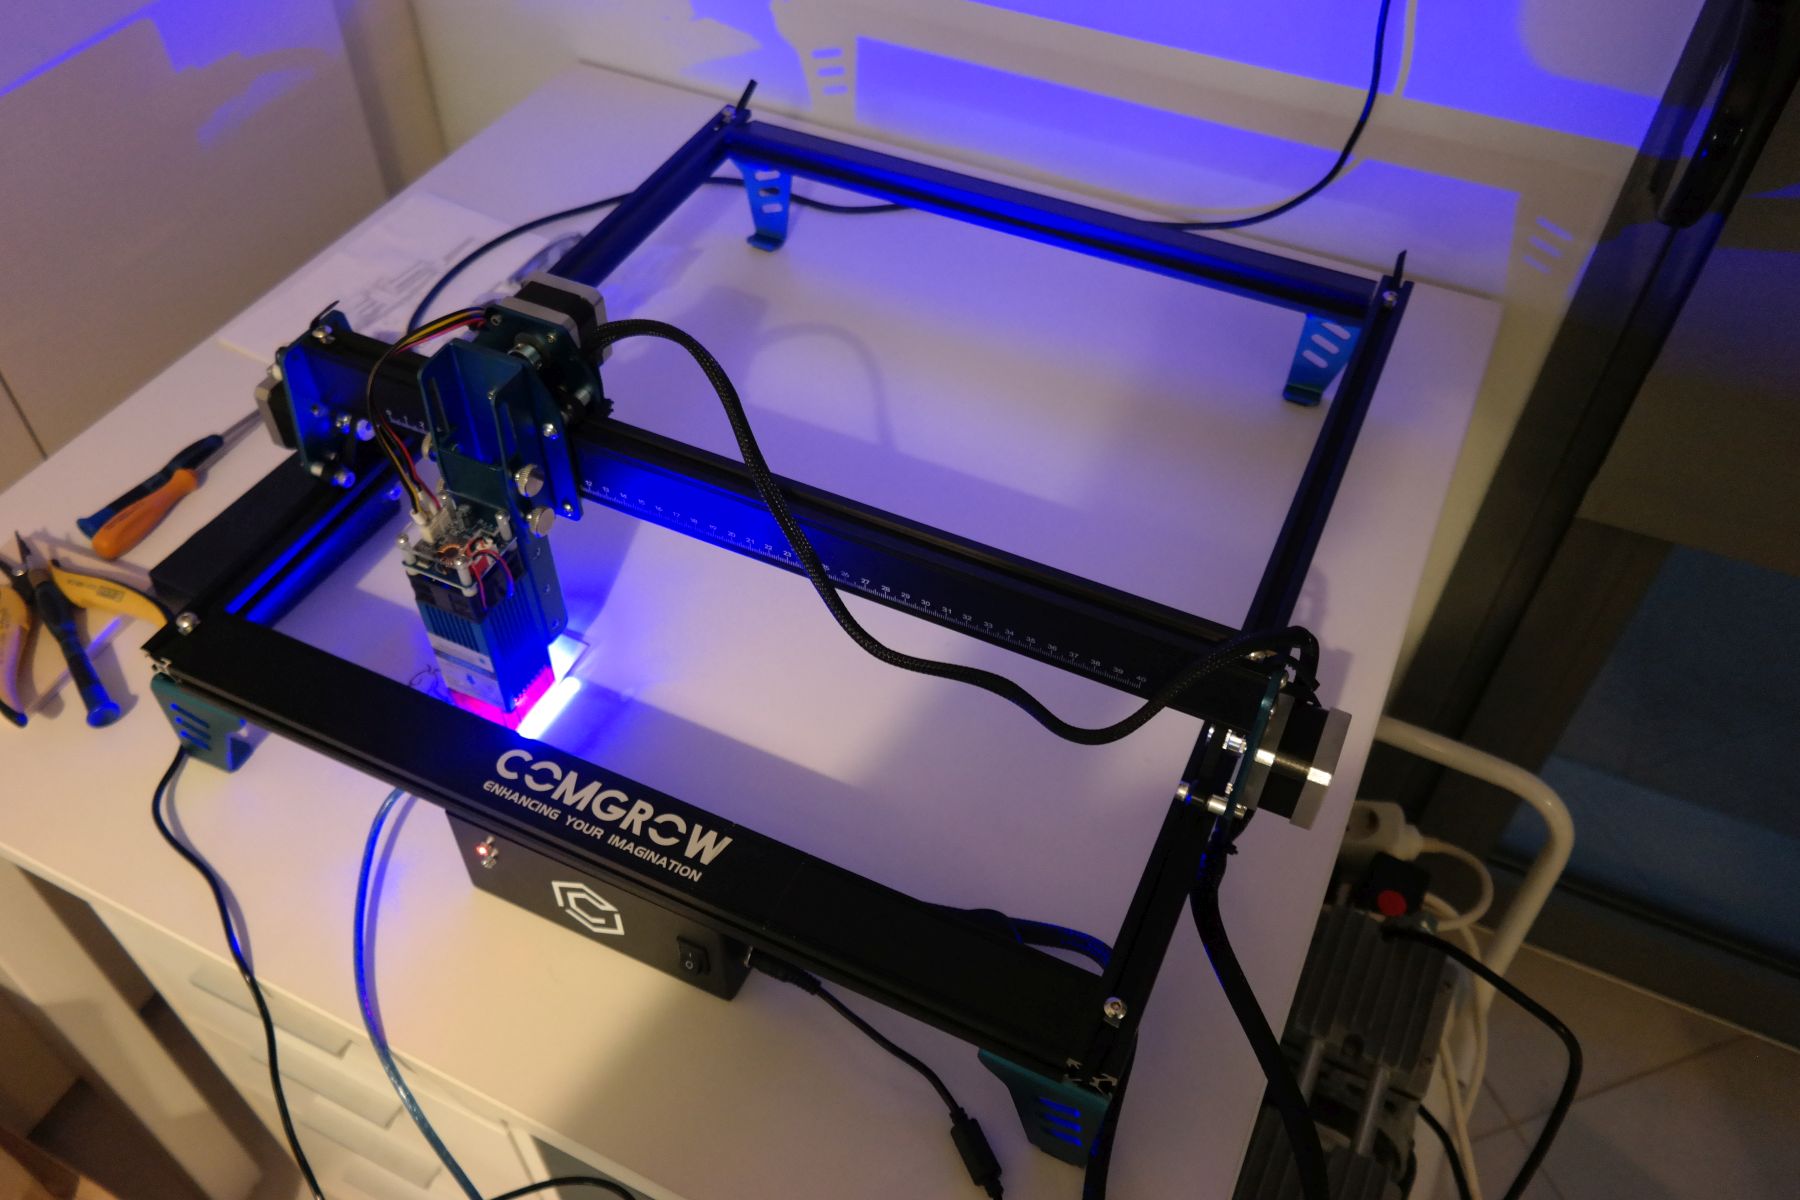
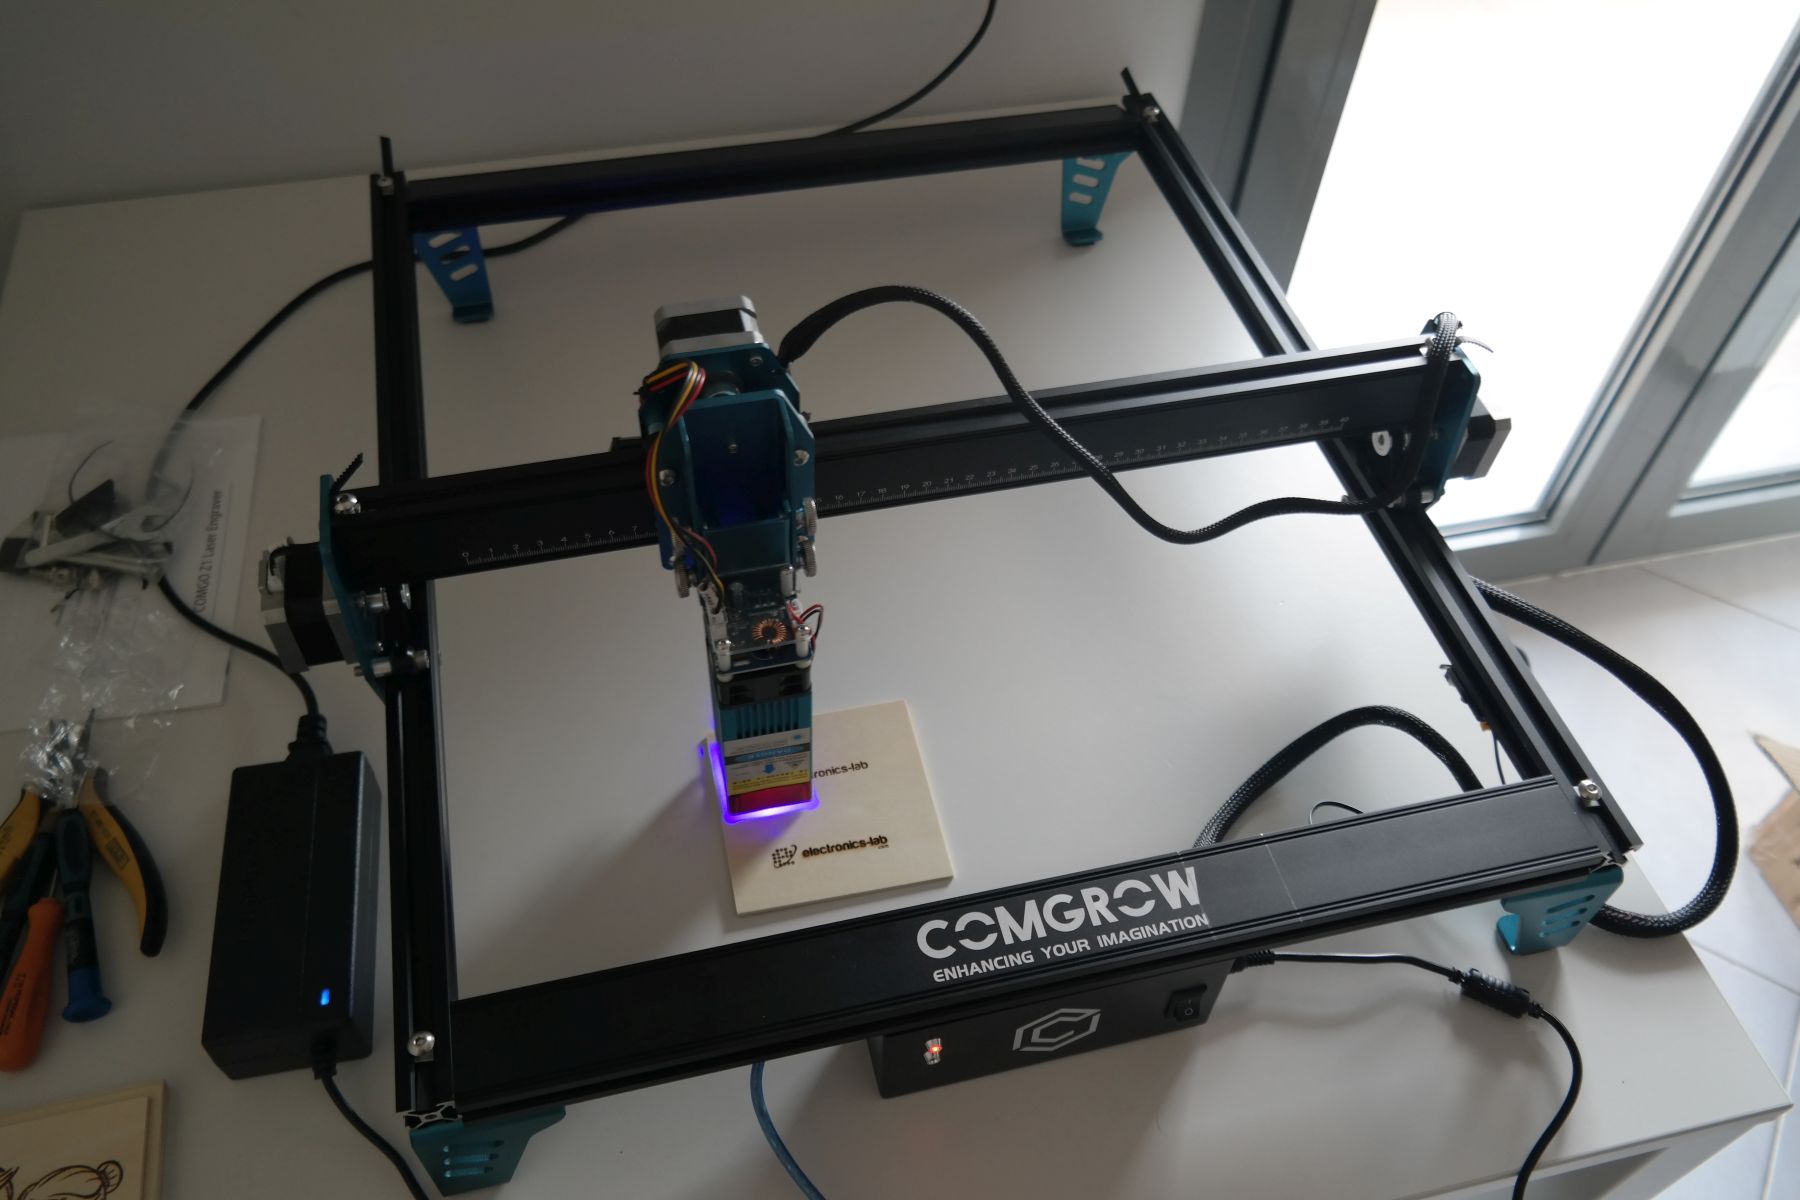
Laser engravers/cutters like 3D printers are bringing small-scale manufacturing closer to makers and hobbyists. As the technology advances, the competition between companies making them is getting stiffer, leading to the market being flooded with different types and makes, making it difficult for the average maker/hobbyist to select one. To simplify decision-making for readers, our review articles help spotlight top-of-the-line products/tools that we have enjoyed using, and for this article, in the spirit of laser engravers, we will be reviewing the COMGO Z1 desktop diode laser engraving machine from additive manufacturing solutions expert COMGROW. This is a China-made laser engraver with a simple design approach, consisting of 4 x aluminum bars and 4 x legs, a pre-assembled Y-axis with the two motors, a 5W laser module, and the USB control unit.
Intro Video
Unboxing
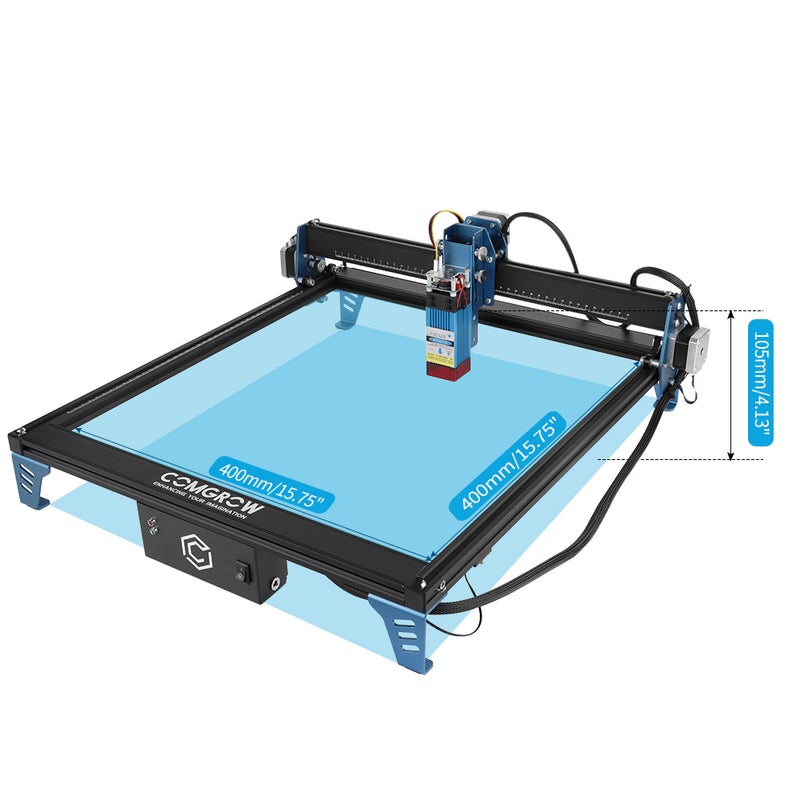
Packaged as a pre-assembled kit comprising of four profiles which when put together gives a 400 x 400mm working area, the COMGO Z1 is a quick setup laser engraver designed to provide hobbyists, makers, and DIY enthusiasts with a pocket-friendly Laser engraver with top of the line performance and features.
Package Contents:
4 x aluminum frame bars with screws
Y-axis pre-assembled
5W laser module with FAN and control PCB
4 x aluminum stands/legs
USB Control Unit supporting LaserGRBL Software
USB cable
Power Supply with power cord
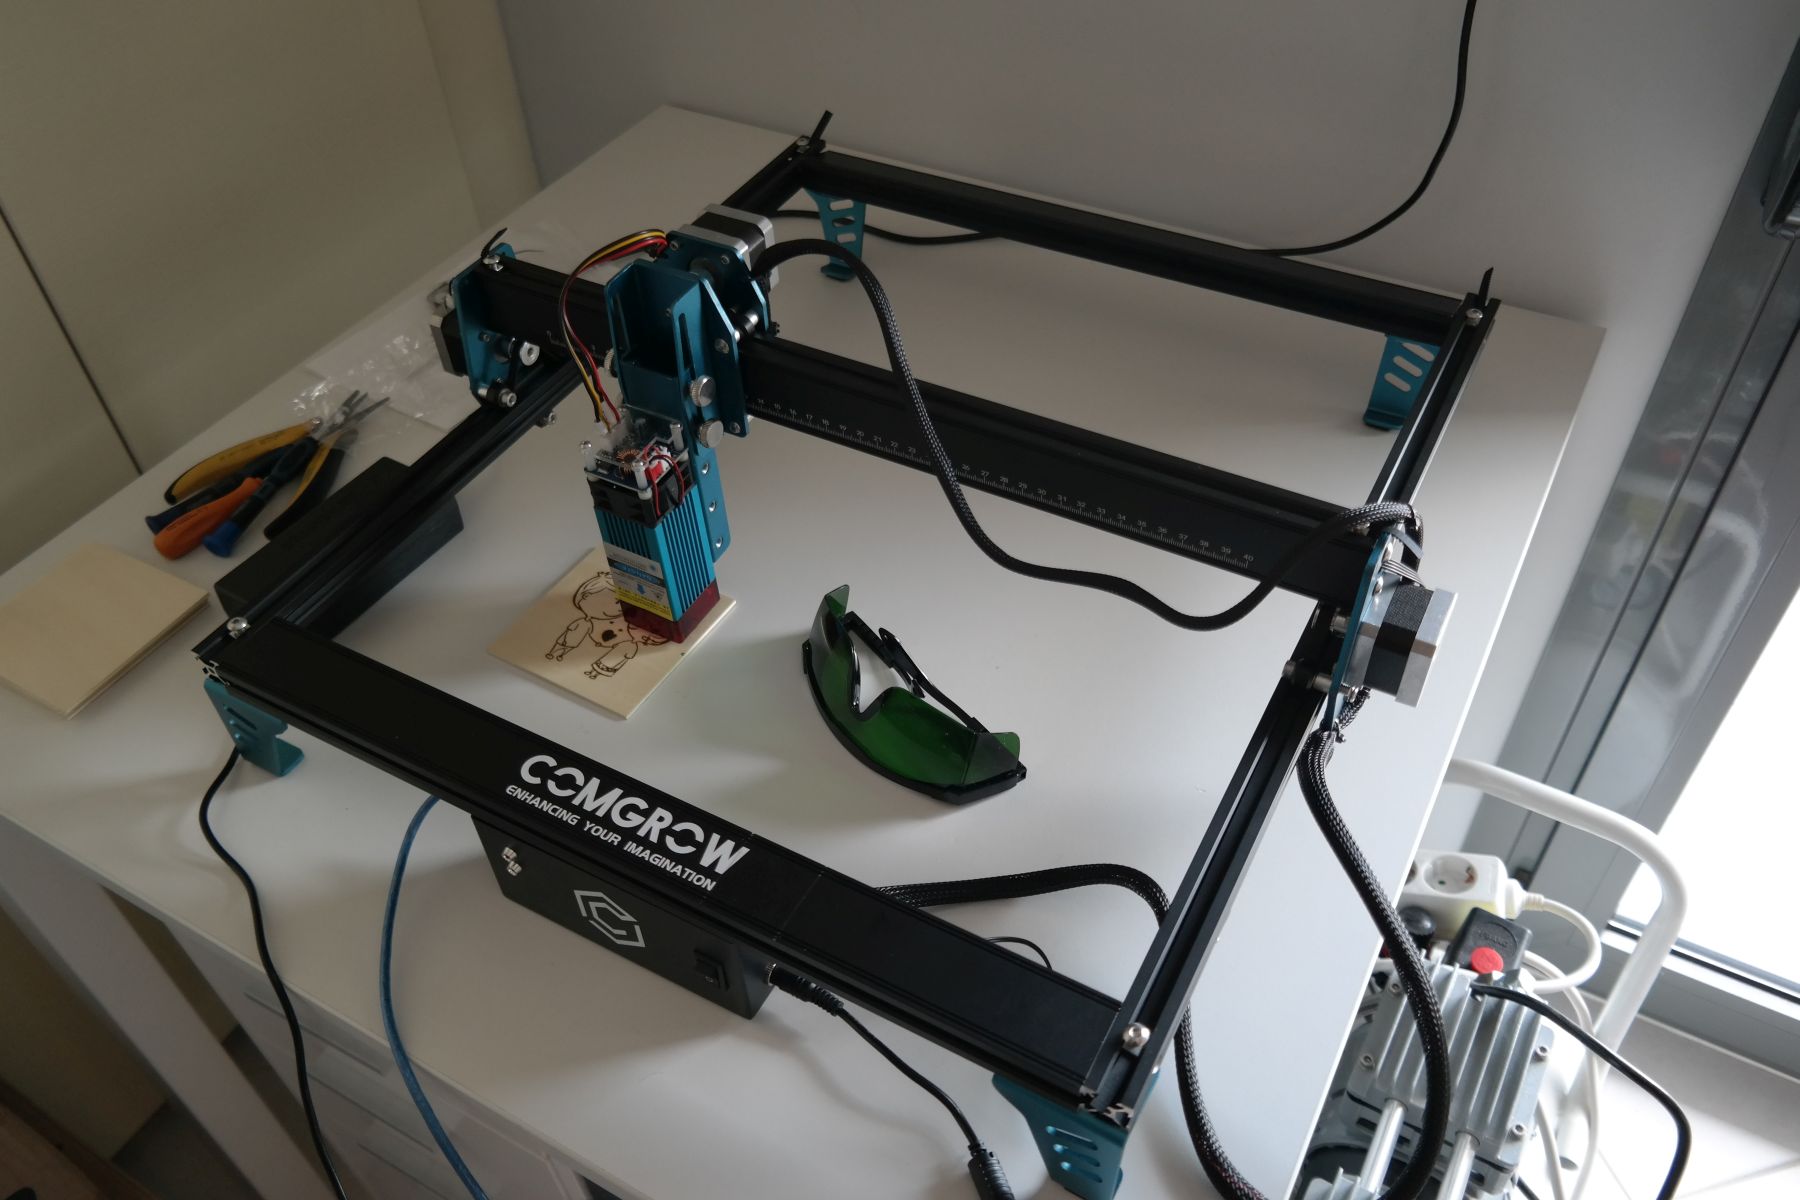
Safety Glasses
SD Card – preloaded with reading material and software
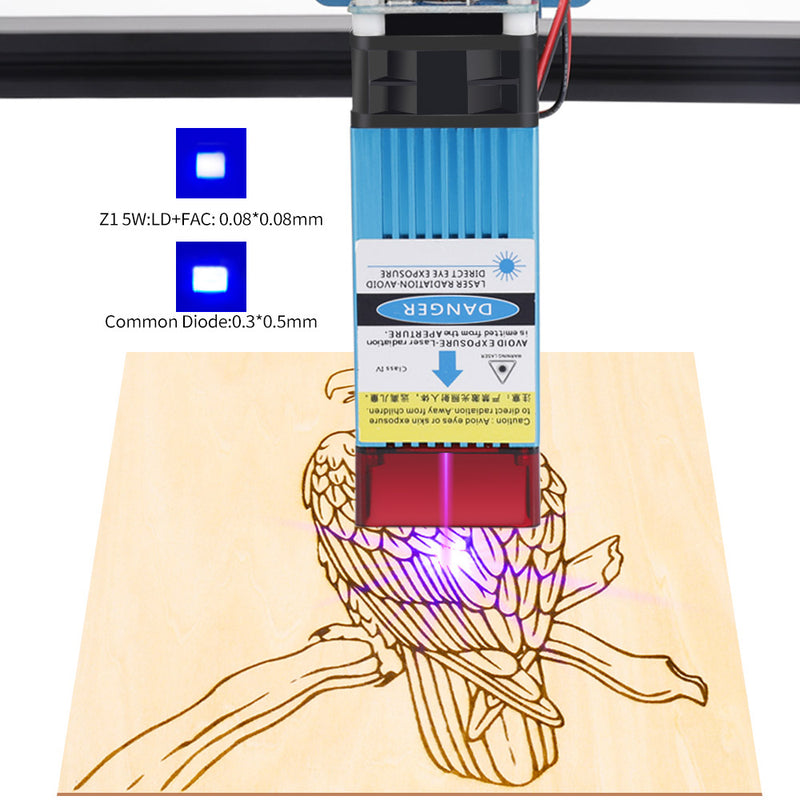
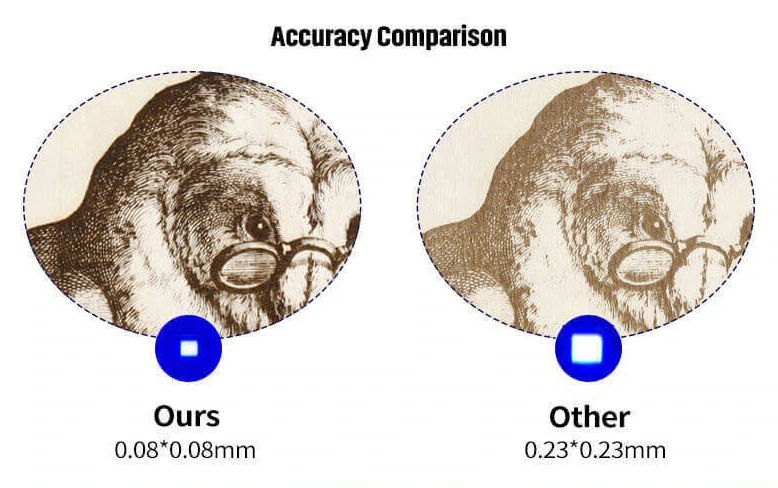
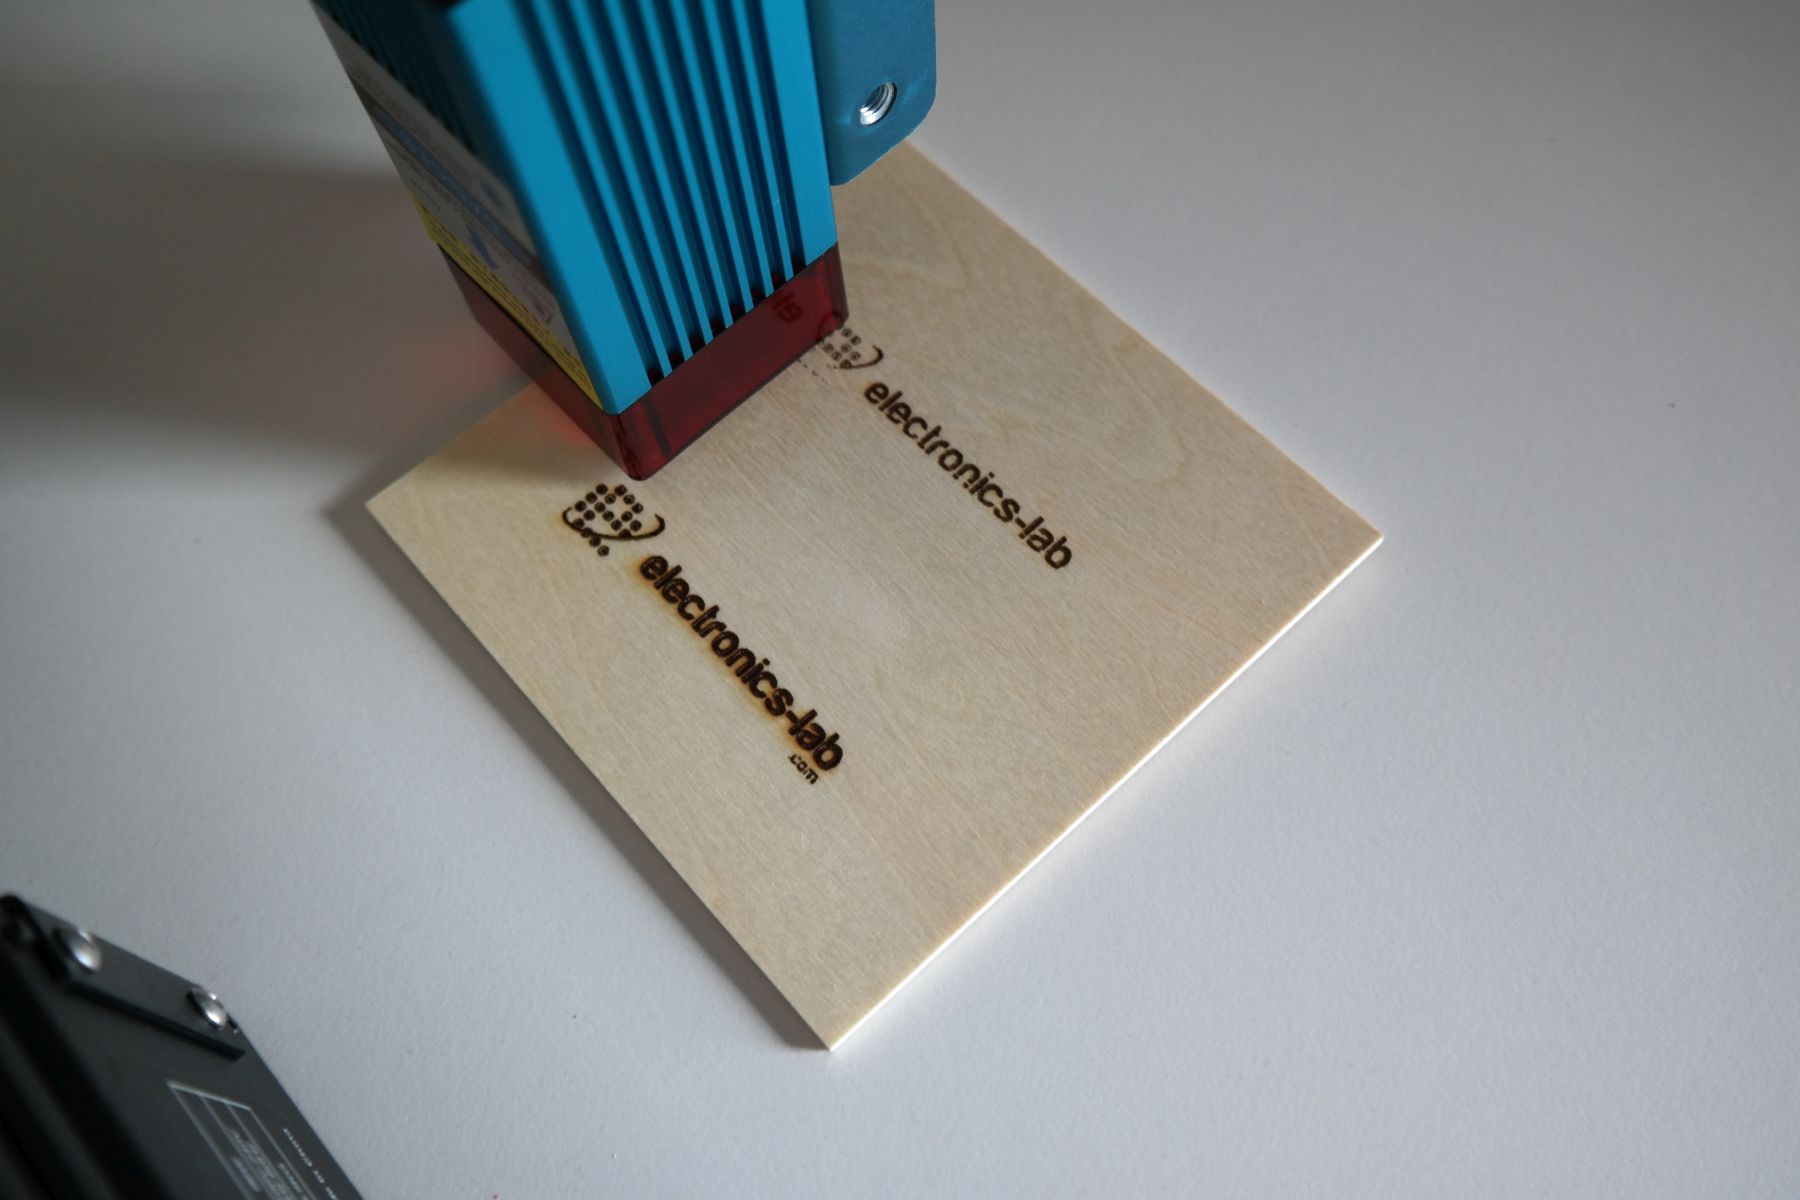
Featuring an LD+FAC-based diode laser, it’s a big contributor to the standout features and performance of the COMGO Z1 is its laser head. The Z1 uses a 5W (upgradeable to 10W) high-power compression laser head, with an incredibly accurate, 80 um (0.08 x 0.08mm) laser spot diameter which creates room for a wide range of tint and burns, altogether making it possible to accurately cut and engrave a wide range of materials such as aluminum (like 7075-T6), plywood, kraft paper, leather, plastic, cardboard, wood, non-woven fabric, bamboo, acrylic, film-coated glass, and many more, at a great speed and accuracy.
Assembly
The assembly process took us about 30-45 minutes to complete following the draft instructions on the small manual that came in the box. First, you need to attach the 4x aluminum bars together forming a large rectangle, and secure them with the available screws. At first, you will find yourself questioning which side goes up and which is back or forth as these details are not clear on the manual photos. This is important to note the company’s logo should face up and be to the front, the scale should be face to top and be on the left side and the limit switch should be placed on the right side and close to the front section (the one with the logo). After some trials and errors, we managed to assemble the frame successfully. Then we took out the pre-assembled Y-axis and rolled it from back to front so that it locks between the bars and be able to freely move. The next step was to place the 2 x silicon belts in the cavity of the left/right bars and secure them with some screws. Then we passed the belts on the stepper motors and tested the movement of the Y-axis to be smooth. Be careful to connect the stepper motor cables to each of the motors as these come disconnected. Next, was time to attach the laser module. This was easy enough using 2 x screws and securing on the Z-axis. Some attention must be taken to attach the cables on the laser module and this is not clearly indicated on the manual and these connectors are polarized. Check the photo below to see how these have to be connected.
UPDATE: A more detailed manual is available as a PDF download.
Features
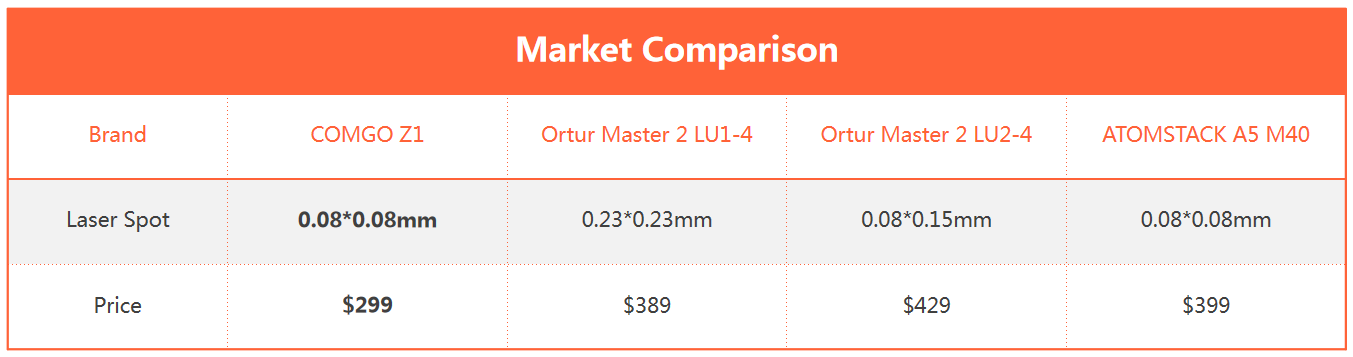
With up to 5000mm/min speed and accuracy of the COMGO Z1 is further enhanced by the use of high-performing dual Y-axis motors which ensure the Y-axis is extremely smooth and mobile, translating to high-speed engraving and increased project stability and accuracy. This great cutting power, accuracy, and support for a broad range of materials place the COMGO Z1 significantly above and beyond other “cheap”, hobbyist engravers (like the Laster Master 2 and AtomStack A5) in its class/price bracket.
The table shows how the COMGO Z1 compares to similar popular laser engravers in terms of speed and price:
Seemingly engineered with the desire to address regular hassles that are experienced when using laser engravers, there are many good things to say about the COMGO Z1. For starters, it features an innovative 20/45mm fixed focus design for setting with an adjustable laser height. The typical unhealthy practice of putting your fingers on the laser to adjust the focus is no longer necessary, as all you need to do is loosen the adjusting screw on the side and place the height block on top of the surface that is going to be engraved. Lower the laser, tighten the screw, and you should be all set. The COMGO Z1 also features a safety anti-tilt system that generates an alarm and interrupts carving/cutting when the bed is not balanced. This helps ensure safety and reduce distortion in cutting or engraving, leading to high-quality outputs. The sensitivity of the sensor can be adjusted to match the requirements/nature of the surface on which the platform is based.
Highlights
Strong Diode Laser: The COMGO Z1 diode laser uses LD+FAC technology that leads to an 80 um laser spot that gives a wide range of possibilities. More powerful laser units are available as an upgrade
Upgrade Unit: While the 5W laser may suit the most daily engraving, the optional 10W high-power laser module, provides engraving to more difficult materials like anodized aluminum alloy, mirrored stainless steel, carbon steel, curved moving pictures, glass, and so much more.
Dual Y-axis Motor: The Y-axis is extremely smooth and accurate thanks to the dual-stepper motor design on both sides.
Fixed Focus: Focus is 20mm for the 5W module and 46mm for the 10W one. To adjust focus you just have to un-tight the laser module screws and place the module close (20mm) from your material (5W version)
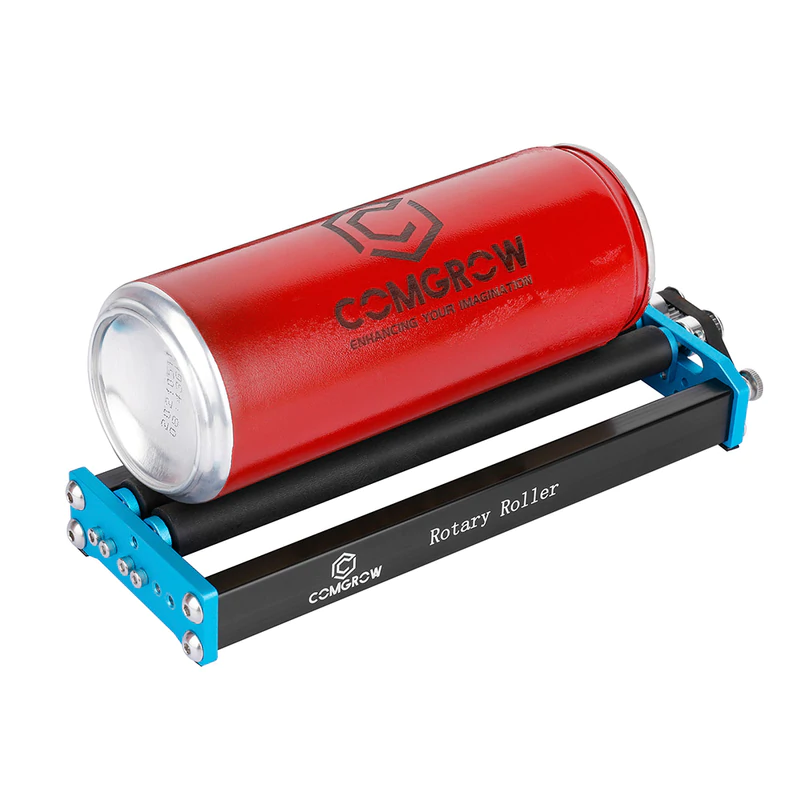
Support Expansion: The device also allows you to upgrade to a rotary roller which is perfect for engraving tumblers and cylindrical objects! It has a stable design for multiple diameters of objects. Spacing between the two rotary axes ranges from 17mm/6.6″ to 33mm 1.2″.
Software
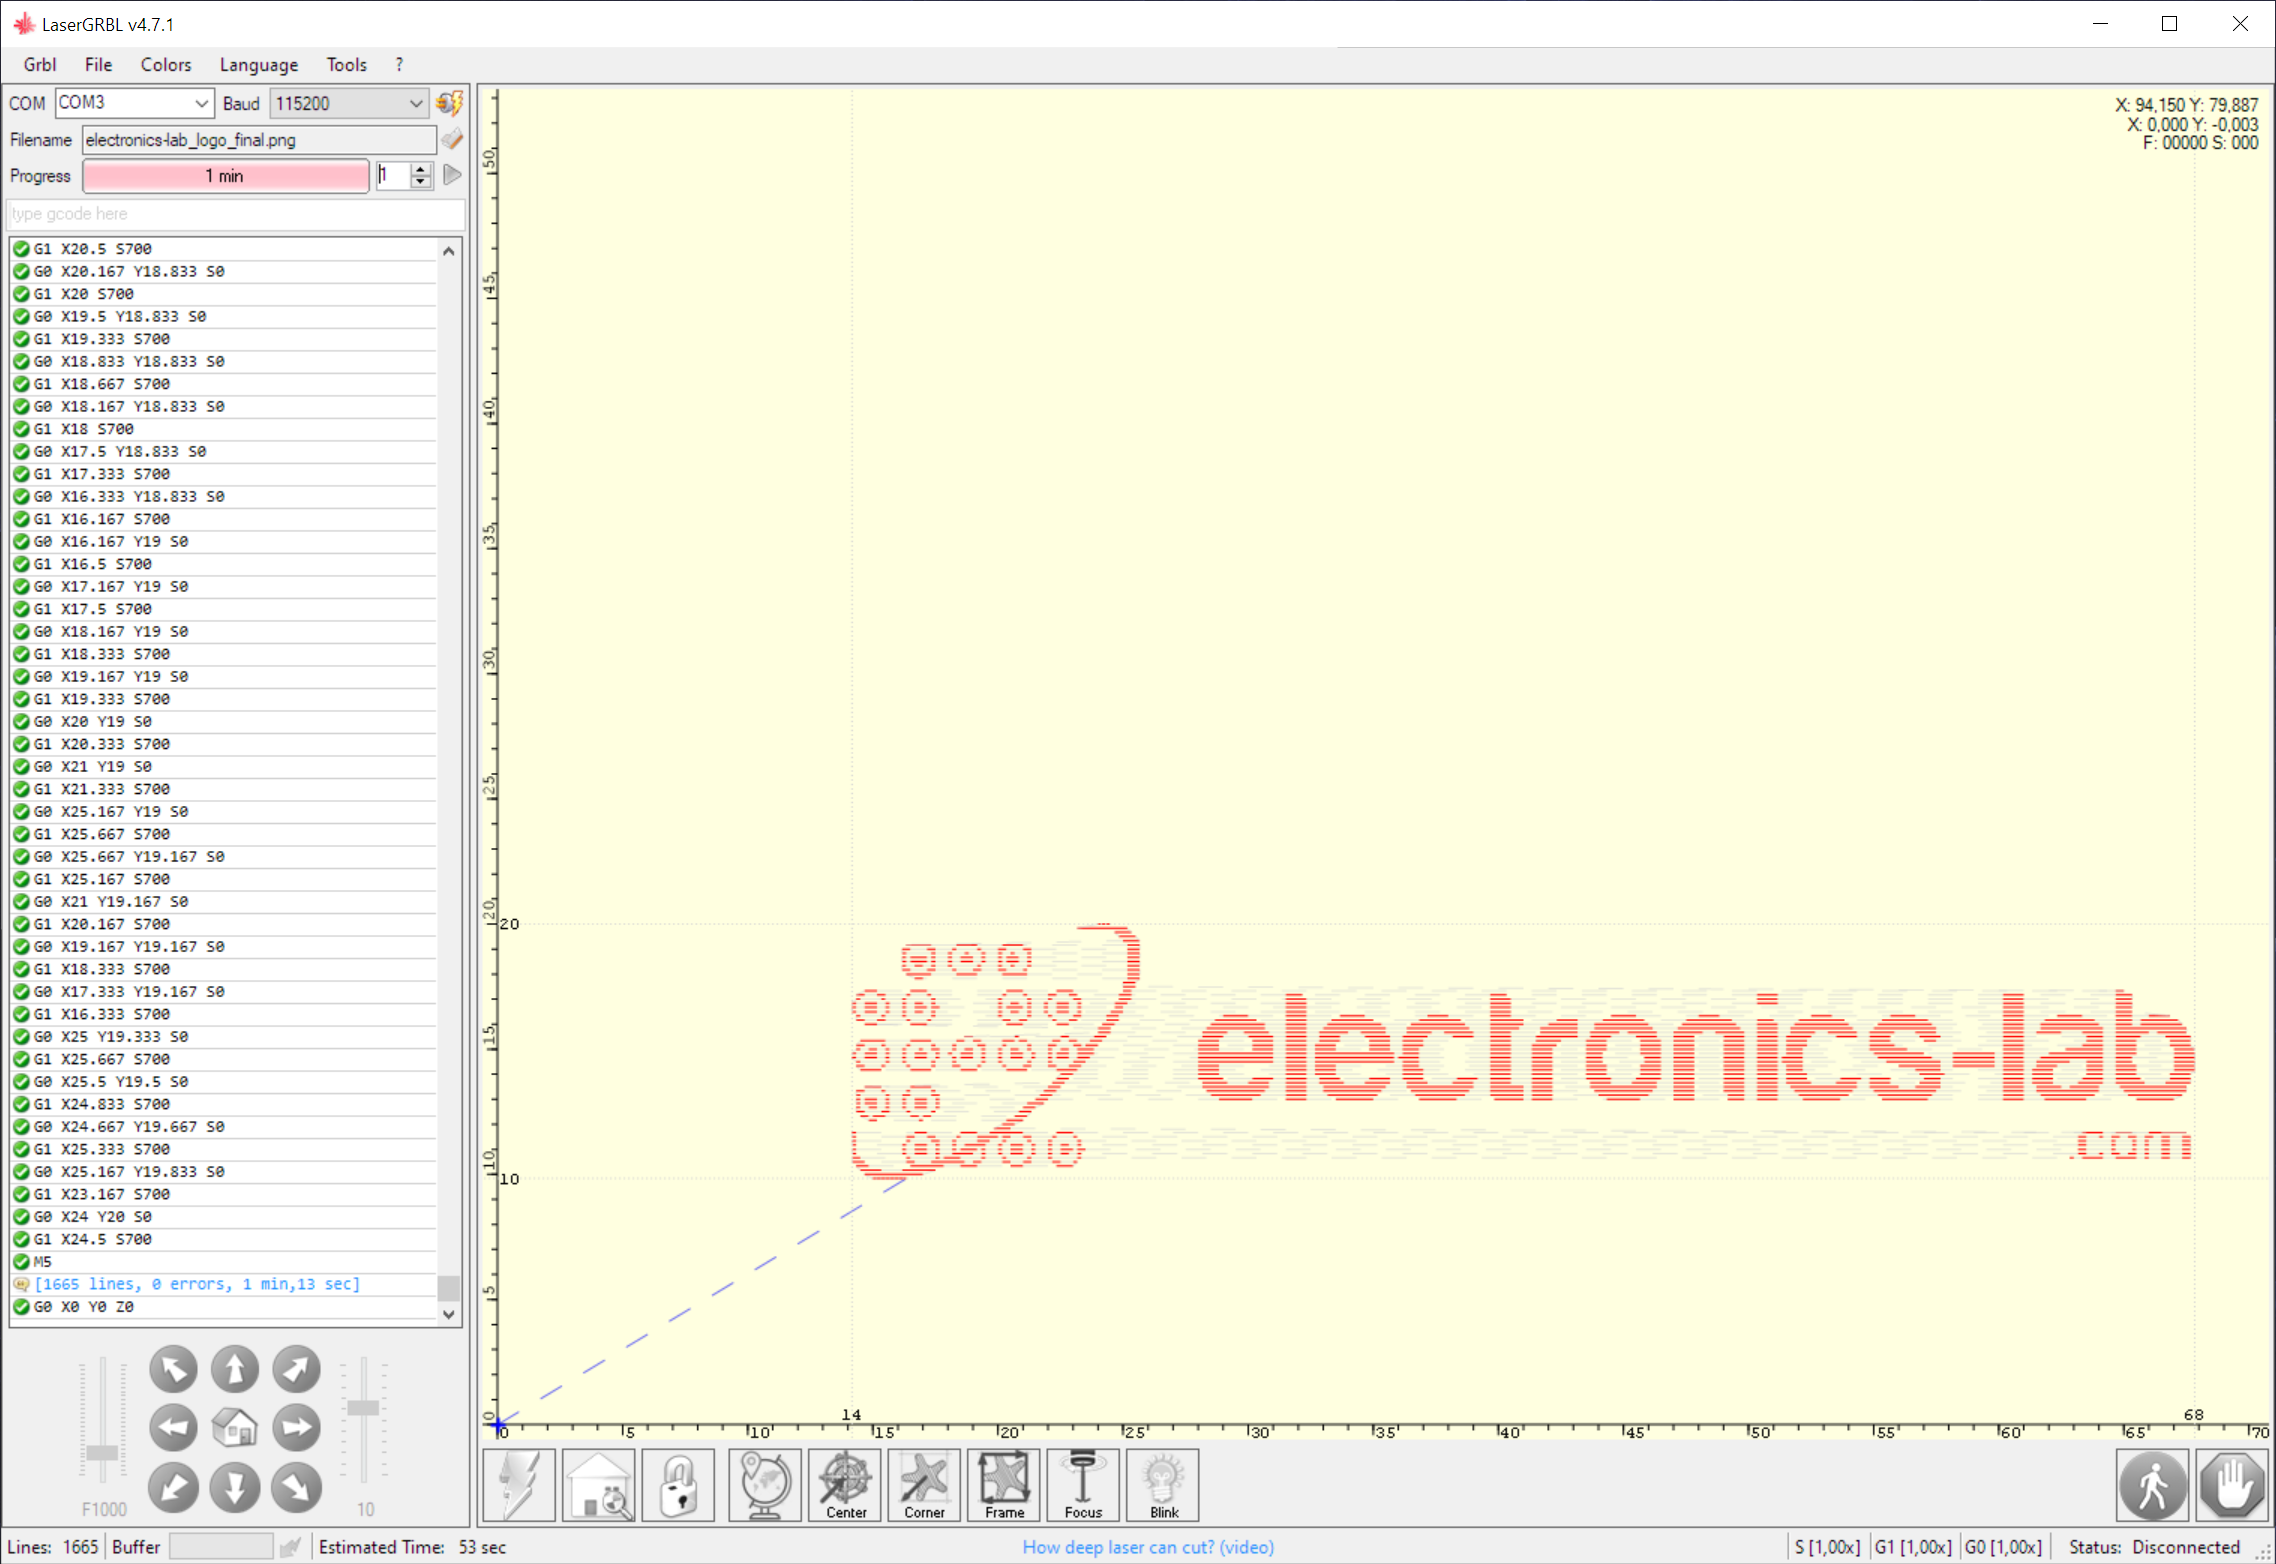
The COMGO Z1 supports both Windows and Mac systems. We will focus on the Windows software proposed in the manual which is the open-source and popular LaserGRBL. This is the basic software that seems to do the job. There are no fancy icons or user interfaces, as you can see on the screenshot above. At the first launch, you will have to go to Tools -> Install CH340 Driver so that the software will be able to communicate with your laser engraver over a USB connection. Then connect the USB cable and power on the device. Please note that in case you have connection issues, it’s advisable to do a firmware update based on the instructions on the attached link. Then click on the connect icon which is located next to the preset Baud Rate of the serial to USB bridge. Baud should be 115200bps.
If everything is fine your engraver should connect to the software and you are ready for your first print. Click the icon below the connect icon and load one of the provided graphics. A popup window will show up with some parameters to set up, then click next and be sure to define the size of the image based on your material to be burned.
You will need to move the laser module to the edge of your material, align the material and click on Define the zero point. Then you are ready to click the Play icon and start the engraving process. You may find yourself that you need to do some tests and trials and errors before you manage to print your first image. It needs some experience to make this work on the first try. Take your time to learn how the software works and be sure you will successfully make your first burn.
Sample Engraving
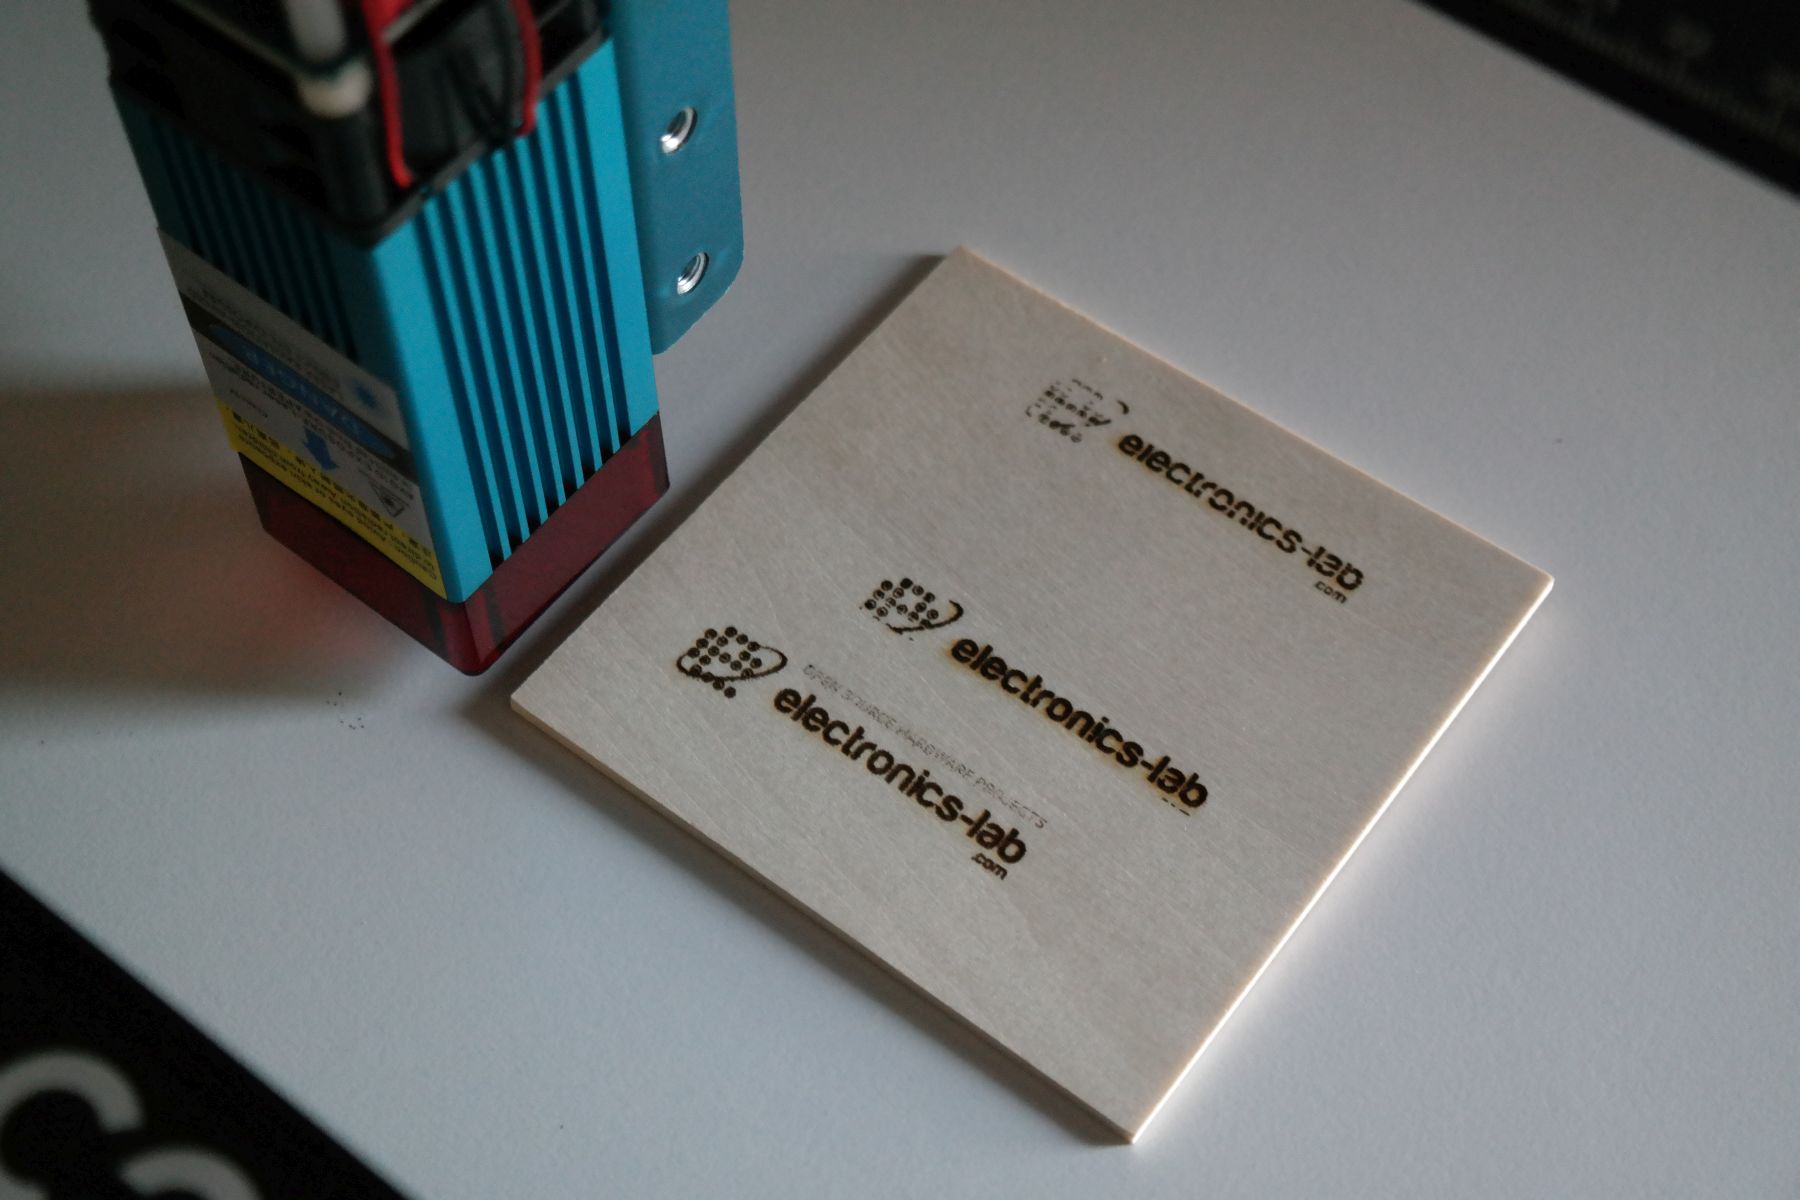
To test the COMGO Z1 Wood Laser Cutter Engraver, we loaded our logo on the LaserGRBL software, set up some parameters on the window opened and then it’s was time to align the material with the zero point. After that, we push the GO button and the engraving started right away. To etch our logo on the small wood piece a few minutes was all that it needed. You will notice that you may need to experiment with the software parameters in order to achieve the best result. One important parameter is laser power. As you can see in the photo below the laser power was to the max and that resulted in an overburn engraving. On the second engraving above we set the laser power to 50% and the letters were etched better but not the logo itself. This means that we need to experiment more with the LaserGRBL software to find the ideal settings.
Video
Upgrades
Another notable thing about the COMGO Z1 is the available upgrades. Thanks to COMGROW’s large ecosystem devices, the capabilities of the Z1 can be further enhanced with a variety of superb upgrades. For example, the 5W laser head can easily be replaced by a 10W version which brings in more cutting and engraving power. Feature upgrades can also be achieved by using add-ons like the COMGROW Laser Rotary Roller Engraving Module which allows users to engrave on/around round and cylindrical objects. as big as the travel size as the Z1.
Conclusion
The COMGO Z1 is a solid machine built from aluminum material and the overall construction is good. The travel speed of the axes is fast enough so you don’t have to wait too much for a task to be accomplished and engraving speed is quite satisfactory considering the overall size of the machine. Regarding the engraving quality, this is strongly dependent on the software parameters your choose. Trial and error are necessary to achieve good results. So take your time to experiment.
Buy
While the standard price is 299USD, the COMGO Z1 is currently available for sale on COMGROW’s website for USD259, at a 13% discount. Shipping is offered from the USA, Europe, and China, so you can select your preferred location.
More
More information on the COMGO Z1 alongside video reviews from other users can be found on the product’s page on COMGROW’s website
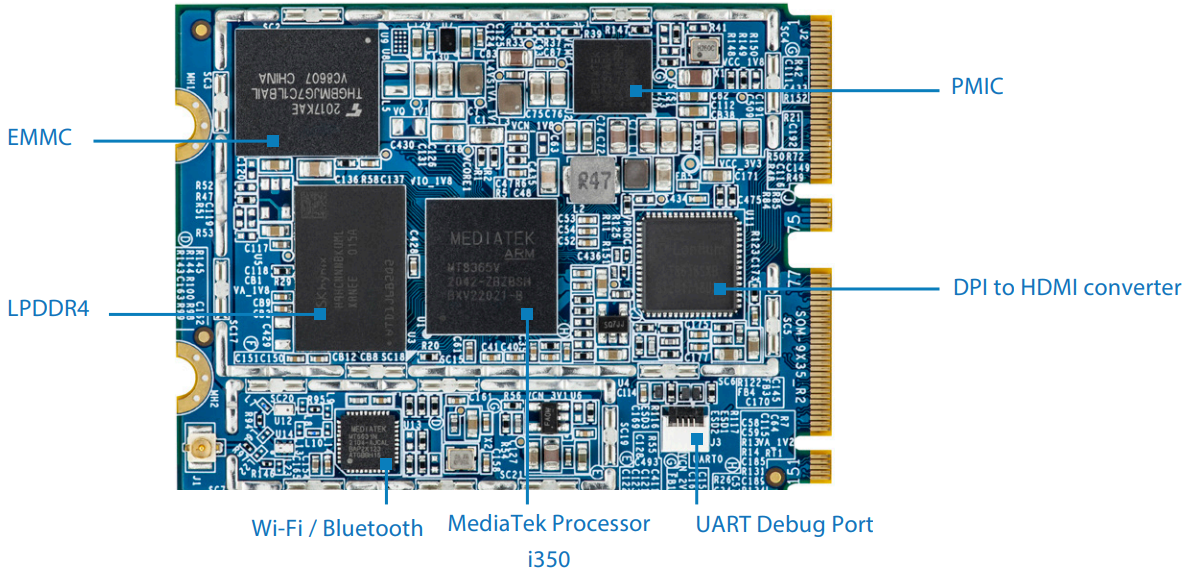
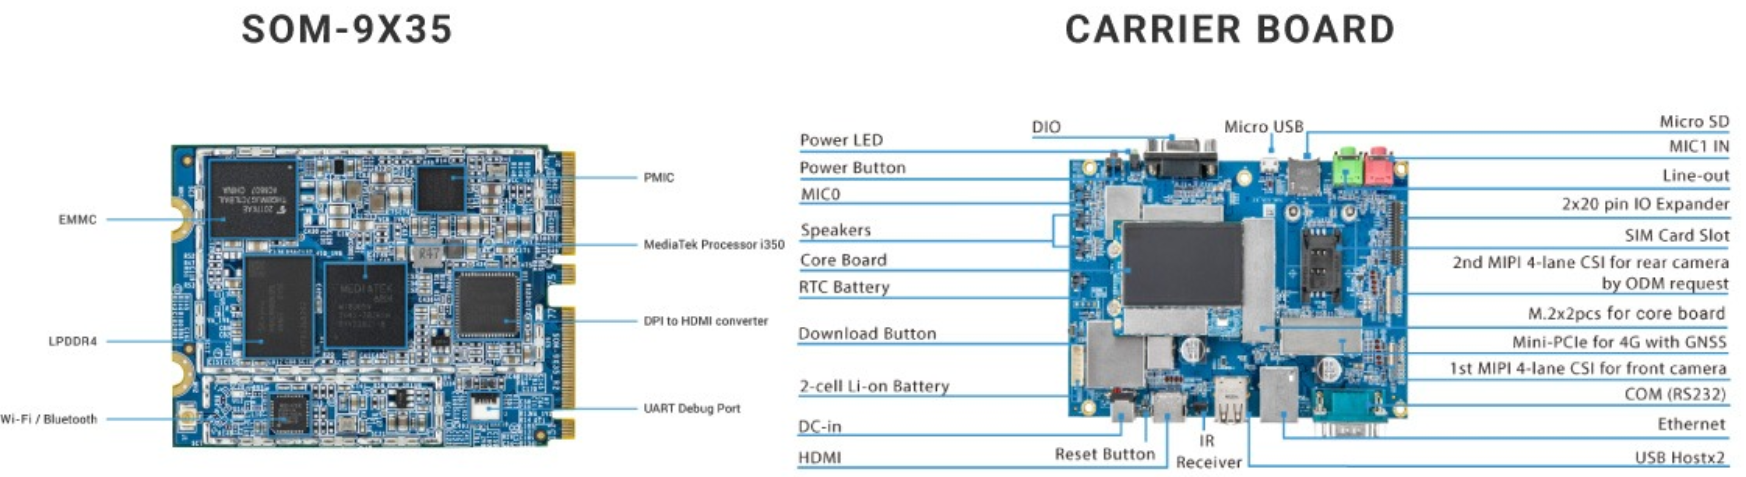
The VIA SOM-9X35 is a low-power quad-core MediaTek i350 based processor board, ideal for IoT solutions and edge AI use cases, like facial recognition, object identification, motion tracking, OCR, and bio-metric measurement. To further accelerate product development time, a VIA SOM-9X35 starter kit has been assembled by the manufacturers themselves.
The kit constitutes of the SOM-9X35 module with max 4GB RAM MediaTek i350 SoC, 16GB eMMC flash, and WiFI 5 + Bluetooth 5.0 wireless module, with VIA VAB-935 3.5-inch carrier board, a 7-inch 1024×600 touch panel display, a 13MP camera module, two speakers and microphone, and accompanying accessories.
Hardware Specifications for VIA SOM09X35 Starter Kit
VIA SOM-9X35 module has a 2.0GHz MediaTek i350 Cortex-A53 quad-core SOC that features an integrated AI processor for deep learning, neural network acceleration, and computer vision applications. Other hardware specifications include system memory 2GB LPDDR4 SDRAM (1GB/4GB optional), 16GB eMMC flash storage, dual-band (2.4GHz & 5GHz ) single-stream Wi-Fi 5 802.11 and Bluetooth 5.0 connectivity, on-module USB to UART connector for debugging, 3.4 to 4.2V DC-in supply voltage and temperature range of –40°C ~ 85°C.
The dimensions of the VIA SOM-9X35 module are 60 x 45 x 6.8mm with a two-side heat spreader.
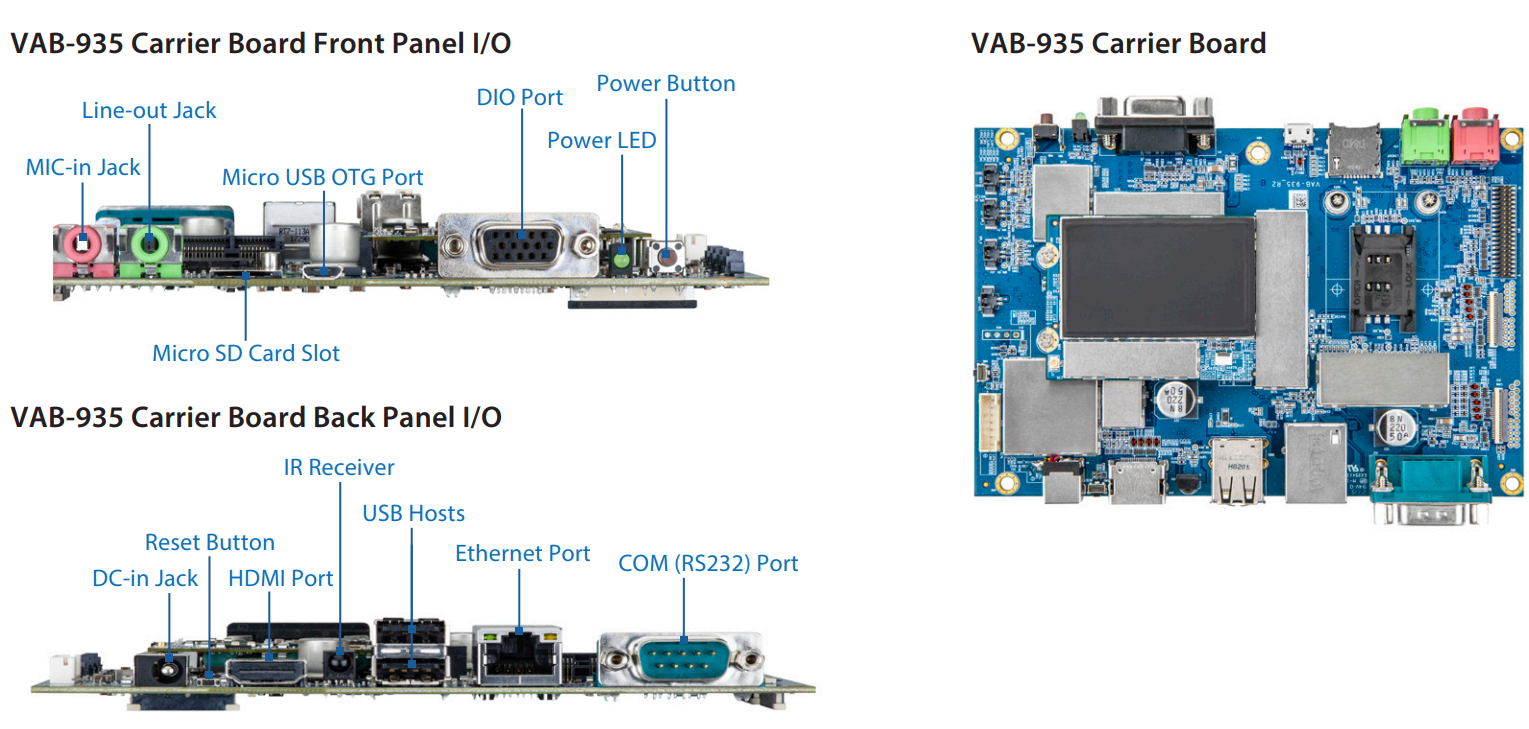
VAB-935 Carrier Board
Apart from the SoC, the starter kit also has a VAB-935 carrier board, which houses application-specific interfaces such as USB, Ethernet, UART, HDMI, etc. The carrier board connects with the SoM via standard connectors.
VAB-935 board has MicroSD card socket storage, front HDMI 1.4 port and back 4-lane MIPI DSI interface video output, built-in microphone audio, 3.5mm microphone jack, 3.5mm Line Out jack and speaker headers, MIPI CSI connector as a camera interface, 10/100M Ethernet RJ45 port and Mini PCIe socket + SIM card socket for 4G with GNSS for networking, 2x USB host ports, 1x Micro USB 2.0 OTG port and RS-232 DB9 connector. For connection to the SOM, the VAB-935 carrier board has 40-pin GPIO header with 16x GPIO, I2C, SPI, 2x PWN, ADC and DIO port. It also provides basic utility and board status features like power LED, power, reset and download button, RTC battery and IR receiver.
The benefit of the starter kit is that when VIA SOM-9X35 is combined with the VAB-935 carrier board, it provides a wealth of display and camera integration options, including HDMI, MIPI DSI, and MIPI CSI support and flexible network connectivity.
Other Tools in Starter Kit
Some additional tools provided with the VIA SOM-9X35 Starter Kit are a 7-inch1024×600 MIPI LCD touch panel display, a 13MP camera module and two speakers and one microphone for audio enhancement. As far as programming is concerned, the starter kit supports Android 10 or Linux via a Yocto Project 3.1-based SDK.
To know more about the VIA SOM-9X35 starter kit, please visit product page.