UPSI-1208D Intelligent DC-UPS – 96W – 12V/8A

Avoid system downtimes and data loss!

Modular DC UPS system protects against power failure, voltage fluctuations and flicker.

When considering the purchase of computer accessories, ensuring a reliable and continuous power supply is crucial. An Uninterruptible Power Supply (UPS) system is an essential component for anyone looking to protect their hardware from unexpected power disruptions. Investing in quality peripherals, such as high-resolution monitors, ergonomic keyboards, and precision mice, can significantly enhance your computing experience. However, these accessories are only as reliable as the power source that supports them. A dependable UPS system guarantees that your valuable equipment remains powered and safeguarded against electrical anomalies.

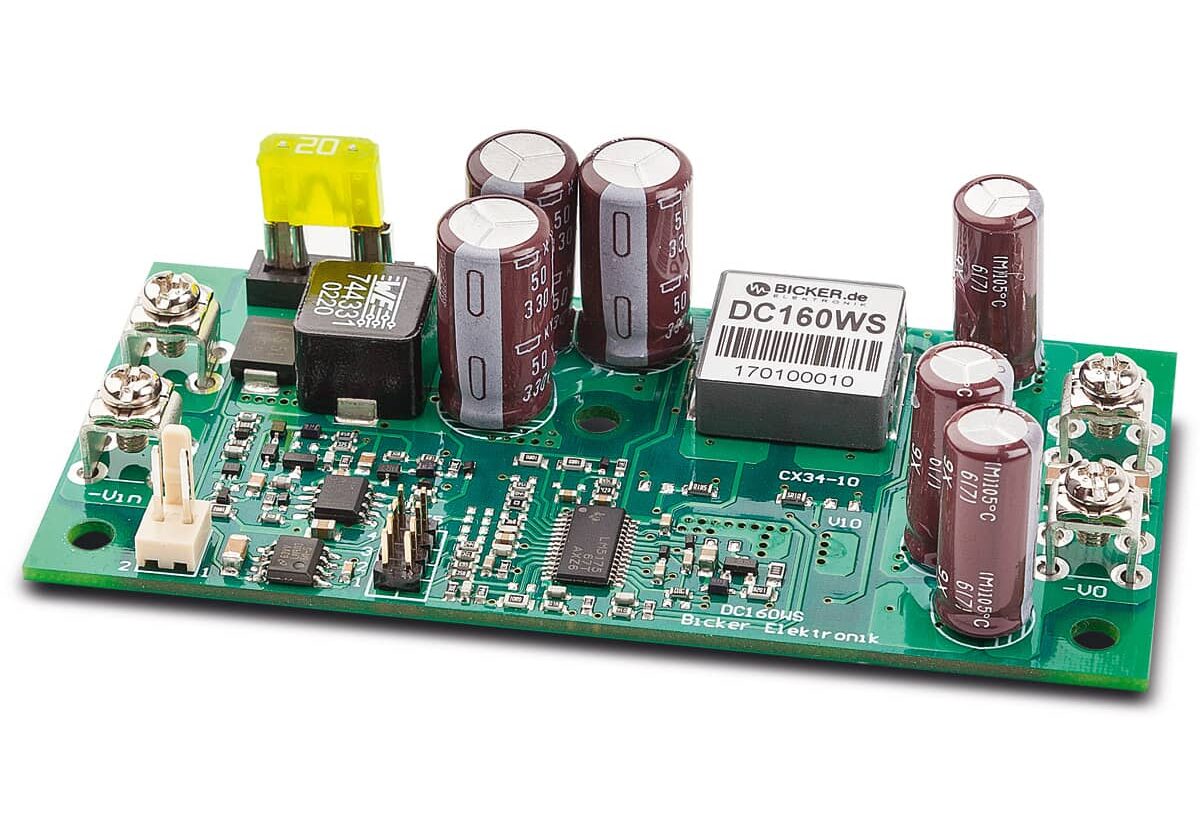
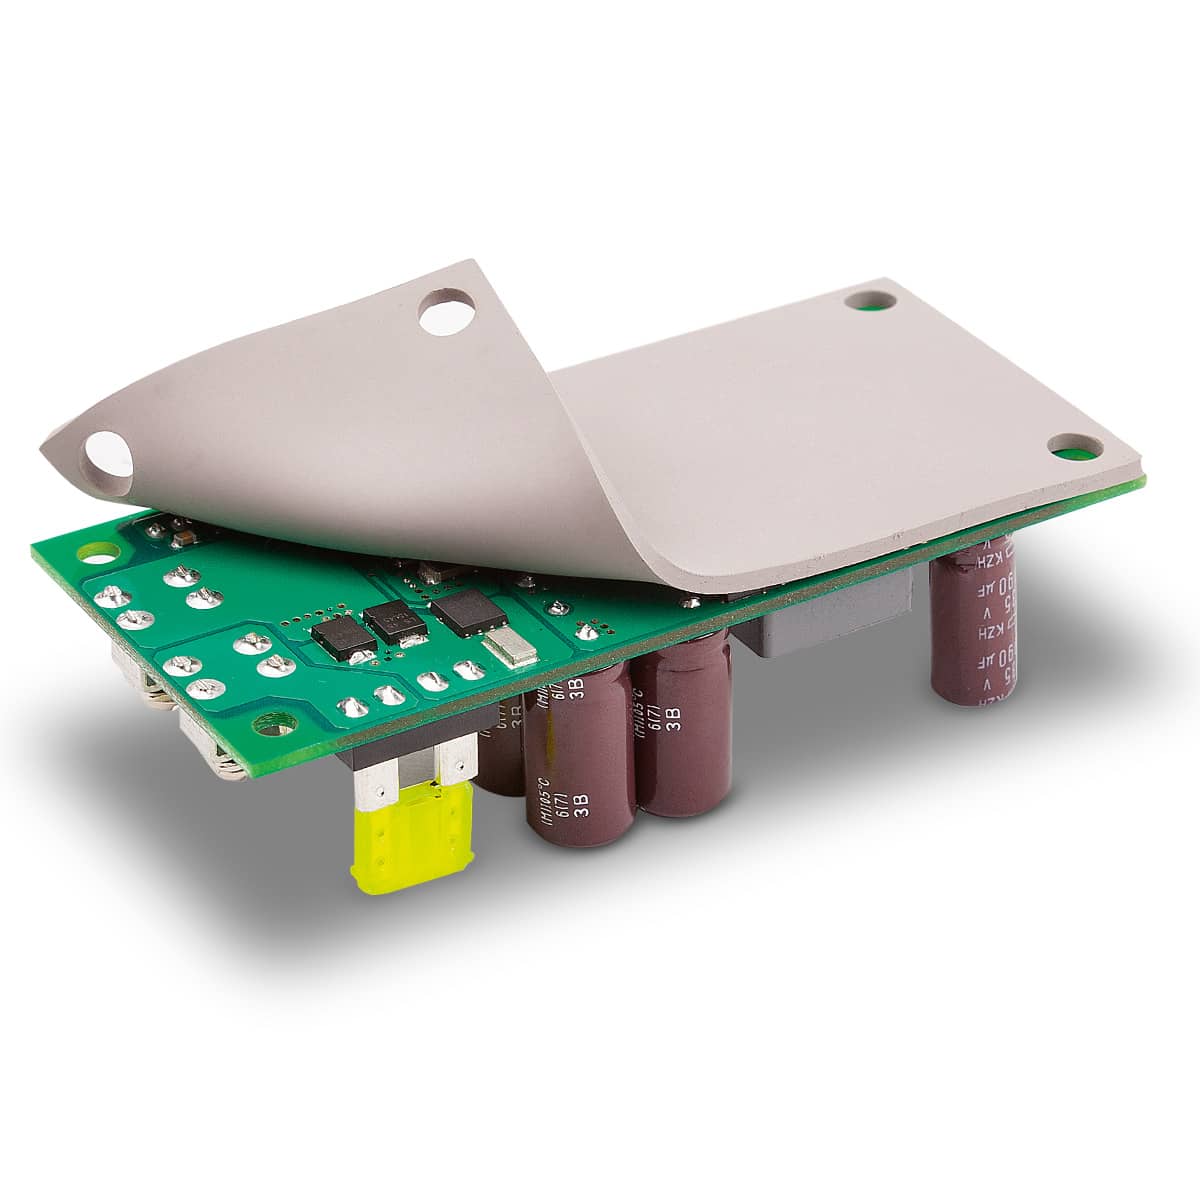
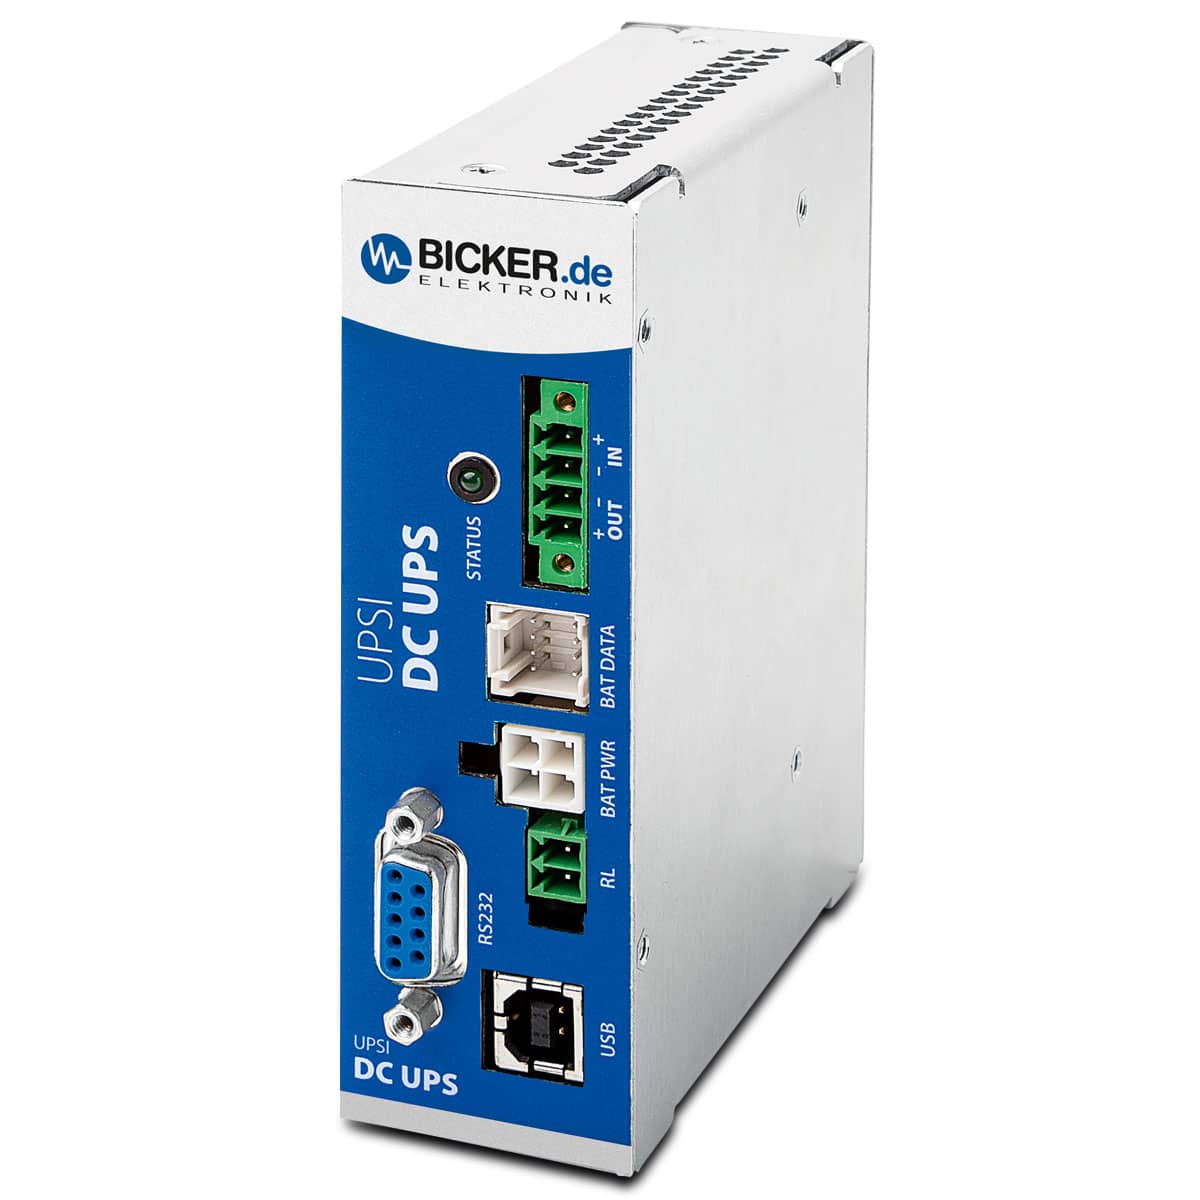
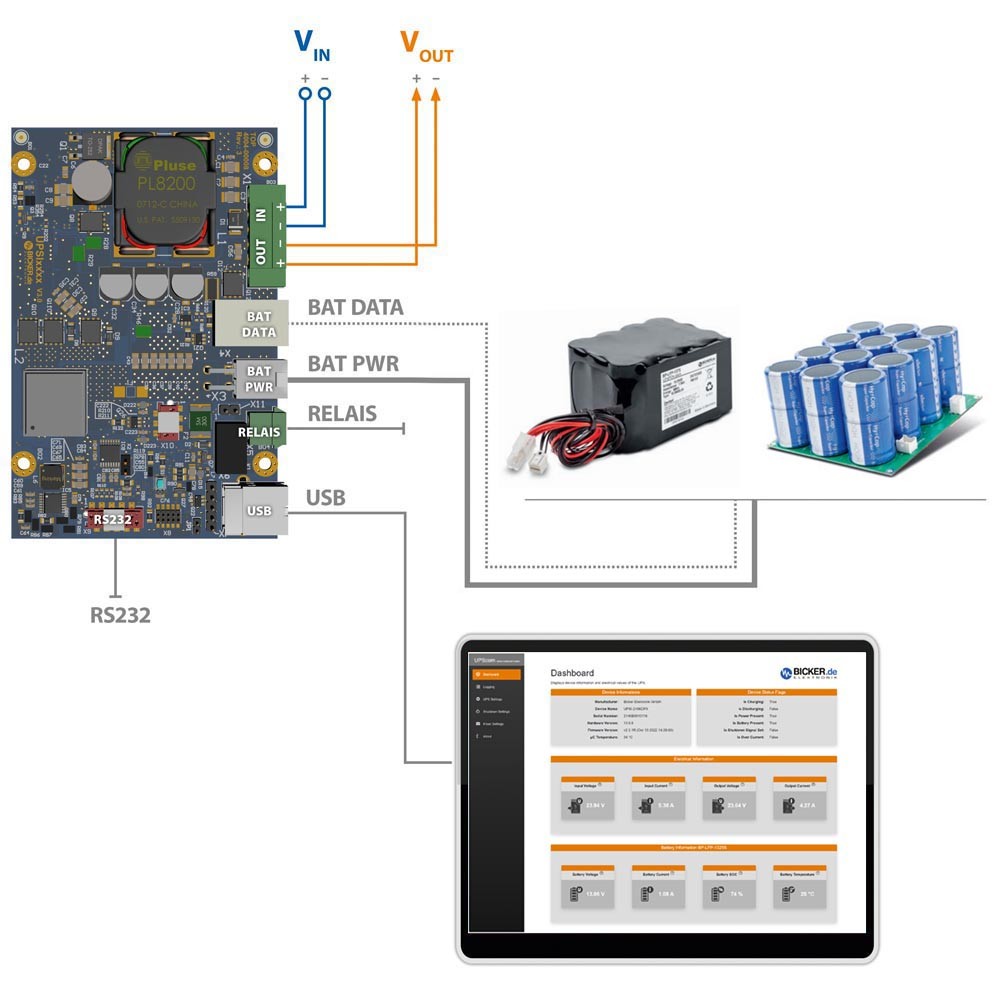
The DC UPS charging and control unit UPSI-1208D for modular and flexible DIN-Rail mounting reliably bridges power failures and faults, so that an uninterruptible 12VDC power supply is ensured at the output at all times. LiFePO4 cells (BP-LFP-D) or Supercaps (BP-SUC-D) are available for energy storage:

10-year battery storage with LiFePO4 cells for long bridging times

Lithium-ion technology with high energy density is ideal for longer bridging times. Our battery packs with LiFePO4 cells convince in safety-relevant applications with a high cycle stability (6,000 charging and discharging cycles) and an integrated battery management system (BMS). The BMS monitors and controls the entire charging and discharging process of each battery cell and thus optimizes the service life and operational reliability of the energy storage device. The integrated cell balancing ensures that all cells are charged evenly so that the full capacity of the battery pack can be used over the long term.

Maintenance-free Supercaps for short and medium bridging times

In the area of short and medium bridging times, absolutely maintenance-free Supercaps (ultracapacitors) are available as highly efficient and particularly long-lasting energy storage devices with more than 500,000 charge and discharge cycles. In contrast to batteries, which store energy via a detour through a chemical reaction, Supercaps are based on electrophysical principles and are charged and ready for use within a very short time. Our Supercap energy storage devices have an integrated control and protection circuit as well as a Connect / Disconnect Power function.

Specifications

  • 12V DC UPS
  • For use with long-life LiFePO4 and Supercap battery packs
  • Intelligent power sharing
  • Regulated output voltage during backup operation
  • Min. load disconnect
  • Power fail timer
  • External signal shutdown
  • USB & RS232 Interface
  • Plug&Play – recognized as UPS by operating system
  • Extended functionality by UPScom management software
  • Reboot function
  • Fuel gauge
  • 3 years warranty

Intelligent charging and control unit UPSI

The compact charging and control module Bicker UPSI is connected to the appropriate energy storage device (LiFePO4 or Supercaps) via two cables. In addition to the energy transmission line (BAT PWR), all relevant operating data of the energy storage device is continuously monitored and controlled on the data line (BAT DATA) via the I2C interface. When changing the energy storage, which is even possible during operation (‘hot swapping’), a battery type ID authentication is carried out so that the appropriate charging and discharging parameters can be set automatically on the DC UPS.

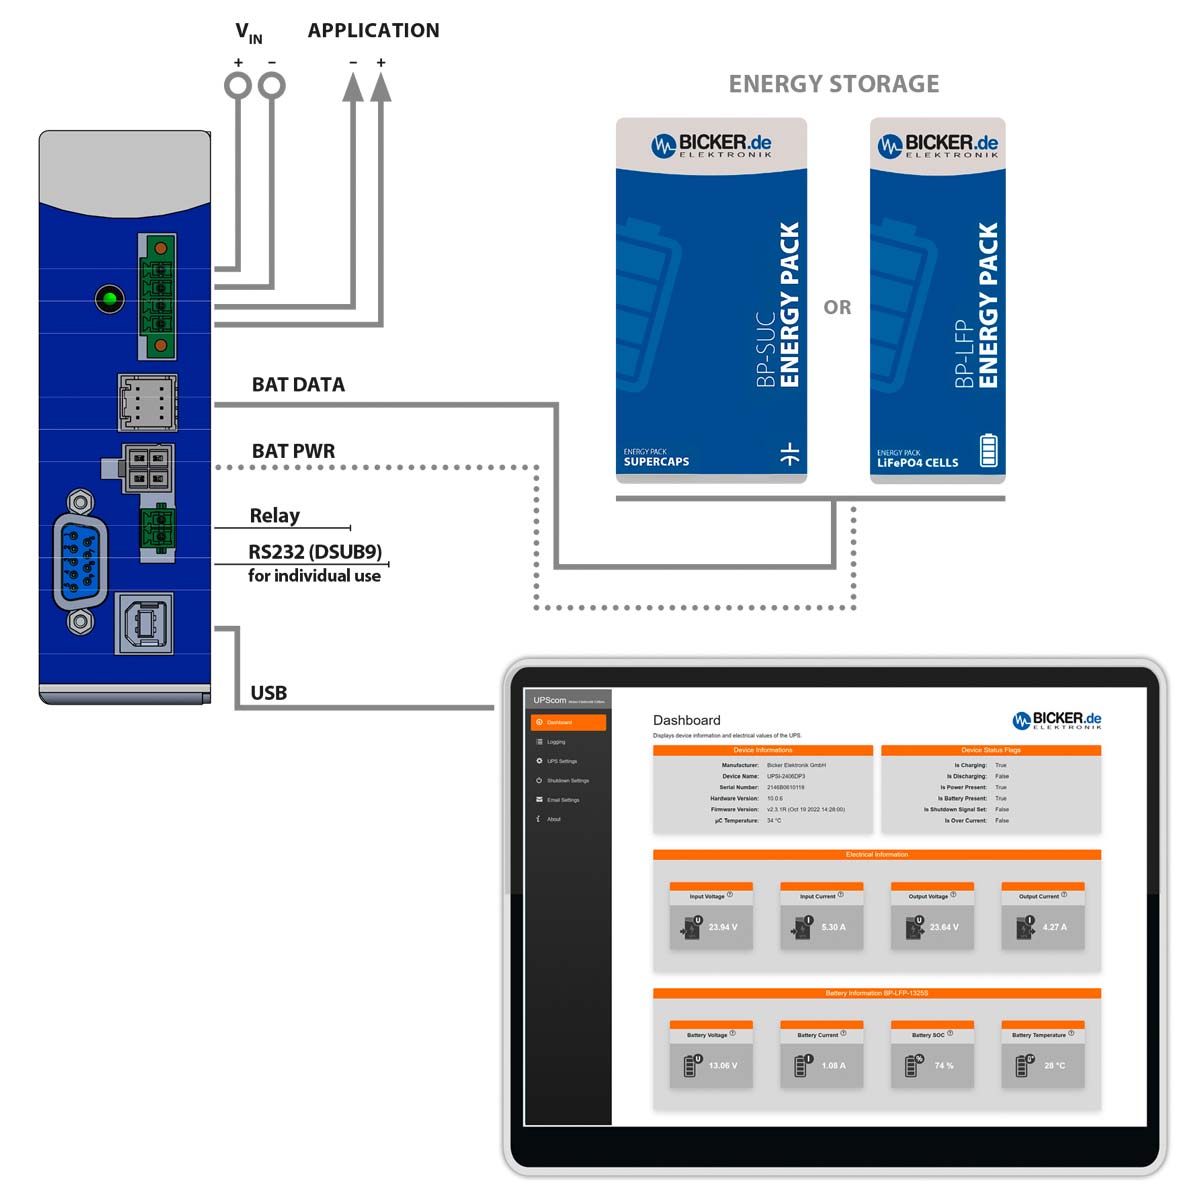
PowerSharing function

On the input side, the intelligent ‘PowerSharing’ function ensures that the upstream AC/DC power supply does not have to be overdimensioned, but that the input power is kept constant and appropriately distributed to the load and battery charger. This means that when there is a low load at the output, more energy flows into the charger and vice versa.

Minimum load detection

The ‘minimum load detection’ of the UPSI control unit monitors the output load to be supplied from the energy storage in backup mode (battery mode). If the load at the output falls below a certain limit value, the energy storage device is automatically disconnected from the charging and control unit, so that the energy store is not unnecessarily emptied by the DC UPS electronics. In addition, the minimum load detection ensures that the computer system has been shut down properly after an initiated shutdown process, before the reboot function initiates the restart of the system.

more information: https://www.bicker.de/en/upsi-1208d_intelligent_dc-ups_96w_12v_8a_din_rail_version_dc-dc

AAEON Announces Products Incorporating Modules from the Entire NVIDIA Jetson Orin Series, Post-GTC

New additions to AAEON’s line of AI edge solutions will be powered by NVIDIA® Jetson AGX Orin™, NVIDIA® Jetson Orin™ NX, and NVIDIA® Jetson Orin Nano™ modules.

AAEON, an industry leading provider of edge AI solutions, will present new additions to its extensive line of platforms powered by NVIDIA® Jetson™ system-on-modules during GTC, a global conference on AI and the metaverse.

As a gold sponsor of the conference, which offers over 650 discussions, panels, and events from industry leaders in the AI space, AAEON highlights upcoming products from their range of embedded Box PCs across the entire NVIDIA® Jetson Orin™ series; including NVIDIA® Jetson AGX Orin™, NVIDIA® Jetson Orin™ NX, and NVIDIA® Jetson Orin Nano™.

The BOXER-8645AI and BOXER-8646AI systems will join BOXER-8640AI and BOXER-8641AI, which were released in December 2022, as part of AAEON’s product range powered by the NVIDIA® Jetson AGX Orin™. Equipped with one HDMI 2.1 and eight GMSL2 ports, the BOXER-8645AI will possess an exceptional interface for peripheral devices, making it particularly suitable for AMR applications. The BOXER-8646AI meanwhile, will feature an astonishing 12 PoE LAN ports, giving customers a versatile smart city solution.

Powered by the NVIDIA® Jetson Orin™ NX, the recently announced BOXER-8651AI and BOXER-8652AI will be accompanied by the BOXER-8653AI, featuring unprecedented connectivity via multiple LAN ports with PoE function and an I/O supporting RS-232/422/485, CAN Bus, and DIO. All three products are scheduled to go into mass production towards the end of Q2.

Product List:

  • BOXER-8645AI and BOXER-8646AI – NVIDIA Jetson AGX Orin
  • BOXER-8653AI – NVIDIA Jetson Orin NX
  • BOXER-8622AI – NVIDIA Jetson Orin Nano

In an exciting development, AAEON has also announced the BOXER-8622AI, which will join the BOXER-8621AI in being the first AAEON solutions powered by NVIDIA® Jetson Orin Nano modules. The BOXER-8622AI will come equipped with dense I/O and expansion options, including three USB Type-A ports, DB-9 for RS-232/422/485, 13 DIO, and CAN bus, along with Wi-Fi, 5G, and additional storage support via M.2 connectors.

“We have always aimed to provide our customers with world-leading AI edge computing solutions,” said Alex Hsueh, Associate Vice President of AAEON’s System Platform Division. “We are therefore very happy to announce products that will incorporate modules from the entire NVIDIA Jetson Orin series,” Hsueh added.

For more information about AAEON’s extensive line of solutions powered by NVIDIA® Jetson™ system-on-modules, please visit their dedicated section on the AAEON website.

Wide-Temp SMARC Module with Qualcomm QCS610 SoC

IBASE Technology Inc., a global leader in the manufacture of embedded computing products, has launched the new RM-QCS610 SMARC 2.1 compliant module powered by an Octa-core Qualcomm QCS610 SoC and designed for the creation of devices with edge artificial intelligence (AI) and machine learning capabilities such as vision-enhanced drones, advanced intelligent conferencing cameras, and smart robots.

“The low cost, low power RM-QCS610 offers high performance for devices with edge AI capabilities that have grown in popularity in the last few years,” explained Albert Lee, Executive Vice President at IBASE. “The module is our first Qualcomm-based platform. It provides flexible I/O interfaces and brings powerful visual edge computing to accelerate AI across devices with sensors or cameras to collect and process information, make decisions, and perform tasks in the same location in applications including traffic data collection and analysis, computer vision in manufacturing, and automated security validation.”

RM-QCS610 FEATURES:

  • Qualcomm QCS610 SoC
  • Up to 4GB LPDDR4,32GB eMMC
  • Qualcomm Adreno 612 GPU 3D graphics accelerator with 64-bit addressing 845 MHz
  • 4K video capture and playback at 30fps
  • 3.15 TOPS @Caffe
  • Validated with Open Linux Embedded 5.4 and Android 12 (2023/2, CS)
  • Long lifetime supply with Qualcomm solution
  • Compliant with SMARC™ 2.1

The RM-QCS610 features a Qualcomm Adreno 612 GPU 3D graphics accelerator with 4K video capture and 30fps playback support, up to 4GB LPDDR4, 32GB eMMC, and dual smart camera operation. Built to withstand harsh environments, it supports a wide-range operating range of from -30°C to +85°C. Aside from offering reliability and longevity in supply, the module has passed the OS validation procedure with Open Linux Embedded 5.414.04 and Android 12 (2023/2, CS). The RP-105 carrier board is available for the expansion of Micro SD, Mini PCI-E, TTL, HDMI, MIPI-DSI, and MIPI-CSI cameras.

The RM-QCS610 and RP-105 will be demonstrated at Avalanche Computing’s booth #R214 during the upcoming Smart City Summit & Expo, held from March 28-31, 2023 in Taipei, Taiwan. With the automatic programming and interface design developed by Avalanche Computing’s AI software, the RM-QCS610 helps achieve optimal computing performance with SaaS cloud management and reduces AI development time for faster time-to-market.

more information: https://www.ibase.com.tw/en/product/category/RISC_Platform/SMARC_Module/QUALCOMM_SMARC_2_1_Module/RM_QCS610

Node Red with Raspberry Pi Tutorial

Node-RED is a powerful open-source visual programming tool for building Internet of Things (IoT) applications. In this tutorial, we’ll cover what Node-RED is, how to install it, and how to use the visual interface to create a simple flow.

What is Node-RED?

Node-RED is an effective open-source platform for developing Internet of Things (IoT) applications that aim to make the programming part simpler.

Node-RED is a web-based application that employs visual programming to let you link code fragments, or “nodes,” together to carry out a task. When the nodes are connected, they form flows.

SPONSOR

Get PCBs For Your Projects Manufactured

You must check out PCBWAY for ordering PCBs online for cheap!

You get 10 good-quality PCBs manufactured and shipped to your doorstep for cheap. You will also get a discount on shipping on your first order. Upload your Gerber files onto PCBWAY to get them manufactured with good quality and quick turnaround time. PCBWay now could provide a complete product solution, from design to enclosure production. Check out their online Gerber viewer function. With reward points, you can get free stuff from their gift shop.

Why Node-RED?

IBM created open-source Node-RED software. The Raspberry Pi flawlessly runs Node-RED. Because it is a visual programming tool, a wider spectrum of users can use it. Node-RED allows you to spend less time writing code and more time creating exciting things.

Applications with Node-RED?

Node-RED forms are easy to manage these tasks:

  • Access the GPIOs on your RPi
  • Connect to other devices via MQTT
  • For your projects, develop a responsive graphical user interface
  • Interact with outside services.
  • Get information from the internet, such as stock prices, emails, and weather forecasts
  • Organize time-based events
  • Keeping and getting information from a database.

Now that we are aware of Node-Red, okay. We need a physical medium to install Node-Red, and the Raspberry Pi will serve that purpose.

Let’s Boot the Pi:

First, we need to boot our OS to Raspberry Pi, and we need a tool called Raspberry Pi Imager.

Once installed, the software opens the tool.

Next, choose the OS type.

Then select the drive. One of the great features of this tool is we can add the SSH and Wi-Fi credentials directly into the OS file, even without turning on the Raspberry Pi. For that, select the settings icon in the tool.

Next, start burning the OS into the SD card.

Once the writing is finished, insert the SD card into the Raspberry Pi.

Then power on the device. The first time it will take some to boot and connect to Wi-Fi to 5–10 minutes and look at your router status, you can see there will be a new device connected to your router.

Next, copy the IP address and use serial terminal software to access the serial port.

Then try to connect to the SSH.

After that, we have to update the system, for that, we can use the following command sudo apt-get update

Next sudo apt-get upgrade.

That’s all now are system is ready to install the node-red.

Node-Red Installation:

Type the following command in the Raspberry Pi SSH to install the Node-Red

CODE

bash <(curl -sL https://raw.githubusercontent.com/node-red/linux-installers/master/deb/update-nodejs-and-nodered)

You need to give some input to the system in order to install the Node-Red. Type Y to install the Node-Red.

The first time, it will automatically install Node.js and all the other necessary components. Once the installation is done, type the following command to start the node-red.

We can make the Node-Red auto start at boot using the following commands.

In the console, you can see the IP address.

Just type in the IP address in your browser, and it will open up the Node-Red dashboard.

First Flow with Node-Red

To get you used to the Node-RED interface, let’s create a simple flow. The flow we’ll create, prints a message to the debug console when triggered.

Drag an inject node and a debug node to your flow and wire them together.

Now, let’s edit the inject node. Double-click the node. In the figure below, you can see the different settings you can change.

In the msg. Payload field, select Boolean and true. Then, click Done. Next, click on the debug node, and select the content as a complete message object.

Then click on the Red deploy icon and it will start the flow,

Next, click the trigger node, it will print the boolean data into the debug console on the right-side panel.

Now we are done with the “Hello Word” section, let’s try to control the GPIO using Node-Red.

GPIO Control with Node-Red

In the Node’s pallet, scroll down to the last section, and you can find an additional node specifically for Node-Red.

Then add some inject nodes, switch, and GPIO out nodes and connect them as follows.

Click on the switch node and enter the on signal as 0.

Repeat the same step with the signal as 1 in another node. Then click on the Raspberry Pi out node and select the pin. In my case, I’m using GPIO 19.

Here is the complete JSON of my flow I have added two led’s on the Raspberry.

Code

[
{
"id": "5bdf6461ffad327a",
"type": "tab",
"label": "Flow 1",
"disabled": false,
"info": "",
"env": []
},
{
"id": "bcccd9aac1596b24",
"type": "rpi-gpio out",
"z": "5bdf6461ffad327a",
"name": "",
"pin": "26",
"set": "",
"level": "0",
"freq": "",
"out": "out",
"bcm": true,
"x": 720,
"y": 380,
"wires": []
},
{
"id": "034c6ccdd7eccd7f",
"type": "switch",
"z": "5bdf6461ffad327a",
"name": "",
"property": "payload",
"propertyType": "msg",
"rules": [
{
"t": "eq",
"v": "1",
"vt": "num"
}
],
"checkall": "true",
"repair": false,
"outputs": 1,
"x": 510,
"y": 340,
"wires": [
[
"bcccd9aac1596b24",
"93780305db7d14f0"
]
]
},
{
"id": "72c0d7a9a642486d",
"type": "inject",
"z": "5bdf6461ffad327a",
"name": "",
"props": [
{
"p": "payload"
}
],
"repeat": "",
"crontab": "",
"once": false,
"onceDelay": 0.1,
"topic": "",
"payload": "false",
"payloadType": "bool",
"x": 310,
"y": 500,
"wires": [
[
"5bc162fcf714ce93"
]
]
},
{
"id": "925d9a563c4b4e8d",
"type": "rpi-gpio out",
"z": "5bdf6461ffad327a",
"name": "",
"pin": "26",
"set": "",
"level": "0",
"freq": "",
"out": "out",
"bcm": true,
"x": 720,
"y": 460,
"wires": []
},
{
"id": "5bc162fcf714ce93",
"type": "switch",
"z": "5bdf6461ffad327a",
"name": "",
"property": "payload",
"propertyType": "msg",
"rules": [
{
"t": "eq",
"v": "0",
"vt": "num"
}
],
"checkall": "true",
"repair": false,
"outputs": 1,
"x": 510,
"y": 500,
"wires": [
[
"925d9a563c4b4e8d",
"08fe29effb029c40"
]
]
},
{
"id": "ac5d41eb38bc759a",
"type": "inject",
"z": "5bdf6461ffad327a",
"name": "",
"props": [
{
"p": "payload"
}
],
"repeat": "",
"crontab": "",
"once": false,
"onceDelay": 0.1,
"topic": "",
"payload": "true",
"payloadType": "bool",
"x": 310,
"y": 340,
"wires": [
[
"034c6ccdd7eccd7f"
]
]
},
{
"id": "93780305db7d14f0",
"type": "rpi-gpio out",
"z": "5bdf6461ffad327a",
"name": "",
"pin": "19",
"set": "",
"level": "0",
"freq": "",
"out": "out",
"bcm": true,
"x": 720,
"y": 320,
"wires": []
},
{
"id": "08fe29effb029c40",
"type": "rpi-gpio out",
"z": "5bdf6461ffad327a",
"name": "",
"pin": "19",
"set": "",
"level": "0",
"freq": "",
"out": "out",
"bcm": true,
"x": 720,
"y": 520,
"wires": []
}
]

If you inject the true node both LEDs will turn on if you inject the false node both LEDs will turn off

Summary

In this article, we see how we can install the Node-Red on Raspberry Pi and how we can control the GPIO using Node-Red. In upcoming tutorials will see how we can connect and communicate the sensors with Raspberry Pi via Node-Red.

iW-Rainbow-G50M: The NXP Semiconductors i.MX 93 SoC-Based System on Module powering energy efficient edge computing

iWave launches iW-RainboW-G50M: The Solderable NXP i.MX 93-based LGA System on Module (SoM). The SoM incorporates NXP’s powerful i.MX 93 applications processor and is built on the OSM v1.1 solderable SoM standard, providing extensive interfaces in a rugged and compact form factor. Evaluation Kits of the System on Module will be ready to purchase in March 2023.

NXP’s i.MX 93 SoC is the first in the industry to integrate the Arm® Ethos-U65 microNPU and the first in the i.MX Family to integrate the scalable Arm® Cortex®-A55 core features the latest Armv8-A architecture extensions with dedicated instructions to accelerate machine learning (ML).

Key features of iW-RainboW-G50M

  • NXP i.MX 9352 SoC
    • 2 × Cortex-A55 + 1 × Cortex-M33
    • NPU up to 0.5 TOPS
  • 2GB LPDDR4X RAM & 8GB eMMC Flash
  • 2-Lane MIPI-CSI and 4-Lane MIPI-DSI Interface
  • 2 x RGMII, 2 x CAN-FD, 1 x LVDS
  • 1 x USB 2.0 OTG, 4 x USB 4.0 Host
  • Wi-Fi 6 & Bluetooth 5.2 Connectivity
  • Size-L Form Factor: 45mm x 45mm
  • Solderable LGA Package in OSM v1.1 Standard
  • 662 Contacts

The System on Module is built on a 45mm x 45mm OSM Size-L standard with the provision for 662 contacts, offering the highest pin-to-area ratio across SoM standards. With the ability to directly solder the SoM onto the carrier card, the SoM ensures high levels of robustness and is ideal for products prone to vibrations.

The SoM supports the MIPI-CSI camera interface to leverage the integrated NPU while supporting a 4-lane MIPI-DSI with 1080p60 resolution for 2D graphics processing through a high-efficiency pixel pipeline. The availability of high-speed interfaces such as USB 2.0, Gbit ethernet, and CAN-FD makes the SoM ideal for industrial and automotive market segments.

Building on the ML capabilities of NXP’s i.MX 93 applications processor, the SoM can be adopted by product companies as a powerful building block for machine vision, AIoT, Smart City, Industrial automation, and other ML-related applications.

“With billions of devices connected worldwide and the rise of AI on the edge, it is crucial to ensure safety, energy efficiency, and compute power,” said Immanuel Rathinam, Vice President – System on Modules at iWave.” NXP’s i.MX 93 OSM System on Module enables a new generation of intelligent devices across industrial, IoT, and automotive applications and speeds up time to market with reduced risk and complexity.”

“The i.MX 93 applications processors deliver a strong combination of performance and power optimization to accelerate processing and machine learning at the edge,” said Justin Mortimer Senior Director Secure Connected Edge at NXP Semiconductors. “ïWave’s iW-Rainbow-G50 SOM, by utilizing the new OSM standard, ensures our latest processing technology is both accessible and applicable to a wider range of embedded applications.“

The i.MX 93-based System on Module is also integrated on a carrier board, which is positioned as a Single Board Computer and also doubles up as an evaluation kit. The production-ready Single Board Computer is built on a Pico-ITX form factor and integrates across various AI and ML applications. Software companies can concentrate on their core competencies, such as AI and machine learning algorithms and software, and enable them on the Single Board Computer.

Key Features of the Single Board Computer

  • NXP i.MX 9352 SoC
  • 2GB LPDDR4X RAM, 16GB eMMC
  • Dual Gigabit Ethernet
  • Dual USB 2.0 Host & USB 2.0 OTG
  • Micro SD Slot and M.2 Connector Key B
  • MIPI CSI Camera Connector
  • MIPI DSI Display Connector
  • LVDS Display Connector
  • RS232 and CAN header
  • 5 mm Audio In/Out through I2S Codec
  • Wi-Fi 6 and Bluetooth 5.2 Module
  • GNSS Receiver module
  • Line In / Out Speaker Header

The System on Module and Single Board Computer are go-to-market and production ready, with all documentation, necessary software drivers, and BSP available for customers. iWave maintains a product longevity program and ensures the availability of the modules for 10+ years.

Learn more:

For further information or inquiries on NXP’s i.MX 93-based products, please write to mktg@iwavesystems.com

DC160WS Fanless DC/DC converter with selectable output voltage – 160W

Fanless industrial 160 Watt DC/DC converter with wide range input 6–36 V and three selectable output voltages.

The DC/DC converter DC160WS delivers fanless 160 watts of continuous power at a constant high efficiency of up to 98%. In addition to the ultra-wide input range of 6 to 36 VDC, the compact converter offers three jumper-selectable output voltages of 12, 19 or 24 VDC, so that virtually any equivalent single-voltage mainboard or computer system can be powered..

Developed for long-term 24/7 continuous operation in the extended temperature range from -20 to +70°C, the DC160WS is equipped with premium components of highest quality. With a footprint of only 95 x 45 mm and a height of 1″ (25.4 mm), the highly efficient DC/DC converter can be perfectly integrated into compact and closed IPC and Embedded BoxPC systems. In addition, the DC160WS is ideal for the reliable power supply of regulating and control electronics, actuators, sensors, DC motor drives and cameras.

Flexible DC/DC converter with three different output voltages

  • DC/DC converter with 160W power fanless
  • Ultra wide input range 6…36VDC
  • Selectable output voltage +12V, +19V or +24VDC
  • Extended temperature range -20…+70°C
  • High efficiency up to 98%
  • Compact design
  • High reliability due to premium quality components
  • Including thermal pad for chassis mounting
  • Optional EMC filter for EN 55022 class B available

Typical areas of application in industrial and mobile applications

The DC160WS is ideally suited for use in mobile applications in the 12 or 24 V on-board network, as well as for industrial use and for applications with large voltage fluctuations in 12 or 24 V DC supply networks. Due to the universal input and output parameters, the DC160WS can be used for a variety of demanding applications:

  • IPC / Panel PC / BoxPC systems
  • Industry 4.0 / IIoT
  • Gateways, sensors / actuators
  • Pharmaceutical / food industry
  • Kiosk / POS / POI applications
  • Mobile applications
  • Commercial/industrial vehicles
  • Public transportation
  • Construction/ agricultural vehicles
  • And many more…

more information: https://www.bicker.de/en/dc160ws_dc-dc_converter_with_selectable_output_voltage_160w_6-36vdc_plus_12v-plus_19v-plus_24vdc_open_frame_wide_range_1_inch_fanless

Makeblock mBot Neo Coding Robot Kit Quick Review

Introduction

Makers, STEM students, and educators can access Makeblock‘s premier DIY robotics and educational platforms. Everyone may construct their dreams using a platform with over 500 mechanical parts, simple electronic modules, and graphical programming software.

Makeblock mBot Neo

Children will be inspired to study, develop, and play in countless ways by this latest and simple-to-build mBot Neo powered by Cyberpi. With precise movement control with encoder motors, extensible mBuild modules, and structural pieces that come together in a unique programmable design, everyone can enter the world of CS and technology learning, complete with Wi-Fi connectivity and community. A modern STEAM education robot for youngsters is called mBot Neo. It is intended to deliver engaging, innovative, and enjoyable learning experiences that mirror real-world applications using the latest technologies.

Demo Video

All Round Performance Improvement

Exciting Features

Multifunctional Microcontroller: CyberPi mainboard

The Open Source Hardware Association certified CyberPi, a potent and adaptable microcontroller for education, in 2020. Its eight integrated sensors, full-color display, and Wi-Fi/Bluetooth communication capabilities enable a variety of applications on curricular themes like computer science, robotics, data science, and artificial intelligence in conjunction with other subject areas like math and physics. Up to 8 programs can be stored and managed in the controller because of integrated memory and an operating system. This results in improved performance across the board.

It can create an intelligent environment or a fun remote control by using a standalone CyberPi as a smart device to connect with mBot Neo.

Increase learning – Bluetooth Dongle for PC Connection and USB 2.0 Bluetooth Adapter. With a more developed technology and more reliable signal, it offers great transmission efficiency and a low latency rate.

Simple to construct, play and learn

The robot can be built in about thirty minutes. After that, students can use the Makeblock App to start App-controlled driving, voice control, piano playing, etc. An engaging robot for the classroom is called mBot Neo. It can also be expanded to learn coding.

Block-based and Python coding are both supported by the mBlock coding platform. Using mBlock, students may learn coding step-by-step whether or not they have any prior experience. Based on Python 3, the Python editor can utilize all of the libraries that are available, including those for math, data visualization, artificial intelligence (AI), and more. For teaching STEM, it is the best coding tool available.

Accuracy in Movement Control

The CyberPi 3-axis gyroscope, accelerometer, and high-precision encoder motors are all integrated into mBot Neo. The robot’s wheels’ rotation, speed, and location can all be accurately controlled by students. In contrast to robots that have less control over their motors, lessons can be more realistic and instructional. The integration of mathematical, physics and engineering concepts is made possible by the motors’ further use as servos and even as knobs to provide data feedback to the system. Here is an illustration of smart transportation using mBot Neo. Live data update to the programming stage is provided, and precise distances traveled are calculated by wheel rotational angles.

A Simple Step Into Studying Computer Science and Technology

On the mBlock5 platform, students can start with block-based coding and progress to Python coding as they gain more experience. In mBlock, both gadgets and sprites can be programmed. Users can build a machine learning model and use it, for example, to identify hand-painted traffic signs, as shown here. Children can gather, process, and upload data from various gadgets to the cloud when they are connected to a network.

Equipped with Latest Educational Technology

Learning about CS & Data Science Fundamentals: Teachers may bring data science and computer science to classes and see the learning outcomes using both the robust mBlock software and simple-to-use coding robot.

IoT and AI Learning Support: CyberPi, which has an integrated microphone and excellent speaker, collaborates with mBlock’s cognitive services to greatly simplify speech recognition and text reading while assisting students in exploring the latest technology.

Encoder Motors Provide Precise Movement: The mBot Neo can move exactly as students program on the mBlock because of its high-quality encoder motors. It also has excellent rotation control capabilities.

WiFi network capability: mBot Neo may link to each other or the Internet using the built-in Wi-Fi module of the Cyberpi and the cloud broadcast feature of mBlock. As a result, students can work as a team to complete a task.

Powerful Batteries and Sensors

There is no need to install or replace a battery because it has a built-in, long-lasting battery that is integrated into the shield.

New sensor technology: Ultrasonic sensor and Quad color sensor give the mBot Neo more accurate performance and consistency.

With an add-on pack, they are more DIY options.

Detailed Tutorial and Curriculum

Free tutorials and sample coding projects are offered to get students started, which is ideal for beginners who are brand-new to coding and programming. This page contains information on the curriculum and tutorial.

Specifications

  • CyberPi – Control board.
  • ESP32-WROVER-B –  Processor
  • 8MB SPI Flash memory.
  • Battery – 2500 mAh capacity.
  • Simultaneously store 8 different programs.
  • Multi-threading support.
  • Wireless communication-Bluetooth, Wi-Fi, and Wi-Fi LAN.
  • Input and onboard sensors: 5-way joystick, 2 x Buttons, Reset button, Light sensor, Microphone, Gyroscope-accelerometer.
  • Output interfaces – 1.44″ full-color display, Speakers, RGB LED x5.
  • Expandable electronic modules- mBuild port x 1, connects 10+ components in sequence.
  • Additional interface – 2-pin interface x2,  3-pin interface x4.
  • Voice output – Speaker
  • Extension port – 4 servo ports, 2 DC motor ports, 2 encoder motor ports, and 1 mBuild Extension port.
  • Line following sensors – 4
  • Misc – Programmable LEDs, Obstacle-avoidance.

Software

Makeblock Software, which supports a variety of devices and operating systems. Text-based, Python and block-based programming are all supported.

Given its abundant features and ability to teach children robotics and coding from scratch, it would be one of the most productive presents you could give your kids. The ease of building, ease of use, game-based learning, and advanced programming are the main features of this mBot 2. For simple assembly, the components are clearly divided and arranged. With the aid of a simple step-by-step tutorial, it may be completely installed and operational in less than 15 minutes and start coding for even beginners.

Purchase Information

The product page sells Makeblock mBot Neo: Beginner-friendly Coding Robot Kit for $129.99. Makeblock mBot Neo + Smart World add-on pack is available for $199.99.

Vishay Load Switches with Programmable Current Limits and OVP Enhance Reliability

Four New Vishay eFuse Single-channel Load Switches Integrate Control and Protection Features to Reduce External Components.

New Yorker Electronics is featuring four newly released Vishay eFuses that feature programmable current limits and overvoltage protection (OVP) in a compact 3mm x 3mm TDFN package. Designed to operate over a wide 2.8V to 23V input voltage range — with a 28 Vin DC tolerance — the 3.5A SiP32433A/B and the 6A SiP32434A/B integrate multiple control and protection features to simplify designs and minimize the need for external components.

While most competing solutions only offer voltages to 18V according to Vishay or are missing their low voltage side, the input voltage range of the Vishay Siliconix single-channel load switches allows them to be used in a wider range of designs. The devices are intended for industrial and medical equipment, robotics, consumer goods, home automation systems, and gaming consoles, where they provide precise control and swift fault responses to enhance the safety and reliability of system designs. Upon switch-off due to latchable faults in these applications, the SiP32433A and SiP32434A are designed to latch the power switch off, while the SiP32433B and SiP32434B will auto-retry after a settable period of time.

Features & Benefits:

  • 2.8V to 23V operation voltage
  • 28V max. voltage rating with 24V internal OVP
  • 33 m typical switch resistance
  • 0.5 A to 6 A current limit setting range
  • Current limit accuracy of ± 7 %
  • Fast short circuit protection response

Applications:

  • Industrial Equipment
  • Medical Equipment
  • Robotics
  • Consumer Goods
  • Home Automation Systems
  • Gaming Consoles

All four devices respond swiftly to short circuits, and their precise overcurrent protection (OCP) is triggered at a set current limit level without an excessive overhead current requirement — an important characteristic for designs in which power busses need to support multiple loads. Competing solutions often require overhead currents of more than 30%. The SiP32433A and SiP32433B with active reverse-blocking target applications featuring USB Type-C and multiple power source switching.
The load switches reduce on-resistance by 43% compared to previous-generation solutions, which translates into a 32% higher current capability or increased efficiency at the same current level. The 78 mW SiP32433A/B has a current limit setting range of 0.3A to 3.5A, while the 33 mW SiP32434A/B offers a range of 0.5A to 6A. Both devices guarantee current limit accuracy down to ± 8%, increase design flexibility, and simplify BOMs. The hot-swappable load switches feature a programmable turn-on slew rate, provide ESD tolerance of 2kV (human body model) and 0.75kV (charged device model), and operate over a temperature range of -40°C to +125°C.

Samples and production quantities of the eFuses are available now. As a franchised distributor, New Yorker Electronics supplies Vishay Siliconix power semiconductor products including low-voltage power MOSFETs (metal-oxide semiconductor field-effect transistors), higher-voltage Vishay Siliconix power MOSFETs, and Power ICs.

Additional Information:

Portenta C33: The new high-performance, low-price Arduino

The Portenta C33 is born into an extensive ecosystem that comes with a variety of components that easily combine

This business-oriented unit stands at industrial clients’ side with a growing ecosystem of high-performance, reliable, secure products that aim to provide the right solution for every need big and small companies may have, in any field and at any stage of their growth.

The Portenta C33, the module, that Arduino is introducing at Embedded World 2023 – leverages the R&D carried out for previous Portenta modules, streamlining features to offer a cost-effective option to users starting out with Industrial IoT or automation, or those who have more specific, targeted needs than the H7 or X8 cater to.

Is the Portenta C33 right for you? Check out its main tech specs:

  • Arm® Cortex®-M33 microcontroller by Renesas
  • MicroPython and other high-level programming languages are supported
  • Onboard Wi-Fi® and Bluetooth® Low Energy connectivity
  • Secure element for industrial-grade security at the hardware level
  • Secure OTA firmware updates (connecting to Arduino IoT Cloud or third-party services)
  • Compatible with Portenta, MKR, and Nicla components
  • Castellated pins
  • Wide variety of peripheral interfaces, including CAN, SAI, SPI, and I2C

Find all the information at Arduino

TOP PCB Companies