Arduino OLED Hygrometer and Thermometer using DHT11
- Emmanuel Odunlade
- https://twitter.com/emmaodunlade
- emmaodunlade@gmail.com
- 6.196 Views
- moderate
- Tested
Hygrometers are used to determine the moisture content of the environment. They find application in farms, food storage, museums, and other places where moisture needs to be monitored to ensure damage is not done to goods and other things stored in that space. For today’s tutorial, we are going to build a Hygrometer using the DHT11 temperature and humidity sensor and an OLED display. To fully utilize the ability of the DHT11 sensor we will add a thermometer to the hygrometer so both temperature and humidity are displayed on the OLED display.
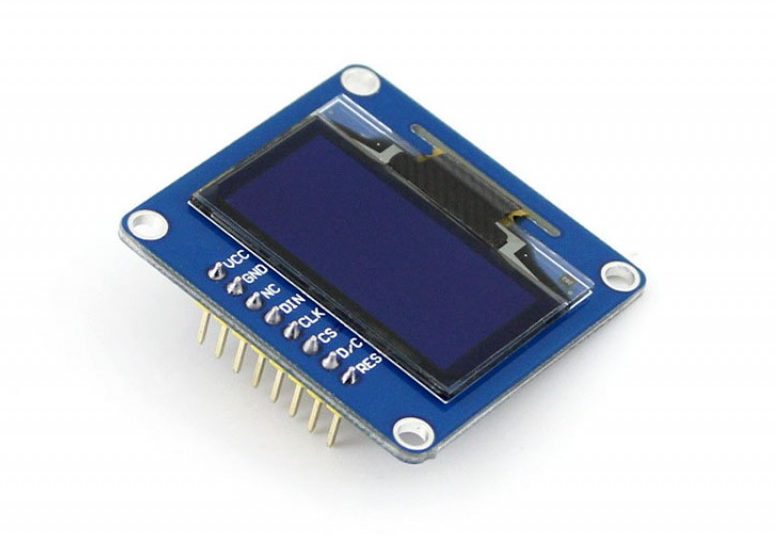
At the center of today’s project is the DHT11 temperature and humidity sensor, and the OLED Display. OLED (Organic light-emitting diode) displays are made of light-emitting diodes (LED) in which the emissive electroluminescent layer is made up of a film of organic compound that emits light in response to an electric current. For this tutorial, we will use the 1.3″ OLED Display from Waveshare. The display is monochrome blue in color, has a resolution of 128×64 pixels and communicates over 4 wire SPI or I2C. It is low power as it only consumes 0.04W of energy which is one-tenth of what is required to power a 16×2 LCD display.
While there are a lot of DHT variations to choose from, for this tutorial, we will use the DHT11. The choice of the DHT11 is not based on any factor other than the fact that we had it lying around. If you desire high accuracy for your project, you should consider either of the DHT21 or the DHT22 both of which surpasses the DHT11 in performance and power consumption.
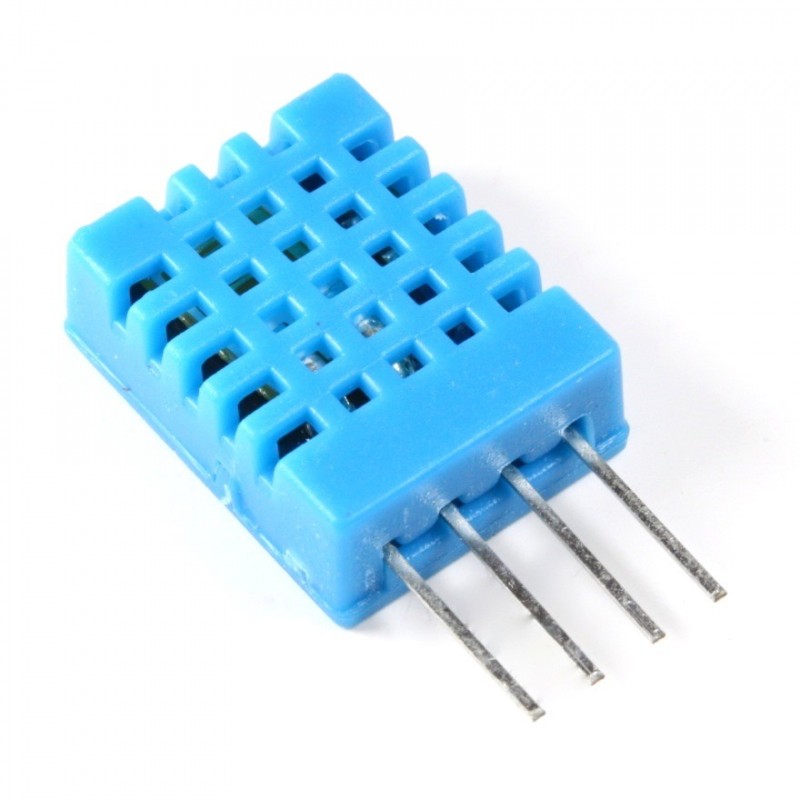
The DHT11 is a basic, ultra low-cost digital temperature and humidity sensor. It uses a capacitive humidity sense element and a thermistor to measure the surrounding air and gives out a digital signal on the data pin (no analog input pins needed). Its fairly simple to use, but requires careful timing to grab data. The only real downside of this sensor is that you can only get new data once every 2 seconds, as such, sensor readings can be up to 2 seconds old.
At the end of today’s project, you would know how to use the DHT11 temperature and humidity sensor and how to display data on an OLED Display.
Required Components
The following projects are required to build this project:
Each of these components can be bought via the attached links. There is no special reason behind the choice of the Uno, feel free to use any of the other Arduino boards.
Schematics
The schematics for today’s project is easier than most. The OLED display communicates over SPI and is connected to corresponding pins on the Arduino, while the signal pin of the DHT can be connected to any of the rest of pins on the Arduino. For this tutorial, we will connect it to analog pin A0.
Connect the components as shown in the schematics below.
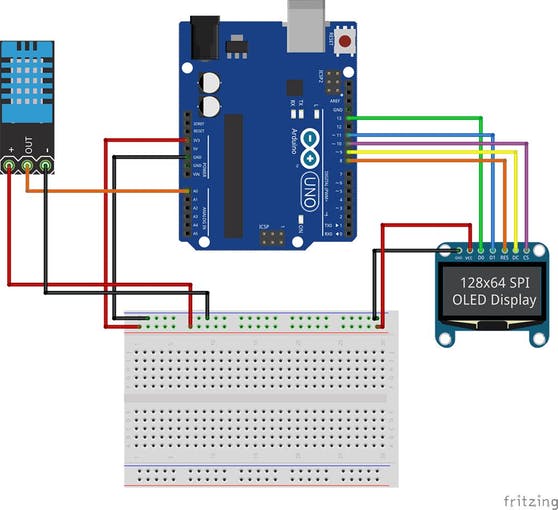
As usual, a pin-map showing how the components are connected to one another, pin to pin, is described below.
OLED – Arduino
VCC - 5v
GND - GND
DIN - D13
CLK - D11
RES - D8
D/C - D9
CS - D10
DHT – Arduino
VCC - 5V
GND - GND
DOUT - A0
Go over the connections once again to ensure there is no mixup. With this done, we are now ready to write the code for the project.
Code
As mentioned during the introduction, the goal for today’s project is to build a digital hygrometer and thermometer, which essentially involves us reading the current temperature (for thermometer) and humidity (for hygrometer) data from the DHT and display it on the OLED display.
To reduce the amount of code we need to write, we will use two superb libraries; the u8glib, and the DHT library. The DHT library contains functions and methods that allows us to easily obtain temperature and humidity data from the DHT11 while the U8Glib library contains functions which reduce the complications and the amount of code we need to write to display text or graphics on the OLED display.
The libraries can be installed via the Arduino Library Manager or downloaded via the links attached to them, and installed by extracting them into the Arduino Libraries folder.
As usual, I will do a breakdown of the code and explain the functional part of it.
We start the code, by including the libraries that will be used for the project.
//Written by Konstantin Dimitrov
#include <U8glib.h>  // U8glib library
#include <dht.h>     // DHT library
Next, we declare the pin of the Arduino to which the signal/Dout pin of the DHT is connected, and create an instance of the DHT library which will be used to reference it throughout the sketch.
#define dht_apin A0  // Analog pin to which the sensor is connected
dht DHT;
Next, we create an instance of the u8glib Library with pins of the Arduino to which the OLED is connected as arguments. To make the tutorial easy for those who do not have the exact OLED display used in this tutorial, the code contains multiple instances to support diverse kind of OLEDs. Uncomment the one that matches your own display and comment out the others.
U8GLIB_SH1106_128X64 u8g(13, 11, 10, 9, 8);  // DIN=13, CLK=11, CS=10, DC=9, Reset=8
//U8GLIB_SSD1306_128X32 u8g(13, 11, 10, 9, 8); // DIN=13, CLK=11, CS=10, DC=9, Reset=8
//U8GLIB_SSD1306_128X64 u8g(13, 11, 10, 9, 8); // DIN=13, CLK=11, CS=10, DC=9, Reset=8
Next, we create the function “draw” which is used to achieve all the goals of this project. The function, when called, will obtain temperature and humidity data from the DHT and display it on the OLED.
We start the function by calling the u8g.setFont() method which is used to set the font in which text is displayed on the screen. The U8glib library supports quite a number of fonts, you can find them all here. With the fonts in place, the u8g.drawStr() function is then called to display the strings that show what the data stands for, after which the u8g.print() function is then used to print the values in front of each string. The u8g.setPrintPos() function is used to set the cursor to the right position on the screen before the text is displayed.
void draw(void)
{
   u8g.setFont(u8g_font_fub17r);   // select font
   u8g.drawStr(0, 20, "Temp: ");   // put string of display at position X, Y
   u8g.drawStr(0, 60, "Hum: ");
   u8g.setPrintPos(72, 20);        // set position
   u8g.print(DHT.temperature, 0);  // display temperature from DHT11 in Celsius
   u8g.println("C");
   u8g.setPrintPos(60, 60);        // set position
   u8g.print(DHT.humidity, 0);     // display humidity from DHT11
   u8g.println("%");
}
With that done, we move to the void setup function. The void setup() function for this project will, however, be left blank as we really need not to initialize any of the variables. For other DHT libraries, it might be necessary to call a dht.begin() function under the void setup, but it is not necessary for the library used in this tutorial.
void setup(void)
{

}
Next is the void loop() function. The void loop is simplified due to the Void draw() function which we created earlier. We start the void loop() by calling the DHT.read11() function to obtain temperature and humidity data from the DHT, this data is then displayed on the display by calling the draw() function, allowing a data refresh time of 2 seconds in between reads to ensure the accuracy of the DHT.
void loop(void)
{
   DHT.read11(dht_apin);  // Read apin on DHT11
   u8g.firstPage();
   do
{
   draw();
}  while( u8g.nextPage() );
   delay(2000);  // Delay of 2 sec before accessing DHT11 (min - 2sec)
}
The complete code for the project is available below and also attached under the download section of the tutorial.
#include <U8glib.h>  // U8glib library
#include <dht.h>     // DHT library

#define dht_apin A0  // Analog pin to which the sensor is connected
dht DHT;
               /*Uncomment and comment*/
U8GLIB_SH1106_128X64 u8g(13, 11, 10, 9, 8);  // DIN=13, CLK=11, CS=10, DC=9, Reset=8
//U8GLIB_SSD1306_128X32 u8g(13, 11, 10, 9, 8); // DIN=13, CLK=11, CS=10, DC=9, Reset=8
//U8GLIB_SSD1306_128X64 u8g(13, 11, 10, 9, 8); // DIN=13, CLK=11, CS=10, DC=9, Reset=8

void draw(void)
{
   u8g.setFont(u8g_font_fub17r);   // select font
   u8g.drawStr(0, 20, "Temp: ");   // put string of display at position X, Y
   u8g.drawStr(0, 60, "Hum: ");
   u8g.setPrintPos(72, 20);        // set position
   u8g.print(DHT.temperature, 0);  // display temperature from DHT11 in Celsius
   u8g.println("C");
   u8g.setPrintPos(60, 60);        // set position
   u8g.print(DHT.humidity, 0);     // display humidity from DHT11
   u8g.println("%");
}
void setup(void)
{

}

void loop(void)
{
   DHT.read11(dht_apin);  // Read apin on DHT11
   u8g.firstPage();
   do
{
   draw();
}  while( u8g.nextPage() );
   delay(2000);  // Delay of 2 sec before accessing DHT11 (min - 2sec)
}
                           /*END OF FILE*/
Demo
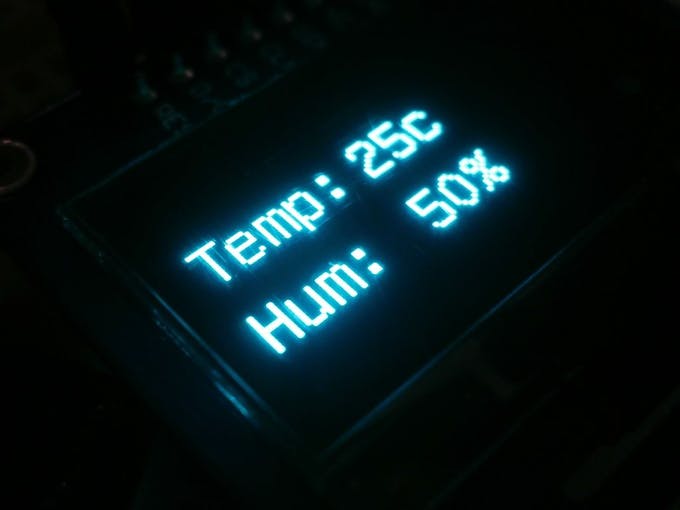
With the sketch complete, go over the connections once again to ensure everything is connected as described under the schematics section. With that done, connect the Arduino to your computer and upload the sketch. After a while, you should see the screen come up with the temperature and humidity information as shown in the image below.

That’s it for this tutorial guys, as with all the other tutorials, these simple tutorials could be important to your startup, business or enterprise. This tutorial could be the building block to build that patient monitor device for hospitals, environmental monitoring devices for farmers, or add connectivity options to it and start sending the data to a web server. Your Imagination is the only limit to the things you can build with borrowed ideas from this project.
This tutorial inspired from Konstantin Dimitrov’s tutorial.


