SIM800L GSM module with Nokia 5110 LCD and Arduino
- Emmanuel Odunlade
- https://twitter.com/emmaodunlade
- emmaodunlade@gmail.com
- 6.767 Views
- medium
- Tested
Over the past few tutorials, we have explored different projects that involve building GUI interfaces and menu on the Nokia 5110 LCD display. For today’s tutorial, we will do something similar to that but we will kick it up a notch by introducing a GSM module which will help us put a range of GSM based options in the menu.
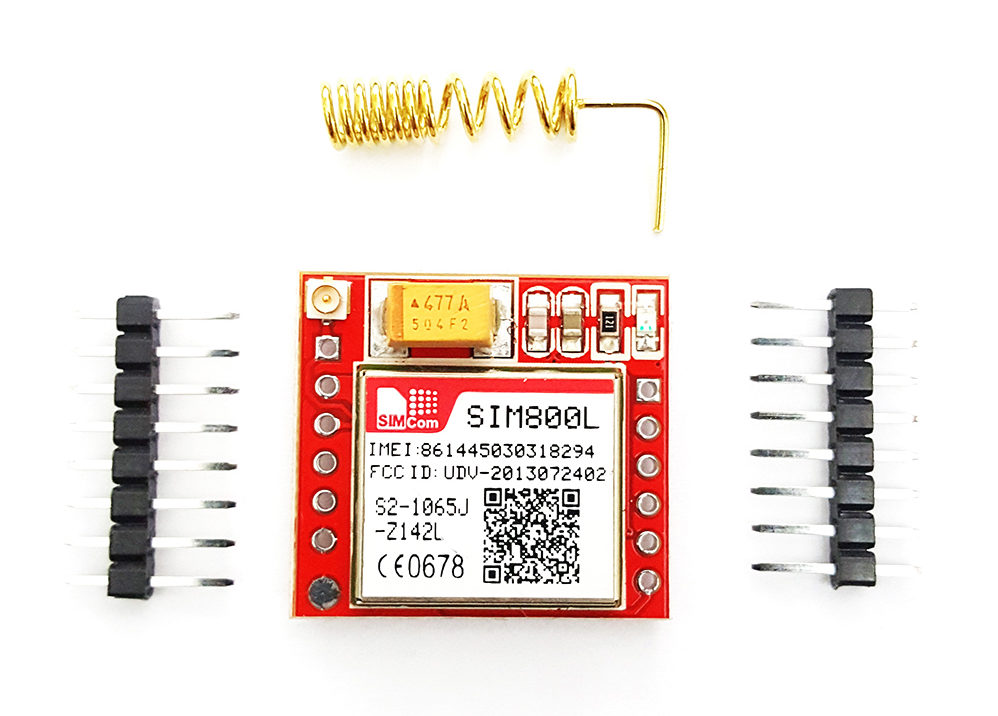
At the center of, today’s project is the SIM800l GSM/GPRS Module. This module is a miniature GSM modem, which can be integrated into a great number of IoT projects. The module can be used to achieve anything you can do with a normal feature phone, including sending SMS/text messages, make or receive phone calls, connecting to the internet through GPRS, TCP/IP, among others. In addition to this, the module supports quad-band GSM/GPRS network and can be controlled via microcontrollers or processors over serial communication, as such, it should work wherever you are in the world and should work with whichever microcontroller you choose to use it with.
Aside the SIM800L, we will also use the Nokia 5110 LCD Display, 3 pushbuttons, and an Arduino Pro Micro. The Nokia 5110 LCD will be used to display all the options associated with the project, providing visual feedback to the user when scrolling through them while the pushbuttons will be used to move up and down through the menu and make a selection when desired. The Arduino Micro, on the other hand, will serve as the brain for the project. It processes the inputs from the pushbuttons and determines what is displayed on the screen.
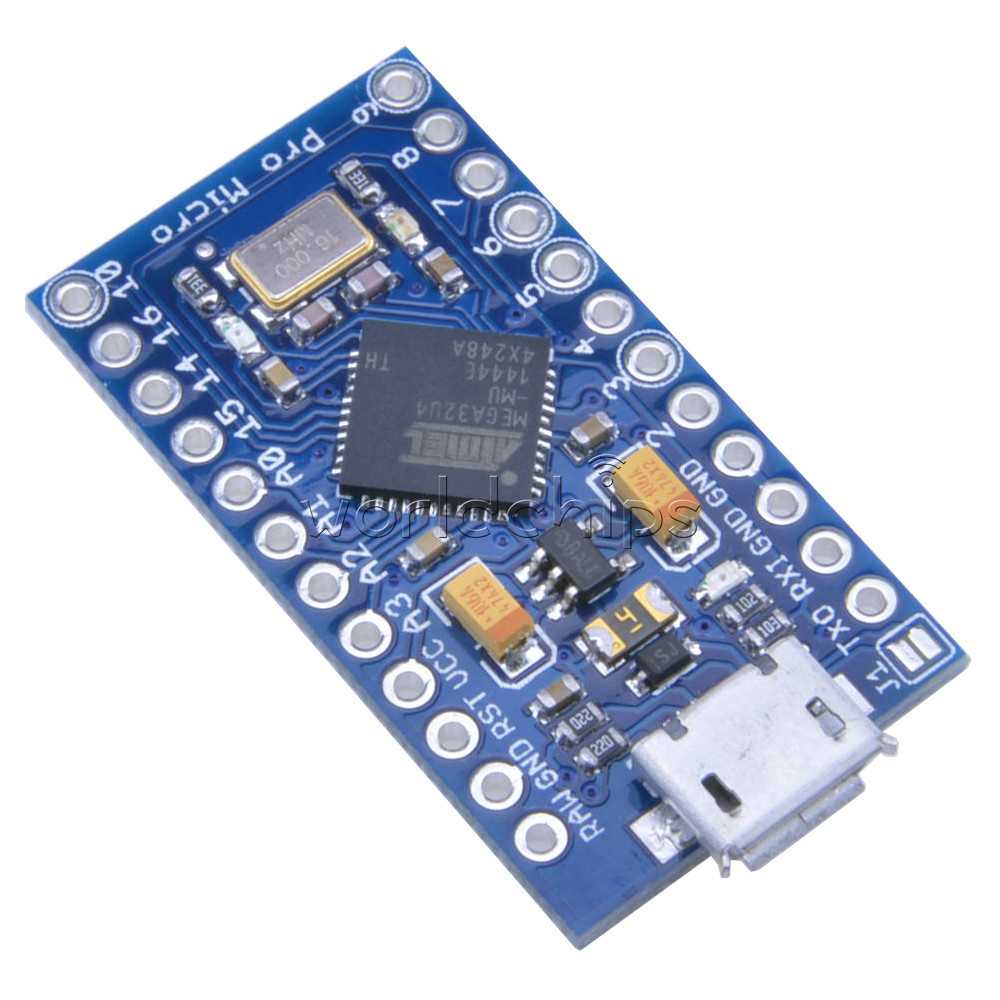
The Arduino pro micro is based on the Atmega32u4 microcontroller and while it is similar to the Arduino Pro Mini, this singular point makes all the difference. The Pro Micro possesses an onboard USB transceiver inside the 32U4, which removes the need for a bulky external USB interface and also has a voltage regulator on-board which means it can accept up to 12V DC., although if supplying unregulated power, you need to connect to “RAW”, not “VCC”. The Pro Micro has the same GPIO pins as the Arduino Leonardo and can be used in a project where smaller, easy to program boards are required.
At the end of today’s project, you will know some of the basic commands required to send data from Arduino to a webpage using a GSM module, receiving data from a webpage and generally using the SIM800 GSM Module with Arduino. File request, Network info, Weather info, Location info, Save location, Upload location, Auto Upload, Connect, Disconnect, Lightswitch, Power-down, Reset all these are enabled using the SIM800L
Required Component
The following component is required for this project;
- Arduino Pro Micro
- Sim800l
- Nokia 5110 LCD Display
- Pushbuttons (3)
- 2n222
- Jumper Wires
- Breadboard
Each of these components can be bought from different electronics component websites. The Pro Micro was used basically because it is cheap and because it’s high speed as such, if these are not a requirement, you can also decide to use an Arduino Uno or any other Arduino board for the project. However, ensure you pay attention on how this change could affect the code for the project.
Schematics
The schematics for this project is quite straight forward with the only element that may be difficult to follow is the connection of the Pushbuttons without pull-ups or pull-down resistors. These were done to reduce the number of components used for the project, as such, the internal pull-ups of the Arduino digital pins will be used such that the digital pin is driven LOW when the push button is pressed.
Connect the component as shown in the schematics below.
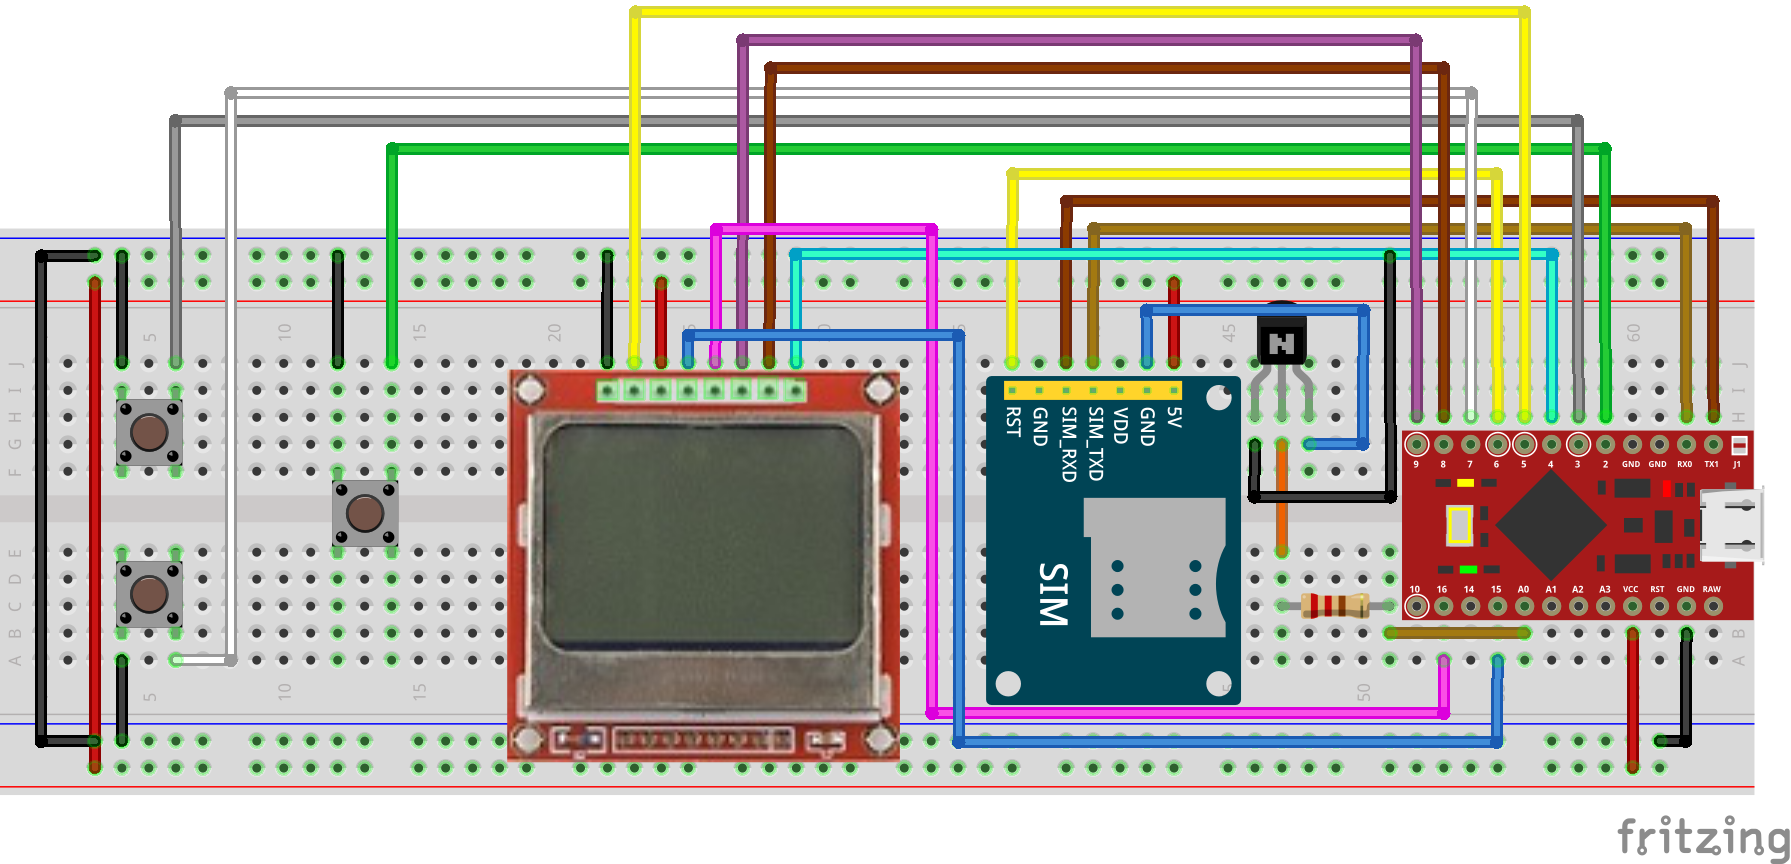
A pin to pin map showing how the components are connected to the Arduino is described below;
LCD – Arduino
LED - GND
MOSI - 5v
SCLk - D5
DC - D15
RST - D16
SCE - D9
GND - D8
VCC - D4
Sim800 – Arduino
RST - D6
Rx - Tx1
Tx - Rx0
GND - D18
VCC - 5V
To learn more about connecting the Nokia 5110 LCD to Arduino and some of the other cool things that you can do using the display, you can check some of our past tutorials here.
With all the components connected, go over it one more time to ensure everything is as it should be.
Code
The code for these project is quite simple as mentioned in the introduction, we will create a menu on the display that will allow us to control the device and perform all the functions mentioned in the introduction.
To reduce the amount of code we need to write, we will use quite a number of libraries including; the EEPROM Library, the AVR library, the Adafruit_GFX Library, and the Adafruit_PCD8544 library. While the EEPROM and AVR libraries come preloaded on the Arduino IDE, the Adafruit_GFX and PCD8544 libraries will need to be installed via the Arduino library manager or downloaded from the links attached to them and installed. The EEPROM Library will be used to store the weather information and location data pulled from the server, while the AVR library will be used to implement several low power features for the project. The Adafruit_GFX and PCD8544 libraries, on the other hand, will be used to reduce the amount of work required to talk to communicate with the display.
As usual, I will do a run through the code and explain as much of it as possible.
Like always, we start the code by including the libraries that are required for the project.
#include <EEPROM.h>
#include <avr/sleep.h>
#include <avr/power.h>
#include <avr/wdt.h>
#include <Adafruit_GFX.h>
#include <Adafruit_PCD8544.h>
Next, we declare the pins of the Arduino to which the pins of the other components are connected with descriptive names that help us understand with each pin stands for. Also, create a variable which will be used to hold different values for the project.
#define lcdBL 5         // LCD backlight pin
#define resetPin 6      // Reset pin of Sim800L
#define pwrPin A0       // controling an NPN transistor that provides 0V to GND pin of Sim800L
#define btnEnt 2
#define btnUp 3
#define btnDwn 7
#define MENU_ROW_HEIGHT 11
#define LCD_ROWS 5
#define COUNTER 2550   // auto upload sleep counter will make the device sleep for 6 hours (COUNTER * 1.059 * 8 seconds)
Next, we create an object of the Adafruit PCD8544 library and a few other variables.
Adafruit_PCD8544 display = Adafruit_PCD8544(9, 8, 4);

unsigned long startMillis, currentMillis;
const unsigned long period PROGMEM = 30000; // The duration in milliseconds before the microcontroller goes to sleep
bool GPRSCon, isItSleep, exitBool;
byte menuPos, menuScreen, markerPos, menuStartAt;
const char* const menu[13] PROGMEM  = {"File Request", "Network Info", "Weather Info", "Location Info", "Save Location",
                                       "Last Saved" , "Upload Loc", "Auto Upload", "Connect", "Disconnect",
                                       "Light Switch", "Power Down", "Reset Sim800L"
                                      };
byte MENU_LENGTH =  sizeof(menu) / sizeof(menu[0]);
Next, we move to the void setup() function.
We start by declaring the pin mode of each of the pins and activating the Arduino built-in pull up resistors on the pins to which the buttons are connected.
void setup() {
  pinMode(btnUp, INPUT_PULLUP);
  pinMode(btnDwn, INPUT_PULLUP);
  pinMode(btnEnt, INPUT_PULLUP);
  pinMode(lcdBL, OUTPUT);
  pinMode(resetPin, OUTPUT);
  pinMode(pwrPin, OUTPUT);
Next, we create a default state for some of the pins including the backlight of the display and its reset pin.
digitalWrite(resetPin, HIGH);
digitalWrite(resetPin, HIGH);
digitalWrite(pwrPin, HIGH);
digitalWrite(lcdBL, LOW);
Next, we initialize the display, flipping it to the desired orientation and clearing it so it is blank.
display.begin();
  display.setRotation(2);     // My screen is flipped upside down! :/
  display.clearDisplay();
  delay(4000);  // You may increase this if the duration isn't enough
Next, we use a while loop to check the state of the SIM800L and display the debug information. If it is turned off or not responding, the command resetSim800() is called to restart the GSM module.
while (!checkSim800()) {
    display.clearDisplay();
    display.println(F("Sim800L is \nturned off or \nnot responding"));
    display.display();
    delay(2000);
    resetSim800();
  }
With this done, the waitToReg() function is called to allow the GSM module to connect to a network before proceeding. The menu containing all the functions we will be demonstrating is then displayed on the screen and the millis() is recorded as the variable startmillis. This will be used to estimate how much time has passed later on in the device operations.
  waitToReg();
  showMenu();
  startMillis = millis();
}
We then proceed to the void loop() function.
The void loop function is charged with detecting if any of the buttons are pressed and depending on the button that is pressed and the current position of the menu, take actions in line with the functions of the project.
The function starts with an “if” function that checks if the push button representing button-down is has been pressed. If yes, the button checks if the menu is at its end and if it’s not, it increases the position by one and refreshes the display. If it is at its end, the position is set to the beginning.
The same is done if the btnup variable representing the pushbutton that is pressed.
void loop() {
  currentMillis = millis();
  if (isButtonDown(btnDwn) == true) {
    if (menuPos < MENU_LENGTH - 1) {
      menuPos++;
      if (menuPos - menuStartAt > 3 )
        menuStartAt++;
      showMenu();
    }
    delay(100);
    startMillis = currentMillis;
  }
  if (isButtonDown(btnUp) == true) {
    if (menuPos > 0) {
      menuPos--;
      if (menuPos - menuStartAt < 0 && menuStartAt != 0)
        menuStartAt--;
      showMenu();
    }
    delay(100);
    startMillis = currentMillis;
  }
Next, the push button designated as “enter” is read via the isButtonDown() function. If yes, this, via a series of if statements, takes into account the current position of the menu using the “menuPos” variable and determines the action to be performed based on the function of the project. For example, if the “menuPos” variable is equal to 3, the locinfo(0) function is called and the menu is displayed after the function has run its course. The if…else if… function is used to check all the possible menu position and call the right functions.
void loop() {
  currentMillis = millis();
  if (isButtonDown(btnDwn) == true) {
    if (menuPos < MENU_LENGTH - 1) {
      menuPos++;
      if (menuPos - menuStartAt > 3 )
        menuStartAt++;
      showMenu();
    }
    delay(100);
    startMillis = currentMillis;
  }
  if (isButtonDown(btnUp) == true) {
    if (menuPos > 0) {
      menuPos--;
      if (menuPos - menuStartAt < 0 && menuStartAt != 0)
        menuStartAt--;
      showMenu();
    }
    delay(100);
    startMillis = currentMillis;
  }
  if (isButtonDown(btnEnt) == true) {
    if (menuPos == 0) {
      String s = openURL(F("raw.githubusercontent.com/HA4ever37/Sim800l/master/Sim800.txt"), true); // Change the URL to your text file link
      if (s == "ERROR" || s == "")  {
        display.clearDisplay();
        display.println(F("Bad request! \ntry again"));
        display.display();
        delay(2000);
      }
      else {
        s = s.substring(s.indexOf('\r') + 2, s.lastIndexOf("OK"));
        s = s.substring(s.indexOf('\r') + 2, s.length() - 1);
        display.clearDisplay();
        digitalWrite(lcdBL, LOW);
        /*for (byte i = 0; i < s.length(); i++) {
          //Serial.print(s.charAt(i));
          display.print(s.charAt(i));
          }*/
        display.print(s);
        display.display();
        digitalWrite(lcdBL, HIGH);
        delay(500);
        digitalWrite(lcdBL, LOW);
        while (!isButtonDown(btnEnt) && !isButtonDown(btnUp) && !isButtonDown(btnDwn));
      }
      showMenu();
    }
    else if (menuPos == 1) {
      netInfo();
      showMenu();
    }
    else if (menuPos == 2) {
      const String s = openURL(locInfo(3), false);
      char split = '"';
      int pos = s.indexOf(F("description\":\"")) + 14;
      String weather = s.substring(pos, s.indexOf(split, pos));
      weather[0] = toupper(weather[0]);
      display.clearDisplay();
      display.println(weather);
      split = ',';
      pos = s.indexOf(F("temp\":")) + 6;
      display.print(F("Temp:"));
      display.print(s.substring(pos, s.indexOf(split, pos)));
      display.println(F(" C"));
      pos = s.indexOf(F("p_min\":")) + 7;
      display.print(F("Min:"));
      display.print(s.substring(pos, s.indexOf(split, pos)));
      display.println(F(" C"));
      split = '}';
      pos = s.indexOf(F("p_max\":")) + 7;
      display.print(F("Max:"));
      display.print(s.substring(pos, s.indexOf(split, pos)));
      display.println(F(" C"));
      split = ',';
      pos = s.indexOf(F("humidity\":")) + 10;
      display.print(F("Humidity:"));
      display.print(s.substring(pos, s.indexOf(split, pos)));
      display.println(F("%"));
      pos = s.indexOf(F("speed\":")) + 7;
      display.print(F("Wind:"));
      display.print(s.substring(pos, s.indexOf(split, pos)));
      //display.print(s.substring(s.indexOf(F("speed\":")) + 7, s.indexOf(F(",\"deg"))));
      display.print(F(" m/s"));
      display.display();
      while (!isButtonDown(btnEnt) && !isButtonDown(btnUp) && !isButtonDown(btnDwn));
      showMenu();
    }
    else if (menuPos == 3) {
      locInfo(0);
      showMenu();
    }
    else if (menuPos == 4) {
      locInfo(2);
      showMenu();
    }
    else if (menuPos == 5) {
      readEeprom();
      showMenu();
    }
    else if (menuPos == 6) {
      locInfo(1);
      showMenu();
    }
    else if (menuPos == 7)
      autoUp();
    else if (menuPos == 8) {
      connectGPRS();
      showMenu();
    }
    else if (menuPos == 9) {
      disConnectGPRS();
      showMenu();
    }
    else if (menuPos == 10)
      toggle();
    else if (menuPos == 11)
      pwrDown();
    else if (menuPos == 12) {
      resetSim800();
      showMenu();
    }
    delay(100);
    startMillis = currentMillis = millis();
  }
  if (currentMillis - startMillis >= period)
    pwrDown();
}
Next up are the codes, for each of the functions called under the setup() and void loop() functions. The codes are well commented and should be studied to better understand how each of the functions work. If you get stuck trying to figure out what any part of it does, feel free to reach out to me via the comment section.
The complete code for the project is available below and also attached under the download section of the tutorial.
#include <EEPROM.h>
#include <avr/sleep.h>
#include <avr/power.h>
#include <avr/wdt.h>
#include <Adafruit_GFX.h>
#include <Adafruit_PCD8544.h>

#define lcdBL 5         // LCD backlight pin
#define resetPin 6      // Reset pin of Sim800L
#define pwrPin A0       // controling an NPN transistor that provides 0V to GND pin of Sim800L
#define btnEnt 2
#define btnUp 3
#define btnDwn 7
#define MENU_ROW_HEIGHT 11
#define LCD_ROWS 5
#define COUNTER 2550   // auto upload sleep counter will make the device sleep for 6 hours (COUNTER * 1.059 * 8 seconds)

Adafruit_PCD8544 display = Adafruit_PCD8544(9, 8, 4);

unsigned long startMillis, currentMillis;
const unsigned long period PROGMEM = 30000; // The duration in milliseconds before the microcontroller goes to sleep
bool GPRSCon, isItSleep, exitBool;
byte menuPos, menuScreen, markerPos, menuStartAt;
const char* const menu[13] PROGMEM  = {"File Request", "Network Info", "Weather Info", "Location Info", "Save Location",
                                       "Last Saved" , "Upload Loc", "Auto Upload", "Connect", "Disconnect",
                                       "Light Switch", "Power Down", "Reset Sim800L"
                                      };
byte MENU_LENGTH =  sizeof(menu) / sizeof(menu[0]);

void setup() {
  pinMode(btnUp, INPUT_PULLUP);
  pinMode(btnDwn, INPUT_PULLUP);
  pinMode(btnEnt, INPUT_PULLUP);
  pinMode(lcdBL, OUTPUT);
  pinMode(resetPin, OUTPUT);
  pinMode(pwrPin, OUTPUT);
  digitalWrite(resetPin, HIGH);
  digitalWrite(resetPin, HIGH);
  digitalWrite(pwrPin, HIGH);
  digitalWrite(lcdBL, LOW);
  display.begin();
  display.setRotation(2);     // My screen is flipped upside down! :/
  display.clearDisplay();
  delay(4000);  // You may increase this if the duration isn't enough
  while (!checkSim800()) {
    display.clearDisplay();
    display.println(F("Sim800L is \nturned off or \nnot responding"));
    display.display();
    delay(2000);
    resetSim800();
  }
  waitToReg();
  showMenu();
  startMillis = millis();
}

void loop() {
  currentMillis = millis();
  if (isButtonDown(btnDwn) == true) {
    if (menuPos < MENU_LENGTH - 1) {
      menuPos++;
      if (menuPos - menuStartAt > 3 )
        menuStartAt++;
      showMenu();
    }
    delay(100);
    startMillis = currentMillis;
  }
  if (isButtonDown(btnUp) == true) {
    if (menuPos > 0) {
      menuPos--;
      if (menuPos - menuStartAt < 0 && menuStartAt != 0)
        menuStartAt--;
      showMenu();
    }
    delay(100);
    startMillis = currentMillis;
  }
  if (isButtonDown(btnEnt) == true) {
    if (menuPos == 0) {
      String s = openURL(F("raw.githubusercontent.com/HA4ever37/Sim800l/master/Sim800.txt"), true); // Change the URL to your text file link
      if (s == "ERROR" || s == "")  {
        display.clearDisplay();
        display.println(F("Bad request! \ntry again"));
        display.display();
        delay(2000);
      }
      else {
        s = s.substring(s.indexOf('\r') + 2, s.lastIndexOf("OK"));
        s = s.substring(s.indexOf('\r') + 2, s.length() - 1);
        display.clearDisplay();
        digitalWrite(lcdBL, LOW);
        /*for (byte i = 0; i < s.length(); i++) {
          //Serial.print(s.charAt(i));
          display.print(s.charAt(i));
          }*/
        display.print(s);
        display.display();
        digitalWrite(lcdBL, HIGH);
        delay(500);
        digitalWrite(lcdBL, LOW);
        while (!isButtonDown(btnEnt) && !isButtonDown(btnUp) && !isButtonDown(btnDwn));
      }
      showMenu();
    }
    else if (menuPos == 1) {
      netInfo();
      showMenu();
    }
    else if (menuPos == 2) {
      const String s = openURL(locInfo(3), false);
      char split = '"';
      int pos = s.indexOf(F("description\":\"")) + 14;
      String weather = s.substring(pos, s.indexOf(split, pos));
      weather[0] = toupper(weather[0]);
      display.clearDisplay();
      display.println(weather);
      split = ',';
      pos = s.indexOf(F("temp\":")) + 6;
      display.print(F("Temp:"));
      display.print(s.substring(pos, s.indexOf(split, pos)));
      display.println(F(" C"));
      pos = s.indexOf(F("p_min\":")) + 7;
      display.print(F("Min:"));
      display.print(s.substring(pos, s.indexOf(split, pos)));
      display.println(F(" C"));
      split = '}';
      pos = s.indexOf(F("p_max\":")) + 7;
      display.print(F("Max:"));
      display.print(s.substring(pos, s.indexOf(split, pos)));
      display.println(F(" C"));
      split = ',';
      pos = s.indexOf(F("humidity\":")) + 10;
      display.print(F("Humidity:"));
      display.print(s.substring(pos, s.indexOf(split, pos)));
      display.println(F("%"));
      pos = s.indexOf(F("speed\":")) + 7;
      display.print(F("Wind:"));
      display.print(s.substring(pos, s.indexOf(split, pos)));
      //display.print(s.substring(s.indexOf(F("speed\":")) + 7, s.indexOf(F(",\"deg"))));
      display.print(F(" m/s"));
      display.display();
      while (!isButtonDown(btnEnt) && !isButtonDown(btnUp) && !isButtonDown(btnDwn));
      showMenu();
    }
    else if (menuPos == 3) {
      locInfo(0);
      showMenu();
    }
    else if (menuPos == 4) {
      locInfo(2);
      showMenu();
    }
    else if (menuPos == 5) {
      readEeprom();
      showMenu();
    }
    else if (menuPos == 6) {
      locInfo(1);
      showMenu();
    }
    else if (menuPos == 7)
      autoUp();
    else if (menuPos == 8) {
      connectGPRS();
      showMenu();
    }
    else if (menuPos == 9) {
      disConnectGPRS();
      showMenu();
    }
    else if (menuPos == 10)
      toggle();
    else if (menuPos == 11)
      pwrDown();
    else if (menuPos == 12) {
      resetSim800();
      showMenu();
    }
    delay(100);
    startMillis = currentMillis = millis();
  }
  if (currentMillis - startMillis >= period)
    pwrDown();
}

void waitToReg() {
  display.clearDisplay();
  display.println(F("Waiting to \nregister sim \ncard"));
  display.display();
  do {
    Serial.print(F("AT+COPS?\r"));
  } while (Serial.readString().indexOf(F("+COPS: 0,0,\"")) == -1);
}

String openURL(String string, bool ssl) {
  while (!GPRSCon)
    connectGPRS();
  display.clearDisplay();
  Serial.print(F("AT+HTTPINIT\r"));
  display.println(F("HTTP \nIntialization\n"));
  display.display();
  if (Serial.readString().indexOf(F("OK")) == -1)
    return "";
  Serial.print(F("AT+HTTPPARA=\"CID\",1\r"));
  Serial.readString();
  display.print(F("Sending URL\nrequest"));
  display.display();
  Serial.print(F("AT+HTTPPARA=\"URL\",\""));
  Serial.print(string + "\"\r");
  if (Serial.readString().indexOf(F("OK")) == -1)
    return "";
  display.print(Serial.readString());
  display.display();
  display.clearDisplay();
  Serial.print(F("AT+HTTPPARA=\"REDIR\",1\r"));
  Serial.readString();
  if (ssl) {
    Serial.print(F("AT+HTTPSSL=1\r"));
    Serial.readString();
  }
  else {
    Serial.print(F("AT+HTTPSSL=0\r"));
    Serial.readString();
  }
  Serial.print(F("AT+HTTPACTION=0\r"));
  Serial.readString();
  while (!Serial.available());
  Serial.readString();
  if (Serial.readString().indexOf(F(",200,")) != -1)
    return "";
  display.print(F("Downloading \ndata"));
  display.display();
  Serial.print(F("AT+HTTPREAD\r"));
  string = Serial.readString();
  string.trim();
  Serial.print(F("AT+HTTPTERM\r"));
  Serial.readString();
  return string;
}

String locInfo(byte save) {
  while (!GPRSCon)
    connectGPRS();
  display.clearDisplay();
  display.println(F("Getting\nlocation info\n"));
  display.display();
  Serial.print(F("AT+CIPGSMLOC=1,1\r"));
  Serial.readString();
  while (!Serial.available());
  String s = Serial.readString();
  if (s.indexOf(',') == -1) {
    display.println(F("Failed to \nget info!"));
    display.display();
    delay(2000);
  }
  else {
    s = s.substring(s.indexOf(',') + 1, s.indexOf("OK"));
    s.trim();
    String data[4];
    for (byte i = 0; i < 4; i++) {
      data[i] = s.substring(0, s.indexOf(','));
      s = s.substring(s.indexOf(',') + 1, s.length());
    }
    if (save == 0) {
      display.clearDisplay();
      display.print(F("Dt:"));
      display.println(data[2]);
      display.print(F("Time:"));
      display.println(data[3]);
      display.println(F("Latitude: "));
      display.println(data[1]);
      display.println(F("Longitude: "));
      display.println(data[0]);
      display.display();
      while (!isButtonDown(btnEnt) && !isButtonDown(btnUp) && !isButtonDown(btnDwn));
    }
    else if (save == 1) {
      display.print(F("Connecing to\nupload server"));
      display.display();
      display.clearDisplay();
      s = "{\"Date\": \"" + data[2] + "\", \"Time\": \"" + data[3] + "\", \"Location link\": \"www.google.com/maps?q=" + data[1] + "," + data[0] + "\"}";
      Serial.print(F("AT+HTTPINIT\r"));
      Serial.readString();
      Serial.print(F("AT+HTTPPARA=\"CID\",1\r"));
      Serial.readString();
      Serial.print(F("AT+HTTPSSL=0 \r"));
      Serial.readString();
      Serial.print(F("AT+HTTPPARA=\"URL\",\"api.jsonbin.io/b\"\r"));
      Serial.readString();
      Serial.print(F("AT+HTTPPARA=\"CONTENT\",\"application/json\"\r"));
      Serial.readString();
      // WARNING!!!  YOU MUST CHANGE the secret-key otherwise your location info will be sent to my JSON account!
      Serial.print(F("AT+HTTPPARA=\"USERDATA\",\"secret-key: $2a$10$/4cwS1j8JzAgdbYKEDbeM.x19a0UM5C612PtEvoBv.hqtGagcY.DG\\r\\nprivate: true\"\r"));
      Serial.readString();
      Serial.print(F("AT+HTTPDATA="));
      Serial.print(String(s.length()) + ",2000\r");
      Serial.readString();
      Serial.print(s + "\r");
      Serial.readString();
      Serial.print(F("AT+HTTPACTION=1\r"));
      Serial.readString();
      while (!Serial.available());
      s = Serial.readString();
      if (s.indexOf(F(",200,")) == -1 ) {
        display.print(F("Failed to\nupload info!"));
        display.display();
      }
      else {
        display.println(F("Location \nuploaded!"));
        display.display();
      }
      Serial.print(F("AT+HTTPREAD\r"));
      Serial.readString();
      Serial.print(F("AT+HTTPTERM\r"));
      Serial.readString();
    }
    else if (save == 2) {
      writeEeprom("Dt:" + data[2] + "\nTime:" + data[3] + "\nLongitude:\n" + data[0] + "\nLatitude:\n" + data[1]);
      display.println(F("Info saved \nto Eeprom!:"));
      display.display();
      delay(2000);
    }
    else if (save == 3) {
      s = F("api.openweathermap.org/data/2.5/weather?lon=");
      s += data[0];
      s += F("&lat=");
      s += data[1];
      s += F("&units=metric&appid=0a3456488cb52d167293ee9ca1f00539"); // Please change the App id to your API key
      return s;
    }
  }
  s = "";
  return s;
}

void netInfo() {
  if (isItSleep) {
    wakeUp();
    isItSleep = false;
  }
  display.clearDisplay();
  display.println(F("Getting\nnetwork info"));
  display.display();
  String data[2];
  String network;
  do {
    Serial.print(F("AT+COPS?\r"));
    network = Serial.readString();
    //Serial.println(network);
  } while (network.indexOf(F("+COPS: 0,0,\"")) == -1);
  network = network.substring(network.lastIndexOf(F(",\"")) + 2, network.lastIndexOf(F("\"")));
  exitBool = false;
  attachInterrupt(digitalPinToInterrupt(btnEnt), exitLoop, FALLING);
  while (!exitBool) {
    Serial.print(F("AT+CSQ\r"));
    String quality = Serial.readString();
    quality = quality.substring(quality.indexOf(F(": ")) + 2, quality.indexOf(F(",")));
    if (quality.toInt() < 10)
      quality = "Poor " + quality;
    else if (quality.toInt() < 15)
      quality = "Fair " + quality;
    else if (quality.toInt() < 20)
      quality = "Good " + quality;
    else
      quality = "Excellent " + quality;
    Serial.print(F("AT+CCLK?\r"));
    String s = Serial.readString();
    char am_pm[] = "AM";
    byte hrs = 12;
    data[0] = s.substring(s.indexOf('\"') + 1, s.indexOf(','));
    data[1] = s.substring(s.indexOf(',') + 1, s.indexOf('-'));
    if (data[1].substring(0, 2).toInt() > hrs) {
      am_pm[0] = 'P';
      hrs = data[1].substring(0, 2).toInt() - hrs;
    }
    else if (data[1].substring(0, 2).toInt() == hrs)
      am_pm[0] = 'P';
    else if (data[1].substring(0, 2).toInt() == 0);
    else if (data[1].substring(0, 2).toInt() < hrs)
      hrs = data[1].substring(0, 2).toInt();
    display.clearDisplay();
    display.println(network);
    display.println(F("Sig. Strength:"));
    display.println(quality);
    display.println(F("Date & Time:"));
    display.print(F("20"));
    display.println(data[0]);
    display.println(String(hrs) + data[1].substring(2, data[1].length() ) + " " + am_pm);
    display.display();
  }
}

void exitLoop() {
  if (isButtonDown(btnEnt)) {
    detachInterrupt(btnEnt);
    exitBool = true;
  }
}

bool checkGPRS() {
  Serial.print(F("AT+SAPBR=2,1\r"));
  if (Serial.readString().indexOf(F("+SAPBR: 1,1,")) != -1)
    return true;
  return false;
}

void connectGPRS() {
  if (isItSleep) {
    wakeUp();
    isItSleep = false;
  }
  if (checkGPRS()) {
    display.clearDisplay();
    display.println(F("Already \nconnected!"));
    display.display();
    delay(2000);
  }
  else {
    display.clearDisplay();
    display.println(F("Initializing \nSim800L\n"));
    display.display();
    Serial.print(F("AT+CSCLK=0\r"));
    while (!Serial.available());
    Serial.readString();
    Serial.print(F("AT+SAPBR=3,1,\"APN\",\"pwg\"\r"));   // Need to be changed to your APN
    Serial.readString();
    display.println(F("Trying to\nconnect to the\naccess point"));
    display.display();
    display.clearDisplay();
    Serial.print(F("ATE0\r"));
    Serial.readString();
    Serial.print(F("AT+SAPBR=1,1\r"));
    while (!Serial.available());
    if (Serial.readString().indexOf(F("OK")) != -1) {
      display.print(F("Connected!"));
      GPRSCon = true;
    }
    else {
      display.print(F("Failed to \nconnect!"));
      display.display();
      delay(1000);
      resetSim800();
      waitToReg();
    }
    Serial.print(F("ATE1\r"));
    Serial.readString();
  }
}

void disConnectGPRS() {
  if (!checkGPRS()) {
    display.clearDisplay();
    display.println(F("Already \ndisconnected!"));
    display.display();
    delay(2000);
  }
  else {
    display.clearDisplay();
    display.print(F("Disconnecting \nGPRS"));
    display.display();
    Serial.print(F("AT+SAPBR=0,1\r"));
    Serial.readString();
    delay(100);
    Serial.print(F("AT+CSCLK=2\r"));
    Serial.readString();
    GPRSCon = false;
  }
}

void readEeprom() {
  String s;
  for (int i = 0; EEPROM.read(i) != 0 && i < EEPROM.length(); i++)
    s += (char)EEPROM.read(i);
  display.clearDisplay();
  display.print(s);
  display.display();
  delay(100);
  while (!isButtonDown(btnEnt) && !isButtonDown(btnUp) && !isButtonDown(btnDwn));
}

void writeEeprom(String s) {
  for (int i = 0; i < s.length() && i < EEPROM.length(); i++) {
    EEPROM.update(i, s.charAt(i));
  }
}

void resetSim800() {
  if (isItSleep) {
    wakeUp();
    isItSleep = false;
  }
  else {
    display.clearDisplay();
    display.println(F("Restarting"));
    display.display();
    digitalWrite(resetPin, LOW);
    delay(100);
    digitalWrite(resetPin, HIGH);
    GPRSCon = false;
    delay(2000);
    waitToReg();
  }
}

void autoUp() {
  display.clearDisplay();
  display.println(F("To disable \nautoupload\nplease restart\nthe device"));
  display.display();
  delay(3000);
  while (true) {
    if (isItSleep)
      connectGPRS();
    locInfo(1);
    Serial.print(F("AT+CPOWD=0\r"));
    Serial.readString();
    digitalWrite(lcdBL, HIGH);  // keep the LCD backlight off during sleep time and wakeups to reduce power consumption
    display.clearDisplay();
    display.display();
    display.command( PCD8544_FUNCTIONSET | PCD8544_POWERDOWN);
    digitalWrite(pwrPin, LOW);
    savePower();
    for (int i = 0; i < COUNTER; i++)
      myWatchdogEnable (0b100001);  // 8 seconds
    //myWatchdogEnable (0b100000);  // 4
    sleep_disable();
    power_all_enable();
    display.begin();
    isItSleep = true;
  }
}

void toggle() {
  if (isButtonDown(btnEnt))
    digitalWrite(lcdBL, !digitalRead(lcdBL));
}

bool isButtonDown(byte pin) {
  if (digitalRead(pin) == LOW) {
    delay(30);
    if (digitalRead(pin) == LOW)
      return true;
    return false;
  }
  return false;
}

void showMenu() {
  for (byte i = menuStartAt; i < (menuStartAt + LCD_ROWS); i++) {
    byte markerY = (i - menuStartAt) * MENU_ROW_HEIGHT;
    if (i == menuPos) {
      display.setTextColor(WHITE, BLACK);
      display.fillRect(0, markerY, display.width(), MENU_ROW_HEIGHT, BLACK);
    }
    else {
      display.setTextColor(BLACK, WHITE);
      display.fillRect(0, markerY, display.width(), MENU_ROW_HEIGHT, WHITE);
    }
    if (i >= MENU_LENGTH)
      continue;
    display.setCursor(3, markerY + 2);
    display.print((char*)pgm_read_word(&(menu[i])));
  }
  display.display();
}

bool checkSim800() {
  Serial.begin(9600);
  while (Serial.available() > 0)
    Serial.read();
  Serial.print(F("AT\r"));
  delay(100);
  if (Serial.available() > 0) {
    Serial.read();
    return true;
  }
  else
    return false;
}

void wakeUp() {
  digitalWrite(resetPin, HIGH);
  digitalWrite(pwrPin, HIGH);
  display.clearDisplay();
  display.println(F("Waking up \nSim800L"));
  display.display();
  delay(4000);
  while (!checkSim800()) {
    display.clearDisplay();
    display.println(F("Sim800L is \nturned off or \nnot responding"));
    display.display();
    delay(2000);
    resetSim800();
  }
}

void pwrDown() {
  delay(250);   //debouncing
  isItSleep = true;
  GPRSCon = false;
  digitalWrite(lcdBL, HIGH);
  display.clearDisplay();
  display.display();
  display.command( PCD8544_FUNCTIONSET | PCD8544_POWERDOWN);
  digitalWrite(pwrPin, LOW);
  attachInterrupt(digitalPinToInterrupt(btnEnt), pinInterrupt, RISING);
  set_sleep_mode(SLEEP_MODE_PWR_DOWN);
  sleep_enable();
  savePower();
  sleep_mode();
  sleep_disable();
  power_all_enable();
  display.begin();
  digitalWrite(lcdBL, LOW);
  startMillis = currentMillis = millis();
  showMenu();
}

void pinInterrupt(void) {
  detachInterrupt(btnEnt);
}

ISR(WDT_vect) {
  wdt_disable();
}

void myWatchdogEnable(const byte interval) {
  MCUSR = 0;                          // reset various flags
  WDTCSR |= 0b00011000;               // see docs, set WDCE, WDE
  WDTCSR =  0b01000000 | interval;    // set WDIE, and appropriate delay
  set_sleep_mode (SLEEP_MODE_PWR_DOWN);
  wdt_reset();
  sleep_mode();            // now goes to Sleep and waits for the interrupt
}

void savePower() {
  ADCSRA = 0;
  power_adc_disable();
  ACSR |= (1 << ACD); // disable Analog comparator, saves 4 uA
  DIDR0 = 0x3F; //Disable digital input buffers on all ADC0-ADC5 pins
  DIDR1 = (1 << AIN1D) | (1 << AIN0D);
  power_usart0_disable();
  power_spi_disable();
  power_twi_disable();
  power_timer0_disable();  // Do not disable if you need millis()!!!
  power_timer1_disable();
  power_timer2_disable();
  power_all_disable();
}
The code for the project can also be downloaded from Github here.
Demo
With all the libraries required, installed, copy the code above or from the download section, and upload to the Arduino board. Ensure you select the right board (Arduino Pro Micro) when uploading and ensure all the connections have been double-checked to prevent any error or damage to your components. With the code upload successful, you should see the screen come up as shown in the image below.
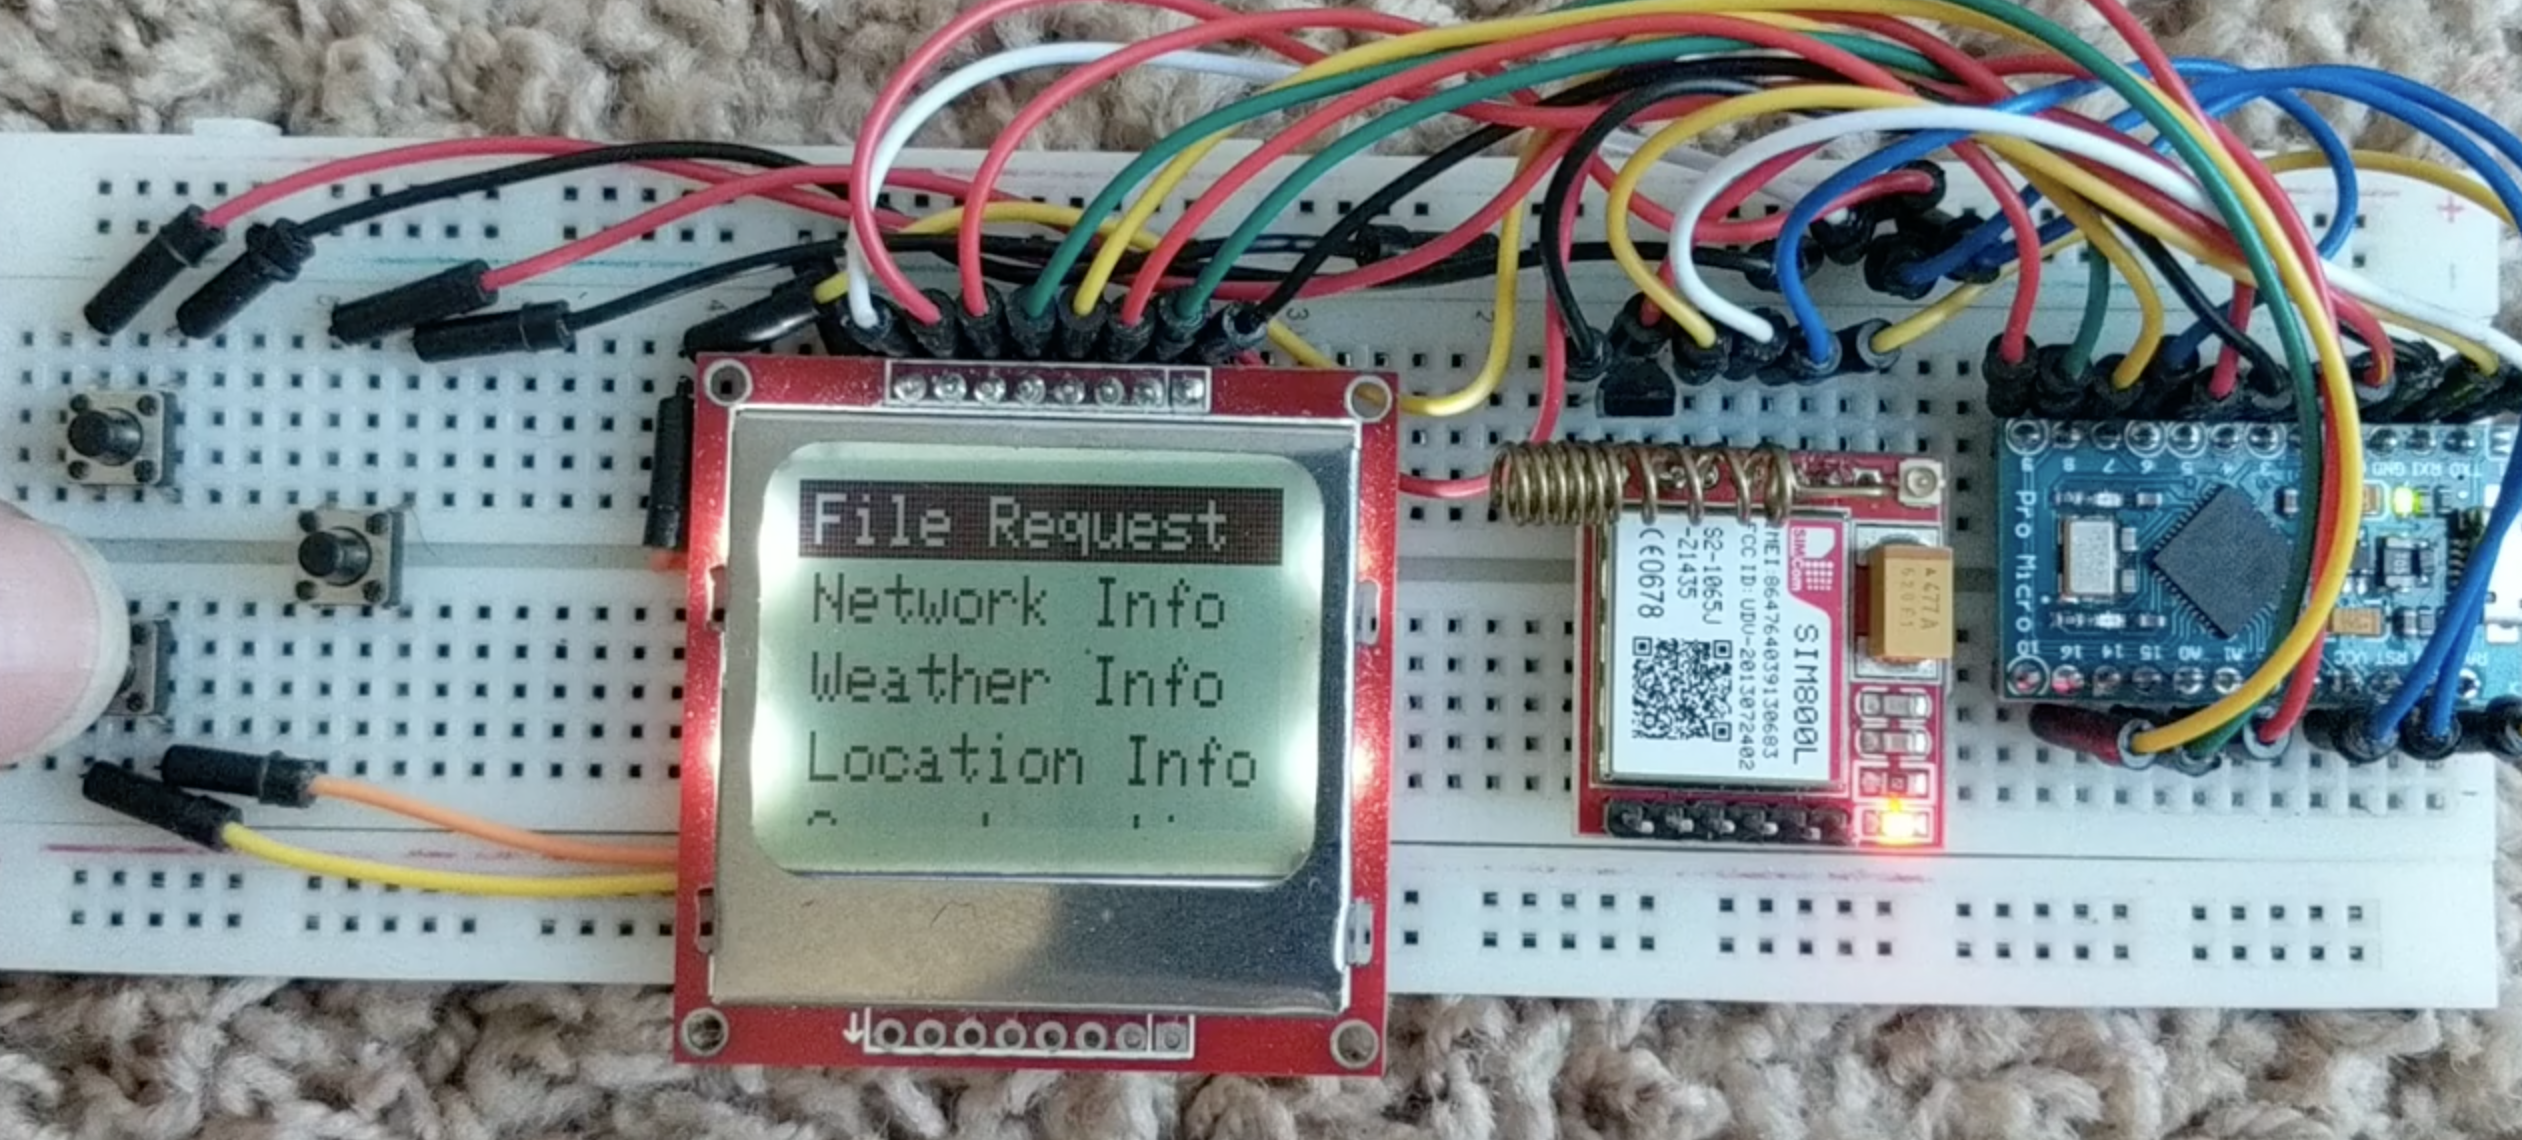
Navigate through the screen using the pushbuttons and try some of the functions out like in the video below.
Going Forward
Over the past few tutorials, we have done massive work on how you can build menu into your own Arduino. With today’s project, we pushed the boundaries further by incorporating a GSM module. These, in my opinion, provides the building block you need to build a DIY feature phone for instance or go further on a more serious note to build a GSM Based Alert system or a GSM-based alarm system with interactive menu, or two-way communication system. The possibilities are endless and it all depends on your imagination.
That’s it for today’s tutorial, thanks for reading. You can watch the video version of the tutorial by HA4ever37 on youtube.


